Rug Tape Peeled the Finish Off My Hardwood

Clara Townsend
I have a specific kind of sympathy for this problem because it always happens right after you finally get the rug sitting perfectly. One confident peel later and suddenly you are staring at a raw, pale patch of wood or a jagged edge where the polyurethane used to be. And the panic spiral begins.
Here is the key truth: if the tape lifted the finish (polyurethane, varnish, or another topcoat), this is not an “adhesive removal” job. Adhesive remover is for sticky film. Lifted finish is a floor repair, and the safest first move is to slow down.
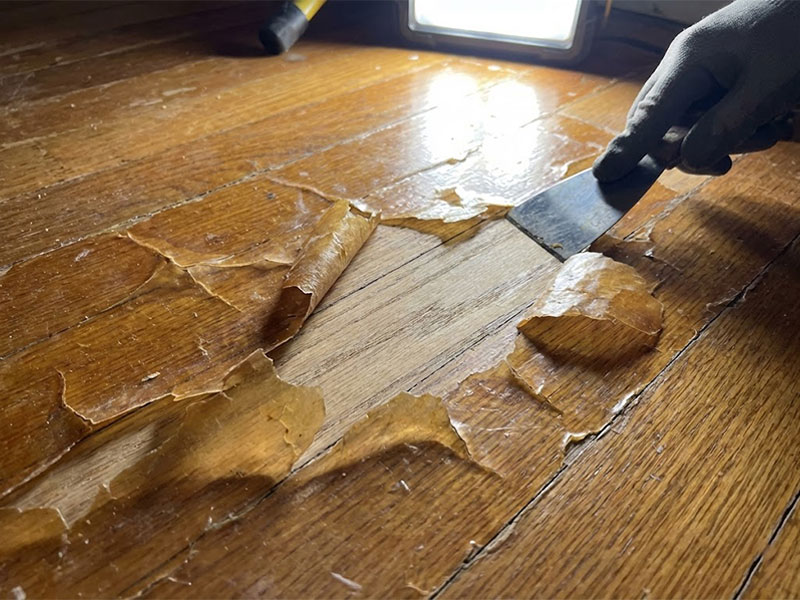
First, confirm what actually came up
Before you touch anything else, figure out which scenario you are in. It changes the fix completely.
Signs the finish lifted (your situation)
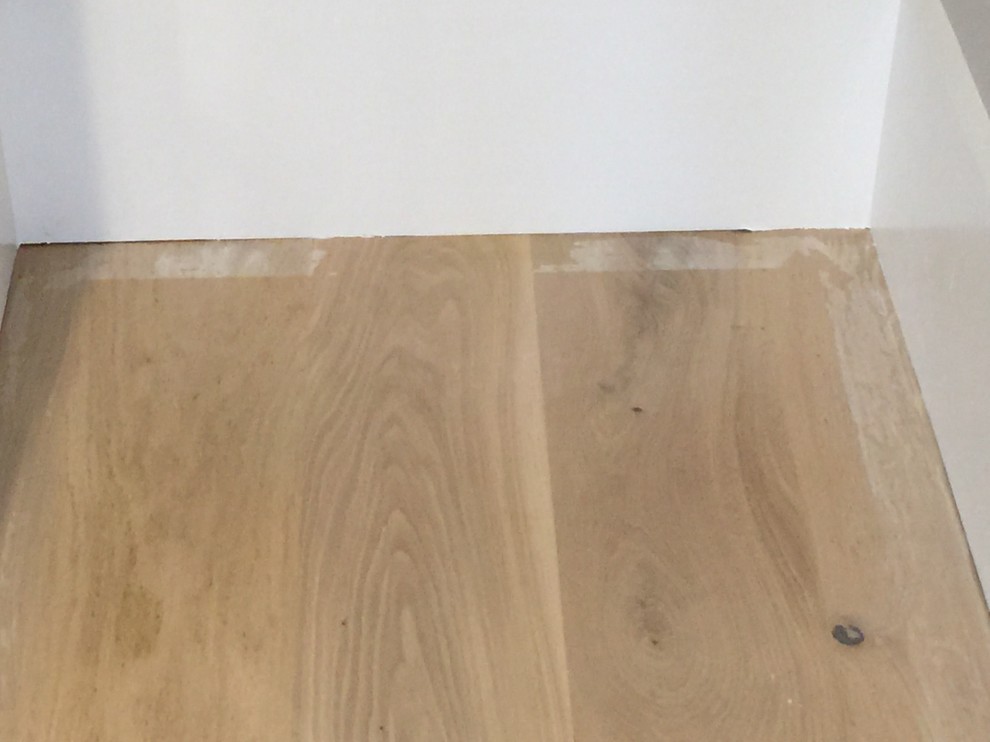
- The damaged spot looks lighter, dry, and porous, like unfinished wood.
- You can feel a step with your fingertip where the intact finish ends and the raw area begins.
- The tape has clear or amber flakes stuck to it (often looks like thin plastic).
- A tiny bit of water may darken the spot quickly (helpful clue, not a definitive test).
Signs it is only adhesive residue (different fix)
- The area looks shiny or cloudy but not bare.
- Your finger feels tacky or grabs.
- A gentle wipe with mild soap and water improves it.
If you are seeing bare wood or a crisp edge where the coating sheared off, skip the adhesive-remover mindset and move to damage control.
Do this immediately (especially if you rent)
If you are a renter, your goal is to document clearly and avoid accidentally making the damage larger. Even if you own, the same steps help you get a clean repair later.
1) Stop pulling anything
If there is still tape down, resist the urge to rip it up. The remaining adhesive bond can keep lifting finish as it releases.
2) Photograph thoroughly
Take photos in bright natural light and again with overhead lights on. Get:
- A wide shot that shows the damage location in the room (helps prove it is from rug placement).
- Medium shots from standing height and knee height.
- Close-ups that show the edge where finish ends and bare wood begins.
- The underside of the rug and the exact tape product packaging if you still have it.
- A photo with a coin or ruler nearby for scale.
For renters, also photograph the surrounding boards that are undamaged. It helps establish that you did not gouge the floor with furniture or a pet accident.
3) Gently remove loose flakes only
If there are curled bits of finish that are already detached, you can lift them with your fingers or a piece of low-tack painter’s tape dabbed lightly. Do not pick at edges that feel anchored.
4) Protect the spot from water right now
Bare wood stains easily. Until repaired, keep the area dry. If it is in a walkway, place a clean piece of paper or kraft paper over it and tape the paper down to itself, not to the floor.
What not to do
I know the instinct is to scrub. Please do not. These are the big no-thank-yous:
- Do not put acetone, nail polish remover, or strong adhesive removers on bare wood. They can discolor raw wood and create adhesion problems for a later repair.
- Do not assume “mild” solvents are automatically safe on a bare patch. Even mineral spirits, which is often used on fully cured intact finishes, can wick into raw wood at edges and leave you with blotching or bonding issues later.
- Do not scrub with a Magic Eraser. It is micro-abrasive and will dull the sheen around the spot, turning a small repair into a larger refinishing problem.
- Do not sand immediately unless you are intentionally doing a controlled feather-sand for a spot repair. Random sanding creates a shallow dish that catches light forever.
- Do not steam mop or wet mop over the area.
- Do not slap on oil, wax, or furniture polish to “blend” it. Many finishes will not adhere later if the wood is contaminated with wax or silicone.
Why tape pulls finish
This is not always about “bad tape.” It is often about the floor finish being vulnerable in that spot.
- Weak adhesion between coats (from contamination, compatibility issues, or rushed prep) can make the topcoat delaminate.
- Wear and age can make some finishes more brittle or thin in high-traffic zones, which can contribute, but it is not the only cause.
- Moisture and cleaners used over time can undermine the bond.
- Strong acrylic adhesives used in some carpet and rug tapes are simply too aggressive for many site-finished and factory-finished floors.
Translation: you are not the first person this has happened to, and you are not doomed. It just needs the right kind of fix.
Finish type matters
If you plan to DIY even a tiny repair, compatibility and color are the trap doors here.
- Water-based polyurethane tends to dry clearer and stay less amber over time.
- Oil-based polyurethane tends to amber and warm the wood tone as it ages.
- Prefinished floors often have factory-applied, very tough coatings (sometimes aluminum oxide). Many hardware-store polys do not blend or bond nicely to these, which is one reason pros often recommend a larger, controlled repair area rather than a dab-and-go patch.
If you do not know what you have, do not guess aggressively in the middle of your living room. A hidden test spot and a little patience beats a shiny mismatched “badge” on the floor.
How to decide: DIY or pro
With lifted finish, the best approach depends on how big the area is and how visible it will be.
DIY is realistic when
- The bare area is small (think coin-sized to a few inches across).
- The damage is in a lower-stakes spot, like under a side table or near the rug edge.
- You can live with “good from standing height” rather than invisible.
Call a pro when
- The damage is larger than your palm or spans multiple boards.
- The finish came off in a long strip where tape ran.
- The floor is a high-gloss finish that will show every blend line.
- You have engineered hardwood with a thin wear layer and are unsure how much sanding is safe.
- You are renting and want a repair that is defensible at move-out.
- You suspect a prefinished factory coating and you are not sure a typical polyurethane touch-up will bond.
A flooring pro can often do a board-length blend, a localized refinish that follows natural seams, or a broader screen-and-recoat over a continuous section so the sheen reads evenly. The right scope depends on your floor and how picky the light is in that room.
If you are renting: talk to your landlord
I am not a lawyer, but I have styled enough rentals to know that the calmer and more organized you are, the better this goes.
What to send
- Your best wide shot and close-up photos.
- A short description: “Double-sided rug tape lifted the clear coat finish when the rug was removed. No moisture event. No gouging.”
- The date it happened.
- Whether the tape is still partially attached (so they know you did not keep peeling).
What not to do before they respond
- Do not attempt a glossy topcoat repair if you cannot match sheen.
- Do not stain the bare wood to “make it less obvious.” Stain can make a future professional blend harder.
- Do not keep experimenting with solvents.
If they want to send their own maintenance person, that is common. Your job is to keep the damage stable and well documented.
Adhesive residue on intact finish (mini fix)
If you have a sticky ring or tacky film on intact finish around the peeled spot, treat it like a separate project. The goal is to lift adhesive without letting liquid creep into the raw area.
Step 1: Start mild
Use a microfiber or other lint-free cloth with a drop of dish soap in warm water. Wipe lightly, then wipe again with clean water, then dry immediately.
Step 2: Spot test a mild solvent
If soap and water does nothing, spot test on an inconspicuous area of intact finish first. A small amount of isopropyl alcohol on a cloth can sometimes cut tackiness. Use a little, rub gently, and dry right away.
Step 3: Mineral spirits only with strict boundaries
On many fully cured polyurethane finishes, mineral spirits can help with adhesive, but keep it away from the bare wood. Work with a barely damp cloth, not a wet one, and stop if you see any dulling, softening, or color transfer.
If the residue sits right on the edge of exposed wood and you cannot isolate it, that is a good moment to pause and call a pro. Edge-wicking is how small problems get bigger.
A careful DIY spot repair (small areas only)
If your spot is small and you want to make it look tidy, you are trying to do two things: seal the bare wood and blend the sheen with the surrounding finish. Take it slow and test everything on the least visible edge first.
Supplies that help
- Microfiber cloths or other lint-free cloths
- Mild dish soap and water
- Nitrile gloves
- Fine artist brush or small foam brush
- Very fine sandpaper (320 to 400 grit) or a fine sanding sponge
- A matching clear finish (often water-based polyurethane in satin or semi-gloss, but the right match depends on your floor)
Step 1: Clean gently
Wipe the area with a cloth dampened in a drop of dish soap diluted in water, then wipe again with a clean damp cloth, then dry immediately. The goal is to remove any dirt, not to soak the wood.
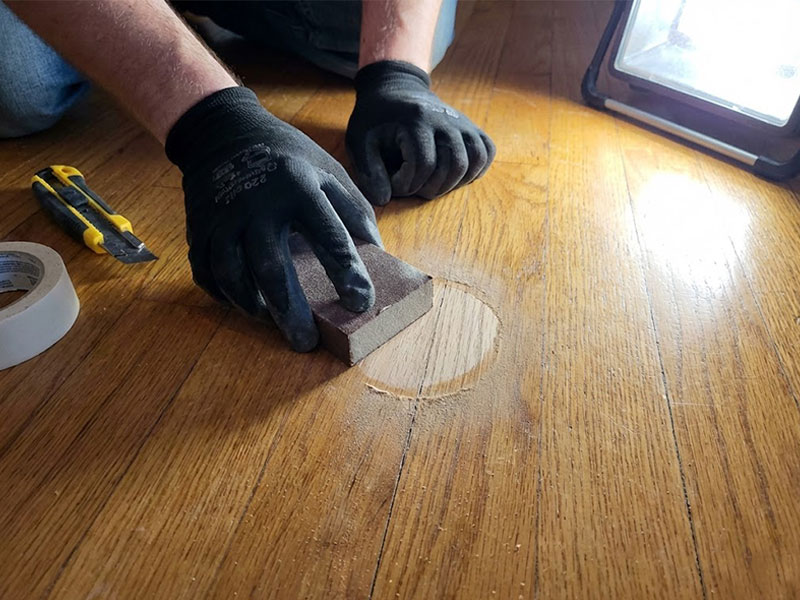
Step 2: Feather the sharp edge very lightly
If you can feel a hard ridge, use 320 to 400 grit and barely soften the edge where intact finish meets bare wood. You are not sanding the whole board. You are just taking the sharp lip down so the patch does not look like a crater.
Step 3: Test sheen and color
Hardwood finish is mostly about sheen. Satin next to semi-gloss looks like a bandage. Color matters too. Water-based products can look clearer while oil-based can warm up. If you do not know what your floor is, pick a hidden spot like inside a closet corner for a tiny test dab with your chosen finish and let it dry fully.
Step 4: Apply thin coats
Using an artist brush, apply a very thin coat only over the bare wood, feathering slightly onto the surrounding finish. Let it dry per label directions. Repeat with additional thin coats until the bare area stops looking thirsty and the surface looks even.
Step 5: Let it cure
Dry is not cured. Keep rugs and furniture off the area for as long as the finish instructions recommend. If you cover too soon, you can imprint the new finish.
Safety basics
- Ventilate well and follow the product label for PPE.
- If you use any oil-based products, handle disposal carefully. Oily rags can be a fire hazard if wadded up. Follow local guidance and the product label for safe drying and disposal.
When you need a pro repair
If the lifted area is big, the best fix is usually a controlled repair that blends across a natural boundary, like the full length of a board or a continuous section of flooring. Pros have a few advantages: they can match sheen more reliably, they can blend without visible lap marks, and they know how not to sand through an engineered wear layer.
When you call for quotes, describe it clearly as “finish delamination from rug tape” and mention whether the floor is solid or engineered, and whether it is site-finished or prefinished if you know. If you do not know, a photo of the board edges can help a contractor identify it.
Quick FAQ
Is there any product that will magically fix lifted polyurethane?
Not really. Once the topcoat is gone, you have to replace it with a compatible finish. Adhesive removers address stickiness, not missing film thickness.
Can I just color the bare spot with a wood marker?
You can, but I would treat that as cosmetic triage, not a repair. Marker does not protect the wood from water, and it can complicate a future finish touch-up if it bleeds.
Why does the spot look so light?
Because you are seeing raw wood that has not ambered under finish. It will also take on moisture and oils from skin quickly, which can darken it unevenly. That is why sealing it matters.
What if the tape also left sticky residue around the peeled area?
Work in two zones: treat the sticky residue on intact finish gently, and keep solvents away from the bare wood. If you are renting, pause and document before attempting a mixed cleanup.
The calmest next step
If you take nothing else from this: do not scrub, do not dump solvents on bare wood, and do not keep peeling tape. Photograph it, keep it dry, and decide whether you are dealing with a tiny spot you can seal and blend or a larger patch that deserves a pro.
Your home is allowed to be lived in. Even the floors. We just want the fix to look as intentional as the rug placement did in the first place.