Undermount Sink Pulling Away From a Solid-Surface Counter

Clara Townsend
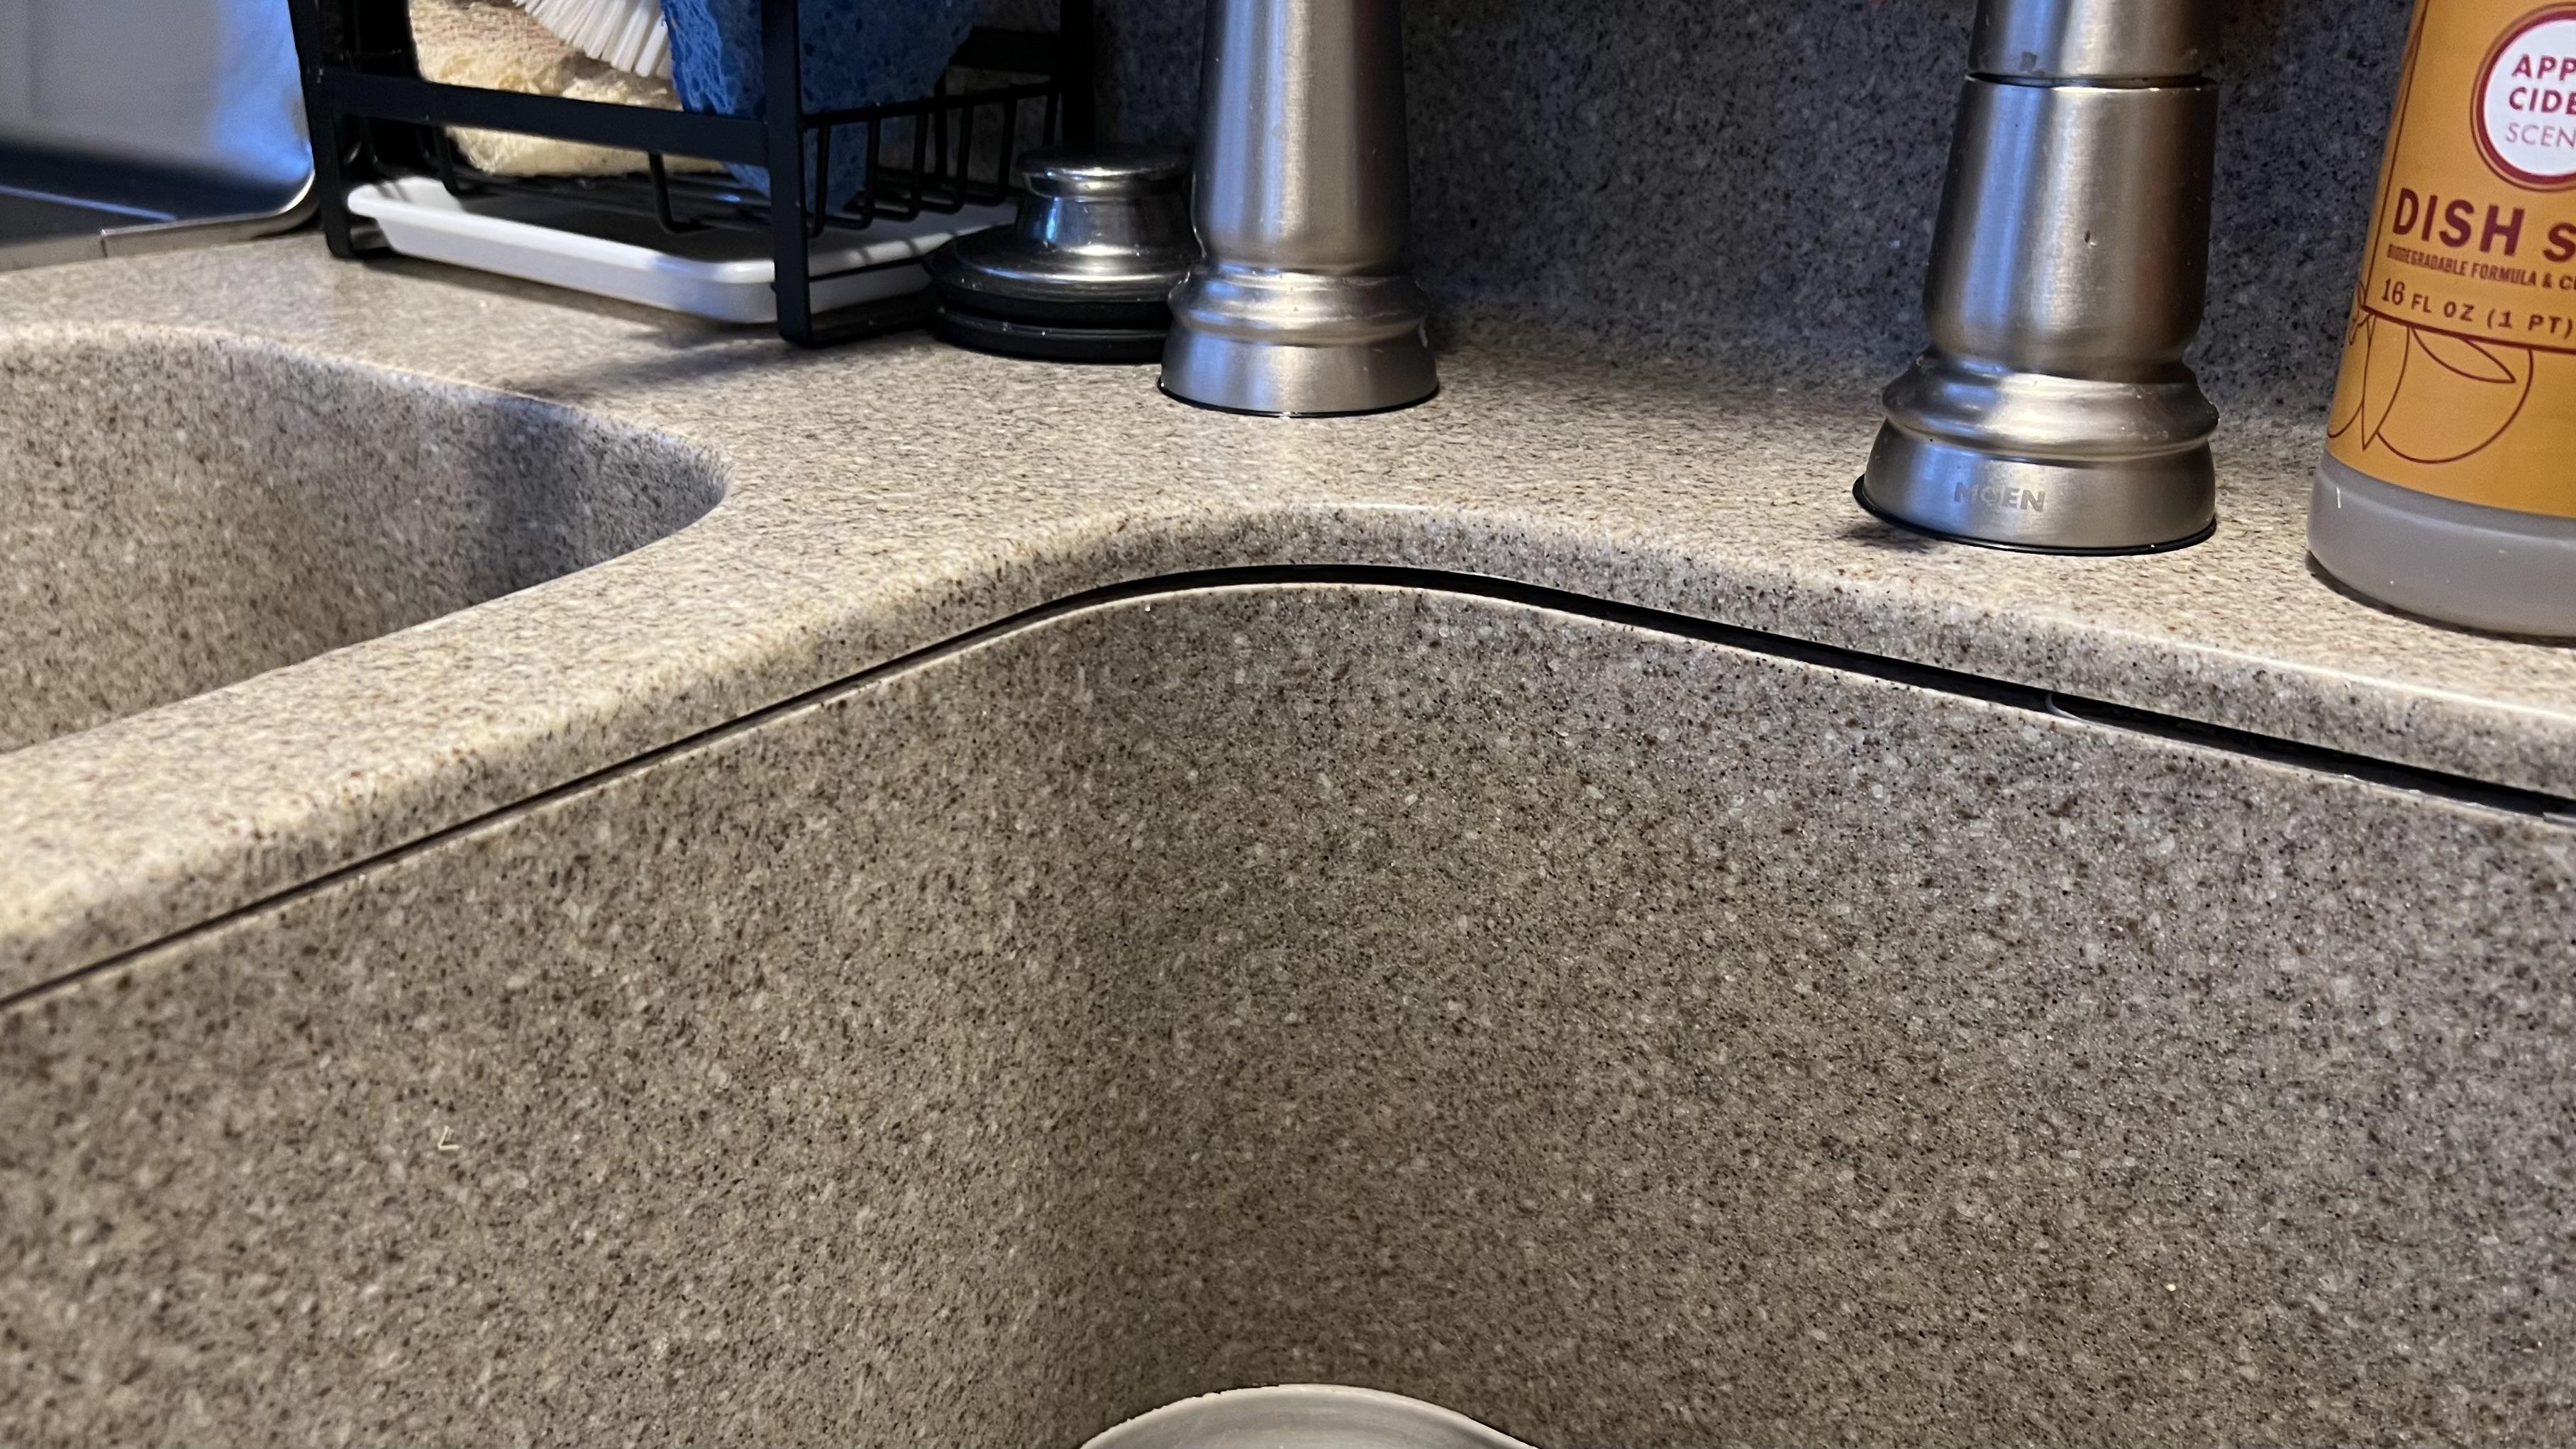
The first time I noticed an undermount sink “letting go,” it was not dramatic. It was a shadow line that had not been there before, a little crescent of darkness between sink and counter that my brain kept circling back to. Then came the telltale drip sound in a quiet kitchen.
If your undermount sink is pulling away from a solid-surface countertop (think Corian and similar materials), you are usually dealing with one of three things: failed adhesive support, failed mechanical supports (clips, rails, brackets), or a sealant bead that has torn and is now letting water travel where it should not. Sometimes you get a fourth common lookalike: a leak from the disposal or drain that makes it look like the sink is failing when it is really plumbing.
Let’s sort out what you are seeing, what you should not do, and what to photograph before anyone starts prying or tightening anything.
Quick triage: leak, gap, or drop?
Start with what your eyes and ears are telling you. Different symptoms point to different failures. As a rough guide, a thin gap is a hairline shadow that does not change when you press lightly on the rim. A drop is a visible, widening gap, movement you can feel, or a bowl that looks measurably lower than it used to.
1) A thin gap at the sink edge, but the sink feels steady
This often means the sealant bead has separated. The sink can still be supported underneath by clips or a mounting system, but water can now sneak into the joint. A common tell is a hairline dark line that wipes clean when everything is wet, then reappears once the area dries.
On solid-surface counters, persistent moisture in that seam can lead to mildew and odor in the cabinet voids, and it can shorten the life of some sealants or adhesives depending on the product and surface prep.
2) The sink has actually lowered (even a little)
If the bowl looks like it is sitting lower than it used to, or you can see daylight where you never could, suspect support failure: loosened or broken clips, a failed mounting rail, or an adhesive bond that has released. This is the scenario where you want to stop using the sink until it is stabilized, especially if it is a heavy sink (cast iron, fireclay, or deep stainless with a disposal attached).
3) Water in the cabinet, but the sink edge looks fine
Do not assume the sink is detaching. A disposal connection, dishwasher hose, slip-joint washer, or the sink strainer can leak and drip down in a way that makes the sink area look guilty.
4) A musty smell or a changing seam line nearby
This can happen when moisture has been migrating for a while. Solid-surface material itself typically does not swell like wood does, but you can see seam shadowing, adhesive line discoloration, or subtle distortion if a wood build-up strip, underlayment, or the sink base cabinet has absorbed water. That is a different repair than simply resealing a sink edge, but the two problems often travel together.
Why undermount sinks separate
Solid-surface countertops are wonderful because they are repairable and relatively forgiving, but the sink area lives a hard life. Constant moisture, heat swings, vibration from disposals, and cleaning habits all add up. Also, not every undermount sink on solid surface is installed the same way. Some are bonded with fabricator-grade adhesives, some use a support frame, and some rely heavily on clips or rails. The symptoms can look similar even when the mounting method is different.
One quick self-check: some kitchens have an integrated solid-surface sink (the sink is the same material and is chemically bonded to the top). Those are a different animal. They do not “drop” like a metal undermount bowl, and repair is usually a fabricator job focused on the seam and the bond line, not clips.
- Sealant failure. The flexible bead around the sink can crack, peel, or release from one side due to age, movement, or harsh cleaners.
- Clip or bracket failure. Undermount sinks should not rely on caulk alone. If clips loosen, corrode, or pull out, the sink can drop.
- Adhesive bond failure. Some installations use adhesives and support frames. If the bond line was contaminated during install (dust, moisture) or stressed over time, it can release.
- Overloaded sink. A disposal plus a full basin of water plus someone leaning on the sink edge is more force than people realize.
- Cabinet movement. If the sink base cabinet is racked, swollen, or settling, it can stress the sink mount.
Before you touch anything
When a sink is actively pulling away, your instinct might be to shove it back up, run a bead of caulk, and hope for the best. I get it. But a rushed fix can make a proper repair harder.
- Do not pry the sink down “to see how bad it is.” If the sink is partially supported, prying can snap clips or crack the countertop around the cutout.
- Do not rely on caulk to hold a sagging sink. Sealant is not a structural support. If the bowl has dropped, it needs mechanical support restored first.
- Do not overtighten clips. Over-tightening can crack or chip the cutout edge, strip fasteners, or rip out embedded inserts or anchors.
- Do not keep running the disposal if you suspect movement. Vibration can worsen a failing mount and shake a marginal plumbing connection into a full leak.
- If the sink is noticeably dropping, stop filling it. Use another sink or a dishpan temporarily.
- Do not brace it with a random board jammed hard into the bowl. Temporary support needs to spread the load. Thin stainless can dent, and uneven pressure can twist the sink out of alignment.
If you see active dripping, place a towel and a bowl under the plumbing and turn off the water to the faucet if needed. If a supply line is spraying or bulging, shut off the valves under the sink immediately and call for help.
Renters: what to photograph first
If you rent, documentation is your best friend. Take photos and a short video before you, a roommate, or a well-meaning neighbor starts tightening anything.
From above
- A full shot of the sink and counter area.
- A close photo of the gap at the sink edge, especially where it is widest.
- The countertop cutout area, focusing on staining, roughness, or a torn sealant bead.
- If there is a seam near the sink, a clear photo of the seam line.
From below (inside the cabinet)
- The underside of the countertop around the sink perimeter.
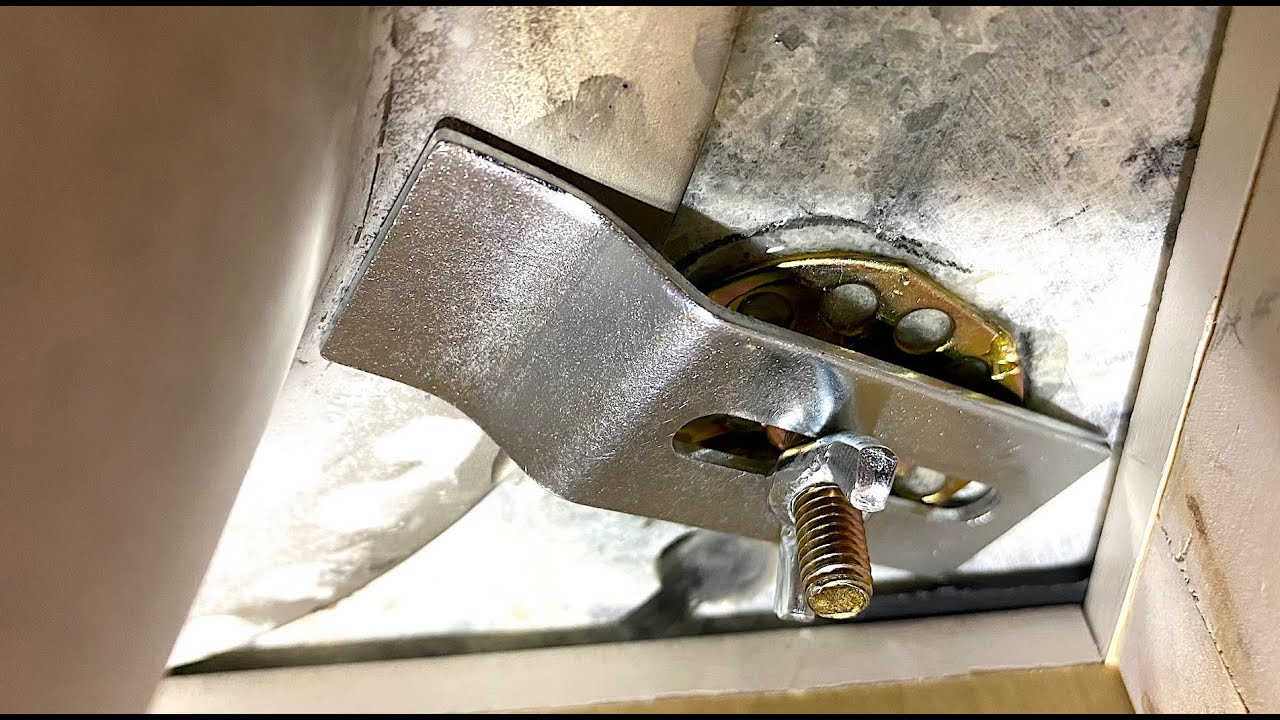
- Any clips, rails, brackets, or mounting frames you can see (two angles usually tells the story).
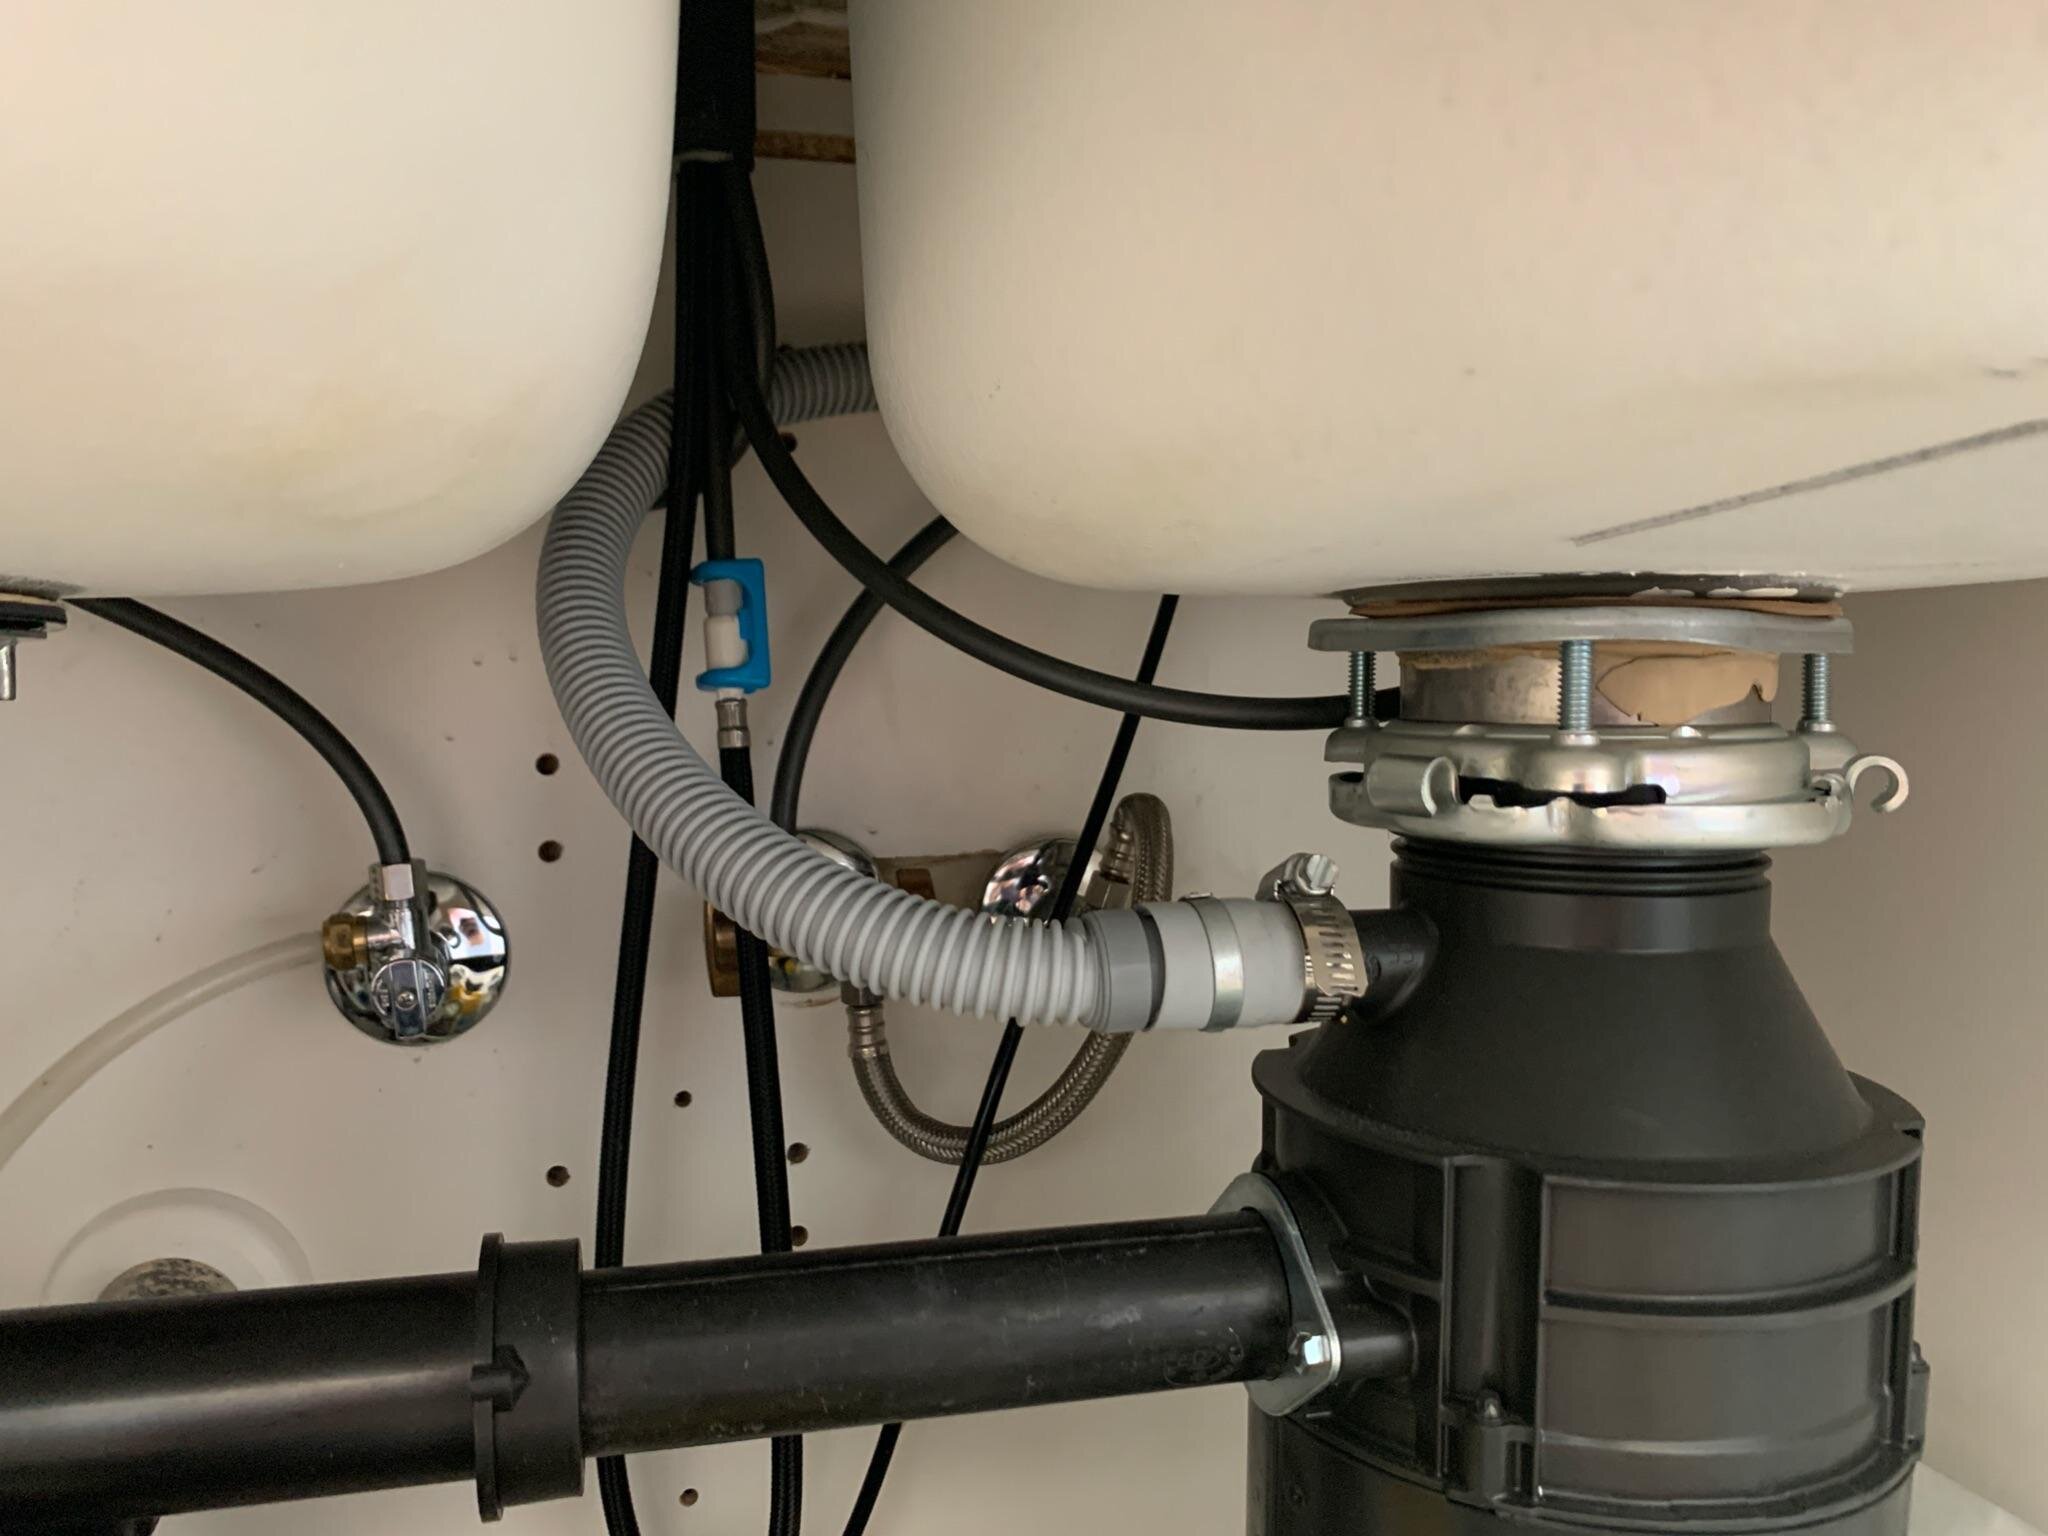
- A wide shot showing the disposal, drain, dishwasher hose (if present), and supply lines.
- Close-ups of drip marks, mineral deposits, or a cabinet floor that looks swollen or soft.
Video that helps
- A slow pan around the sink edge gap from above.
- Under-sink video while you run water lightly, first at the faucet, then briefly into each basin, watching for drips.
Send these to your landlord or property manager with a simple, factual note: when you noticed it, whether there is active leaking, and whether the sink feels loose.
Sink separation or plumbing leak?
Because water is sneaky, it often shows up far from the true source. Here is a quick way to narrow it down.
Signs the sink-to-counter joint is the main issue
- Water appears around the sink rim on top of the counter after use.
- You can see the sealant bead is cracked, missing, or peeling away.
- The sink physically shifts when you press down gently on the rim (be gentle).
- You see gaps between sink and counter that change slightly when the disposal runs.
Signs the plumbing is the main issue
- The counter surface stays dry, but the cabinet interior gets wet.
- Drips start only when water is running, or only when the disposal runs.
- You see water trails on the disposal body, drain trap, or dishwasher inlet hose.
- The wettest point is on a hose connection or slip joint, not at the sink perimeter.
A very common culprit is the dishwasher discharge hose where it connects to the disposal inlet. Another is a slip-joint nut on the trap that has loosened over time. If you have a disposal, also look at the disposal mounting ring and sink flange area where the unit attaches to the bottom of the sink. That is a more likely “mystery drip” point than anything happening inside the disposal itself.
What a proper repair involves
I am going to stay in my lane here: you can absolutely do careful, small maintenance yourself if you are a confident DIY person and you own the home. But when an undermount sink is pulling away from a solid-surface counter, the correct fix is usually a combination of support and sealing, in that order.
If you just want a quick “who do I call” rule: if the sink is moving or the plumbing is leaking, start with a plumber, and if the countertop itself seems involved (cracks, seam issues, stripped inserts in the solid surface), start with a solid-surface fabricator.
Step 1: Stabilize the sink
A pro will typically support the sink from below (often with a temporary brace or jack setup) so the bowl is held firmly in its correct position while mounts are repaired or replaced. This prevents resealing a bad alignment, which almost guarantees an early failure.
Step 2: Fix the mounting system
Depending on what your install has, this could mean:
- Retightening loose clips (carefully, evenly).
- Replacing corroded or broken clips.
- Installing a support rail system or sink cradle if the original system was inadequate.
Solid-surface counters vary, and the wrong mounting method can cause real damage, including cracking around drilled holes, stripping threaded inserts, or pulling out anchors. This is where many renters should stop and call maintenance.
Step 3: Remove failed sealant and reseal
Old sealant must be removed cleanly so the new bead bonds. The goal is a neat, continuous, flexible line that keeps water from migrating into the joint. A pro will also ensure surfaces are properly cleaned and dry before resealing.
Step 4: Confirm there is not a second leak
If a disposal or drain leak has been dripping for months, it can contribute to mounting issues and cabinet damage. A good repair includes running water and checking every connection after everything is re-secured.
Homeowners: what to do today
If the sink is not actively dropping and you are mainly seeing a small gap or a messy bead, you can do a careful inspection and some gentle cleanup. Think of this as smart observation, not aggressive repair.
- Clean and dry thoroughly. Wipe the sink edge and counter rim dry and keep it that way for a day if possible. Moisture hides the true size of a gap.
- Inspect mounting from below with a flashlight. Look for missing clips, dangling hardware, rust, or adhesive that looks separated or chalky.
- Do the paper towel test for plumbing. Wrap dry paper towels around the dishwasher hose connection, the trap joints, and the supply valves. Run water briefly and see which towel shows moisture first.
- Reduce stress. Do not fill the sink to the brim, avoid leaning on it, and go easy on the disposal until you know it is stable.
If the sink has dropped, if clips are missing, or if you can move the sink by hand, call a pro. A solid-surface fabricator or a plumber who regularly works with undermount sinks is often the right starting point. If there is countertop seam involvement, a fabricator is especially helpful.
When to call for help now
- The sink is visibly sagging, or you can see a widening gap day to day.
- There is active leaking that you cannot pinpoint quickly.
- The cabinet floor is swollen, soft, or smells musty.
- You have a heavy sink plus a disposal attached.
- You see cracking around the cutout or feel rough, chipped edges developing.
A dropping sink can damage plumbing connections and, in worst cases, crack the countertop at the cutout. It is much cheaper to fix early than to replace later.
FAQ
Can I just recaulk the gap between an undermount sink and solid-surface counter?
If the sink is firmly supported and has not dropped, resealing can help prevent water intrusion. If the bowl is loose or sagging, caulk will not hold it long term. Support comes first, seal second.
Is this the same as a countertop seam opening?
Not exactly. A countertop seam is where two sheets of solid surface meet. A sink joint is the bond and seal between the sink and the cutout. They can both be affected by moisture, but they are repaired differently.
What if my disposal is leaking and my sink is also gapped?
Fix the leak and the sink support issue. A persistent disposal or drain leak can keep the underside damp, which makes any mounting system struggle over time and can swell wood cabinet parts.
Will silicone stick to solid surface?
Silicone can adhere, but long-term success depends on proper surface prep and choosing the right sealant for kitchen wet areas. The more important point is that sealant is not structural. If you need the sink to be held up, you need mechanical support.
How do I explain this to my landlord or maintenance team?
Keep it factual: “The undermount sink is separating from the countertop at the front right corner. There is a visible gap and water has dripped into the cabinet. I have photos and a video. Please send maintenance to inspect the mounting clips and reseal after re-securing the sink.”