Under-the-Sink Bathroom Organization for Tiny Vanities and Pedestal Sinks
Clara Townsend
Clara Townsend is an interior stylist, vintage furniture enthusiast, and the creative voice behind Velvet Abode. With over a decade of experience transforming both cramped city apartments and sprawling fixer-uppers, she believes that a beautiful home is built on personal stories rather than massive budgets. When she isn't hunting for the perfect brass sconce at a local flea market, she can usually be found rearranging her living room for the third time this month.
Under-the-sink space in a bathroom is a little like the back row of a crowded theater. It exists, but it is tricky to access, it is darker than you want it to be, and something always seems to be tipping, rolling away, or plotting minor chaos at the worst moment.
The good news: you do not need a larger vanity to get a calmer under-sink situation. You need two things: a layout that respects your plumbing, and containers that can handle humidity. I am going to walk you through a simple setup that works for tiny vanities, plus real-world workarounds for pedestal sinks and wall-mount sinks where there is basically no “under” to speak of.
Before you buy bins: a 10-minute reset
If you take nothing else from this article, take this: the under-sink cabinet is not a pantry. Bathrooms have steam, splashes, and surprise drips, so the goal is easy-to-wipe, quick-to-access storage that stays put.
Step 1: Empty and sort into four “zones”
- Daily: face wash, toothpaste backups, contact solution, deodorant refills.
- Weekly: hair masks, bath cleaning sprays, shaving supplies.
- Rare: first-aid, extra toiletries for guests, backup bulbs for your vanity lights.
- Not under the sink: open paper packaging, extra toilet paper, anything you would cry over if it got wet.
Step 2: Check for the three classic problems
- Condensation and humidity: products get tacky, labels peel, metal rusts.
- Plumbing obstacles: P-trap and supply lines steal the middle space.
- Awkward access: deep cabinets hide what you own until you buy it again.
Step 3: Measure the cabinet like you mean it
Measure width, depth, and height. Then measure the “no-go” zone around the P-trap. Write it down. Most under-sink organization fails because the bins are gorgeous but do not fit around the pipes.
Quick measuring tip: account for door hinges and any lip at the cabinet opening. If you want a pull-out caddy, measure the narrowest point at the front, not just the roomy back.
Moisture-safe materials that behave
I love a good woven basket, but the bathroom is not the place for anything that absorbs moisture unless it is intentionally washable and you are okay with patina. For most people, the easiest win is switching to materials that can be wiped in one pass.
- Plastic: clear PET or sturdy polypropylene bins are simple, affordable, and easy to rinse.
- Acrylic: beautiful and clean-looking, but can scratch. Still great if you want that “boutique hotel” shine.
- Powder-coated metal: works well if the coating is intact. Avoid bare wire that can rust in humid bathrooms.
- Silicone mats: a drip-catching liner under everything makes cleaning feel like a quick reset instead of an event.
If you already have pretty bins that are not moisture-safe, use them for dry items only and keep them on the highest shelf or in a closed lidded container.
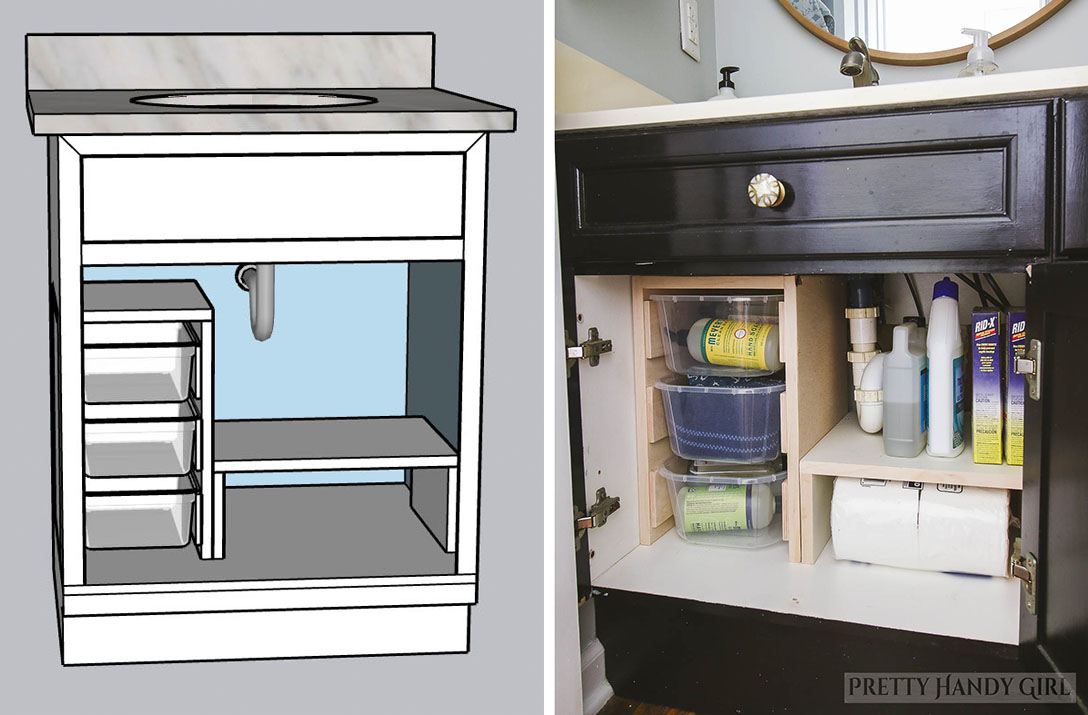
The tiny vanity blueprint
Here is the approach I use over and over in small bathrooms. It is modular, it is renter-friendly, and it makes the space feel intentionally “done” instead of improvised.
1) Add a drip layer first
Put a waterproof mat, silicone tray, or even a cut-to-size shelf liner on the cabinet floor. This protects the vanity and makes leaks obvious quickly, which is exactly what you want.
2) Use stackers to add a second level
Most under-sink cabinets waste vertical space because everything sits on the floor like it is camping. Add one small stacking shelf or a two-tier riser on the side with the least plumbing.
- Top level: daily items in a small bin.
- Bottom level: backups and less-used items.
Tip: Choose a stacker with solid shelves, not wire, so little bottles do not tip or snag.
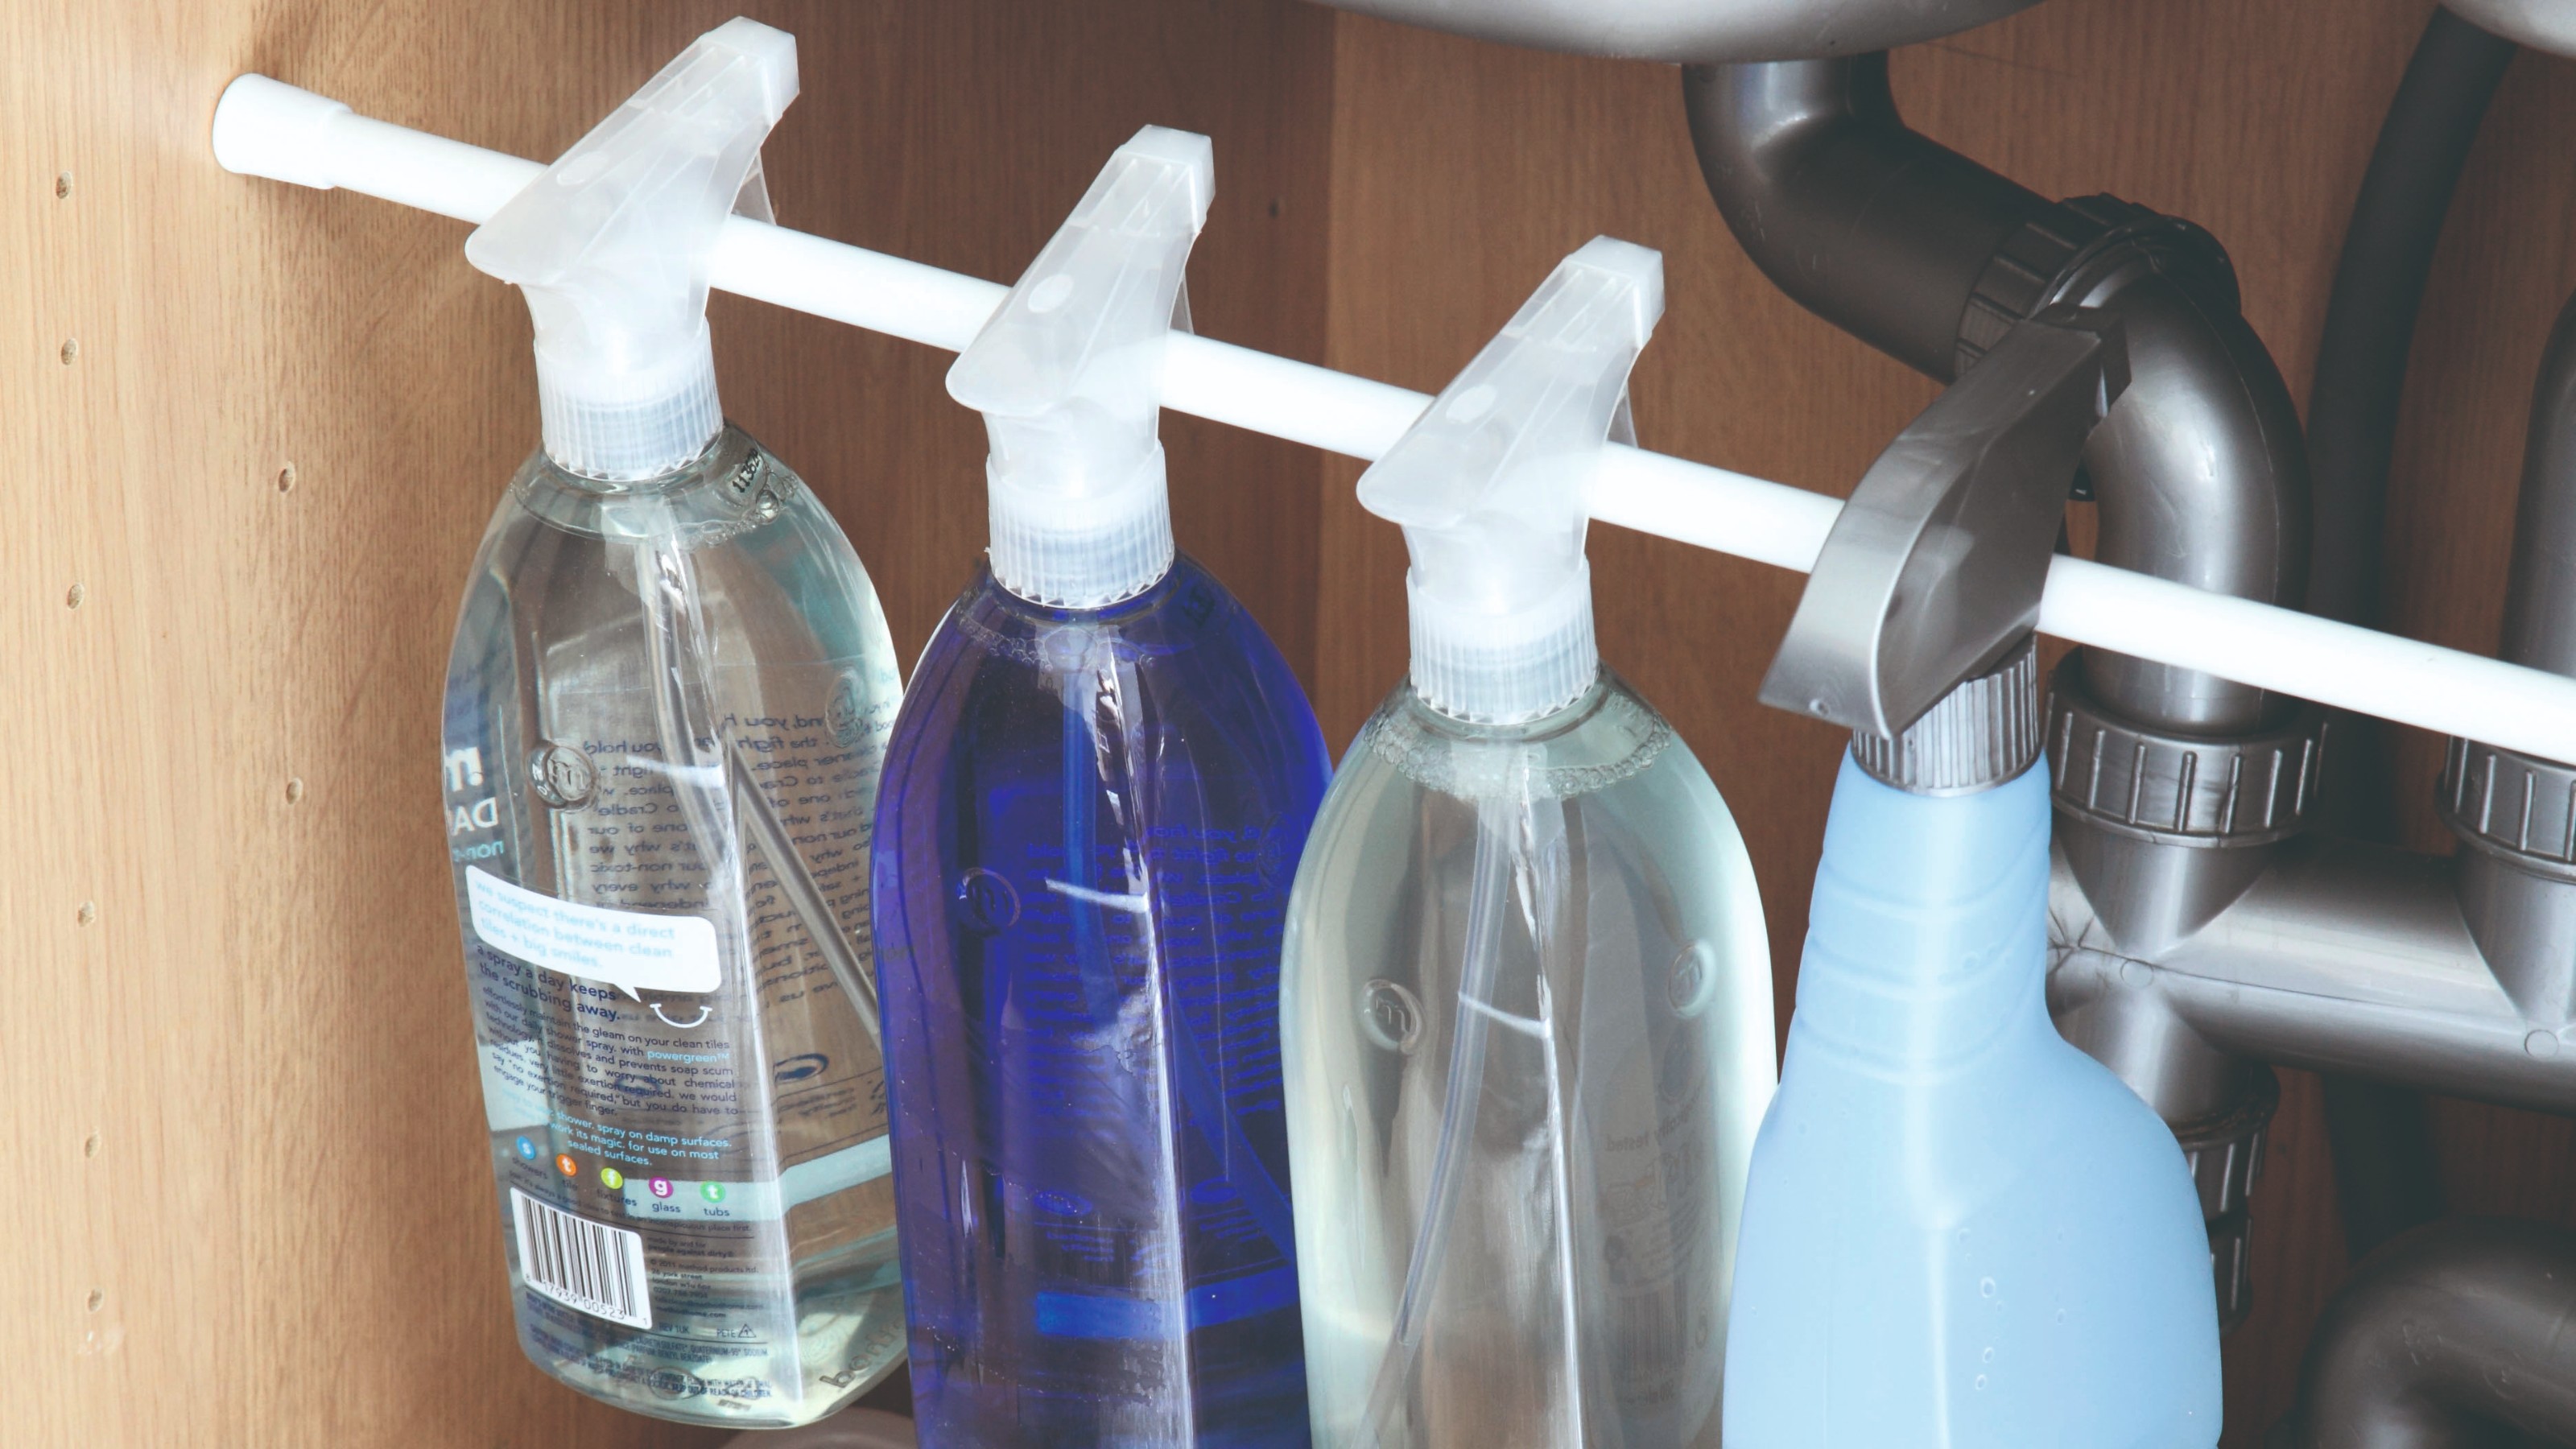
3) Hang spray bottles with a tension rod
This is the tiny-vanity trick that feels like magic the first time you do it. Add a tension rod across the cabinet (usually near the top, in front of the plumbing). Hang spray bottles by their triggers. Suddenly, your cabinet floor is free for bins.
- Best for: bathroom cleaner, glass cleaner, disinfectant, stain remover.
- Avoid: very heavy bottles or anything that leaks.
Two important caveats: Do not over-tighten the rod. Thin particleboard side walls can bow or crack under too much pressure. Also, not every trigger head hangs securely, and slick melamine cabinet walls can make rods slip. Use a rubber-ended rod, test it with one bottle first, and keep it lightly loaded.
4) Add a turntable for the back corner
A small lazy Susan is perfect for the deep back corner where things disappear. Use it for shorter items: skincare backups, travel-size products, hair oil, cotton rounds in a container. If your cabinet is very shallow, pick a low-profile turntable so it does not feel crammed.
5) Use pull-out caddies for deep cabinets
If your cabinet is deep, a narrow pull-out caddy turns hidden space into accessible space. This is especially helpful if you have limited mobility or you just hate crawling around on the bath mat to find floss.
Organize around plumbing
Pipes are not your enemy. They are just awkward roommates who refuse to move out.
Option A: Two bins and a bridge
Place one bin on each side of the P-trap, then add a small stacker or riser spanning above the lowest pipe area like a bridge.
- Left bin: daily toiletries and backups.
- Right bin: cleaning supplies and tools.
- Bridge shelf: small items in a tray, like razors, extra soap bars, or mini lotions.
Option B: U-shaped bins
There are storage pieces designed with a U-cut to wrap around the pipe. They are not mandatory, but they are wonderful if your plumbing sits dead-center and steals the most useful area.
Option C: Grab-and-go trays
When space is tiny, categories matter more than perfection. Use two or three small trays:
- Morning tray: face care, deodorant refill, shaving.
- Hair tray: brushes, clips, dry shampoo backups.
- Clean-up tray: microfiber cloths, bathroom cleaner refills.
Pull the tray out, do the thing, slide it back. No rummaging.
Pedestal sink workarounds
Pedestal sinks are charming in a vintage, airy way. Storage-wise, they are a little feral. The goal is to create a “shadow vanity” that looks intentional and does not fight the sink’s silhouette.
Best options
- Two-tier pedestal sink caddy: A freestanding wrap-around organizer that hugs the base. Choose one with a rust-resistant finish.
- Small lidded canisters: If you have a tiny ledge or corner, canisters keep things from looking cluttered.
- Rolling slim cart: Tucks between sink and wall or beside the toilet. Use the top for daily items, lower shelves for backups.
- Wall shelves or a shallow cabinet: Place it beside the mirror, not above the sink if you are short on splash control.
- Over-the-toilet cabinet: Great for renters who need storage without drilling into tile, if you choose a stable unit. Use anti-tip hardware when possible, even if it anchors into drywall.
Keep it calm
- Pick one finish family (white, black, brass, or clear). Your eye reads it as purposeful.
- Limit yourself to two daily categories visible: for example skincare and dental. Everything else goes behind a door or in a lidded bin.
- Choose moisture-safe containers even outside the cabinet. Pedestal areas still get splashed.
Wall-mount and floating sinks
Wall-mount and floating sinks give you beautiful visual space, but they can leave you with nowhere to hide the not-so-beautiful stuff. The trick is to think in vertical planes.
Try these setups
- Shallow wall cabinet: A medicine cabinet style unit with doors, mounted to the side of the sink if mirror space is limited.
- Hanging fabric organizer: On the back of the bathroom door for hair tools and extra products. Look for one that is washable and has structured pockets.
- Floating shelf plus trays: One shelf, two trays, done. The trays prevent the “everything creeps outward” problem.
- Sink skirt: If you love a vintage look, a tailored fabric skirt can hide storage baskets under a wall-mount sink. Use washable fabric and keep products in lidded plastic bins inside to protect from splashes.
Safety note: If you have exposed plumbing, keep heat-sensitive products away from warm or hot pipes (especially near shutoff valves). Store anything electrical (hair tools, razors) dry and unplugged.
What belongs under the sink
This is the gentle boundary that keeps under-sink organization from turning into a mystery drawer.
Great under-sink items
- Cleaning sprays and tools (in a leak-proof bin)
- Extra soap, shampoo, conditioner, and lotion
- Feminine care backups
- Shaving supplies
- Small first-aid kit in a sealed container
Keep these somewhere else
- Extra toilet paper: it absorbs moisture and looks rumpled fast.
- Makeup you love: humidity shortens the lifespan of some products and can make powders clump.
- Anything in cardboard: it warps, gets musty, and attracts mess.
- Fragrances: heat and humidity can alter scent.
If you only have one alternate storage spot, let it be a small lidded bin on a shelf for paper goods and anything you would not want near a drip.
Chemical and kid/pet safety
Because we are talking about storing cleaners down low and easy to reach, here are the unglamorous basics that matter.
- Keep cleaning products in their original containers with labels intact.
- If you have kids or pets, add a cabinet lock or place chemicals in a lidded, handled bin on the highest usable shelf.
- Do not store bleach next to ammonia-based cleaners. If a bottle leaks and products mix, it can create dangerous fumes. When in doubt, keep them in separate bins.
Tiny vanity shopping list
You do not need all of these. Pick based on your cabinet shape and your habits.
- 1 waterproof cabinet liner or silicone mat
- 1 tension rod for spray bottles (rubber ends)
- 1 small lazy Susan (8 to 10 inches)
- 1 stacking shelf or under-shelf riser
- 2 to 4 clear, lidded bins (shoebox size or smaller)
- 1 narrow pull-out caddy if your cabinet is deep
- Optional: a small labeled pouch for travel items (keep it inside a bin)
Design tip from my flea-market-loving heart: if you want a touch of warmth, add one vintage-feeling element outside the cabinet, like an amber apothecary jar for cotton swabs or a brass tray on a shelf. Keep the under-sink zone hardworking and wipeable.
A simple maintenance rhythm
Under-sink organization is not a “set it and forget it” situation, but it can be very low effort.
- Weekly (2 minutes): wipe any moisture, toss empty bottles, re-center bins.
- Monthly (10 minutes): check for leaks, clean the liner, wipe sticky product residue.
- Seasonally: edit what you do not use, replace rusting items, and restock intentionally.
And if you are someone who reorganizes when life feels chaotic, you are in good company. I have absolutely “fixed” my week by lining up skincare backups like they are auditioning for a magazine shelf.
Humidity and odor help
If your cabinet gets musty, do not fight it with fancy containers alone. Help the space dry out.
- Run the bath fan during showers, and leave it on a few minutes after.
- Once a week, crack the cabinet doors open for a little airflow.
- If you are in a very humid climate, add a small moisture absorber or desiccant pack in a corner (kept away from kids and pets).
Quick troubleshooting
“My bins get slimy or dusty.”
Switch to lidded bins and add a wipeable liner. Keep a small microfiber cloth in the cabinet for quick cleanups.
“Everything falls over when I pull one thing out.”
Use trays inside the cabinet so items move as a group. Add a turntable for small bottles that tip.
“I have no room because of the pipes.”
Go narrow on both sides, then use height with a stacker. Consider a U-shaped organizer if your plumbing is centered.
“My pedestal sink has zero storage and I hate it.”
Start with a slim rolling cart or a wrap-around caddy. Keep only daily items visible, stash backups in closed containers.
One last nudge
Your bathroom does not need to be huge to feel luxurious. A tiny vanity can still offer that quiet, tidy feeling when your products have a home and your hands can find what they need without a scavenger hunt. Start with one upgrade, my vote is the tension rod or the lazy Susan, and build from there.
If you want a quick way to choose, use this rule: deep cabinet equals pull-outs, awkward corner equals turntable, spray bottles equals tension rod, and lots of pipes equals two bins and a bridge.