Turn a Coat Closet Into a Pantry
Clara Townsend
Clara Townsend is an interior stylist, vintage furniture enthusiast, and the creative voice behind Velvet Abode. With over a decade of experience transforming both cramped city apartments and sprawling fixer-uppers, she believes that a beautiful home is built on personal stories rather than massive budgets. When she isn't hunting for the perfect brass sconce at a local flea market, she can usually be found rearranging her living room for the third time this month.
If your kitchen is doing that familiar tiny-kitchen thing where snacks live on the counter and pasta boxes topple out every time you open a cabinet, I have good news: that coat closet you barely use can become the calm, sensible pantry you deserve. No contractor. No built-ins. No landlord drama. Just a thoughtful layout, a few renter-friendly tools, and storage pieces that make your groceries feel like they belong.
This is less “Pinterest perfection” and more “I can find the cinnamon without taking everything out.” We are aiming for a pantry that supports real life.
Quick renter note: check your lease before removing any rods or shelves. If you do take anything down, save the hardware in a labeled bag so move-out is painless.
Measure and Map First
Coat closets are often narrow and deep, which can be pantry gold if you plan for visibility. Grab a tape measure and jot down four numbers:
- Interior width (side wall to side wall)
- Interior depth (back wall to the point where the door, hinges, or door stops reduce usable depth)
- Usable height (floor to the underside of the top shelf or ceiling)
- Door style (swing door, bifold, sliding)
Then decide what stays and what goes:
- If there is a single top shelf plus a hanging rod, the rod is usually the first thing to remove. Many rods are screwed into side brackets and can be patched later with minimal fuss. If removing hardware is not allowed, you can still work around it with a narrow shelf unit on the floor plus door storage.
- Check for a baseboard bump-out in the back. It changes how flush a shelf unit can sit.
My quick rule: in a deep closet, prioritize pull-out access (bins, drawers, turntables) so nothing becomes a forgotten food museum in the back.
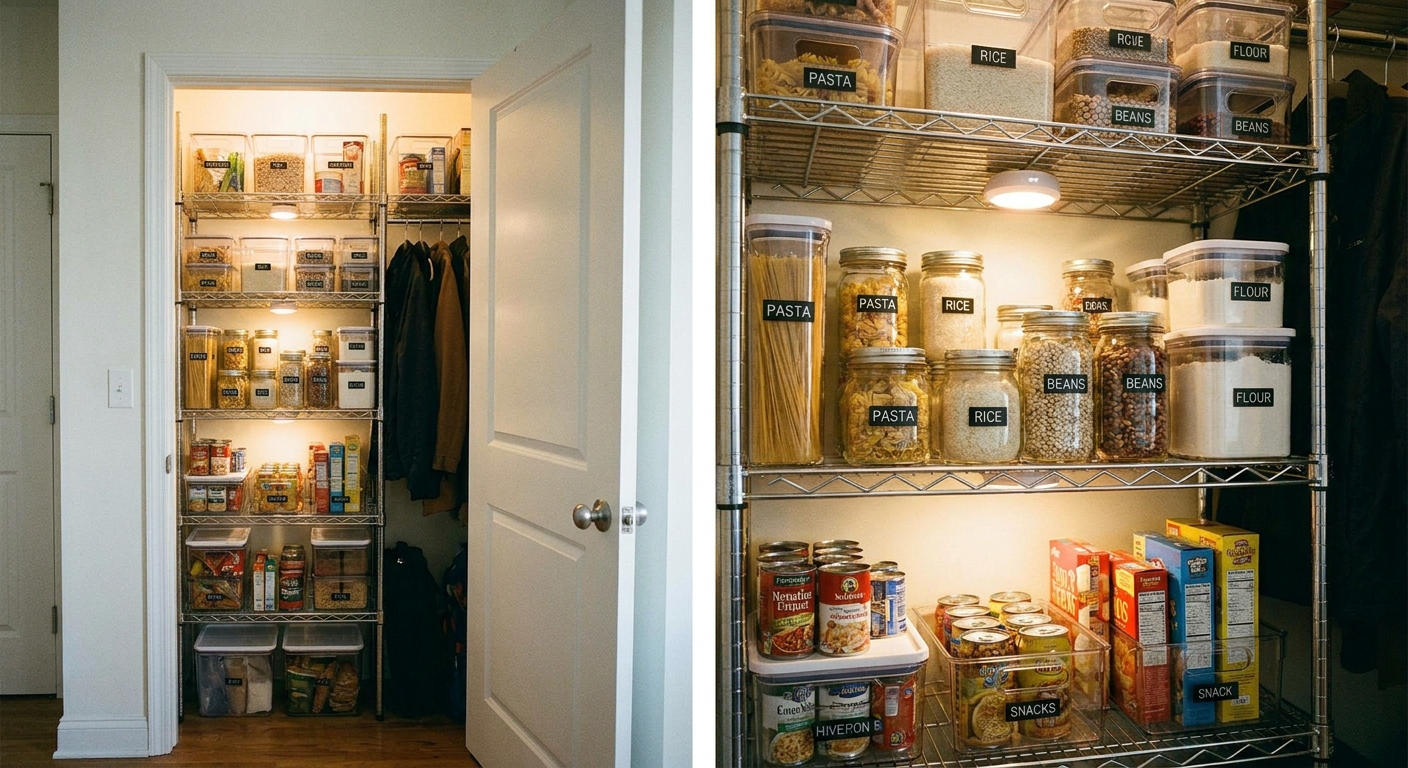
A Simple Layout Plan
Here is a layout that works in most coat-closet footprints and feels intuitive the moment you start unloading grocery bags.
Top zone: light, bulky, rarely used
- Paper towels, napkins, extra pantry bins, party supplies
- A lidded tote for “backstock” so it stays contained
Eye-level zone: daily drivers
- Cereals, snacks, nut butters, coffee, tea, lunchbox items
- Clear bins or open-front bins so you can see categories at a glance
Middle zone: cooking staples
- Pasta, rice, canned goods, sauces, baking ingredients
- Risers and turntables to prevent the “can wall” problem
Bottom zone: heavy and awkward
- Large oils, drinks, small appliances you use weekly
- Pull-out crates, handled bins, or a short drawer unit to save your back
Weight note: keep the heavy stuff low. Door racks and tension systems are real-life helpful, but they also have real-life weight limits.
When people say pantries are “life-changing,” they usually mean this: you stop stacking and start zoning.
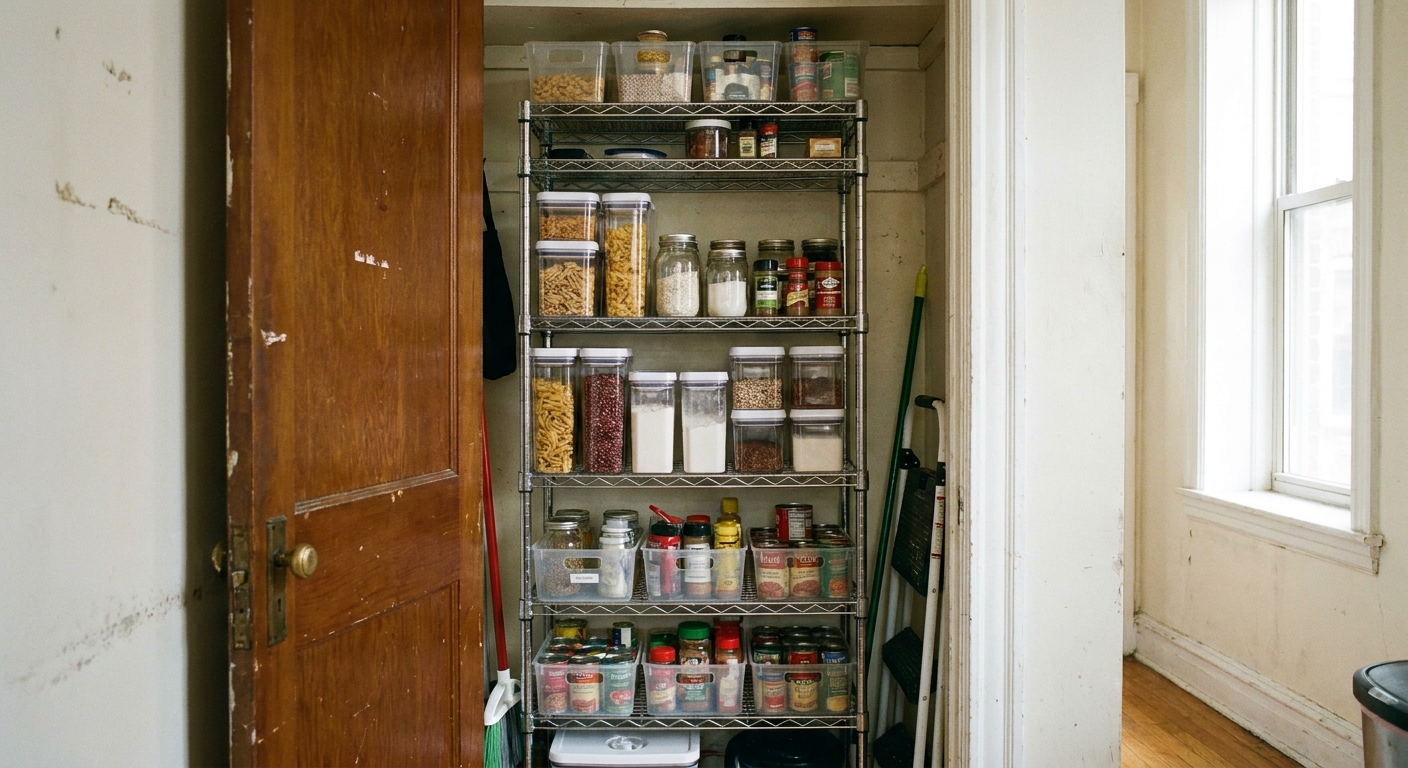
Renter-Friendly Shelving
You have a few excellent, landlord-safe ways to add shelves. Pick the one that matches your closet size and your tolerance for assembling furniture on a Tuesday night.
1) Freestanding wire shelving
Classic for a reason. It is adjustable, easy to fit into awkward dimensions, and the airflow can be helpful in a closed closet if things get musty.
- Best for: closets with at least 14 to 18 inches of depth
- Look for: adjustable shelf heights and leveling feet
- Upgrade: add shelf liners so small packets do not tip
2) Tension-pole shelving systems
These brace between floor and ceiling and usually feel more “built-in” without actually being built-in.
- Best for: renters who want a clean look with minimal drilling
- Tip: measure your ceiling height carefully. Avoid slick or flaky surfaces where poles can slip, and keep heavier items on lower shelves.
3) Slim bookcase-style shelves (wood or metal)
If your closet is shallow, a narrow shelf unit can outperform wire because you can choose a depth that leaves room for the door to close.
- Best for: narrow closets where every inch matters
- Tip: choose a unit with a finished back so food does not touch the wall
4) Over-toilet style shelves (yes, really)
Some coat closets have a bump-out or weird proportions. A frame that straddles something (like a lower shelf, a hamper zone, or a small rolling cart) can be surprisingly useful.
- Best for: awkward closets where a standard unit wastes space
- Stability tip: if it wobbles, skip it. If your lease allows, add an anti-tip strap. Otherwise, keep it low and lightly loaded.
Visibility Tools
The biggest pantry problem is not space. It is seeing. A narrow closet goes from frustrating to fabulous with a few simple helpers.
Shelf risers
Use risers like tiny bleachers for cans, jars, and sauces. They prevent the “front row hides the entire back row” situation.
- Best for: canned goods, spice refills, small jars
- Choose: sturdy metal or acrylic, 2-tier if your shelf height is limited
Handled bins as “drawers”
If you remember one thing, let it be this: deep shelves need pull-out categories.
- Best for: snacks, baking supplies, soup packets, breakfast bars
- Tip: match bin width to your shelf so you do not waste side gaps
Turntables (lazy Susans)
Perfect for oils, vinegars, nut butters, and those little bottles that love to hide.
- Tip: choose a turntable with a rim so bottles stay put
Tiered steps (even if it is not spices)
These are great for small cans, extracts, food coloring, or medicine-like pantry things.
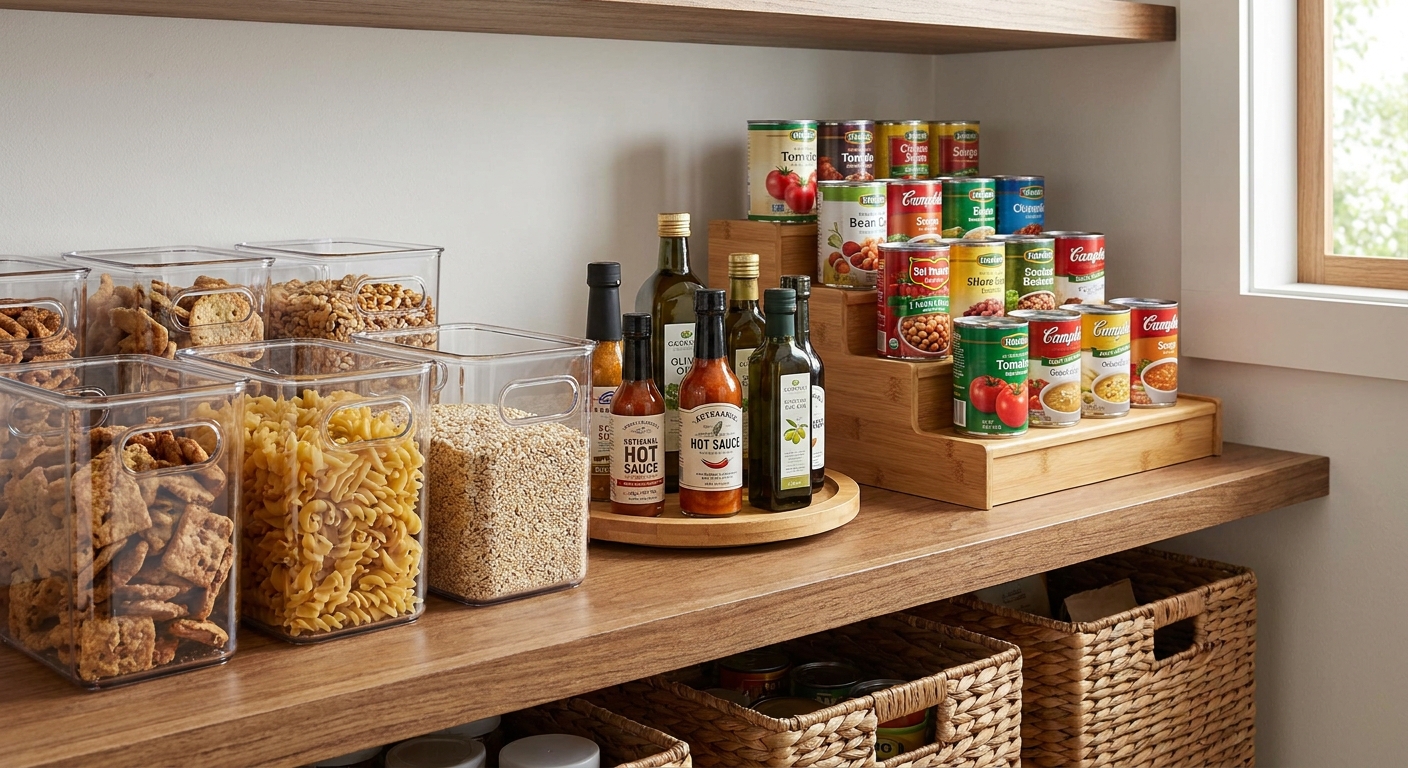
Bins and Containers
I love a beautiful glass jar moment as much as anyone, but you do not need to decant your entire life to have an organized pantry. The goal is containment and consistency.
Pick 4 to 6 categories
Start with categories that match how you cook and snack:
- Breakfast (oatmeal, cereal, coffee, tea)
- Snacks (chips, crackers, bars)
- Baking (flour, sugar, chocolate chips, sprinkles)
- Dinner staples (pasta, rice, noodles)
- Cans and jars (beans, tomatoes, broths)
- Backstock (extras of what you already use)
Open bins for packages, sealed containers for ingredients
- Open bins: keep packets and odd shapes from falling over
- Airtight containers: flour, sugar, rice, cereal, anything that goes stale or attracts pests
Make it reset-proof
If your household will not put things back unless it is effortless, choose bins that are:
- Easy to grab with one hand
- Not too deep to see into
- Clear or at least open-front
One small but magical example: a single “grab-and-go snacks” bin at eye level, plus a “snack refills” backstock bin on the top shelf. Refilling becomes a one-minute job, not a whole reorganization.
My favorite pantry trick is leaving a little “landing zone” bin for half-open bags. Once a week, decant or finish them. It keeps the shelves from turning into chaos confetti.
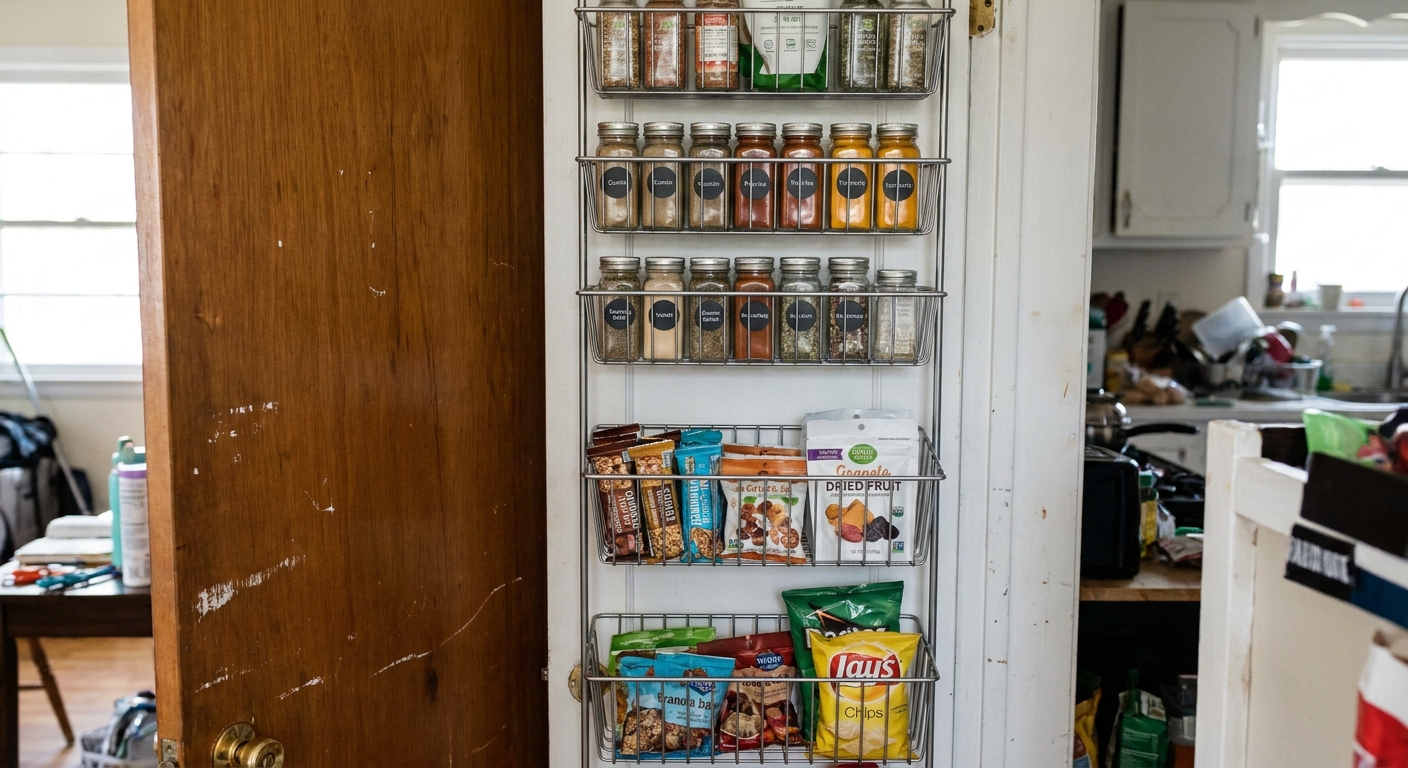
Use the Door
The inside of the closet door is often the most underused square footage in your home. For renters, door storage is also a gift because it is easy to remove later.
Over-the-door rack systems
- Best for: spices, sauces, snacks, small jars
- Tip: add adhesive felt pads where metal meets the door to prevent scratches and rattling
- Weight note: keep glass and heavy jars off the door if it slams, sticks, or has questionable hinges
Over-the-door clear pocket organizer
This is not just for shoes. It is brilliant for small pantry items.
- Best for: seasoning packets, granola bars, pudding cups, small baking tools
- Tip: keep it lightweight so the door closes smoothly
Removable hooks plus hanging baskets
If your door is narrow, a couple of sturdy removable hooks can hold lightweight baskets for wraps or chip clips.
Lighting Without Wiring
A dark closet makes food feel like clutter. A tiny bit of warm light turns it into a pantry you actually want to use.
Battery puck lights
- Best for: instant visibility on shelves
- Placement: under each shelf, toward the front edge so light spills downward
- Look for: warm white (around 2700K to 3000K) for a cozy feel
Motion-sensor stick-on bars
These are wonderful if your hands are always full of grocery bags.
- Placement: one vertical bar along the door frame or the side wall
- Tip: test the motion range before fully committing with adhesive
My little styling note: warm light tends to feel easier on the eyes in a small closet, and it makes labels feel less squinty.
Closet to Pantry Steps
Empty the closet completely. Wipe walls and baseboards, and vacuum the floor. This is the only time it will ever be this empty again.
Decide what to do with the rod. Remove it if allowed, or push your shelving plan to the floor and door area if not. Save any hardware.
Add your main shelving. Center it, level it, and leave a small air gap from the back wall if the closet tends to feel humid or if it is an exterior wall.
Set shelf heights for categories. Give cereal and snacks taller spacing. Keep canned goods closer together so the shelf does not waste height.
Add risers and turntables. Do this before you load food, so you are not rebuilding around cans.
Assign bins and zones. Keep your most-used items at eye level. Heavy items live low.
Install door storage. Close the door gently and check clearance. Adjust until it closes smoothly.
Add lights. Turn off overhead room lights and test. Move lights forward if shelves still feel shadowy.
Load groceries by category. Not by “where it fits.” Category is what makes it stay organized.
Common Problems
It is too deep and things disappear
- Use bins as drawers and keep backstock in a lidded tote on the top shelf.
- Reserve the very back for rarely used items only.
It is too narrow for a shelf unit
- Use door storage plus a slim rolling cart on the floor.
- Try a tension-pole shelf system that can be customized to the width.
It gets warm or humid
- Oils can live in a pantry, but heat speeds up rancidity. If the closet runs hot, store oils somewhere cooler and darker.
- Avoid storing chocolate and other temperature-sensitive items here if it gets warm.
- If humidity is a thing, do not push food right up against the wall. Consider a moisture absorber and keep containers sealed.
You want to store potatoes and onions
- Only if the closet is cool, dry, and dark.
- Use a ventilated basket or crate, not a sealed bin.
- Keep potatoes and onions separate for longer shelf life.
Pests are a concern
- Decant flour, sugar, rice, and cereal into airtight containers.
- Discard any infested items immediately and wipe the shelf before restocking.
- Skip pesticides near food. Sealed containers and quick cleanups do the heavy lifting.
The closet shares space with non-food items
- Do not store cleaners, paint, or strong-smelling chemicals with food.
- Do not block HVAC returns or vents if your closet has them.
Make It Feel Like Home
This is Velvet Abode, so yes, we can be practical and a little romantic about it. Once the system works, make it feel nice to open the door:
- Add a small washable runner if the closet floor is scuffed.
- Choose bins in one color family so the space feels calmer.
- Mix one or two vintage touches, like an old brass label holder on a bin or a thrifted basket for bread.
A pantry is not about having more. It is about knowing what you already have, and letting your kitchen breathe a little.
Quick Shopping Checklist
- Adjustable freestanding shelf unit or tension-pole shelving
- Shelf liners (optional but helpful)
- 2 to 4 handled bins for pull-out categories
- 1 to 2 risers for cans and jars
- 1 turntable for bottles and condiments
- Airtight containers for flour, sugar, rice, cereal
- Over-the-door organizer or rack
- Battery puck lights or motion-sensor light bar
- Removable hooks and felt pads for quiet, damage-free door storage
- Ventilated basket or crate (if storing potatoes or onions)