Sofa Leg Replacement: Threads, Plates, and Safe Height Changes
Clara Townsend
Clara Townsend is an interior stylist, vintage furniture enthusiast, and the creative voice behind Velvet Abode. With over a decade of experience transforming both cramped city apartments and sprawling fixer-uppers, she believes that a beautiful home is built on personal stories rather than massive budgets. When she isn't hunting for the perfect brass sconce at a local flea market, she can usually be found rearranging her living room for the third time this month.
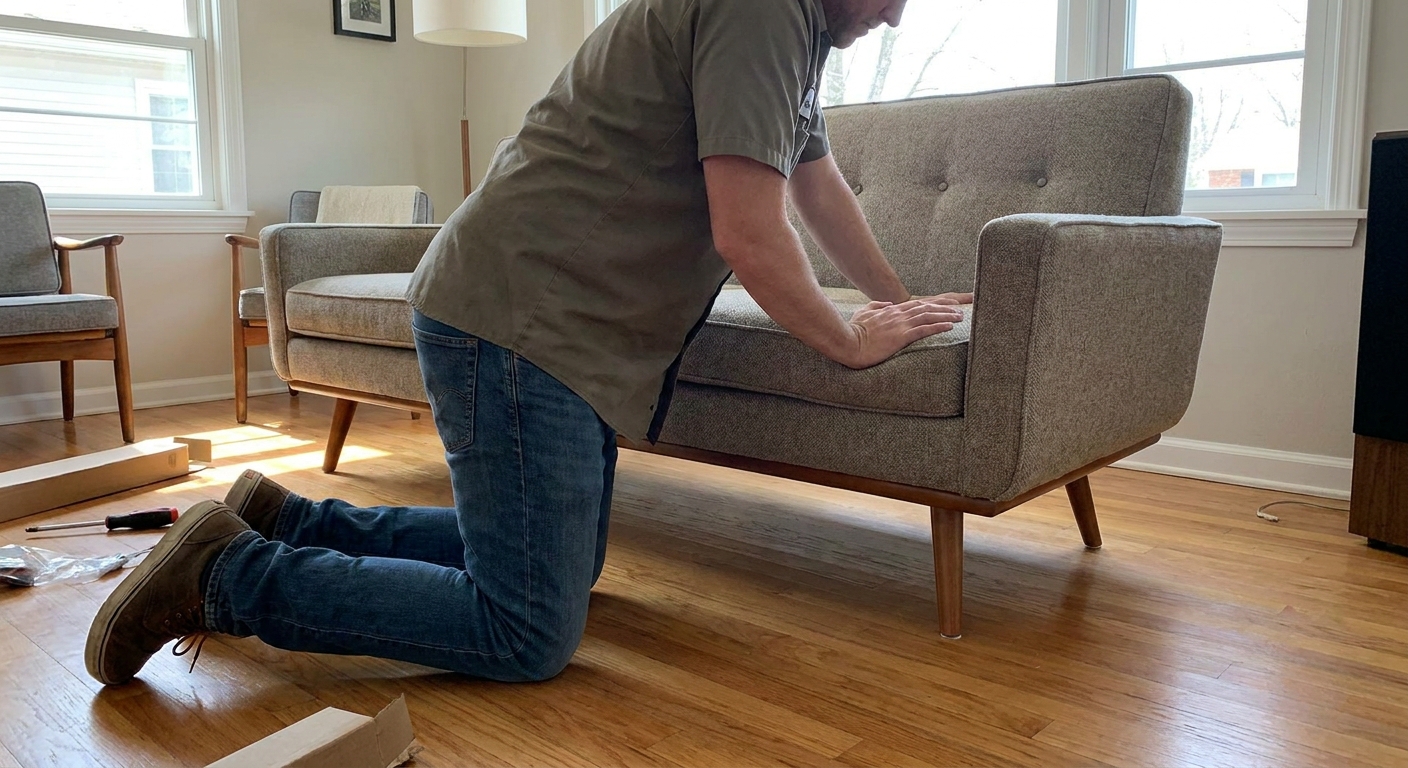
Replacing sofa legs sounds like a quick “unscrew, swap, done” moment. Sometimes it is. But if you have ever ordered gorgeous tapered legs, only to realize the threads do not match, you know the specific heartbreak of a box of furniture parts that cannot talk to each other.
Let’s make this simple and safe. We will cover two of the most common thread sizes you will see in replacement-leg listings (M8 and 5/16), why IKEA uses several attachment styles across models and years, when a furniture leg mounting plate (often called a T-plate) is your best friend, and how to add height for cleaning clearance without turning your sofa into a wobbly baby deer.
Quick safety note: flipping a sofa is easier with a helper. Lay down a blanket to protect upholstery, lift with your legs, and avoid stressing the arms or backrest while it is on its side.

How legs attach
Most replacement legs are held on in one of three ways:
- Threaded bolt into a pre-installed insert in the sofa frame (common for many modern sofas).
- Hanger bolt (wood thread on one end, machine thread on the other) screwed into the leg, then into the sofa.
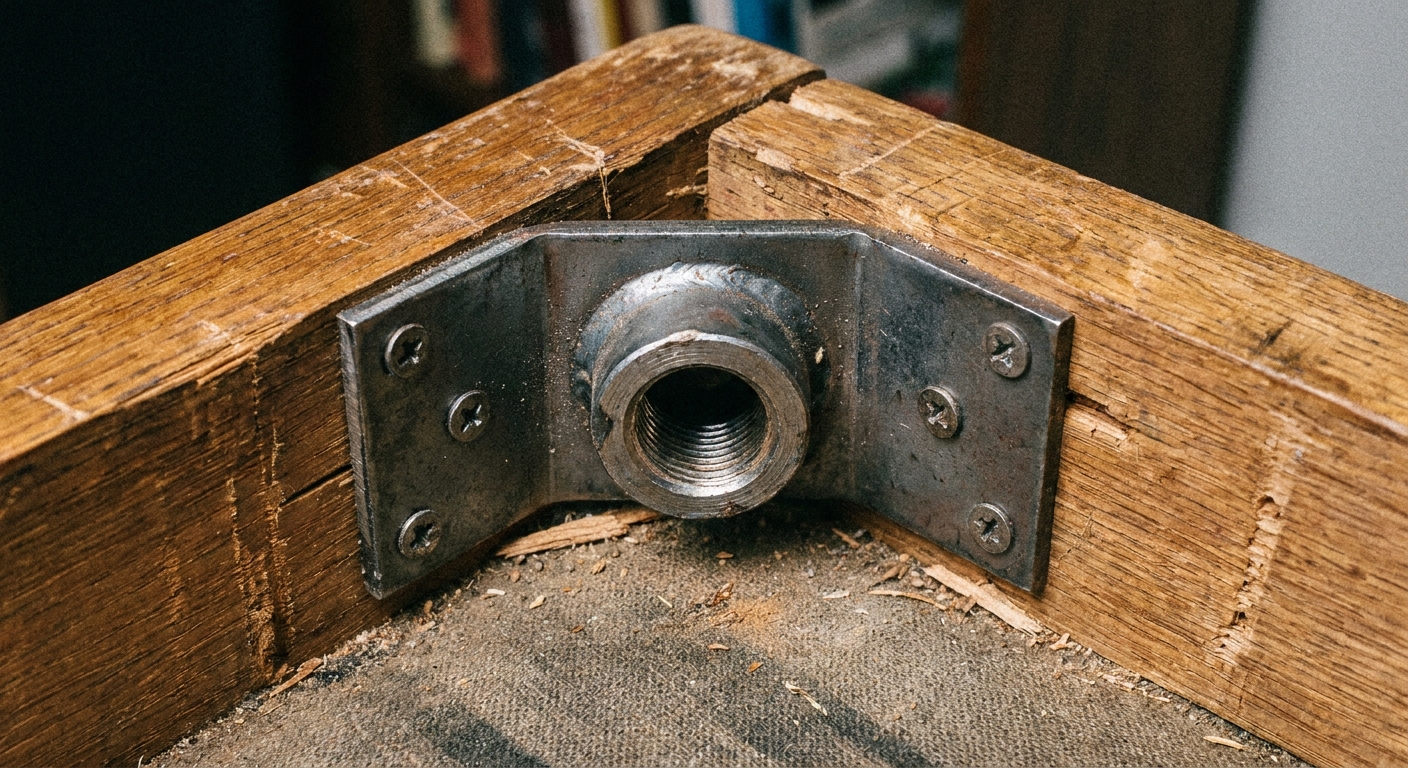
- Furniture leg mounting plate (often called a T-plate ) screwed to the underside of the sofa, giving you a threaded receiver for the new leg.
Your job is to identify what you have now, then match it, or convert it cleanly using the right hardware.
Threads: M8 vs 5/16
If you only learn one thing today, let it be this: M8 and 5/16 are close enough to look similar, but not close enough to “make it work”. Forcing the wrong thread can strip the insert in the sofa frame, which is the fastest way to turn a simple swap into a repair job.
Why it fails in real life
- Diameter is almost the same: M8 is about 8.0 mm. 5/16 is about 7.94 mm.
- Pitch is usually the deal-breaker: common M8 furniture bolts are often 1.25 mm pitch. Common 5/16 furniture threads are often 18 TPI (about 1.41 mm pitch), and sometimes 24 TPI (about 1.06 mm pitch).
So yes, it can start to catch. No, it will not seat correctly. And it can damage the insert on the way down.
How to identify your thread (without special tools)
- Check your old leg or bolt for markings. Some hardware is stamped “M8” or “5/16.”
- Measure diameter, but do not stop there. Diameter gets you close. Pitch confirms it.
- Use a hardware store thread checker board. This is the easiest and safest match.
- Try a nut test. If your old bolt threads cleanly into an M8 nut, it is M8. If it fits a 5/16 nut, it is 5/16. No grinding, no forcing.
- Quick pitch check at home: hold your bolt against a known bolt (or a matching nut) and compare the “ridge spacing.” If the ridges do not line up over several threads, it is not a match. You can also use a printable thread-pitch gauge if you want to be extra sure.
Velvet Abode tip: Put the old bolt in a little bag taped to your phone case before you shop. It is not glamorous, but it is wildly effective.

IKEA notes
IKEA sofas and chairs often use metric hardware, and M8 is very common in the IKEA universe. That said, attachment styles vary by model and year, so it is worth checking what your frame actually has.
What you will usually see
- Pre-installed threaded inserts in the frame where legs screw directly in.
- Metal brackets or plates that accept a specific leg design.
- Center support legs (especially on long spans) that matter for sag prevention.
Two crucial IKEA-friendly checks
- Count the legs you actually need. If your sofa has a center support leg, replacing only the four corners can change load distribution if the new legs are taller or softer.
- Check clearance around the attachment point. Some frames have fabric dust covers, staples, or thin rails that limit where a mounting plate can sit.
If you cannot confirm the thread size from documentation, remove one leg and match it in person. IKEA may be consistent, but your future self deserves certainty.
Mounting plate or direct bolt?
This is the moment where most “pretty leg” upgrades succeed or fail. The right choice depends on what your sofa frame already has and what you are trying to change.
Use a direct bolt-in leg when
- Your sofa already has a solid, centered threaded insert.
- Your new legs come with the correct thread (M8, 5/16, or whatever your frame requires) and length.
- You want the cleanest swap with the least carpentry.
Use a mounting plate (T-plate) when
- Your sofa has no usable threaded insert, or the insert is stripped.
- Your new legs have a different attachment style than your frame.
- You need to slightly reposition the mounting point to hit solid wood.
A mounting plate creates a new threaded receiver that your legs can screw into. Think of it as giving your sofa a fresh “socket” for the leg.
Angled plates for splayed legs
If you are chasing that mid-century splayed look, look for angled mounting plates. They let the leg sit at a tilt while keeping the connection secure, instead of asking a straight plate to do geometry it was never meant to do.
When a hanger bolt helps
If you have legs you love that are not pre-threaded, a hanger bolt can be your bridge. You screw the wood-thread end into the leg (often with a pilot hole), and the machine-thread end goes into the sofa insert or into a mounting plate.
Important: choose a hanger bolt that matches your frame thread (for example, M8 machine thread). Do not mix-and-match just because it is “close.”
Installation notes that save headaches
- Pre-drill pilot holes for mounting-plate screws to reduce splitting.
- Use the right screw length. Long enough to bite into solid wood, short enough not to poke through the frame.
- Choose real wood when possible. A plate screwed into soft particleboard will not hold like one anchored into a solid rail or corner block.
Height changes
I love a leg swap because it can change the whole silhouette of a sofa. Suddenly it feels lighter, airier, less like it is sitting down in the carpet. But height is not just aesthetic. It is physics.
Why people add height
- Cleaning clearance for a vacuum head, robot vacuum, or mop.
- Comfort tweaks if the sofa sits too low for your knees.
- Style updates like mid-century tapers or turned vintage legs.
A practical clearance goal
If the goal is cleaning, measure your tool:
- Many robot vacuums need roughly 3.25 to 4 inches of clearance, but some models are taller (especially with a lidar “turret”). Measure your specific robot before you commit.
- Many vacuum floor heads are happier with 4 inches or more, depending on design.
Measure from the floor to the lowest point under the frame (not just the bottom of the dust cover fabric). Then decide how much more you need.
My “go gently” rule
- Up to about 1 inch: usually low drama if the frame is sturdy and the legs are comparable in thickness.
- About 1.5 to 3 inches: often fine, but check stability and fastener strength carefully.
- More than 3 inches: higher tipping risk and more stress on joints, especially on older frames.
Also, if your new legs are thinner or more angled, they can “feel” taller because they flex more. A chunky bun foot and a slim tapered leg do not behave the same under load.
Stability checks
Once the new legs are on, do a stability test before you let anyone flop down with a bowl of popcorn.
Step-by-step stability check
- Level test: with the sofa in its final spot, press down on each corner. If it rocks, you have uneven legs, uneven floors, or a loose mounting point.
- Push test: with two hands on the backrest, gently push side-to-side. You are looking for racking or twisting.
- Sit test: sit on the front edge, then the far left and far right cushion areas. Listen for creaks and watch for shifting.
- Tip tendency check: if you increased height, gently lean back against the top of the backrest while someone watches the front legs. If the front legs start to lighten or lift, you need a safer plan.
If it wobbles, troubleshoot in this order
- Tighten first. Many wobbles are simply a leg that is not fully seated.
- Check the mounting surface. A mounting plate screwed into soft particleboard will not hold like one screwed into solid wood.
- Confirm thread match. A partially cross-threaded bolt can feel “tight” but will not be secure.
- Use washers or removable thread locker if needed. A washer can help a leg seat flush. A removable thread locker can help keep vibrations from loosening bolts over time.
If the frame itself flexes or creaks at the corners, the issue may be the sofa structure, not the legs. In that case, reinforcing the corner blocks or rails is the real fix.
Shopping checklist
- Thread size: M8, 5/16, or another size (M10, M6, 1/4-20 also show up). Do not guess.
- Thread pitch / TPI: confirm it, especially if you are shopping online based on “looks about right.”
- Thread length: long enough to fully engage the insert or plate, not so long that it bottoms out.
- Mounting method: direct bolt, hanger bolt, or mounting plate.
- Leg height: current height vs new height, plus clearance needs.
- Leg footprint: wider bases can feel steadier. Very narrow legs can increase wobble on soft floors.
- Weight rating: especially important for sleepers, sectionals, and deep sofas that get real daily use.
- Center support: replace it too if your sofa uses one and you are changing height.
- Floor protectors: felt pads for hard floors, rubber grippers for slick floors, and proper glides for carpet.
If you are buying vintage legs (my personal weakness), check that the wood is not cracked at the bolt area and that the threads are not stripped. Patina is charming. Structural problems are not.
Do not skip floor protection
Your new legs might be prettier, but your floors still deserve kindness. Add felt pads to prevent scratches on hardwood and tile, or rubber grippers if you need more traction on slick surfaces.
One more reason this matters: taller legs increase leverage. That means tiny shifts (and tiny grit under a leg) can do bigger damage over time.
When to pause
A leg swap is DIY-friendly, but there are a few moments where it is wise to slow down:
- The sofa frame is particleboard and the attachment area is crumbling.
- You see splits in the corner rails or loose corner blocks.
- You are increasing height significantly and the sofa already feels top-heavy.
- The leg attachment point is near wiring (some recliners) or mechanisms.
- The threaded insert spins or pulls out of the frame when you try to tighten the leg.
If an insert spins, you may be able to replace the insert, repair the hole, or switch to a mounting plate positioned into solid wood. A local upholsterer or furniture repair pro can often reinforce a corner in less time than it takes to doom-scroll replacement sofas.
A cozy final note
New legs are one of my favorite “small change, big mood” upgrades. They can lift a heavy sofa visually, echo the wood tone in your coffee table, or give a modern frame a little vintage wink. Just make sure the hardware is right, the height is intentional, the floor is protected, and the finished result feels steady enough to be a true end-of-day landing spot.
If you want, tell me your sofa brand and the thread size you found (or share what is currently under the corners), and I can point you toward the most likely mounting setup.