Rustic Pallet Coffee Table
Clara Townsend
Clara Townsend is an interior stylist, vintage furniture enthusiast, and the creative voice behind Velvet Abode. With over a decade of experience transforming both cramped city apartments and sprawling fixer-uppers, she believes that a beautiful home is built on personal stories rather than massive budgets. When she isn't hunting for the perfect brass sconce at a local flea market, she can usually be found rearranging her living room for the third time this month.
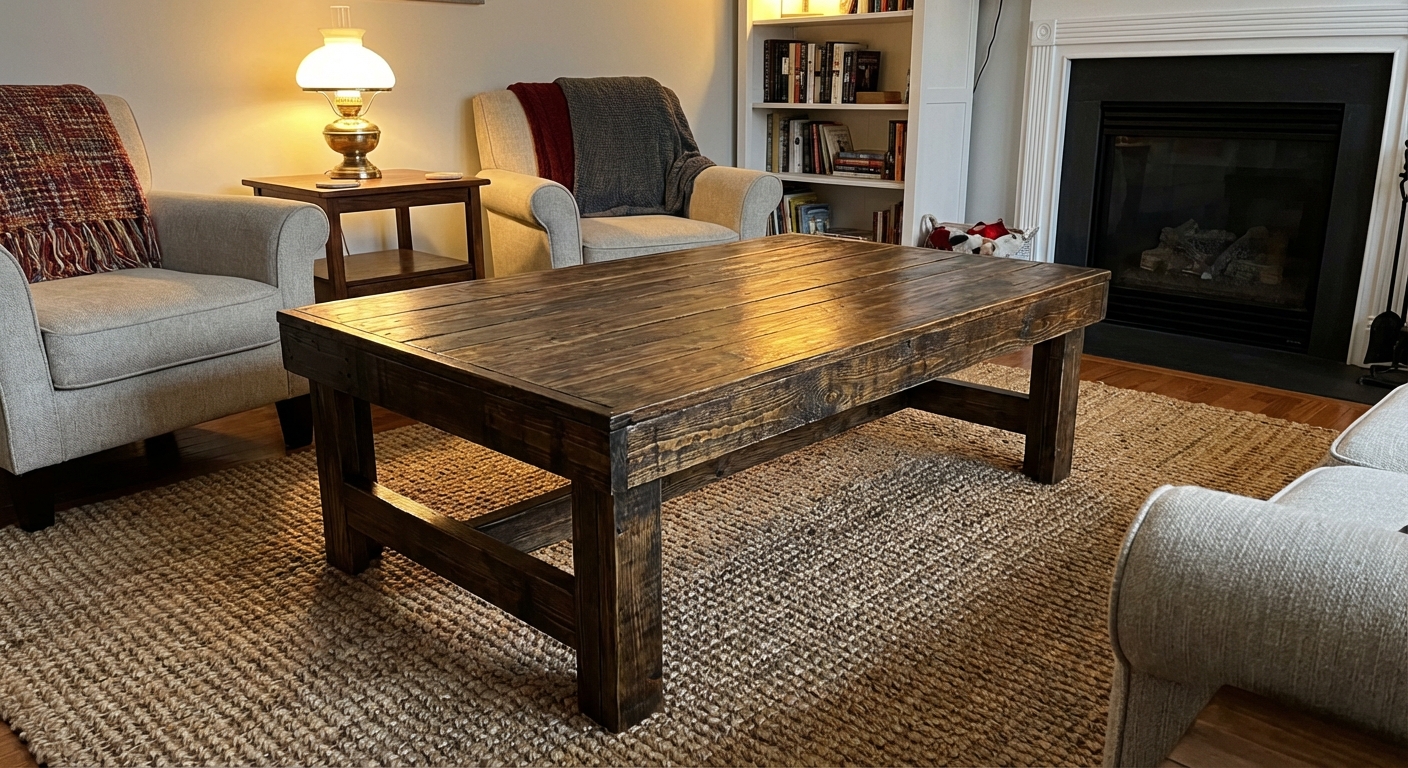
There is something deeply satisfying about turning scrappy, road-worn pallet boards into a coffee table that looks like it has lived a whole charming life already. The knots, the nail holes, the little dents. That is character you cannot fake with a big box store finish.
This tutorial walks you through the full process: how to choose safer pallets, dismantle them without splitting every board, clean and prep the wood, and assemble a sturdy farmhouse-style coffee table that can handle real life.
Before you start: pallet safety
Pallet projects are affordable and beginner-friendly, but you do need to be picky about what wood you bring into your home. A little caution now, a lot of peace later.
How to pick safer pallets
- Look for an IPPC stamp on the pallet stringer (the thicker support pieces). You want HT, which means heat-treated.
- Avoid MB (methyl bromide), which indicates chemical fumigation. Do not use those indoors.
- Know what the stamp does and does not mean: HT reduces insect risk, but it does not certify cleanliness. Even a heat-treated pallet can still get spilled on later. Use your eyes and nose.
- Skip pallets with stains or strong odors, especially chemical or oily smells. If you would not want to put your sweater near it, do not make a table from it.
- Stick to “one-trip” pallets when you can. They tend to be cleaner and less splintery.
- Unmarked pallets are common, especially domestic pallets (not always regulated the same way). I only use unmarked pallets when I know their source (for example, a small local shop that receives boxed goods, not chemicals).
Common pallet stamp codes
- HT: heat treated (good choice)
- MB: methyl bromide (avoid)
- KD: kiln dried (about moisture content, not a safety guarantee)
- DB: debarked (a processing note, not a safety marker)
Also avoid: boards that look like pressure-treated lumber (often has a greenish tint) for indoor furniture tops. When in doubt, choose different wood.
Tools and materials
You can build this with basic tools. If you have a circular saw, drill, and sander, you are in great shape.
Tools
- Pry bar (a flat wonder bar is ideal)
- Hammer or mallet
- Cat’s paw nail puller (optional but so helpful)
- Reciprocating saw with metal-cutting blades (optional, best for quick dismantling)
- Circular saw or miter saw
- Drill and bits
- Countersink bit (for clean, snag-free screw heads)
- Orbital sander and sandpaper (60, 80, 120, 180 grit)
- Clamps (at least two)
- Tape measure and carpenter’s square
- Safety gear: gloves, eye protection, hearing protection, dust mask or respirator
Materials
- 2 to 4 heat-treated pallets (amount depends on board width and how many good boards you get)
- Wood screws (1 1/4 inch and 2 1/2 inch). I like quality general-purpose or deck-style screws for strength.
- Wood glue (optional but increases stiffness)
- Wood filler (optional, for a smoother top)
- Finish: stain, paint, or oil plus a protective topcoat (water-based polyurethane is easy)
- Felt pads for the feet
Pick your table size
Before you cut anything, measure your seating area. The most common “feels right” coffee table proportions are simple:
- Height: about the same as your sofa seat height, usually 16 to 18 inches
- Length: roughly two-thirds the length of your sofa
- Clearance: leave 14 to 18 inches from sofa to table edge so your knees are happy
For this build, I will use a classic medium size: 40 inches long x 22 inches wide x 17 inches tall.
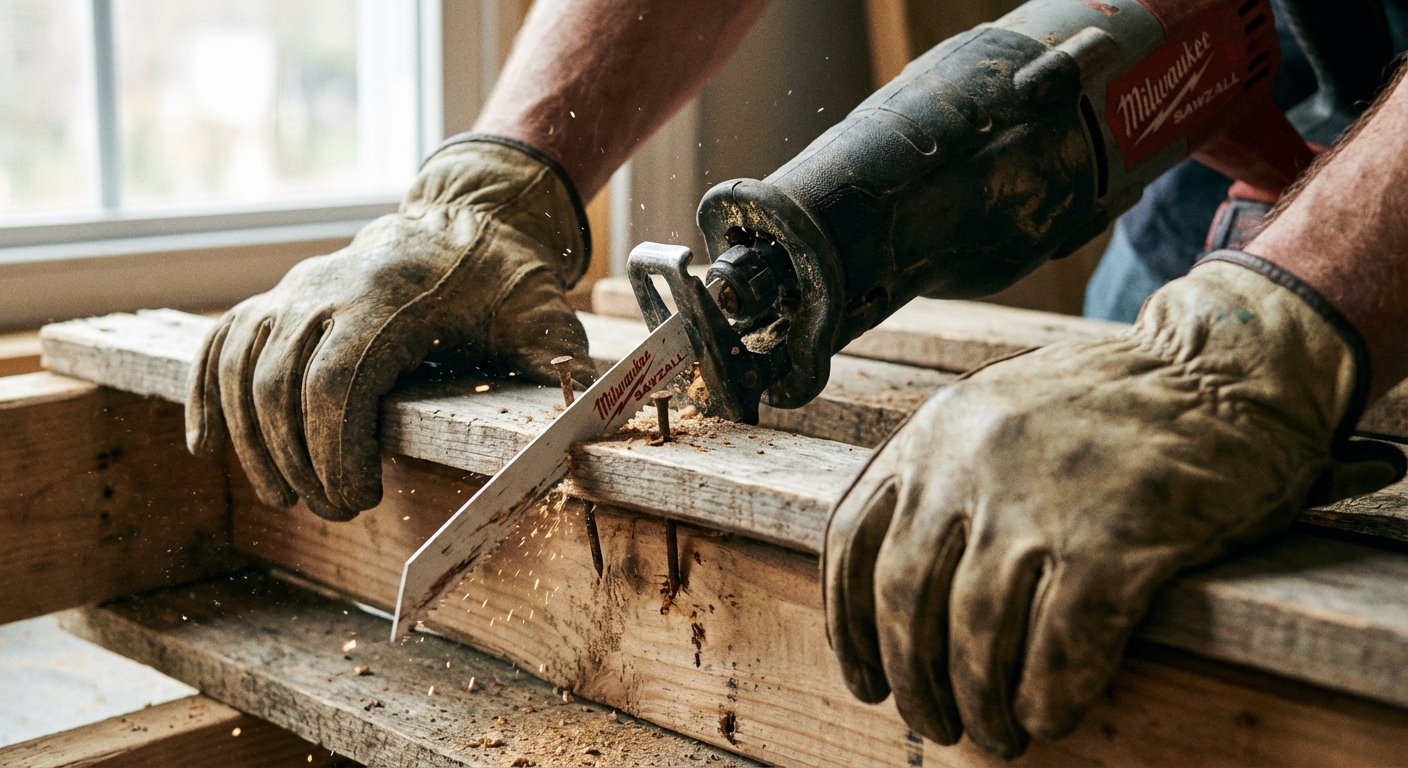
Step 1: dismantle pallets
Pallet wood splits easily because it is usually nailed in fast and hard. Your goal is to separate, not wrestle. Take your time here and the rest of the project becomes a joy.
Method A (best): recip saw
- Slide the reciprocating saw blade between a deck board and the stringer.
- Cut through the nails at each connection point.
- Lift the board off. Repeat.
This method saves boards because you are not prying against the grain. You will have nail stubs to remove later, but the boards stay intact.
Safety note: Cutting metal is loud and throws grit. Wear eye and hearing protection, and keep your hands clear of the blade path.
Method B: pry bar
- Work from the ends, sliding the pry bar in a little at a time.
- Lift gently, move a few inches, lift again.
- If a board starts to crack, stop and switch to cutting the nails.
Remove nails and staples
- Use a cat’s paw to dig around stubborn nail heads.
- Pull nails straight out when possible to reduce tearing.
- Check for staples. Pallets love hiding them.
- Run a magnet over boards and your workspace afterward.
Step 2: clean and prep wood
This is the unglamorous part that makes the finished table feel clean and truly home-worthy.
Clean
- Brush off loose dirt with a stiff brush.
- Wash boards with warm water and a mild detergent.
- Rinse and let them dry completely. Give it at least 48 to 72 hours in a dry, ventilated area.
Treat (optional)
- If you worry about pests, you can lightly spray with a borate wood treatment (follow label directions) and let it fully dry and cure.
- This is not always necessary for indoor furniture, especially if you start with clean, heat-treated pallets.
- If you are working indoors, choose low-odor products and ventilate well.
Do not rush to sand wet wood. Damp boards clog sandpaper instantly and can warp as they dry.
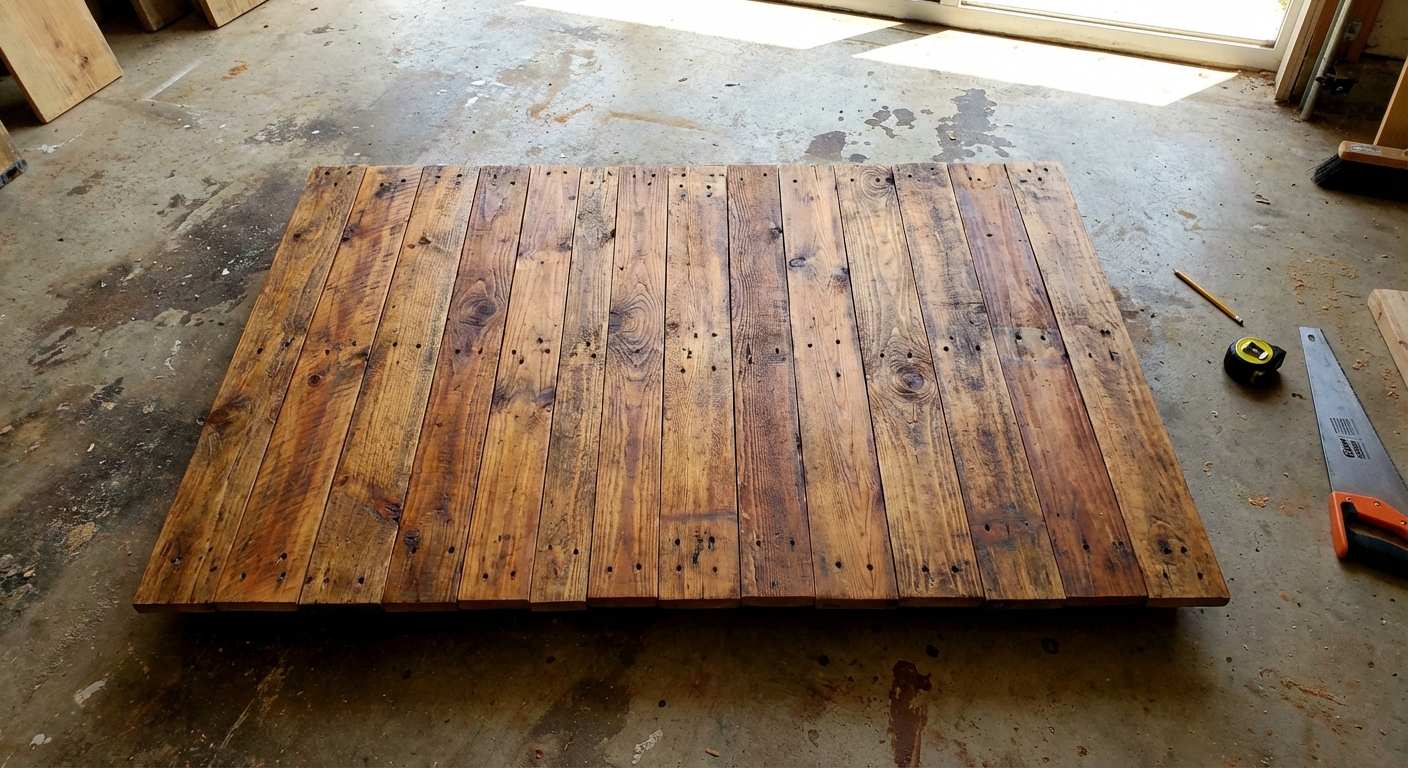
Step 3: sort and plan boards
This is where you get to be a little romantic about the grain. Lay your boards out and “audition” them like you are styling a bookshelf.
- Choose the prettiest faces for the top.
- Alternate grain direction and tone for a balanced look.
- Mix widths on purpose so it reads rustic, not accidental.
- Check for twist and cup: sight down each board and set the worst offenders aside for the lower shelf or hidden supports.
Once you love the arrangement, mark the underside with chalk or pencil so you can keep the order.
Step 4: cut list
Pallet dimensions vary, so treat this as a guide. The simplest way is to build a strong frame from standard lumber, then use pallet boards for the visible surfaces.
Quick terms
Aprons are the boards that run just under the tabletop, connecting the legs and stiffening the table.
Option 1: strongest build
Use kiln-dried lumber for the frame and legs, and pallet boards for the visible surfaces.
- Legs: 4 pieces of 4x4 (or laminated 2x4s), cut to 16 inches (final height depends on top thickness)
- Aprons: 1x4 or 2x4, sized using the formulas below
- Tabletop: pallet boards cut to 40 inches long, enough to reach 22 inches total width
- Lower shelf (optional): pallet boards cut to fit inside the apron opening
Apron length formulas
Choose the layout that matches how you plan to attach the aprons:
- Aprons between legs (common): apron length = table length minus 2 times leg thickness (same idea for width)
- Aprons on the outside of legs: apron length is closer to the full table length, but plan your top overhang to hide end grain and keep it comfortable to bump into
For example, with 3 1/2 inch thick 4x4 legs and aprons between legs: long aprons = 40 minus 7 = 33 inches, short aprons = 22 minus 7 = 15 inches. Adjust to your own dimensions before cutting.
Option 2: mostly pallet build
- Use pallet stringers for legs and frame, trimming them square.
- Double up pieces with glue and screws for strength.
If your pallets are made of hardwood and the stringers are solid, Option 2 can work beautifully. If the wood feels soft and splintery, go with Option 1 so your table lasts.
Step 5: build the base
Think of the base as a sturdy little box that keeps the table from wobbling. Square corners are the difference between handmade charm and why is my mug sliding.
Assemble the apron frame
- Cut your apron pieces to length.
- Dry fit on a flat surface and check for square using a carpenter’s square or by measuring diagonals (they should match).
- Pre-drill to prevent splitting.
- Attach with 2 1/2 inch screws. Wood glue is optional but helpful.
Add the legs
- Stand a leg inside each corner of the apron frame.
- Clamp if you can, then pre-drill.
- Screw through the apron into the leg from both sides.
Optional upgrade: Pocket hole joinery (like a Kreg Jig) is a really clean way to attach the aprons to the legs. It is sturdy, beginner-friendly, and keeps hardware more hidden.
Tip: Keep the leg tops flush with the top edge of the apron so the tabletop sits neatly.
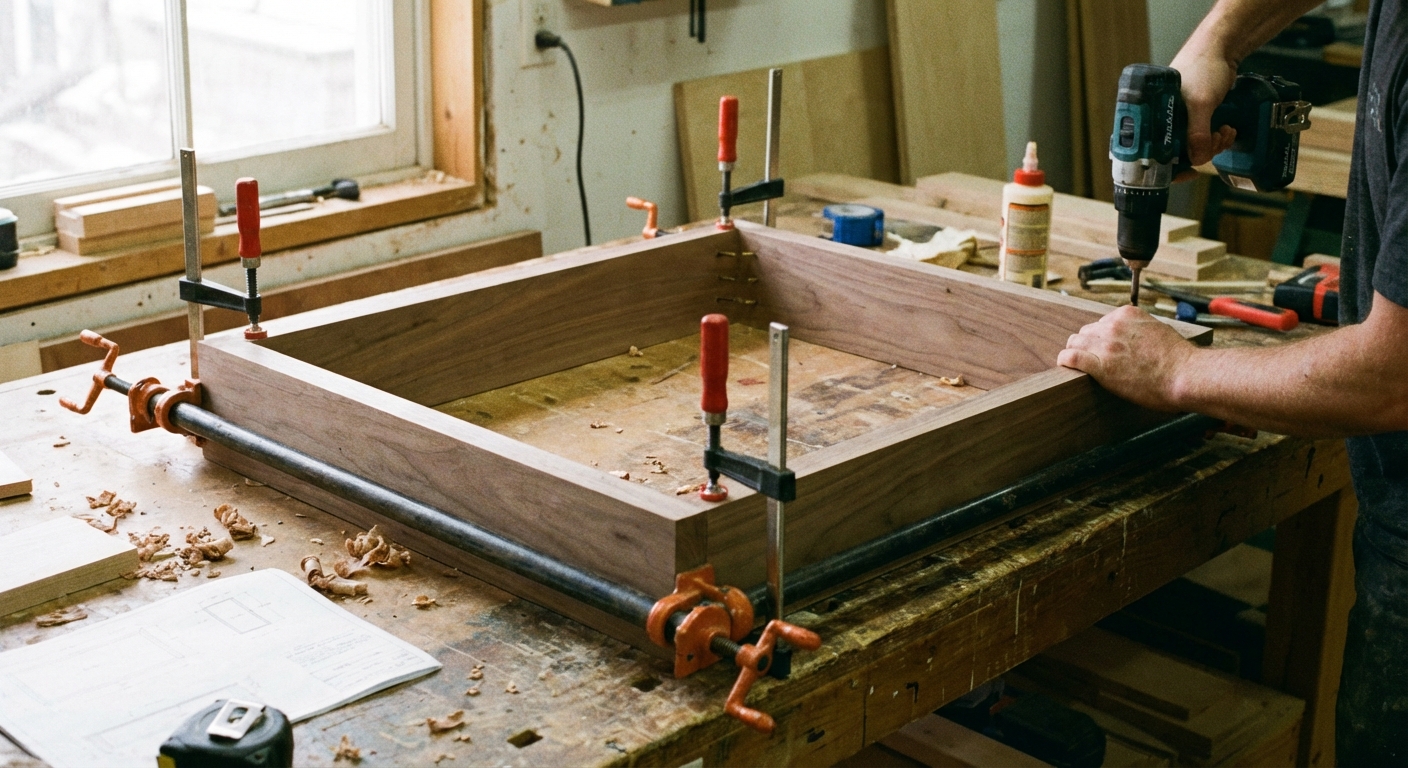
Step 6: attach the top
This is the part that makes it feel like a table, not a carpentry exercise.
- Trim pallet boards to 40 inches long (or your chosen length). Square ends matter for a clean edge.
- Lay boards across the top, keeping your planned order.
- Leave a tiny gap between boards (about a credit card thickness) if you want a more rustic look and to forgive seasonal movement.
- Countersink your pilot holes, then pre-drill and screw down into the apron and any interior supports using 1 1/4 inch screws. This keeps screw heads flush or slightly below the surface so they do not snag or scratch.
- Choose screw length carefully so you do not poke through the top.
Want a thicker, more farmhouse top? Breadboard ends (two boards running perpendicular at the short ends) can look beautiful, but they need to allow wood movement. If you add them, fix the center and use elongated holes toward the ends so the top can expand and contract without splitting. If that sounds fussy, skip it and keep the top simple.
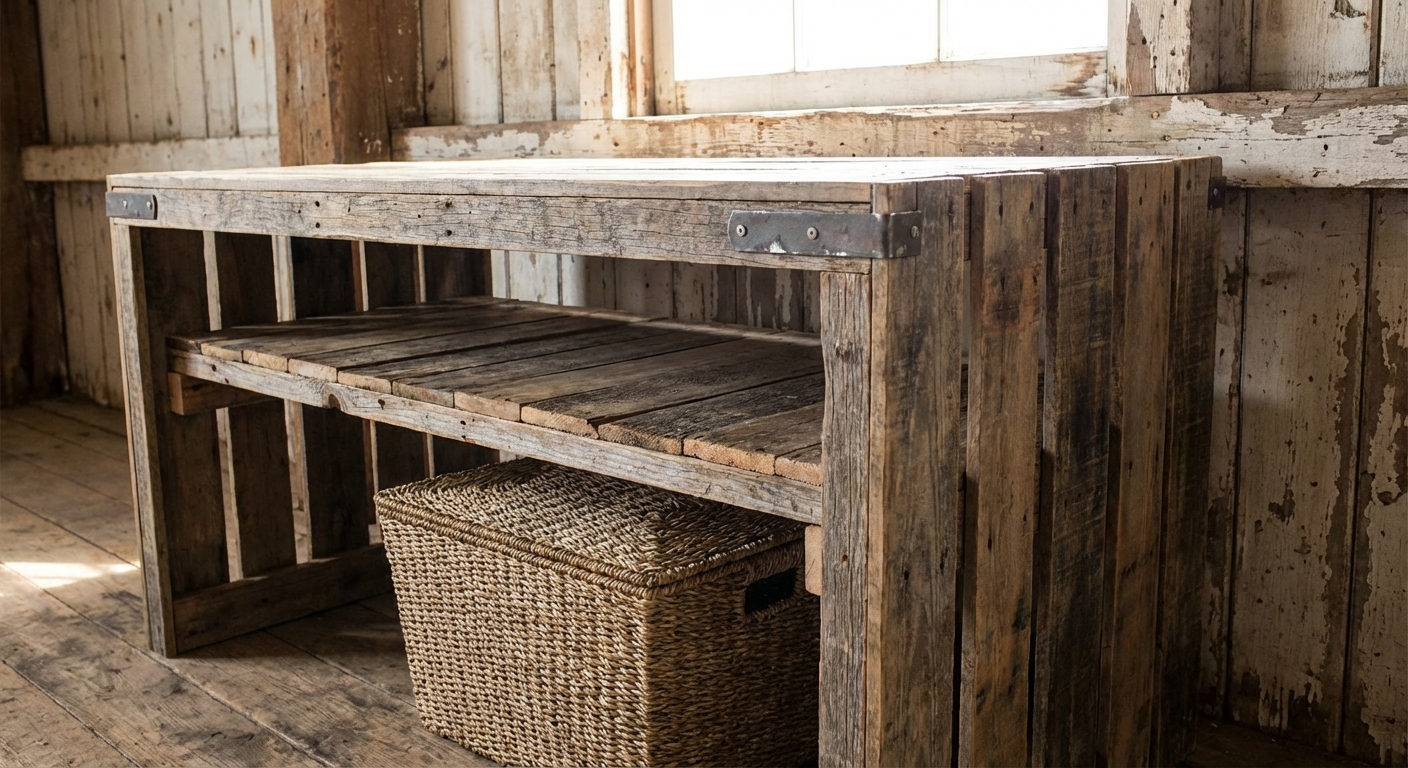
Step 7: add a lower shelf
A lower shelf is where cozy living rooms are born. Baskets, art books, that throw blanket you actually use.
- Add interior runners or cleats along the inside of the aprons, about 5 to 7 inches up from the floor.
- Cut pallet boards to fit the opening and lay them across the supports.
- Pre-drill and screw them down with 1 1/4 inch screws.
Step 8: sand it smooth
Rustic does not mean rough. Your goal is a surface that feels good under your palm and will not snag a knit blanket.
My sanding sequence
- 60 grit only if boards are very splintery or uneven
- 80 grit to smooth and level
- 120 grit to refine
- 180 grit for a softer, clean-to-the-touch finish
Round over sharp edges lightly with 120 or 180 grit. Your shins will thank you.
Important: If you used a reciprocating saw to cut nails, look closely for embedded metal before sanding. A quick pass with a strong magnet can save your sandpaper and your nerves.
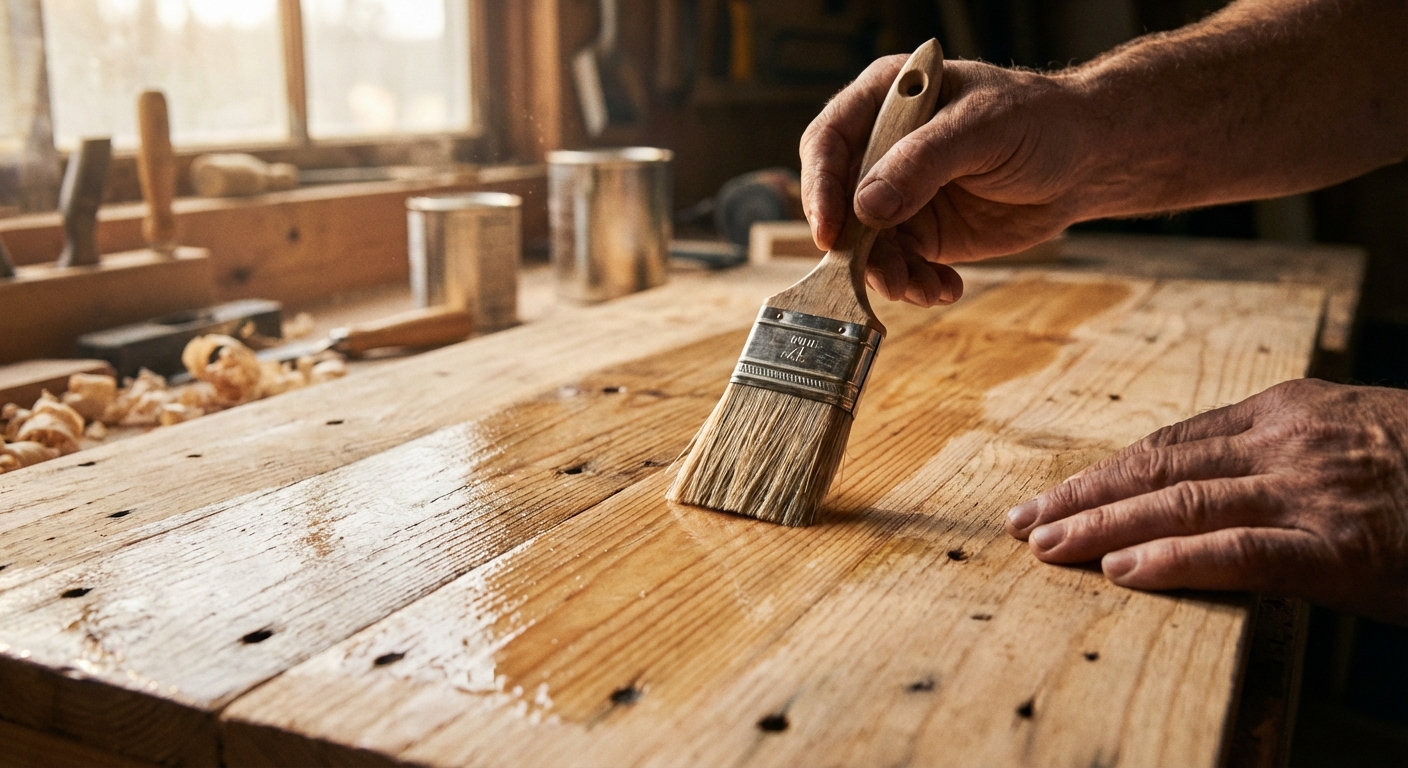
Step 9: finish options
The finish is where pallet wood becomes home furniture. Choose based on the vibe you want and how hard your table will be used.
Option A: natural matte
- Apply a clear matte water-based polyurethane in 2 to 3 coats.
- Lightly sand with 220 grit between coats.
This keeps the wood looking honest and warm, like it belongs next to linen curtains and an amber lamp.
Option B: classic stain
- Use a pre-stain conditioner if your boards look blotchy (common with softwoods).
- Wipe on stain, wipe off excess, let dry fully.
- Seal with polyurethane.
Option C: whitewash
- Mix white paint with water (about 1:1) and brush on.
- Wipe back with a rag to let grain show.
- Seal with a clear topcoat.
If you are putting drinks on this table, do not skip a protective topcoat. Pallet wood is thirsty, and condensation rings happen fast.
Cure-time note: Finish can feel dry quickly but still be soft underneath. Give it a few days (check your product label) before heavy use, stacking decor, or sliding trays around.
Step 10: final details
- Add felt pads under each leg to protect floors and reduce wobble.
- If the table rocks, sand the bottom of the offending leg slightly or add a thicker felt pad.
- Consider small corner brackets inside the frame if you want extra rigidity.
Then bring it inside, put a well-worn book on top, and let the table settle into its new life. The best rustic pieces look like they have stories because they do.
Troubleshooting
My boards are different thicknesses
That is normal. Choose one show side for the tabletop, and sand that side as level as you can. If it is really uneven, run the boards through a planer if you have access, or embrace a more textured top and use coasters.
The tabletop has gaps
Small gaps are part of the charm. If you want a tighter surface, rip board edges straighter with a circular saw and a guide, or fill gaps with thin wood strips.
The wood looks blotchy after stain
Pallet wood can be a mix of species. Use a conditioner next time, or switch to a gel stain for more consistent color.
How to style it
This is where I get to be the friend nudging your elbow gently. Rustic tables love contrast. Pair weathered wood with something smooth and modern so the whole room feels intentional.
- A stoneware tray for remotes (practical, but pretty)
- A small stack of art books with a brass object on top
- A linen runner if the room needs softness
- A low, wide vase with clipped greenery
If your pallet top is very busy, keep styling simple. Let the grain be the artwork.