Replace Worn Side-Mount Drawer Slides
Clara Townsend
Clara Townsend is an interior stylist, vintage furniture enthusiast, and the creative voice behind Velvet Abode. With over a decade of experience transforming both cramped city apartments and sprawling fixer-uppers, she believes that a beautiful home is built on personal stories rather than massive budgets. When she isn't hunting for the perfect brass sconce at a local flea market, she can usually be found rearranging her living room for the third time this month.
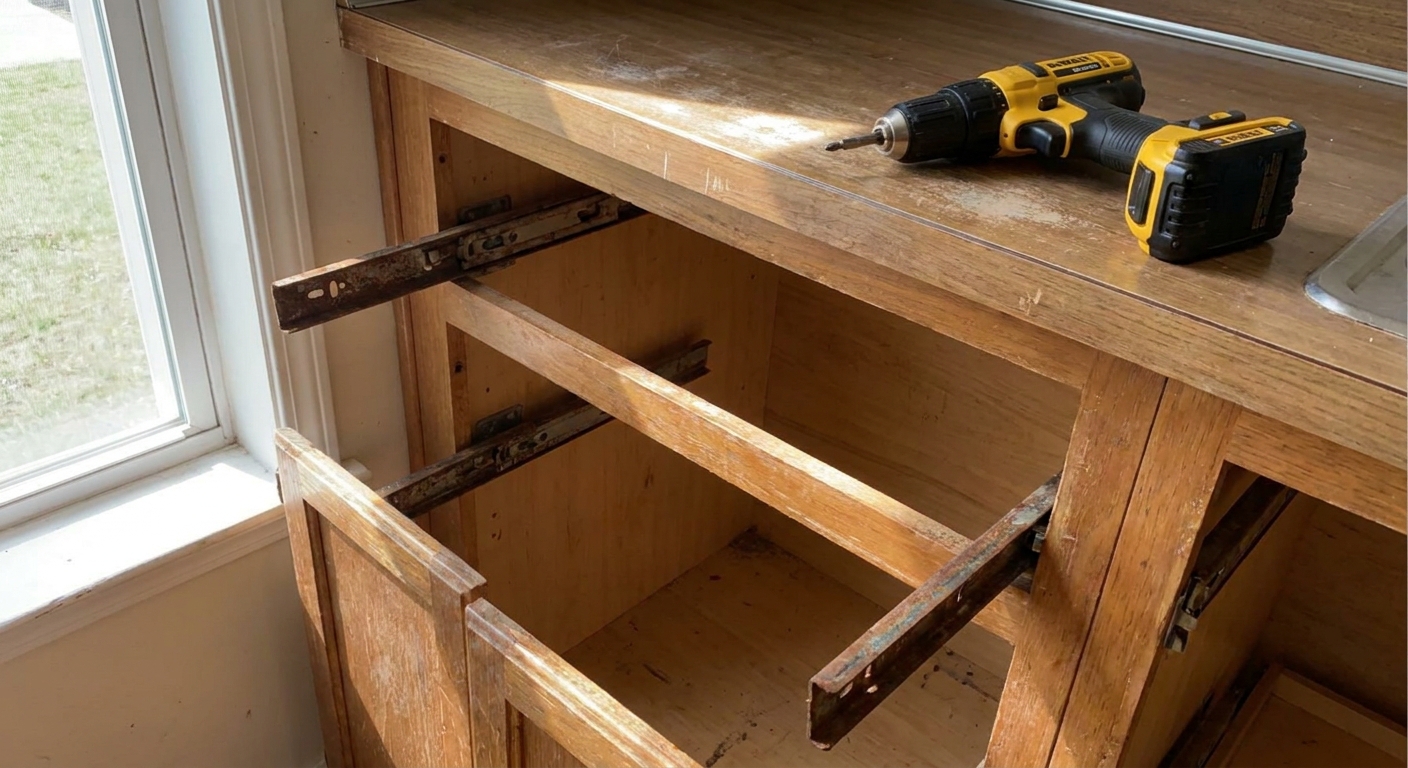
When a drawer starts drooping like it’s tired of carrying your cutlery collection, it’s usually not “the drawer being dramatic.” It’s the slides. Side-mount drawer slides wear out quietly over time: tiny bearings get rough, the thin metal rails bend, and suddenly you’re doing that little lift-and-shove move every time you close it.
The good news: replacing side-mount slides is one of those satisfyingly mechanical fixes that makes your whole cabinet feel brand new again, without changing the look of your kitchen or bath. We’re going to focus on the basics: measuring the slide length, choosing a comparable replacement, removing the old hardware without chewing up your cabinet, and testing alignment so the drawer stops sagging.
Side-mount slide basics
Side-mount slides are the most common “metal rails on both sides” setup. One part mounts to the cabinet interior, the matching part mounts to the drawer box, and they telescope together. Most are either:
- Non-soft-close ball-bearing slides (simple, sturdy, common in older cabinets)
- Soft-close side-mount slides (look similar, but have a closing mechanism that changes how they feel and sometimes how they mount)
For a straightforward swap, aim to replace like with like. If you currently have basic ball-bearing slides and you want soft-close, you can do it, but you’ll need to be more precise with clearances and alignment.
Tools and supplies
- Tape measure
- Phillips bit or screwdriver (most common), sometimes square-drive
- Drill or driver (optional but helpful)
- Small pry bar or stiff putty knife (for gentle persuasion)
- Pencil
- Level or a straight scrap of wood (for alignment checks)
- Replacement slides (a pair, left and right)
- Screws (often included with slides, but not always ideal for every cabinet material)
- Optional: wood glue and toothpicks or 1/8 inch wood dowel (to repair stripped holes)
- Optional: longer screws of the same diameter (only if safe for your cabinet thickness)
Tip from my vintage-loving heart: Put a towel down inside the cabinet and under your work area. It saves finishes from tool dings and catches runaway screws.
Screw note: Use the slide manufacturer’s recommended screw type and length when possible. Avoid drywall screws, they’re brittle and love to snap at the worst time.
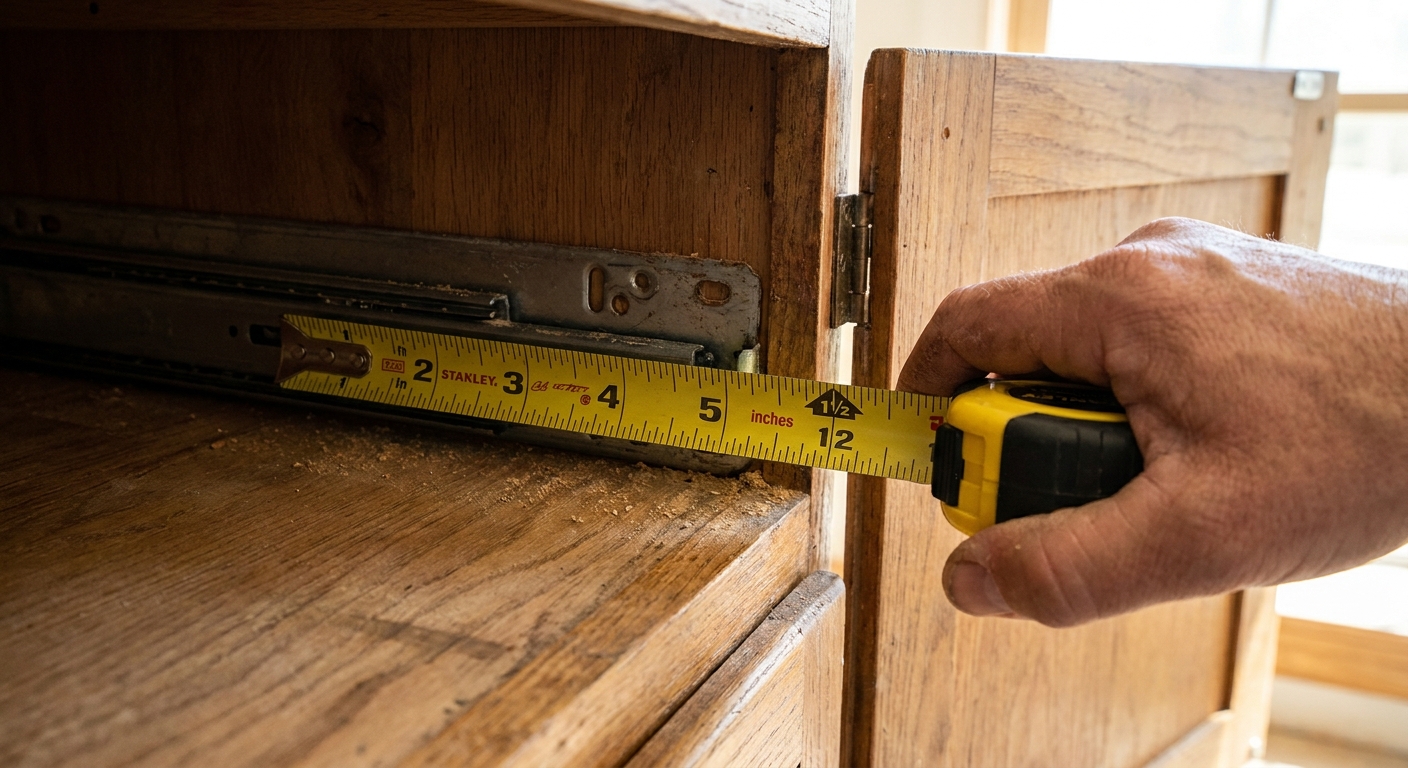
Step 1: Measure and confirm
Measure the slide length
Slide length is typically measured front to back, not including any extra face-frame brackets.
- Remove the drawer.
- Extend the cabinet-side slide fully if you can.
- Measure the metal rail from the very front edge to the very back edge.
If the slide is stuck, bent, or won’t extend smoothly, measure what you can in place, then confirm the exact length after you remove it (you can measure it on the workbench without fighting it).
Common lengths: 10, 12, 14, 16, 18, 20, 22 inches. Buy the same length whenever possible.
Check cabinet depth and drawer depth
If you can’t find an exact match, don’t size up. A slide that’s too long will hit the cabinet back and prevent full closing. If needed, size down to the nearest shorter standard length.
Confirm clearance
Most standard side-mount ball-bearing slides require about 1/2 inch clearance per side (so about 1 inch total between drawer box width and cabinet opening width), but it’s not universal. If you’re unsure, check the slide's packaging or manufacturer specs before you buy.
Step 2: Pick replacements
When you’re standing in the hardware aisle, it helps to make three decisions:
- Length: match existing length.
- Weight rating: choose equal or higher. For kitchen drawers packed with pans, 75 to 100 lb rated slides often feel noticeably more confident.
- Feature set: standard close or soft-close. Match what you have for the easiest swap.
Bring a slide with you if you can. If removing one to take to the store is too much, take clear photos of: the side profile, where screws are placed, and any brackets at the front or rear.
Face-frame vs frameless
If your cabinet has a face frame (a wood frame around the opening), the slide often can’t screw directly into the cabinet side at the front and back the same way a frameless cabinet can. Depending on cabinet construction, you’ll commonly see:
- Front brackets, face-frame mounting brackets, or spacers to bring the slide flush with the face frame
- Rear mounting brackets to support and fasten the back of the slide inside the cabinet (sometimes even when side walls exist, simply for alignment or offset)
Frameless cabinets (common in many newer builds) typically have slides mounted directly to the side walls with no extra brackets.
If you have face-frame cabinets and your existing slides use brackets, try to buy slides that are compatible with face-frame mounting, or reuse your brackets if they’re in good shape.
Step 3: Remove old slides
Remove the drawer
Most side-mount slides have a small release lever on each side. Pull the drawer fully open, press the levers (one often goes up, the other down), and lift the drawer out.
Quick check before you commit: If the drawer box is delaminating, cracked, or wildly out of square, fix that first. Fresh slides can’t outmuscle a failing drawer box for long.
Separate the parts
You will usually have:
- Cabinet member: the part still attached to the cabinet
- Drawer member: the part still attached to the drawer box
Many ball-bearing slides allow the inner drawer member to slide out completely when you press a tab.
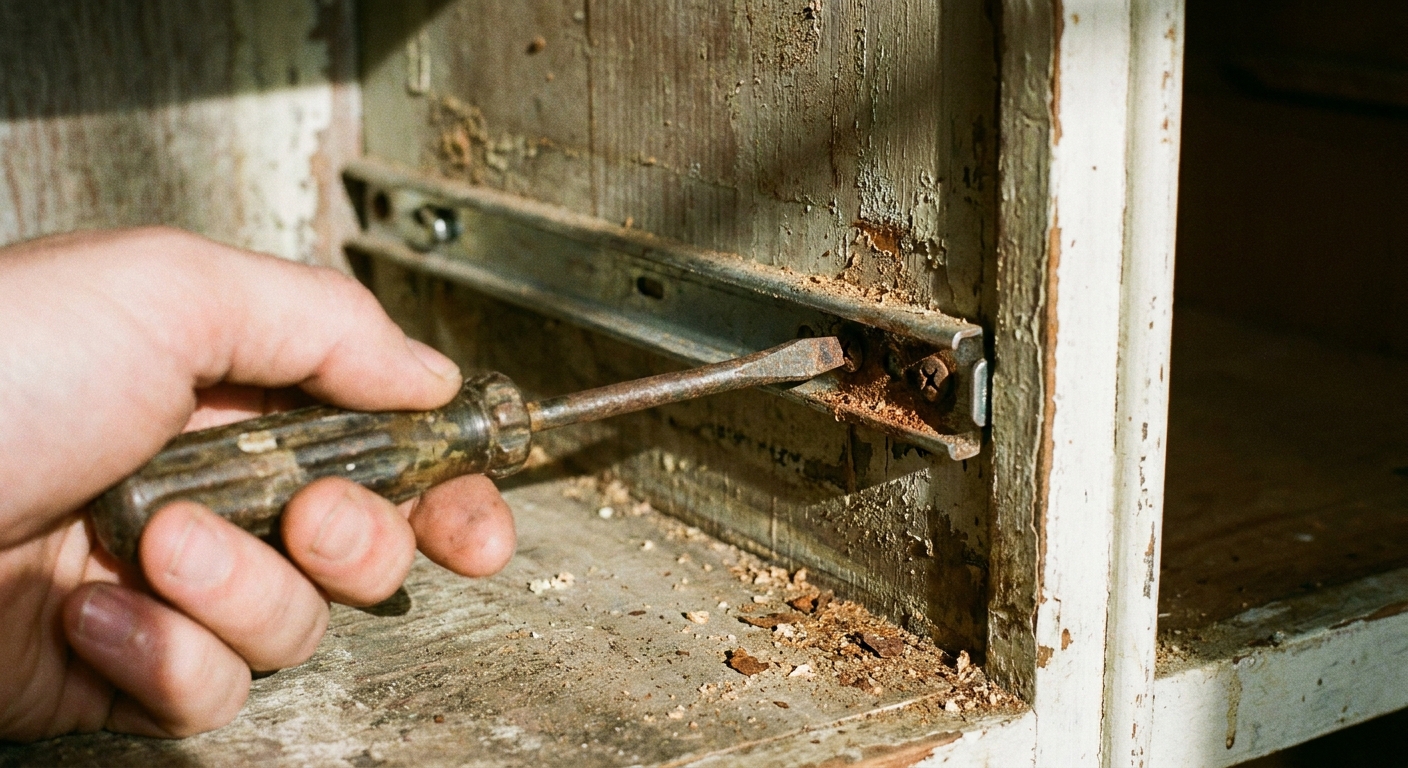
Back screws out gently
Old cabinets can have tender wood, especially in particleboard or in well-loved solid wood that’s been unscrewed a few times.
- Use firm pressure and a bit that fits the screw head snugly.
- If a screw spins but won’t come out, pull very slightly on the slide while backing it out.
- If the screw head is stripped, switch to a fresh bit or grab it with locking pliers.
Cabinet-saving move: If the slide feels stuck to paint or finish, slide a putty knife behind it and wiggle gently. You want separation, not splintering.
Step 4: Fix stripped holes
If you remove the old slide and find soft, stripped holes, don’t panic. This is extremely common, and it’s fixable in five minutes.
Toothpick and glue method
- Add a small dab of wood glue into the hole.
- Pack in toothpicks (as many as fit snugly).
- Snap them flush.
- Let it set 15 to 30 minutes if you can, then re-screw.
For bigger holes, a short piece of 1/8 inch wood dowel works beautifully. The goal is simply to give the screw fresh wood to bite into.
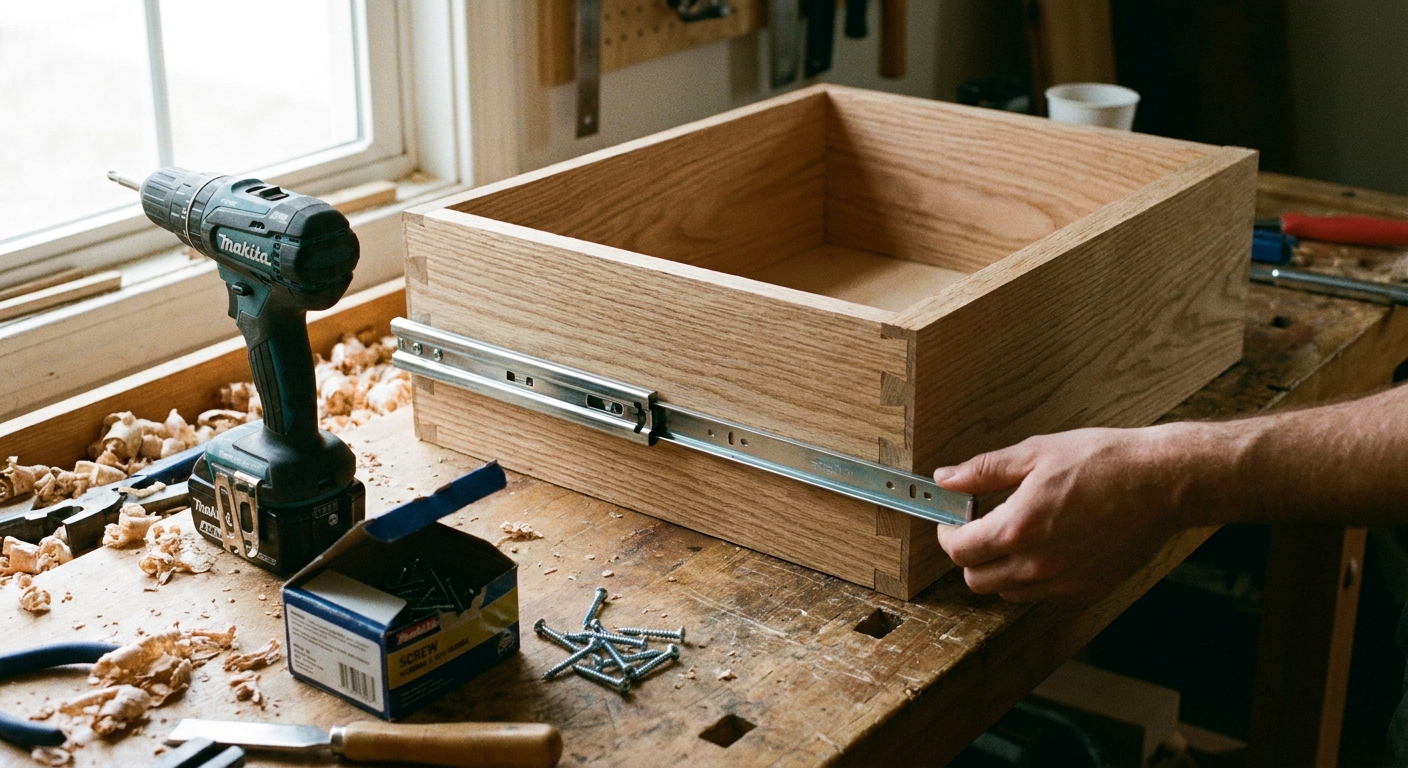
Step 5: Install new slides
Separate the new slide members first
New slides usually come nested together. Before you mount anything, extend each slide and use the release tab to remove the inner drawer member from the outer cabinet member. It’ll save you a lot of awkward drilling inside the cabinet.
Mount the cabinet members
Start with the cabinet-side pieces. If you’re reusing existing holes and the new slide matches, great. If not, use the elongated slots on the slide to give yourself wiggle room for adjustment.
- Hold the slide level and parallel to the cabinet floor.
- Install one screw near the front in an elongated slot, then one near the back.
- Don’t fully tighten until you test the drawer.
Height matters: If one slide is even a little higher, the drawer will rack and sag. Use the old screw holes as a guide if they were working well, or measure from the cabinet floor to the slide on both sides.
Mount the drawer members
Attach the drawer-side pieces to the drawer box at the same height on both sides. Most installs place the slide slightly up from the bottom edge of the drawer side, following the drawer’s existing screw pattern.
If your drawer box has old holes that are chewed up, do the toothpick trick here too. Drawers take a lot of pulling force, so you want a solid bite.
Step 6: Reinsert and adjust
This part feels like magic when it clicks in smoothly.
- Extend both cabinet slides fully.
- Line up the drawer members with the cabinet members.
- Slide the drawer in evenly until you feel it engage, then push closed.
Gentle warning: Don’t force it. If it stops hard or goes in crooked, pull it back out and realign. Forcing it can bend a slide or pop bearings loose.
What “good” feels like
- The drawer opens without lifting the front.
- It closes without a shove.
- Gaps around the drawer front look even.
- There’s no grinding, scraping, or metal clicking beyond normal slide sound.
Micro-adjust for sagging and rubbing
If the drawer still sags or rubs, you usually need a small alignment tweak:
- Drawer rubs on one side: loosen screws on the rubbing side and nudge that slide slightly outward using the elongated holes.
- Drawer face tilts or droops: check that both slides are at the same height. Raise the lower slide by shifting screws in the slots.
- Drawer won’t close fully: verify slide length isn’t too long, and make sure nothing’s blocking the back.
Once it glides well, tighten all screws fully.
Common issues
The drawer still feels sticky
- Make sure the cabinet slides are perfectly parallel. Even slight toe-in can cause resistance.
- Check for bowed cabinet sides or a drawer box that’s out of square.
- Avoid heavy grease. If needed, use a light dry lubricant made for slides, sparingly, and follow the slide maker’s guidance (some prefer no lubricant at all).
The drawer keeps dropping when open
- Confirm you installed the left slide on the left and right on the right. It sounds obvious, but it happens.
- Upgrade weight rating if the drawer is packed with heavy items.
- Check that the drawer-side member isn’t mounted too high or too low relative to the cabinet member.
Screws won’t tighten
- Repair the holes with toothpicks and glue.
- Use the same screw diameter. Going thicker can split older wood and going longer can poke through a cabinet side.
Finishing touches
Once your drawer runs smoothly, take two extra minutes to make the whole moment feel finished:
- Vacuum crumbs and dust from the cabinet base and corners.
- Wipe the drawer sides and the slide area with a damp cloth, then dry.
- If your drawer front sits slightly off, adjust the front screws or hardware so it looks intentional and tidy.
There’s something deeply comforting about a drawer that closes with a confident, quiet glide. It’s a tiny daily luxury that has nothing to do with price tags and everything to do with a home that works with you.
When to call for help
If you discover cracked drawer boxes, severely racked cabinet openings, or water-damaged particleboard that crumbles when you touch it, a slide swap might not hold for long. In those cases, it’s worth repairing the drawer box or adding reinforcement before installing fresh hardware.
But for everyday sagging and rough movement, new side-mount slides are often the cleanest fix you can make in an afternoon.