Renter-Friendly Peel-and-Stick Backsplash Ideas That Look Custom
Clara Townsend
Clara Townsend is an interior stylist, vintage furniture enthusiast, and the creative voice behind Velvet Abode. With over a decade of experience transforming both cramped city apartments and sprawling fixer-uppers, she believes that a beautiful home is built on personal stories rather than massive budgets. When she isn't hunting for the perfect brass sconce at a local flea market, she can usually be found rearranging her living room for the third time this month.
If your kitchen is doing that classic rental thing where the walls are beige, the lighting is aggressive, and the “backsplash” is simply… paint, I have good news. A peel-and-stick backsplash can often give you that finished, built-in look in an afternoon (or a day, depending on square footage, outlet density, and how much prep your walls need) without committing to grout haze, tile saw drama, or awkward landlord conversations.
The secret to making it look custom is not just picking a pretty pattern. It is prep, layout, a few tiny finishing moves, and knowing where peel-and-stick is a yes (behind the sink) and where it needs extra caution (behind the stove).
What makes it look expensive
Before we talk patterns, here are the visual cues that make renters’ backsplashes read “made-for-this-kitchen” instead of “temporary sticker.”
- Intentional stopping points: End at a cabinet line, at a corner, or at the edge of a window trim instead of stopping randomly mid-wall.
- Thin, clean edges: A neat top edge and tidy outlet cuts instantly elevate the whole thing.
- Consistent spacing and alignment: Even “random” patterns like stone need a level baseline so your eye trusts it.
- Lighting that flatters: Under-cabinet lights or a warm bulb make faux materials look more like the real deal.
- A realistic scale: Tiny “subway tiles” printed on a sheet can look toy-like. Look for sizes similar to real tile: 2x6 subway, 2-inch hex, 3x12 zellige, etc.
Materials that look custom
Not all peel-and-stick is created equal. The best choice depends on your wall texture, how much moisture your kitchen gets, and the look you are after.
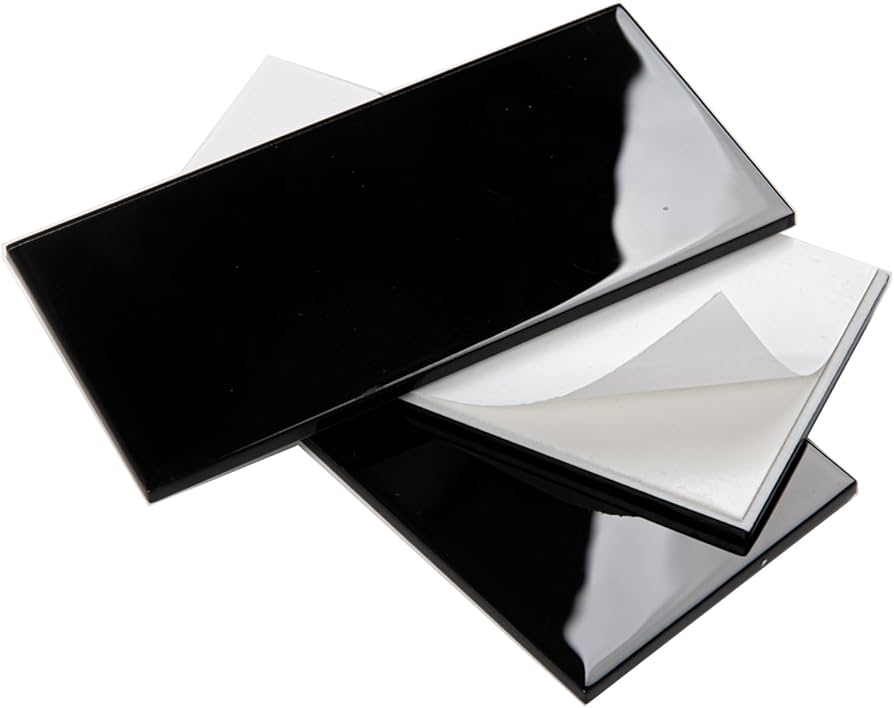
1) Tile-look vinyl sheets (budget-friendly and easy)
These are lightweight sheets or panels with printed tile patterns and a slightly raised texture. They are the easiest to cut and the most forgiving for beginners.
- Best for: Small kitchens, first-time DIYers, and low-stakes makeovers.
- Looks most built-in when: You choose a matte finish and a pattern with subtle variation (not a super glossy, repetitive print).
- My styling tip: Pair with one “real” tactile element nearby, like a linen café curtain or a vintage wood cutting board, so the wall does not have to do all the heavy lifting.
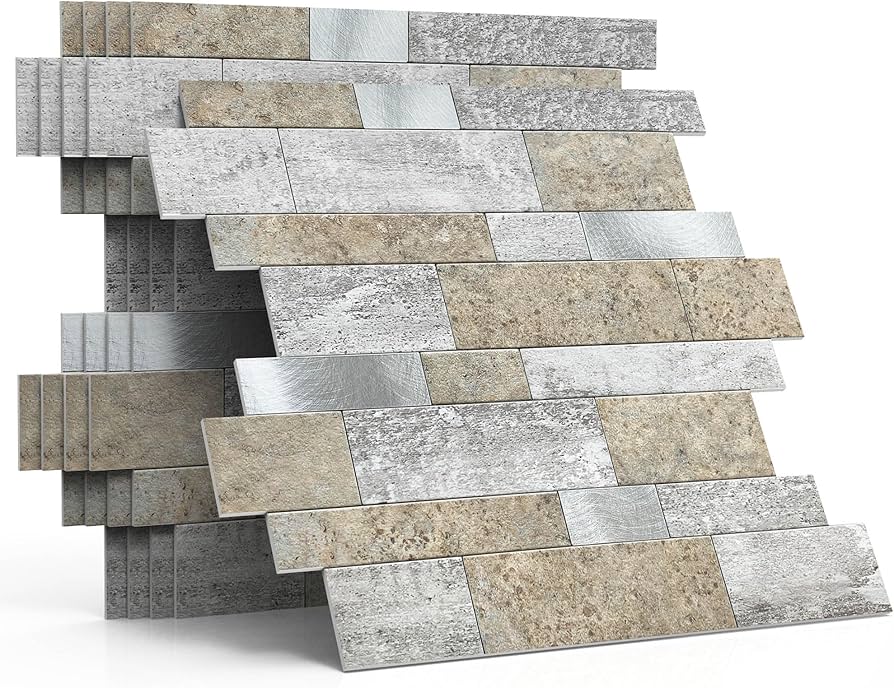
2) Peel-and-stick PVC or PU tile panels (more depth, more realism)
These are thicker than vinyl sheets and often have a 3D profile that mimics individual tiles. They can look surprisingly convincing from a normal standing distance.
- Best for: When you want shadow lines and dimension, especially in all-white kitchens that need texture.
- Watch for: Overly chunky edges. If the tile profile is very thick, it can look less like a backsplash and more like a wall panel.
- Where it shines: Classic subway tile, elongated subway, and scallop patterns.
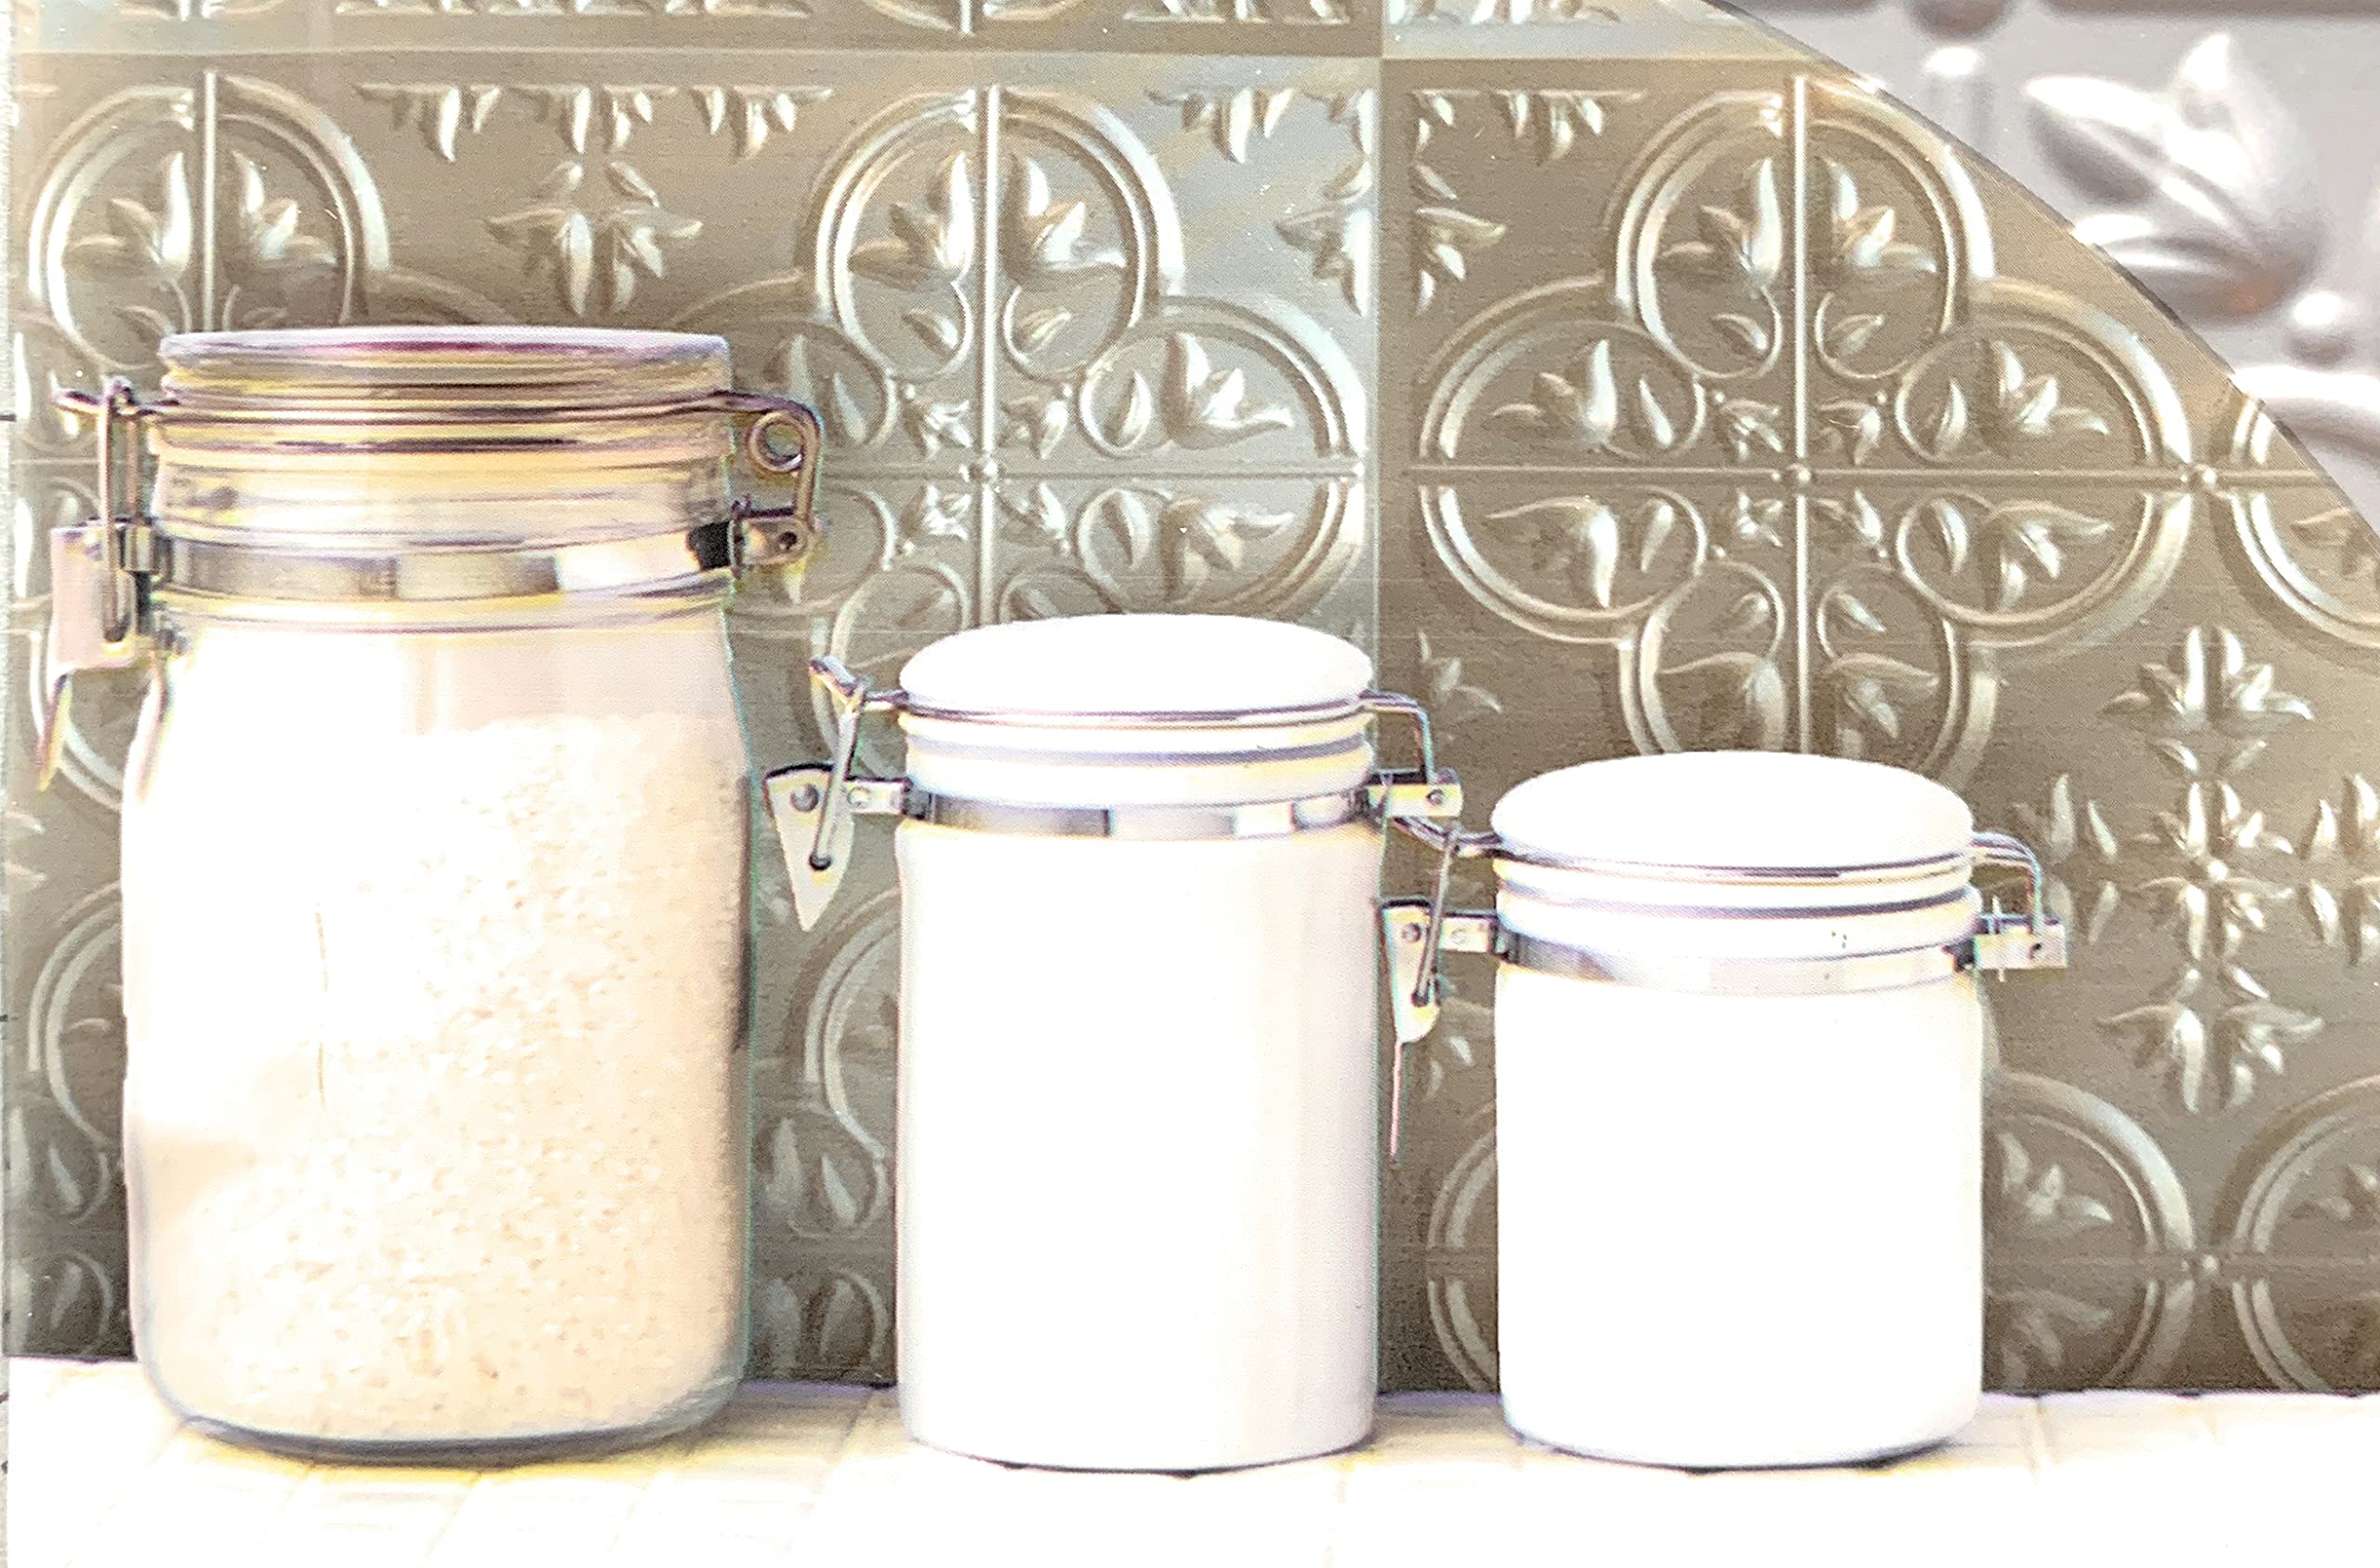
3) Peel-and-stick metal (instant vintage charm)
If you love that old-school tin backsplash look, peel-and-stick metal tiles or faux tin panels can be magical. They bounce light around in a cozy way and feel intentionally decorative.
- Best for: Vintage-leaning kitchens, coffee stations, or a bar nook.
- Looks most custom when: You keep it to a defined zone, like from counter to upper cabinets only, and you add a simple trim edge.
- Watch for: Sharp edges on cut pieces. File lightly if needed, and always keep cuts clean around outlets.
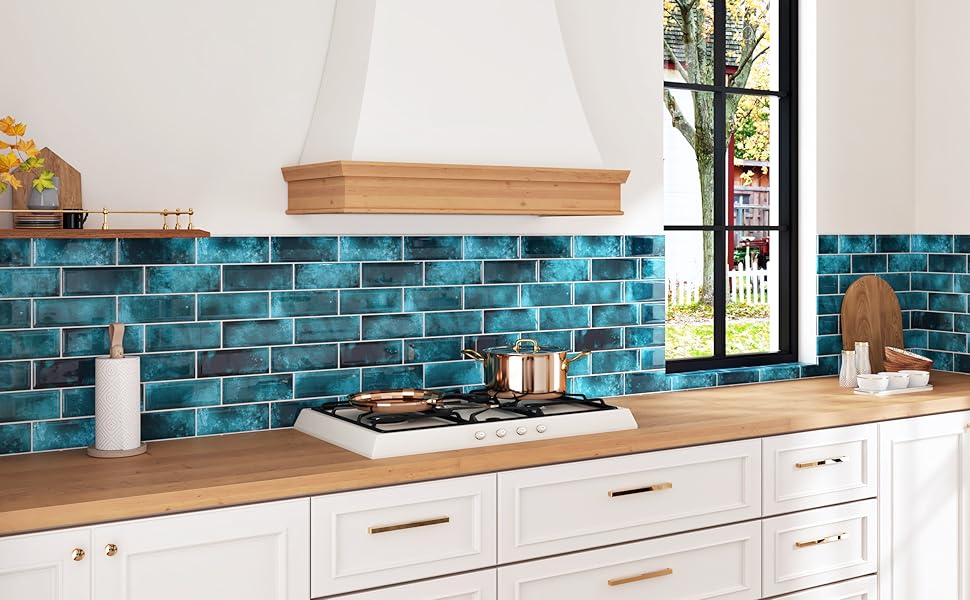
4) Peel-and-stick glass or glass-look tiles (clean and light-bouncing)
Some brands offer real glass mosaics with pressure-sensitive adhesive, but availability varies. More commonly, you will see “glass look” acrylic. Either way, glossy finishes reflect light and can make a darker rental kitchen feel brighter.
- Best for: Modern kitchens, minimal spaces, and areas that need brightness.
- Looks most custom when: You pick a slightly imperfect finish (think soft, watery glass) rather than a mirror-like shine.
- Watch for: Wall texture. Glossy surfaces highlight bumps and unevenness.
5) Faux stone, terrazzo, or slab-look panels (seam-conscious but stunning)
Large-format peel-and-stick panels that mimic marble, soapstone, or terrazzo can look incredibly high-end when installed thoughtfully. The key is to plan seams so they land where the eye expects a break.
- Best for: A modern, “one continuous surface” look.
- Looks most custom when: Seams align with the edges of cabinets, a corner, or a change in depth, and the pattern is not obviously repeating.
- Watch for: Busy veining. If the print is too dramatic, seams become more visible.
Before you buy
Five minutes of checking now can save you hours of re-sticking later.
- Wall finish: Peel-and-stick loves smooth, clean, fully cured paint. “Fully cured” varies by paint type, but 2 to 4 weeks is a common window. Also, glossy and semi-gloss paint can bond differently than flat, and some manufacturers recommend a light scuff-sand for grip.
- Surface type: Peel-and-stick often fails on heavy orange-peel texture, raw plaster, brick, porous surfaces, or anything dusty and chalky.
- Moisture: If your backsplash area gets splashed daily, choose a water-resistant product and seal edges well.
- Heat: Behind a stove is the trickiest zone. Many peel-and-stick products are not rated for high heat or direct flame exposure.
- Lease rules: Some leases allow temporary adhesive decor, others forbid it. When in doubt, choose a method that is easily reversible and photograph the wall before you begin.
If your walls are textured
If your rental has texture that will not play nice, you have a renter workaround: install peel-and-stick on a removable backer panel (thin MDF, acrylic, or PVC sheet) cut to fit the backsplash area, then mount the panel with a damage-minimizing method you are comfortable with and your lease allows. The goal is a smooth surface you can take with you later.
Plan and measure
This is the unglamorous part that saves you from the “I ran out mid-row” spiral.
- Measure square footage: Width times height for each section, then add them up.
- Buy extra: Plan for 10 to 15% overage for cuts, pattern matching, and oops moments. Add a little more if you have lots of outlets.
- Read reviews like a detective: Look for notes on edge lifting, adhesive strength, and how it handled behind a sink.
- Check the fine print: Moisture rating, heat rating, and any clearance guidance for ranges.
Prep that makes it stick
I know prep is the boring part, but it is also the difference between “wow, that looks like tile” and “why is it curling like a sad leaf.”
Step-by-step prep
- Degrease: Kitchens collect invisible cooking residue. Clean with a degreasing cleaner, then wipe with warm water. If your wall has years of cooking film (especially near the stove), a TSP substitute can help. Follow label instructions and rinse well.
- Final wipe: Wipe the wall with isopropyl alcohol on a microfiber cloth to remove remaining oils. Let it fully dry.
- Patch and sand: Fill nail holes and bumps. Lightly sand until smooth, then wipe away dust.
- Let fresh paint cure: If you just painted, wait. Many paint brands recommend a full cure time that can be several weeks. Adhesives can bond oddly to uncured paint.
- Optional but helpful: Test a single tile or small patch behind an appliance for 48 to 72 hours before committing.
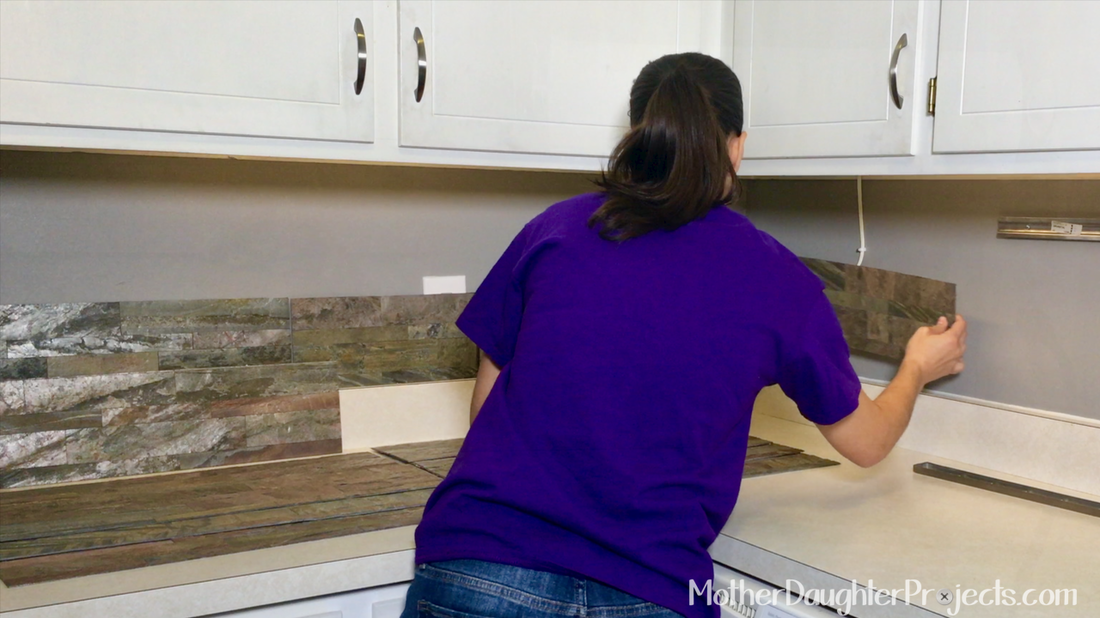
Layout that looks intentional
Here is the easiest way to make your backsplash look designed, not improvised.
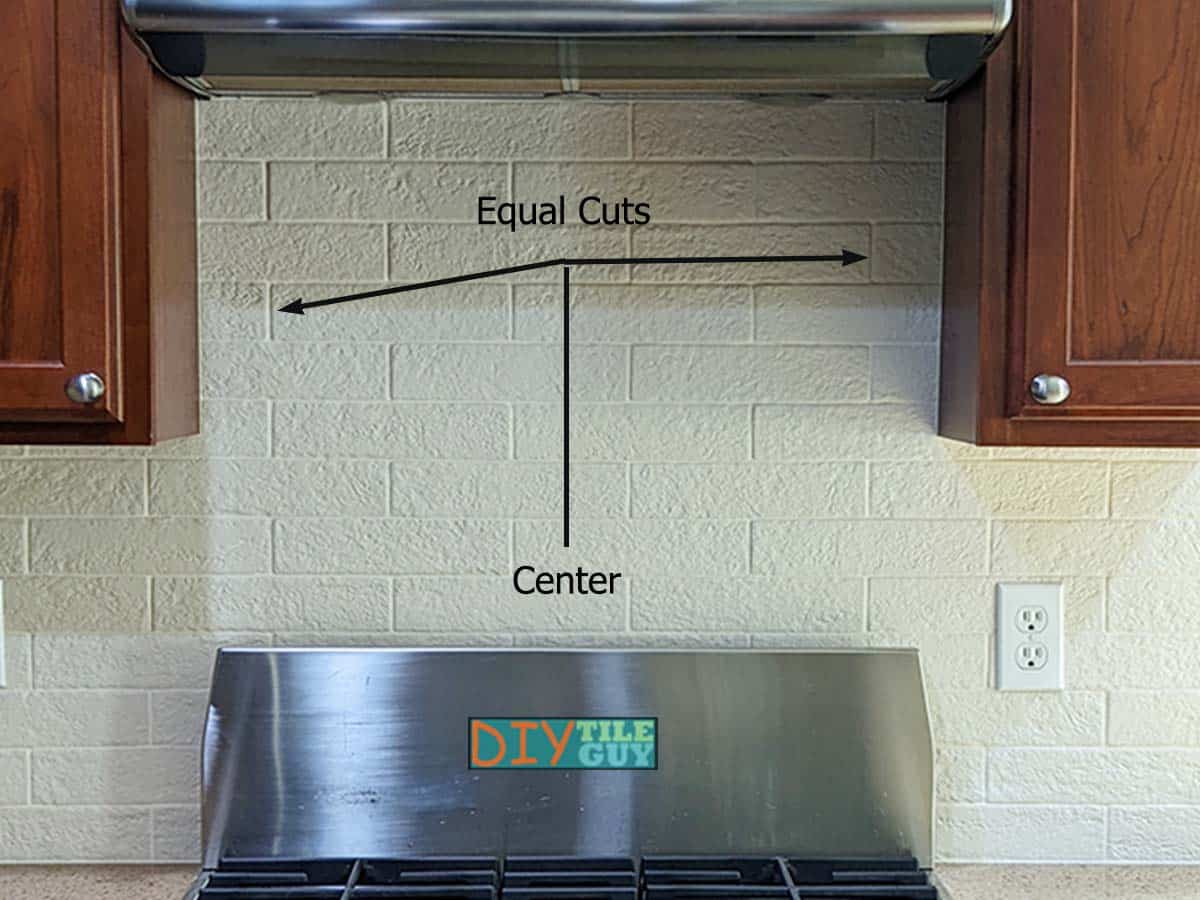
Pick your focal point
Choose the spot your eye naturally lands first. Usually that is behind the sink or the range. Center your pattern there so cuts get pushed to less noticeable edges.
Start with a level baseline
Countertops in rentals are often not perfectly level. Instead of following the counter, use a level to draw a guideline one tile height above it. Your first row follows the line, not the counter. That tiny choice makes everything above it look straight.
Dry-fit first
Hold up a few sheets to see where seams will land, how the pattern repeats, and whether you are about to end up with a one-inch sliver of tile at the end. Adjust now while it is free.
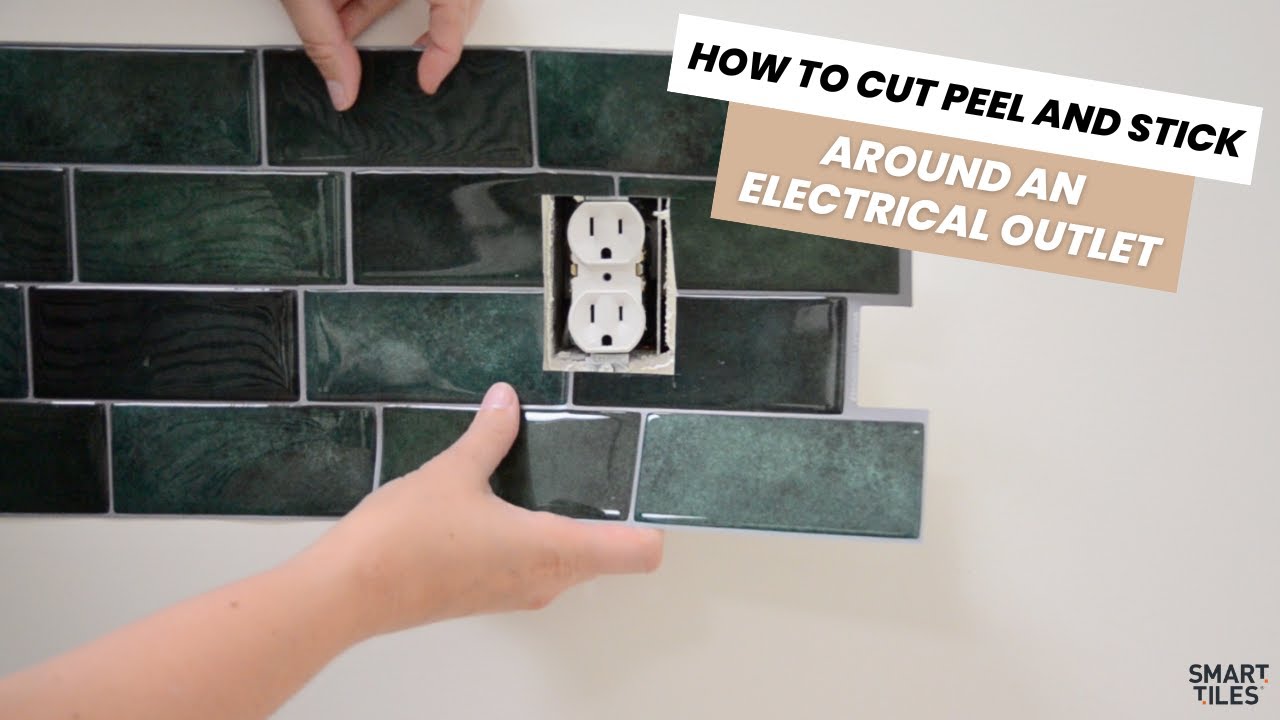
Outlets and switches
Outlets are where most peel-and-stick backsplashes give themselves away. The goal is snug cuts that sit under the outlet cover plate.
What you need
- Utility knife with fresh blades
- Metal ruler or straightedge
- Cutting mat or scrap cardboard
- Pencil
- Small screwdriver
How to do it
- Turn power off at the breaker if you will remove outlet covers and work close to wiring.
- Remove the cover plate and set screws aside.
- Measure from a fixed point like the edge of a cabinet to the outlet opening. Transfer those measurements to your tile sheet.
- Cut slightly small and test-fit. You can always shave off more. Overcutting is harder to hide.
- Reinstall the cover plate after the tile is up.
Pro move: If your new backsplash adds thickness, your outlet cover may not sit flush. Outlet spacers and longer screws can help. In some places, adjusting how an outlet sits (or doing anything inside an electrical box) can require a licensed electrician. If you are not comfortable, call a pro. Safety first, pretty second.
Behind the stove
This is where I will be very honest: many peel-and-stick backsplashes are not designed to live directly behind a high-heat cooking surface. Adhesive can soften, tiles can warp, and edges can lift over time.
What is actually safe
- Follow the product’s heat rating and clearance rules: Many brands specify that the product should not be installed within a certain distance of a gas burner or direct heat source. Follow manufacturer guidance, not vibes.
- Use a dedicated heat shield: A stainless steel or tempered glass range backsplash panel can sit behind the stove, and you can use peel-and-stick on the surrounding areas.
- Create a framed layout: Do peel-and-stick on the left and right runs, and keep the area directly behind the burners protected and minimal.
If you are set on peel-and-stick near heat
- Keep a small gap between product and the hottest zone if possible.
- Seal edges carefully so steam and grease cannot work underneath.
- Be realistic about lifespan. Near heat, you may be signing up for touch-ups.
Finishing touches
These are the little details I reach for when I want a rental upgrade to read as “permanent” even when it is not.
Trim the edges
Some peel-and-stick systems sell matching edge trim. If not, a simple metal tile edge strip can create a clean border at the end of a run. It is the equivalent of hemming pants.
Seal only where needed
In splash-prone areas, a very thin bead of clear caulk along the bottom edge (where tile meets countertop) can keep water from sneaking behind. Tiny caveat: even “removable” or “tenant-friendly” caulk is not risk-free and can still pull paint or leave residue. Use the minimum amount, and test in an inconspicuous spot first.
Style the counter like you mean it
A backsplash looks more custom when it is paired with a few intentional items. Think one warm wood cutting board, one ceramic crock, and one small lamp with an amber bulb. It is less about filling space and more about giving the eye a little story.
Cleaning and maintenance
Peel-and-stick is low-maintenance, not no-maintenance. Treat the edges kindly and it will look good longer.
- Clean gently: Use a soft cloth or sponge with mild soap. Avoid abrasive scrubbers that can catch edges.
- Do not soak seams: Wipe splashes promptly, especially around the sink and along the countertop line.
- Watch corners: If a corner starts to lift, press it back down before water and grease get underneath. Follow the manufacturer’s guidance for touch-ups (some allow extra adhesive, some do not).
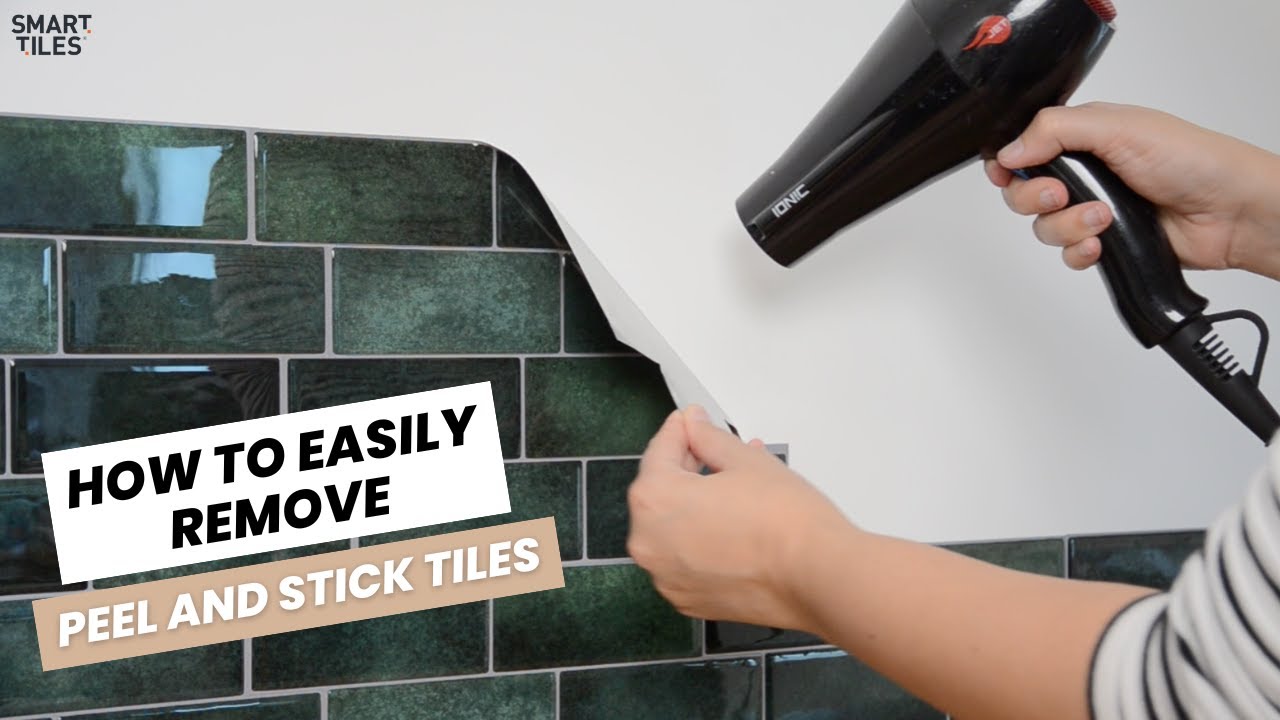
Removal at move-out
The best peel-and-stick removal is slow, warm, and patient. Think of it like peeling a label off a thrifted vase.
Step-by-step removal
- Warm the adhesive: Use a hair dryer on low to medium heat, moving it constantly. Warm tiles release more cleanly.
- Peel at a low angle: Pull back slowly, keeping the tile close to the wall as you peel. This reduces paint lift.
- Remove residue gently: Use an adhesive remover that is paint-safe, or try warm soapy water first if residue is light. Test in a hidden spot.
- Patch and touch up: Fill small imperfections and touch up paint to match. Keep a little labeled paint sample if you can.
If paint starts lifting
Stop and add more heat. In some cases, a plastic putty knife can help support the paint layer as you peel. If your wall was already poorly painted or not fully cured when installed, lifting can happen, so plan extra time for light patching.
Quick style ideas
- Vintage-soft: Cream subway with a slightly uneven edge look, plus aged brass hardware and a warm bulb.
- Moody modern: Matte charcoal brick pattern with black outlets and a simple oak shelf.
- Paris café: White square tiles with dark grout look, paired with a tiny sconce-style plug-in light.
- Coastal calm: Soft blue glass-look tile, pale wood accessories, and linen curtains.
- Maximalist happy: A geometric pattern used only behind the sink as an accent panel with clean edges.
My last word
Renting does not mean your kitchen has to feel like a placeholder. A backsplash is one of those upgrades that changes how you experience the room daily, especially in the evening when the lights are low and you are making tea in your slippers.
If you want the most built-in look with the least stress, choose a higher-quality, thicker tile option, prep like you are prepping for a gallery wall, and take your time around outlets. Your future self, and your security deposit, will thank you.