Mold or Mildew on an Area Rug After a Spill
Clara Townsend
Clara Townsend is an interior stylist, vintage furniture enthusiast, and the creative voice behind Velvet Abode. With over a decade of experience transforming both cramped city apartments and sprawling fixer-uppers, she believes that a beautiful home is built on personal stories rather than massive budgets. When she isn't hunting for the perfect brass sconce at a local flea market, she can usually be found rearranging her living room for the third time this month.
Mildew on a rug after a spill can feel like a personal betrayal, especially when you did everything “right” and still ended up with faint speckling or that musty whiff. The good news is you can often handle early, small growth safely at home if you follow one big rule: dry first, then clean. If you scrub a damp rug, you are basically giving spores a spa day.
This is my calm, step-by-step way to deal with visible mold or mildew on an area rug, plus how to check the pad and backing (the sneaky spots), which products are safest by rug material, and when it is time to stop and bring in pros.
First: mold or mildew?
In everyday life, people often call the lighter, surface-level growth “mildew.” Technically, mildew is still mold. Either way, treat it seriously and focus on what matters: drying fast, removing residue/spores safely, and fixing whatever stayed damp underneath.
- Common signs: powdery or fuzzy spots (white, gray, pale green), plus a musty smell.
- Possible deeper issue signs: darker staining, persistent odor after drying, growth on the underside or pad, or spots that return quickly.
If you are immunocompromised, have asthma, or get strong symptoms around it, jump down to the health stop signs section and consider professional help immediately.
Before you touch it
What to wear and what to avoid
- Wear: disposable gloves, an N95 or KN95 mask, and eye protection if you are sensitive.
- Avoid: mixing chemicals (especially bleach with ammonia). Also avoid doing multiple “chemical rounds” back to back, like vinegar then hydrogen peroxide, in the same session. Rinse, dry, and keep it simple.
- Keep kids and pets out of the room until the rug and floor are fully dry and odor-free.
Ventilation matters more than you think
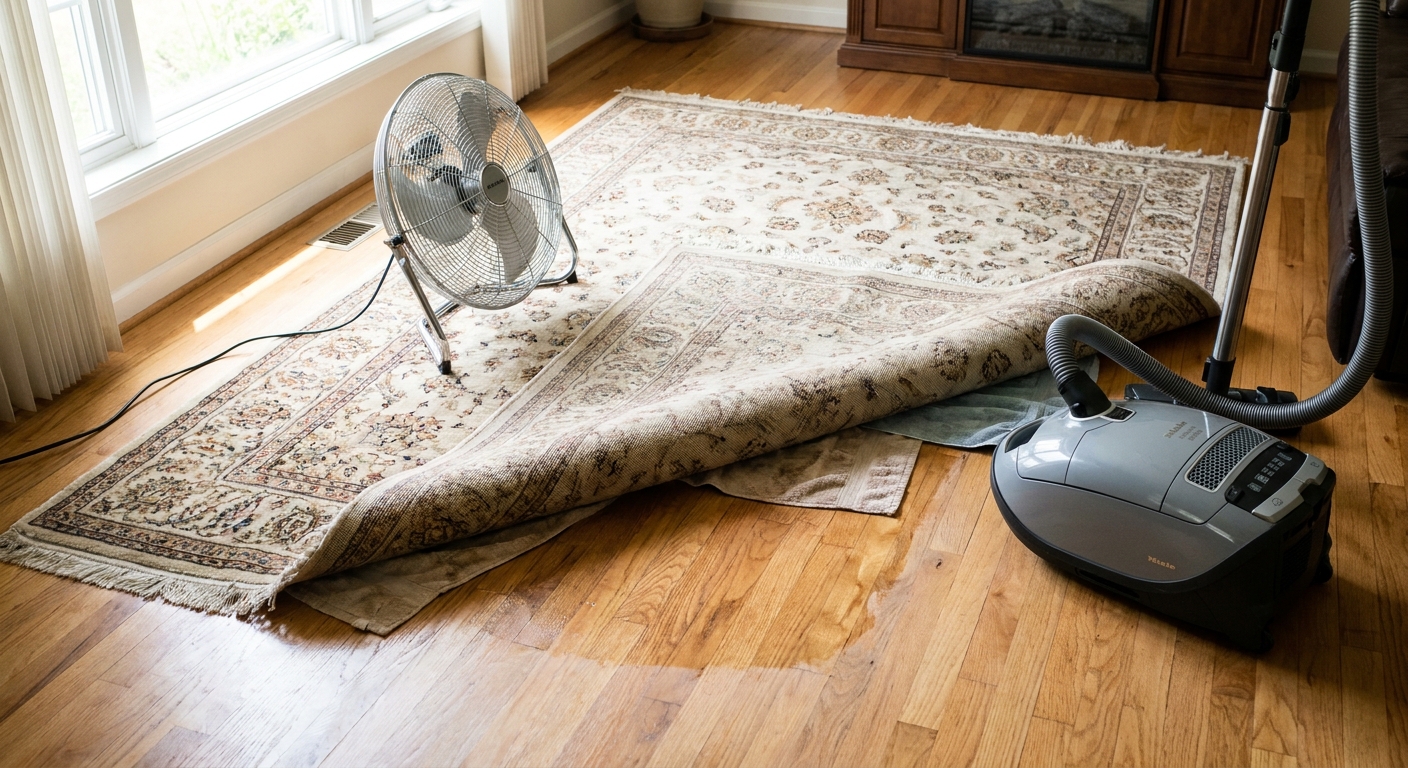
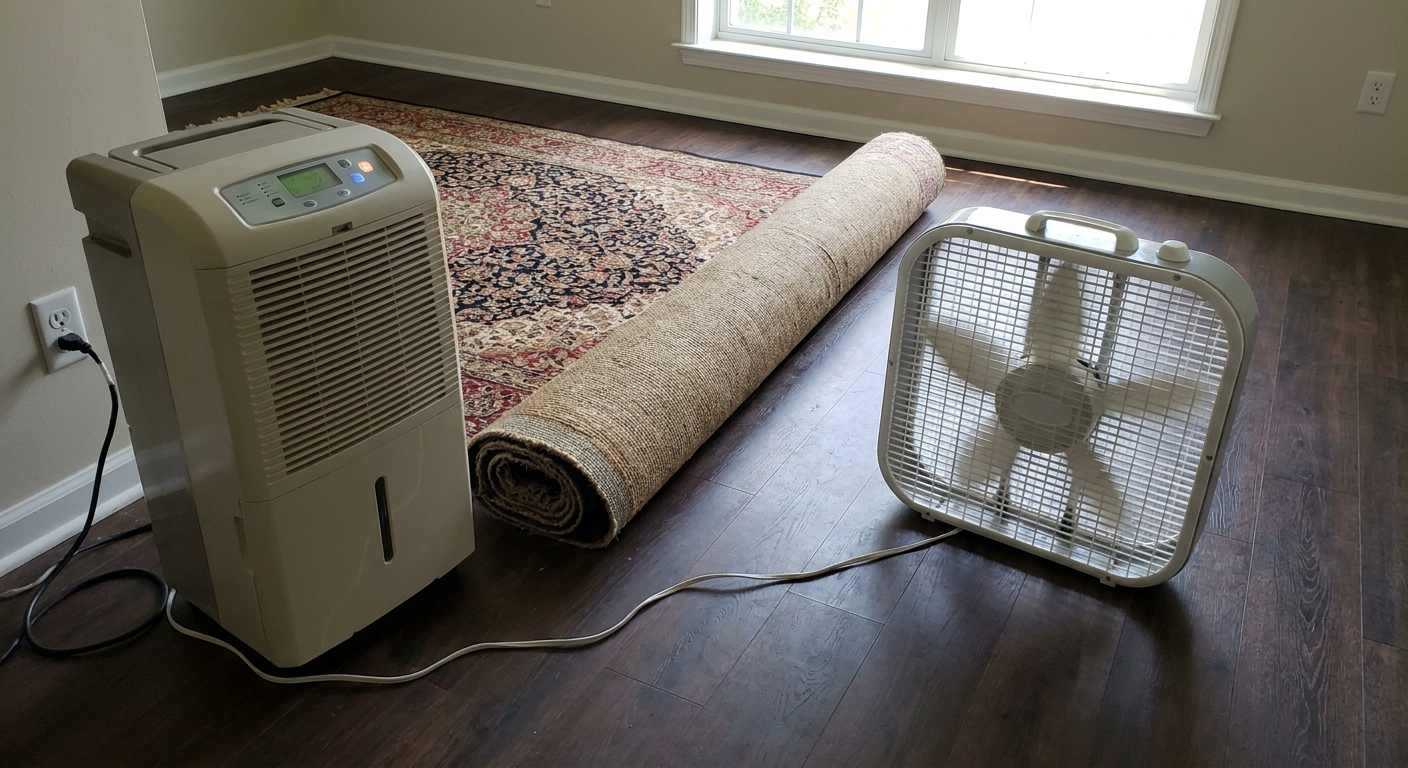
Open windows if outdoor humidity is reasonable, run an exhaust fan if the rug is near a kitchen or bath, and set up a fan to move air across the rug surface. If you have a dehumidifier, this is its moment.
Clean up after (quick but important)
- Seal used paper towels, disposable gloves, and gunk in a trash bag.
- Launder washable towels on hot if the fabric allows, and dry fully.
- Wash hands and consider changing clothes if you were leaning over the rug for a while.
Dry-first rules
Here is the order that prevents a small problem from becoming a bigger project.
- Stop the moisture source. Blot spills and remove any wet pad sections if they are saturated.
- Lift the rug. If it is safe to move, pull the rug off the floor and drape it over sturdy chairs or a railing so air can reach both sides. If it is too large, fold back half at a time.
- Wick moisture temporarily. Slide clean, dry towels under the damp area to pull moisture out, then swap them out often. Do not leave wet towels sitting there to trap moisture.
- Use airflow and drying tools. Fan plus dehumidifier is ideal. A hair dryer can help in small zones, but keep it moving and not too hot, especially on wool.
- Do not cover it. No plastic, no rugs-on-top, no “I will deal with it tomorrow.”
Guideline: try to get the rug dry to the touch (not cool-damp) within about 24 to 48 hours. That window is a common rule of thumb in public-health guidance (EPA and similar sources) for preventing mold from taking hold. If it cannot dry in that time, that is a big indicator to call a pro.
HEPA vacuum order
Once the rug is fully dry, you can remove powdery residue and spores without smearing anything deeper.
Important note before vacuuming
Vacuuming can kick particles into the air. If you have one, use a sealed, true HEPA vacuum system. If you do not, avoid aggressive vacuuming (especially with a beater bar) and consider professional help, particularly if the area is large or you have symptoms.
Step-by-step vacuum sequence
- Take it outside if you can. Vacuuming outdoors reduces what stays in your home air. If you cannot, ventilate well.
- Vacuum the top first. Go slow. For delicate rugs, use a soft brush upholstery attachment or turn off the beater bar if possible.
- Flip and vacuum the underside. This is where spores love to linger.
- Vacuum the floor area. Especially the perimeter where the rug was sitting.
- Only then move on to any light misting or spot cleaning.
Important: Empty the vacuum canister outdoors, or seal and discard the bag. Wipe down the vacuum exterior afterward. You are not being dramatic, you are being tidy.
Pick a safer approach by fiber
You want something that discourages growth and helps with odor without stripping dye, roughing fibers, or breaking down backing. Start with the gentlest option and test in a hidden corner first. Always.
Wool (and most hand-knotted vintage rugs)
Wool is naturally resilient, but it hates harsh alkalines and heavy saturation. Keep cleaning controlled and minimal.
- Best first line: a light mist of white vinegar diluted 1:1 with water, then blot. On textiles, vinegar is not a guaranteed mold “killer,” but it can help reduce odor and some surface growth. Drying and removal do the heavy lifting.
- Odor and moisture control: baking soda sprinkled lightly after the area is dry. Let it sit 4 to 12 hours, then HEPA vacuum.
- If you need a product: choose a wool-safe carpet/rug cleaner or a product specifically labeled for mold or mildew use on carpets or fabrics (follow label instructions and contact time).
Avoid on wool: chlorine bleach, high-pH cleaners, and over-wetting. Also avoid heavy scrubbing that can felt fibers.
Synthetics (polypropylene, nylon, polyester)
Synthetics tolerate more, but the pad and backing still matter.
- Best first line: white vinegar diluted 1:1, blot and dry thoroughly.
- For visible spotting on some synthetics: 3% hydrogen peroxide can help, but it can lighten dyes. Spot test and keep it local. Do not mix peroxide with vinegar or bleach, and rinse or blot with plain water after if the label recommends it.
- If you need a product: an EPA-registered antimicrobial that is explicitly labeled for porous surfaces like carpet or fabric. Follow dwell time, ventilation, and safety directions exactly.
Note: If the spill reached the pad, cleaning only the top rarely solves the smell. You will need to address the pad and the floor below.
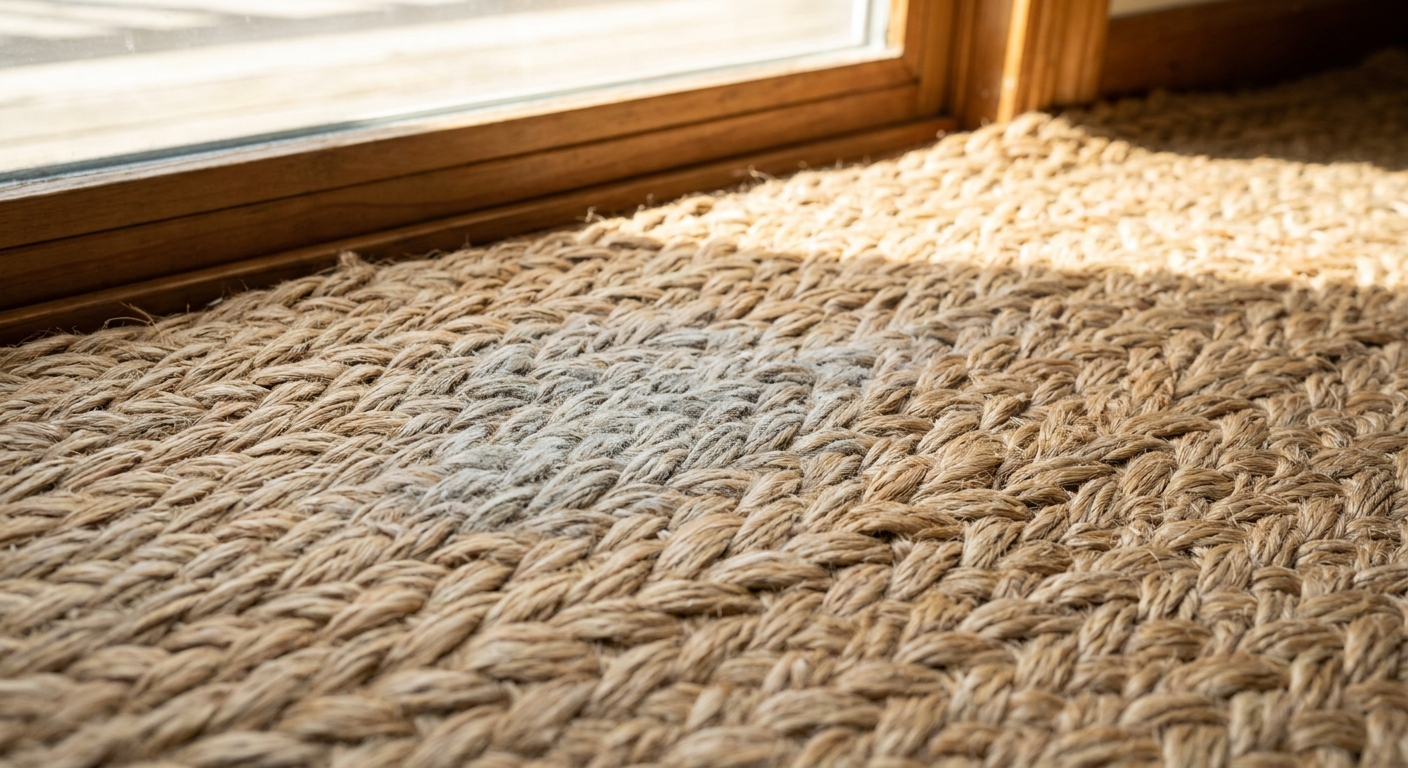
Jute, sisal, seagrass (natural woven rugs)
These are the “beautiful but moody” rugs. They stain easily, can shrink, and can hold odors if over-wet. Your mission is dry removal as much as possible.
- Best first line: dry completely, then HEPA vacuum thoroughly.
- Spot option: a very light vinegar-and-water mist can be used, but keep it minimal and blot immediately. Too much moisture can create tide marks and warping.
- Odor help: baking soda can help, but do not grind it in. Sprinkle, wait, vacuum.
If growth spread on jute: professional help often beats DIY. Natural woven rugs do not forgive repeated wet cleaning.
Silk, viscose, rayon (including “art silk”)
These fibers can water-stain, lose sheen, and shift color easily. If you see growth or a persistent odor, lean professional sooner, especially for large areas. If you do anything at home, keep it to drying, gentle vacuuming with an attachment, and minimal moisture after a careful color test.
Shag, tufted, and high-pile rugs
These trap moisture deep. If the spill soaked in or the rug stayed damp for a day, extraction and controlled drying are often the difference between “fine” and “musty forever.” Consider professional cleaning if the odor persists after drying.
Color test first
Before you use anything beyond plain water, do a quick colorfastness test:
- Pick a hidden spot (corner or under furniture).
- Dab a tiny amount of your diluted solution with a white cloth or cotton swab.
- Wait 5 to 10 minutes, then blot with a clean white cloth.
- If you see dye transfer, lightening, or a tide mark, stop and switch to a gentler method or call a pro.
Cleaning method
After you have vacuumed and chosen a fiber-safe option, use this simple technique.
- Lightly mist, do not pour. “Light mist” means barely damp, not wet enough to soak through to the pad.
- Blot with clean white towels. Press down, lift, rotate to a clean spot. Repeat.
- Rinse lightly if needed. If you used a cleaner that needs removing, mist with plain water and blot. Again, minimal moisture.
- Dry fast. Fans, airflow, and dehumidifier until fully dry on both sides.
If the stain is gone but the smell remains, that is usually a pad or backing issue, not a “spray more vinegar” issue.
Do not skip this
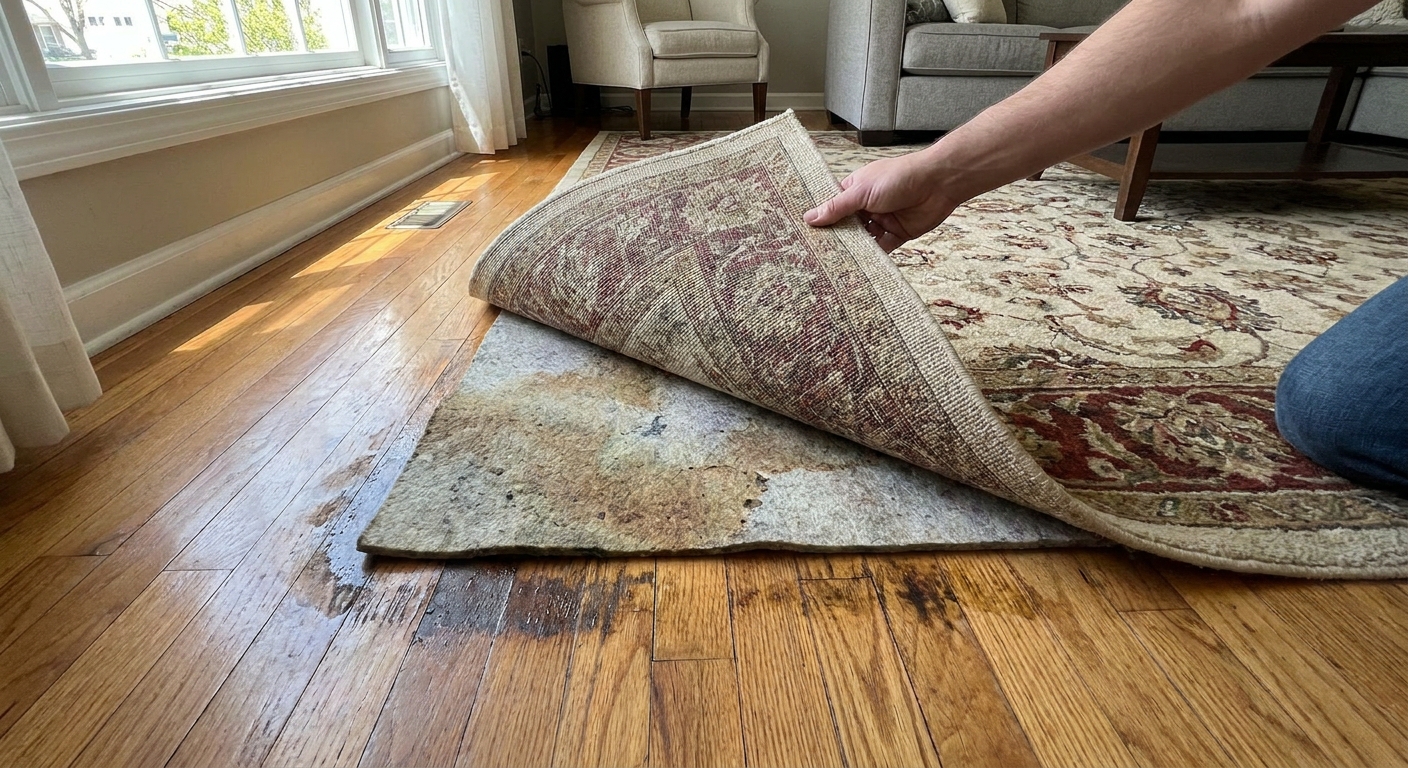
The rug surface is the part you see. The real trouble loves to live underneath.
Check the backing
- Flip the rug and look for dark spotting, sticky residue, or powdery film.
- Smell the underside. If the odor is stronger underneath, treat that area carefully and dry thoroughly.
Check the rug pad
- Foam or felt pads can hold moisture for days. If the pad got wet and smells musty, replacement is often the cleanest solution.
- If the pad is rubber-backed, inspect for a slimy feel or black spotting. If present, discard it.
Check the floor
On hardwood, trapped moisture can cause cupping or finish haze. On concrete, moisture can linger and re-humidify the rug from below. Wipe the floor, let it dry completely, and only then put the rug back down.
Health stop signs
DIY is for small, contained issues. If any of these apply, step back.
- You feel unwell: coughing, wheezing, headaches, or throat irritation when you are near the rug.
- The affected area is large: roughly bigger than a couple of dinner plates, or you see multiple patches across the rug.
- The rug stayed wet longer than about 48 hours after the spill.
- It is in a high-risk space: a basement, bathroom-adjacent area, or anywhere with ongoing humidity problems.
- The smell returns within a day or two of cleaning and drying.
If you are in a rental, it is also worth documenting the situation early. Moisture issues can become building issues, and you deserve a safe home.
When pros beat DIY
Professional rug cleaners have tools you do not, namely controlled extraction that removes moisture and contaminants without saturating the wrong layers, plus drying systems that actually finish the job.
Consider pros when:
- The spill was big (pet accident, plant overwatering, a tipped cooler, flooding, a leaking radiator).
- The rug is valuable or delicate (hand-knotted wool, silk blends, vintage rugs with unstable dyes).
- The pad and subfloor got wet and you cannot fully lift and dry everything.
- You are in a rental and want a clean paper trail. A receipt from a professional can help if there is any dispute about damage or odor later.
What to ask a pro
- Do you offer rug-only cleaning vs in-home cleaning?
- How do you dry rugs after cleaning?
- Do you have experience with wool, natural woven rugs, or silk/viscose?
- Will you evaluate the pad and subfloor?
Quick do and do not
Do
- Dry the rug fast on both sides.
- Use a sealed HEPA vacuum after drying to remove residue and spores.
- Spot test every cleaner.
- Replace a musty pad. It is often the real culprit.
- Keep airflow going until there is no odor.
Do not
- Scrub or shampoo a damp rug.
- Soak jute, sisal, or seagrass.
- Use bleach on wool, silk, or most dyed rugs.
- Mix cleaners, or layer vinegar and peroxide in the same session.
- Put the rug back down on a not-quite-dry floor.
- Ignore recurring musty smells.
Aftercare
Once the rug is clean and dry, prevention is simple and honestly kind of satisfying.
- Use a breathable pad and avoid trapping moisture under rubber in humid spaces.
- Rotate and air rugs seasonally, especially in summer humidity.
- Keep indoor humidity in check, ideally around 30 to 50% if you can.
- Handle spills like a race: blot, lift, dry, then clean.
If you want, tell me what your rug is made of (wool, polypropylene, jute, unknown) and what the spill was. I can help you choose the safest route without turning it into a whole weekend project.