LVP and Laminate Scorch Marks: Hide or Replace?
Clara Townsend
Clara Townsend is an interior stylist, vintage furniture enthusiast, and the creative voice behind Velvet Abode. With over a decade of experience transforming both cramped city apartments and sprawling fixer-uppers, she believes that a beautiful home is built on personal stories rather than massive budgets. When she isn't hunting for the perfect brass sconce at a local flea market, she can usually be found rearranging her living room for the third time this month.
Heat marks on LVP and laminate have a special way of ruining your mood. One second you are enjoying a candlelit evening, the next you are staring at a little brown “freckle” that screams accident. The good news is that not every scorch calls for a full-floor redo. Some marks are purely visual and can be softened with smart camouflage. Others have melted or burned through the surface and look better with a single-plank replacement.
Let’s walk through how to tell the difference, what you can realistically do on a budget, and how to choose the least dramatic fix.
First: what you are actually dealing with
“LVP” and “laminate” get lumped together, but they react to heat a little differently.
- LVP (luxury vinyl plank) is plastic-based. High heat can melt, gloss, or deform the surface. A cigarette or hot curling iron can create a shiny dip or a crater-like spot.
- Laminate is a fiberboard (HDF) core with a decor or print layer and a protective overlay. Heat can scorch the overlay or, if it is intense enough, darken the print layer or even swell the core if moisture follows.
In both cases, the key question is the same: is the damage on the surface finish, or through that protective top layer into what is underneath?
Surface vs deeper damage: quick tests
You do not need lab equipment. You need good light, a gentle hand, and a little patience.
1) The fingertip test
Run your fingertip across the mark.
- If it feels smooth and you only see discoloration, you may be looking at surface staining, light scorching, or a change in sheen.
- If it feels sunken, raised, or rough, heat likely altered the material. That usually means camouflage, not true “removal.”
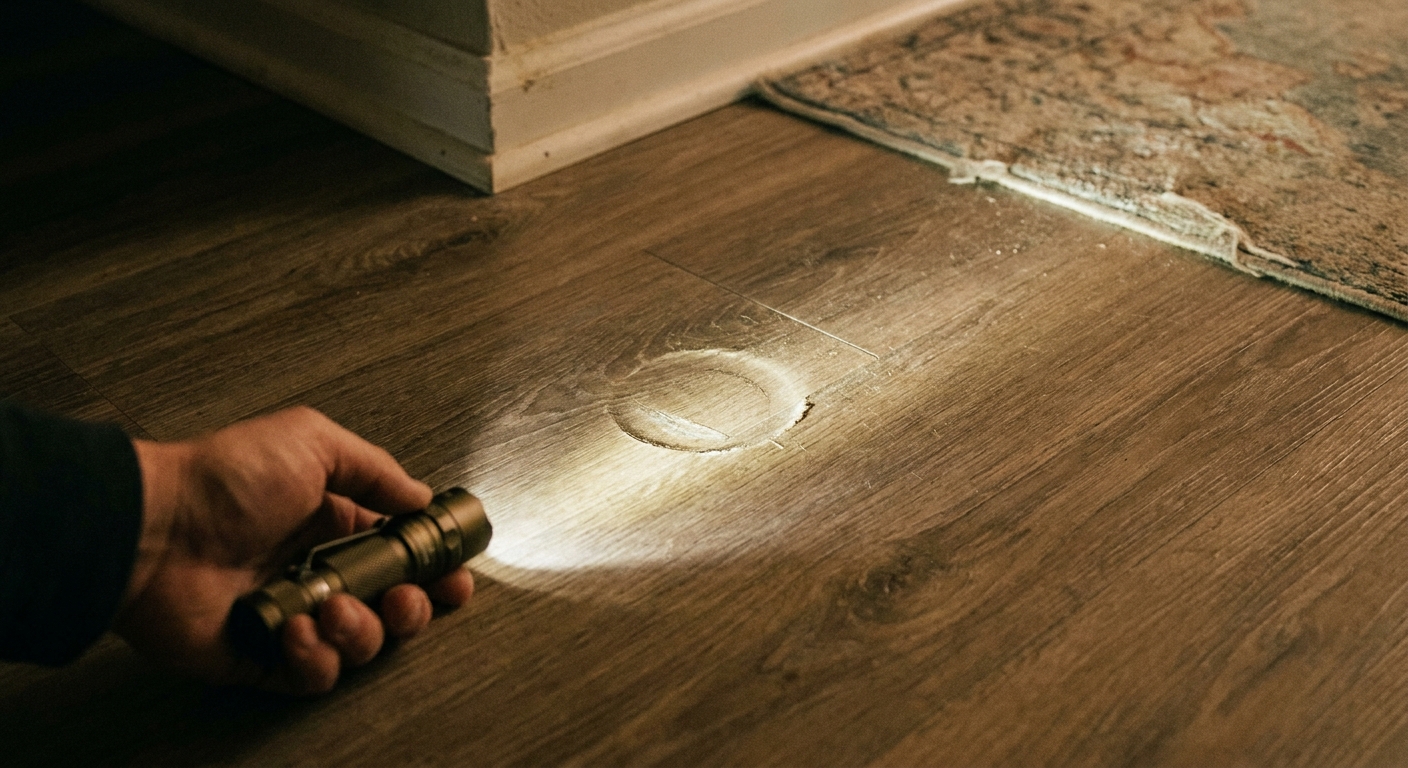
2) The angled-light test
Turn off overhead lights and use a flashlight or your phone light at a low angle.
- If you see a shiny halo, the heat may have changed the top finish (common on LVP).
- If you see a pit or ripple, the surface has physically deformed. Cosmetics can help, but they will not make it perfectly invisible.
3) The gentle clean test (no hero scrubbing)
Before you decide anything, clean the spot properly. Use a barely damp microfiber cloth with a small amount of pH-neutral floor cleaner. Dry immediately.
- If the mark lightens, you may have residue sitting on top of the floor, not a burn.
- If it stays identical, it is likely a true scorch or melt.
Clara note: If you are renting, avoid solvents, acetone, and heavy abrasives. They can turn a small blemish into a big “you damaged the finish” problem. When in doubt, check your flooring manufacturer’s cleaning guide and test any product in a hidden spot first.
Budget triage: camouflage or plank replacement?
Here is the simplest way I decide in clients’ homes, especially rentals and first apartments where every dollar matters.
Camouflage is usually enough when
- The mark is smaller than a pencil eraser or visually minor from standing height.
- The surface is mostly flat with no sharp crater.
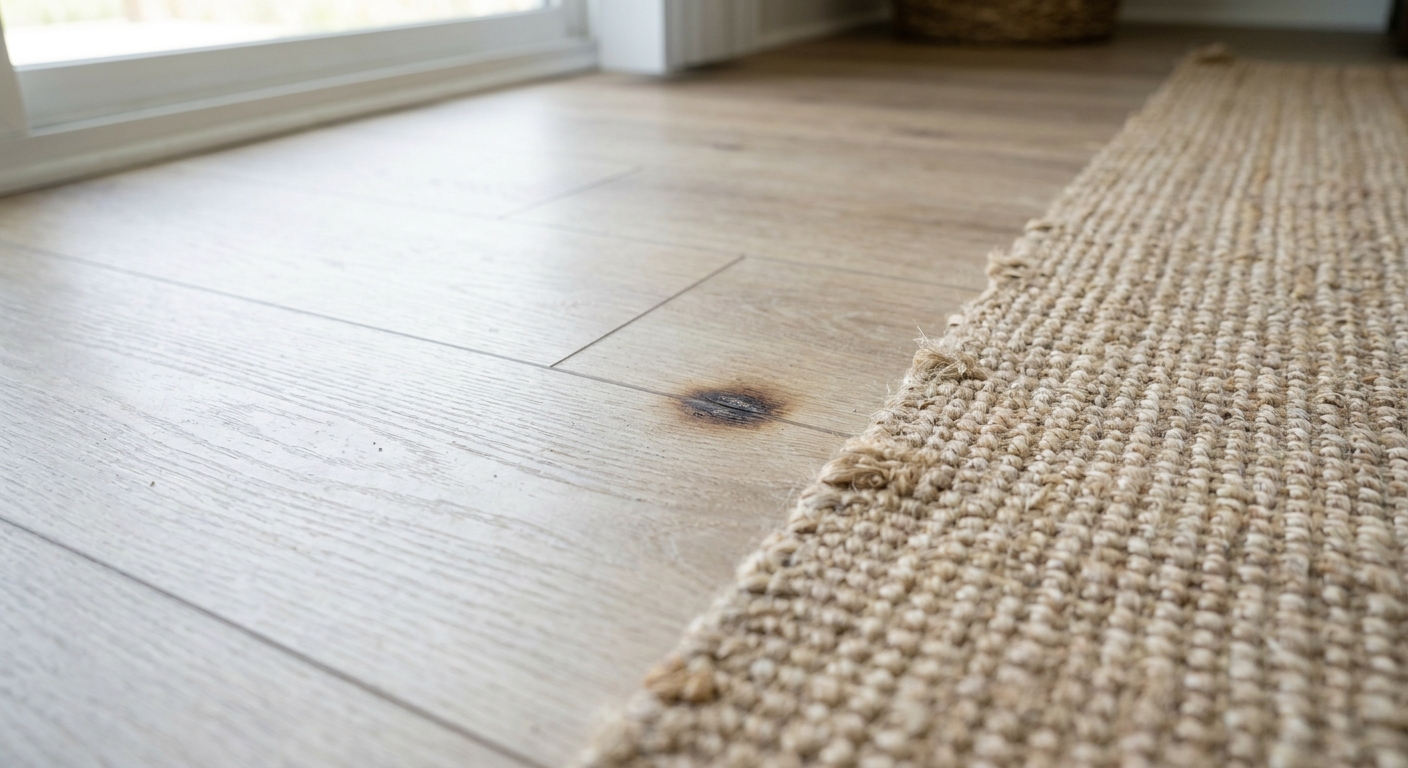
- The damage is in a low-attention zone like under a side table, near the sofa, or along a wall.
- You can soften the contrast with color and sheen, even if it is not “perfect.”
Plank replacement is often the least invasive path when
- The scorch is blackened or looks like the print or decor layer is burned through.
- The area is deformed (melted dip, bubbled ridge, crunchy spot on laminate).
- It sits in a high-visibility lane like the entry, kitchen walkway, or in front of the sink.
- You are dealing with multiple marks in one cluster from a fallen ember or hot tool.
Replacement sounds intense, but swapping one plank can be simpler and cleaner than layering on fixes that never quite blend.
Renter-friendly cosmetics that actually help
Think of these as makeup, not surgery. The goal is to reduce contrast so your eye stops snapping to the spot.
Step 1: Clean and reduce sheen contrast (only if needed)
If the scorch looks like a shiny patch rather than a dark patch, the issue might be a sheen change. After cleaning, you can sometimes reduce attention by keeping the surrounding floor evenly matte or evenly satin through regular maintenance. Avoid “restore” products that leave a heavy coating unless your floor manufacturer recommends them.
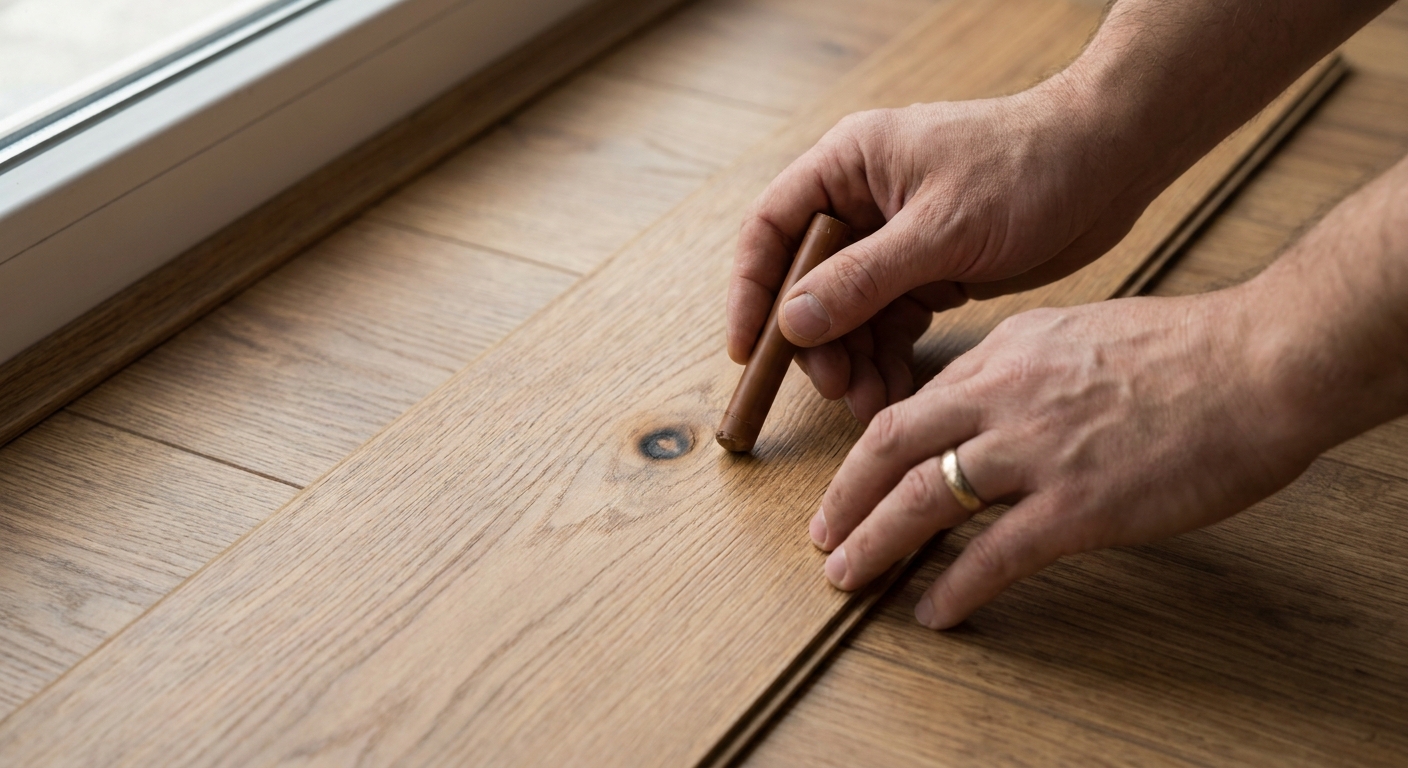
Step 2: Color camouflage with touch-up pens and markers
For tiny cigarette marks or light scorch specks, a floor repair marker or wood-toned touch-up pen can be surprisingly effective.
- Choose a shade slightly lighter than the darkest part of the burn. You can always deepen color with a second pass.
- Use a light tapping motion, not long strokes, so you mimic wood grain variation.
- Feather the edges. A hard outline is what makes repairs obvious.
Always test first in an inconspicuous spot, like inside a closet or under the fridge toe-kick, because some markers lean orange or red under warm lighting.
Step 3: Wax fill sticks for tiny pits and “pepper dot” burns
If the heat left a pinhole or shallow divot, a wax fill stick (often sold in laminate and LVP repair kits) can level the surface and hide the dark center.
- Pick the closest base tone, then blend a second shade if needed.
- Press wax into the pit, then scrape flush with a plastic edge (many kits include one).
- Buff lightly with a soft cloth to soften the transition.
Wax is great for renters because it is low-odor, low-drama, and usually removable with gentle effort later. It is not ideal for a large melted area that is still changing shape under pressure.
Step 4: When to skip putty and hard fillers
Hard-setting fillers can look fantastic on real wood, but on floating LVP and laminate they may crack or pop if the floor moves. If you are in a rental, I would rather you do a subtle wax repair than create a rigid patch that draws attention. If you want a harder repair, follow your flooring manufacturer’s guidance and choose a product that is specifically approved for your floor type.
What not to do
- Do not sand LVP. Vinyl does not behave like wood. Sanding usually creates a permanent dull spot that spreads.
- Be cautious with magic erasers. They are micro-abrasive. On laminate and LVP they can change sheen and create a bigger, lighter patch.
- Avoid high-heat fixes. Ironing, heat guns, or “warming it back” can worsen warping and make the area glossy or bubbled.
- Skip aggressive solvents. Acetone, lacquer thinner, MEK, and similar hot solvents can melt vinyl and haze laminate overlays. If you need to remove residue, check your manufacturer’s cleaning instructions first. Some products allow very limited use of gentler options, but it is surface-specific.
If you are tempted to scrub harder, pause. On LVP and laminate, the most permanent damage often comes from the “fix,” not the original mark.
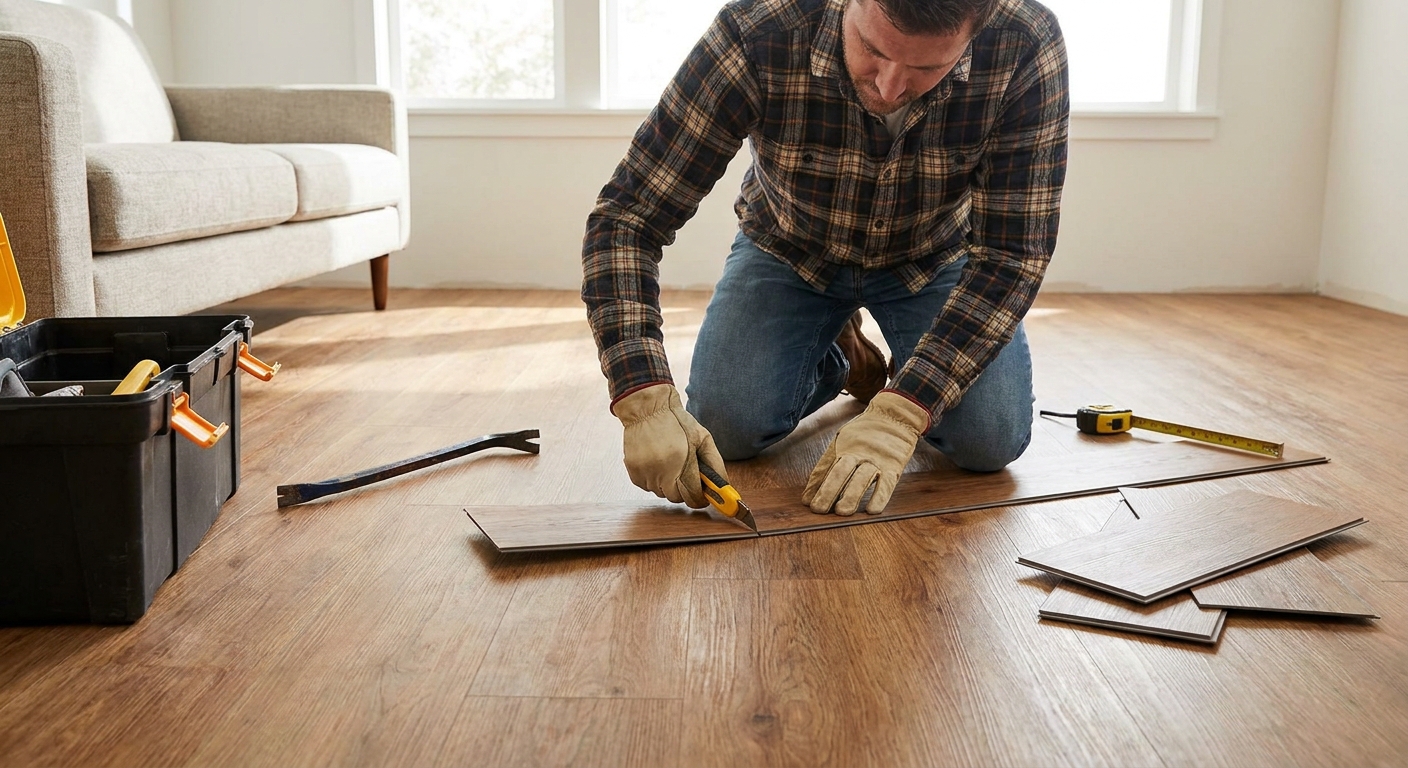
Single-plank replacement on a budget
If the burn is truly through the top layer, replacement is the closest thing to an invisible repair. The trick is making it affordable and as non-destructive as possible.
Before you pick a method: click-lock vs glue-down
Not all LVP installs are the same. Floating click-lock floors are designed to be unclicked and re-clicked, while glue-down LVP is typically patched by cutting out and gluing a new piece in. If you are not sure which you have, check an extra box label or look at an exposed edge at a vent or threshold.
How to source a matching plank
- Check leftover boxes in closets, basements, and utility rooms first.
- Ask your landlord or building maintenance if they have attic stock.
- Look up the product name on the box label if you can find it. Even discontinued lines sometimes show up as overstock.
- Borrow from a hidden spot (last resort). In some homes, you can swap a plank from under a permanent appliance or inside a closet and put the damaged one there.
Two replacement approaches (and what to expect)
1) Unclick and re-click (least damage, most labor)
Many floating floors require you to unclick planks from the nearest wall until you reach the damaged plank. It is time-consuming, but it preserves the locking system.
2) “Drop-in” replacement (least disruption, needs precision)
A pro can cut out a single plank and glue a new one in place. This technique typically involves trimming off part of the tongue and or groove on the replacement plank so it can “drop” into the opening, then securing it with the right adhesive. It is fast in a furnished room, but it must be done carefully to avoid visible gaps, height changes, or a weak seam.
Two important notes: first, some manufacturers do not recommend glue-in repairs on certain click-lock or rigid-core products, and it can affect warranty coverage. Second, blades and adhesives deserve respect. Use cut-resistant gloves, ventilate the room, and stop if you are not confident with a utility knife.
If you are renting or you are not comfortable with blades and adhesives, this is a perfect moment to hire a flooring handyman for a small, contained job. It is often cheaper than you fear, especially compared to a deposit deduction for a very noticeable burn.
Mini decision guide
If you want the fastest path to “I can live with this,” use this checklist.
- Tiny dark dot, no texture change: clean, then try a touch-up marker in light layers.
- Small pit or pinhole: wax fill stick, scrape flush, buff.
- Shiny melted spot: camouflage may reduce contrast, but replacement usually looks best.
- Large black scorch, crater, or bubbled surface: plan a plank swap.
Prevention that does not ruin the vibe
I love a candle moment as much as anyone, but floors prefer a little protection.
- Use wide candle plates under floor candles and lanterns, especially on textured planks where wax can settle into grain.
- Add a heat-safe tray under hot tools on the vanity or bathroom counter, and let them cool there, not on the floor.
- Place one small, washable rug in the “oops zone” where you tend to do hair, open packages, or set bags down.
Your home should feel like a comforting hug, not a museum. The goal is just to keep accidents from becoming permanent roommates.
When to call the manufacturer or landlord
If the floor is newer or still under warranty, take a few clear photos and check your paperwork. Warranties usually do not cover heat damage, but they can help you identify the exact product for a match.
If you rent, it is often smarter to ask about replacement planks early rather than attempt a risky fix that changes the floor finish. A calm message with photos and a plan tends to go better than a surprise at move-out.
Clara note: If this is a rental, document the situation. Take well-lit photos from standing height and close-up, and keep communication in writing. It is boring, but it is protective-boring.