Interior Door Won’t Close? Fix a Sticking Door Fast
Clara Townsend
Clara Townsend is an interior stylist, vintage furniture enthusiast, and the creative voice behind Velvet Abode. With over a decade of experience transforming both cramped city apartments and sprawling fixer-uppers, she believes that a beautiful home is built on personal stories rather than massive budgets. When she isn't hunting for the perfect brass sconce at a local flea market, she can usually be found rearranging her living room for the third time this month.
If your interior door suddenly won’t latch, scrapes the floor, or needs a shoulder-check to shut, you are not alone. Doors are basically big slabs of wood (or wood product) reacting to everyday life: humid air, gravity, and a house that moves a tiny bit over time.
The good news: most sticking doors can be fixed in under an hour with a screwdriver and a little patience. The even better news: you do not need to “live with it” until winter.
First, figure out where it sticks
Before you sand anything (tempting, I know), do a quick diagnosis. The fix depends on whether the door is swollen from humidity, sagging on its hinges, or binding at the hinge side.
Quick checks (2 minutes)
- Look at the gap around the door. A typical interior “reveal” is about 1/8 inch at the sides and top. If the gap is tight at the top latch side (near the strike plate) but wider at the bottom, that often points to hinge sag.
- Check the hinge side too. If the gap is tight on the hinge side or the door seems to bind right where the hinges sit, you may be dealing with a hinge mortise that is too shallow, a bent hinge, or a door that is slightly twisted.
- Find the rub marks. Close the door slowly and watch where it hits. Common spots are the top corner on the latch side, the hinge edge, or the bottom edge.
- Listen for a hinge squeal or pop. Noisy hinges can make the door feel “stuck” even when the gaps look fine.
- Try the paper trick. Slide a strip of paper between the door and the jamb. Where it snags is where the contact is.
- Bottom scrape check. If it started scraping after a new rug, thicker carpet pad, a threshold swap, or a humid spell that made flooring swell, the “door problem” might actually be a flooring change.
Humidity clue: If the problem shows up during muggy months or right after a rainy week, you are probably dealing with seasonal swelling. If it has slowly worsened over months, hinge sag is the usual suspect.
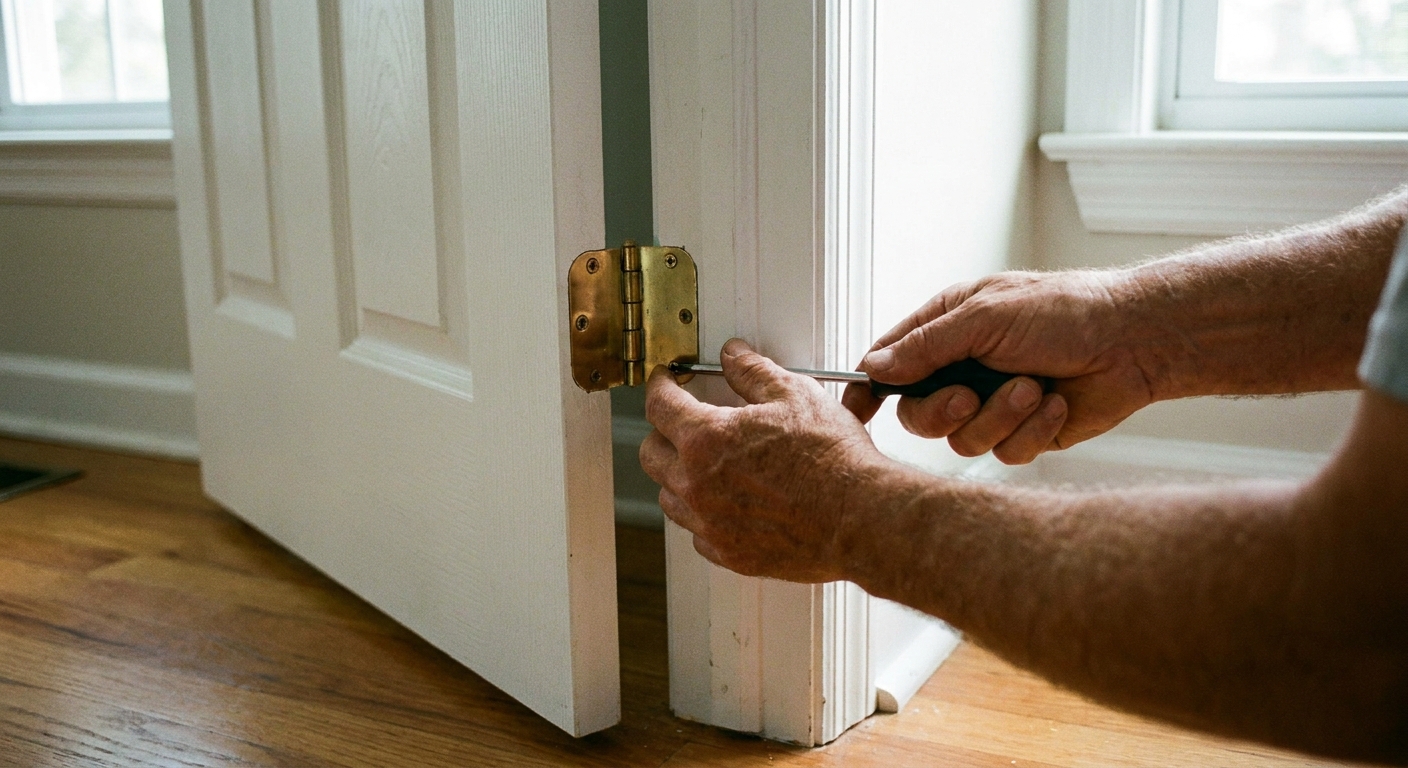
Fix #1: Tighten hinge screws
Loose hinge screws are the stealthiest cause of rubbing doors. They let the door drift down and toward the latch side, which makes the top latch-side corner bite into the frame.
What to do
- Open the door and support it with a folded towel under the bottom edge if it feels heavy or wobbly.
- Using a screwdriver (not a drill, at least at first), tighten every screw on the hinges: both the door side and the jamb side.
- If a screw just spins without tightening, it is stripped. See the stripped-hole fixes below.
Stylist’s note: This is the kind of fix that feels almost too simple, like fluffing a pillow and suddenly the whole sofa looks better. But it works.
Fix #2: Use longer hinge screws
Many interior doors are hung with short screws that only bite into the jamb, not the framing. Over time, that grip loosens. A longer screw can reach the framing behind the jamb and shims, pulling the hinge tighter and nudging the door back into alignment.
Small caveat: Depending on shims and gaps, a long screw can also pull the jamb out of plane if you crank it down too hard. Go slow, check the gaps, and stop as soon as the door behaves.
You will need
- #9 or #10 wood screws, 2 to 2 1/2 inches long (common sweet spot). Match the hinge head style and diameter so it seats neatly in the hinge hole.
- Screwdriver or drill with careful control
- Optional but smart: a small drill bit for a pilot hole
Steps
- Choose one hinge at a time so the door stays supported.
- On the top hinge, remove one jamb-side screw (the side screwed into the frame).
- Drill a small pilot hole first, especially in older, dry framing. This helps prevent splitting and makes the screw drive straight.
- Drive the longer screw in slowly until snug. If you use a drill, start on low torque, keep the bit straight, and stop before the head chews up the hinge or slips and nicks the paint.
- Test the door. If it improved but still rubs, replace one more screw in the top hinge, then test again.
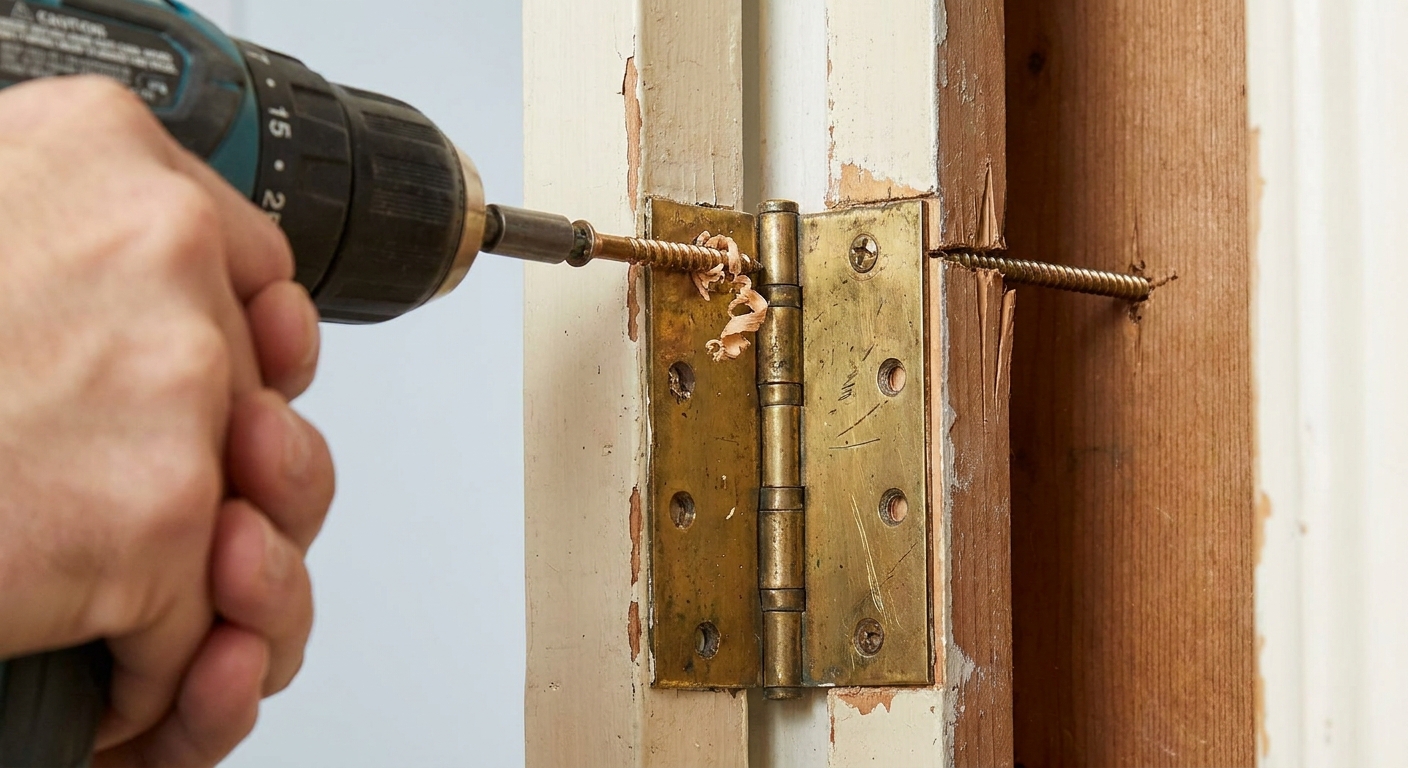
Why this works: The top hinge carries a lot of the door’s leverage. Pulling it firmly into the framing often corrects the classic top-latch-corner rub.
Fix #3: Fix stripped screw holes
If screws will not tighten on the door side (or anywhere a longer screw will not help), you need to give the screw fresh wood to bite into.
Quick options
- Toothpicks and wood glue: Add wood glue to the hole, tap in a few toothpicks (or a matchstick), snap them flush, let it set for a bit, then re-drive the screw.
- Use a slightly larger screw: If the hinge hole allows it, one size up can grab without changing anything else.
- Dowel plug (best repair): Drill the hole clean, glue in a hardwood dowel, let it cure, then re-drill a pilot hole and re-install the screw.
Fix #4: Lubricate hinges
If your door closes but feels sticky, rough, or noisy, the hinge pin may be dry or grimy. Lubrication will not fix a door that is physically rubbing wood, but it can make a door that feels “off” suddenly glide like it remembers its job.
How to lubricate
- Wipe the hinge clean with a dry cloth first.
- Tap the hinge pin halfway out (a nail set and light taps work well), then apply a small amount of silicone spray or dry lubricant along the pin so it can actually get into the barrel.
- Tap the pin back down, wipe excess, and open and close the door several times to work it in.
Avoid: Heavy grease that attracts dust, or soaking the hinge so it runs down painted trim.
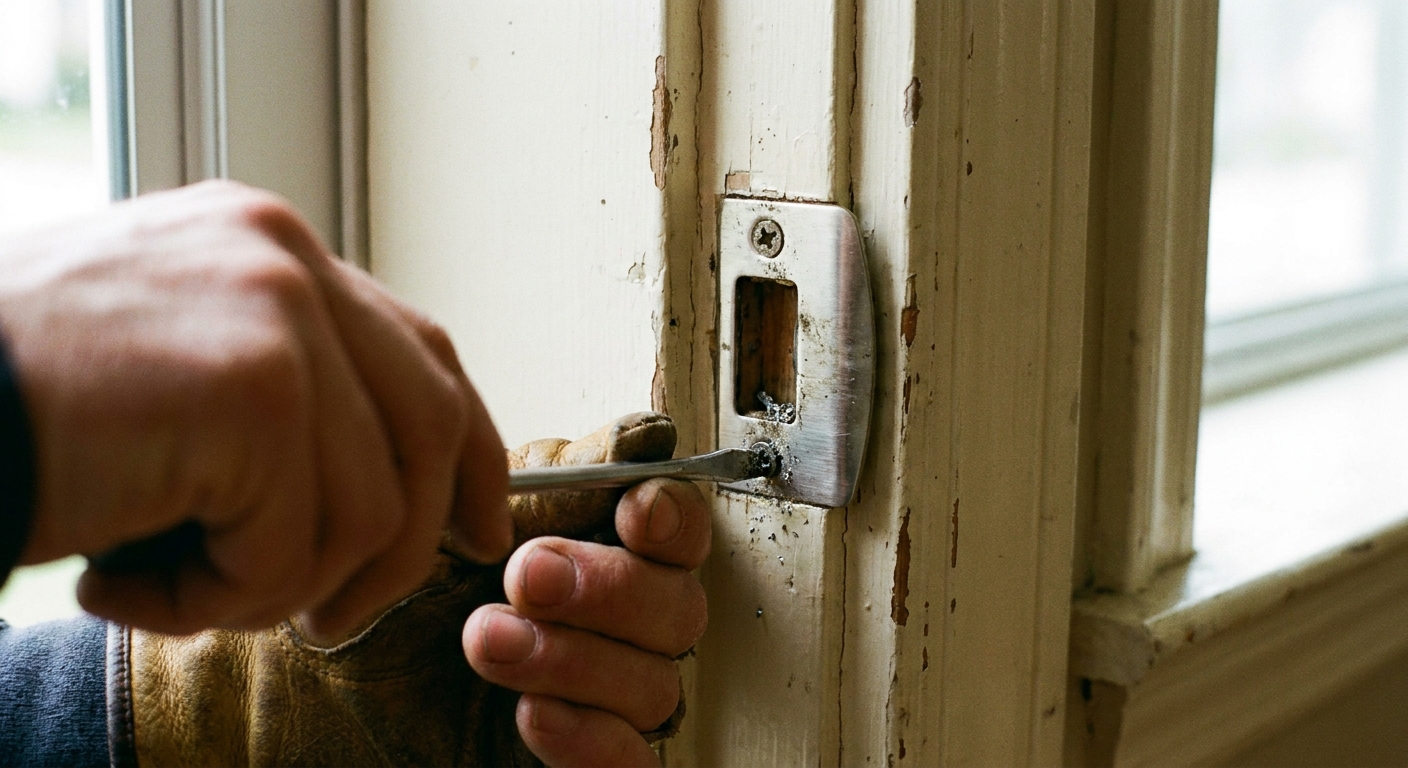
Fix #5: Adjust the strike plate
Sometimes the door swings shut fine, but the latch hits the strike plate and refuses to catch. That is often a tiny alignment issue after seasonal swelling or hinge settling.
Signs this is your issue
- The door meets the jamb, but you have to lift or push hard to get the latch to click.
- You see shiny metal marks where the latch is hitting the strike plate.
Three easy adjustments
- Tighten the strike plate screws. A loose strike plate can shift just enough to block the latch.
- Nudge the strike plate. Loosen the screws, reposition it slightly, then retighten. If the screws keep drifting back into the old holes, fill the holes first with the toothpick and wood glue trick, let it set, and then re-drive.
- Bend the strike lip. If the latch clicks but feels weak, use a screwdriver or pliers to gently bend the little tab (the strike “lip”) inward or outward so the latch seats more confidently.
If the latch is rubbing the edge of the opening, you can carefully file the strike plate opening a tiny amount. Go slow, and test often. You want “click” without a slam.
Fix #6: Shim or tweak a hinge
If the door binds on the hinge side, the fix is often about changing the hinge position by a hair, not removing wood from the door.
Try this
- Check for a bent hinge: A hinge leaf that is slightly tweaked can push the door into the jamb. Tighten screws first, then consider replacing the hinge if it looks visibly bent.
- Shim behind a hinge (paper trick): To move the door slightly away from the hinge side bind, remove one hinge leaf (one hinge at a time), add a thin shim behind it (cardstock or thin cardboard), and reinstall. Tiny changes here make a big difference.
- Mortise too shallow: If a hinge is not sitting flush in its pocket, the door can bind. Tighten screws, confirm the hinge leaf sits flat, and correct the fit if needed.
Fix #7: Sand or plane the door
If your door is rubbing along the edge and it gets worse in humid weather, the door itself may have swollen slightly. This is common with older solid-wood doors and with homes that get sticky-summer air indoors.
My rule: tighten and align first, sand second. Removing wood is permanent. Tightening screws is not.
Mark the rub spot
- Close the door until it hits.
- Mark the contact area with painter’s tape or a pencil line.
Sand first (often enough)
- Remove the door if needed, or keep it on hinges if access is easy.
- Use 120 to 150 grit sandpaper on a sanding block.
- Sand only the marked area, keeping the edge flat and even.
- Test the fit often. You are aiming for a small, consistent gap.
If the bottom scrapes
- Check hinges first: Bottom scraping is very often hinge sag.
- Confirm it is not the floor: Swollen wood flooring, new carpet, or a thicker rug can turn a previously fine door into a plow.
- If it truly is the door bottom and alignment is good, you can lightly sand or plane the bottom edge. Go slowly and keep it square.
If you must plane
- Use a hand plane for control, taking whisper-thin shavings.
- Work in the direction that avoids tearing the grain.
- Stop early and test. It is shockingly easy to take off too much.
Do not skip sealing: After sanding or planing, seal the raw edge with paint, polyurethane, or a matching finish. Unsealed wood drinks humidity like a sponge, which can bring the sticking right back.

Renter-friendly fixes
If you rent, you can still fix a stubborn door without risking your security deposit. The trick is to focus on adjustments that are easy to undo and easy to document.
Try these first
- Tighten hinge screws with a hand screwdriver.
- Lubricate hinges sparingly and wipe clean.
- Tighten the strike plate and gently nudge it if the screw holes allow. If the holes are blown out, the toothpick-and-glue fix is usually clean and reversible.
Document the condition
- Take a quick photo of the door gaps and any existing scuffs before you start.
- If the door is badly out of alignment or the frame looks cracked, email your property manager with photos. Keep it simple and factual.
Proceed carefully with: long screws into framing and any sanding or planing. Some landlords are fine with it, others want maintenance to handle anything that changes the door or frame.
When it is not just the door
Most sticking doors are minor. But sometimes a door that suddenly will not close is a clue that the house itself is shifting.
Call a pro if you notice
- Multiple doors sticking at the same time
- New cracks in drywall near doorways or ceilings
- Floors that feel noticeably sloped or bouncy in a new way
- Windows that also started binding
Foundation settling caveat: A little seasonal movement is normal in many homes. Rapid changes, widening cracks, or repeated re-sticking after you have fixed the hinges can mean it is time for a carpenter or structural professional to take a look.
Quick decision guide
- Door rubs at top latch corner: tighten hinge screws, then swap in longer screws at the top hinge (pilot hole, slow and steady).
- Door squeaks or feels sticky but gaps look okay: tap the hinge pin up halfway, lubricate, wipe clean.
- Door closes but won’t latch: tighten and adjust the strike plate, fill loose holes if needed, bend the strike lip for a better “catch.”
- Door binds on the hinge side: check for a bent hinge, then consider a thin hinge shim.
- Door rubs along the edge during humid weather: sand a little, then seal the edge.
- Door scrapes the floor: check hinge sag first, then confirm flooring changes before trimming the door.
If you try hinge tightening and the longer-screw trick, you will solve a huge percentage of sticking doors without ever touching sandpaper. And that is my favorite kind of fix: quick, tidy, and quietly satisfying.