IKEA Sektion Refresh: Doors, Panels, and Trim Tricks
Clara Townsend
Clara Townsend is an interior stylist, vintage furniture enthusiast, and the creative voice behind Velvet Abode. With over a decade of experience transforming both cramped city apartments and sprawling fixer-uppers, she believes that a beautiful home is built on personal stories rather than massive budgets. When she isn't hunting for the perfect brass sconce at a local flea market, she can usually be found rearranging her living room for the third time this month.
There’s a certain kind of kitchen frustration that only Sektion owners understand: the boxes are doing their job, the layout works, but the whole room still looks a little… flat. The good news is that a Sektion refresh doesn’t have to mean ripping everything out. If your cabinet frames are solid and your countertops are staying put, you can get a surprising “new kitchen” effect by focusing on what your eyes actually land on: doors, drawer fronts, panels, trim details, and hardware.
This is a style-first, budget-conscious guide to feasible swaps and clever cover-ups, including landlord-safe and reversible options. No plumbing, no demo dust, and no life disruption that lasts longer than your patience.
Before you start: a 20-minute prep list
Do this once, and every decision gets easier.
- Inventory your fronts: Count doors and drawer fronts, and note sizes. A quick photo of each run helps when you’re ordering.
- Check your hinges and drawers: Most Sektion kitchens use IKEA UTRUSTA hinges and MAXIMERA drawers. It’s not a quiz, it’s just helpful for compatibility.
- Look for hinge drilling: Some third-party fronts come pre-drilled for IKEA hinges. Some don’t, or require you to confirm hinge cup placement. Double-check before you buy.
- List exposed sides and gaps: Mark where you need cover panels, fillers, and toe-kick faces.
- Measure twice, order once: Especially for panels and fillers, because walls love to be out of square.
Start with the face: doors and drawer fronts
If you do one thing, do this. Changing door and drawer fronts is the biggest visual shift you can make in a Sektion kitchen without touching the cabinet boxes.
One honest note: it’s not always “fast.” Lead times, hinge adjustments, and drawer-front alignment can turn it into a satisfying weekend (or two), not a two-hour project. Still worth it.
Option 1: Stay with IKEA fronts
IKEA fronts are the simplest to order and the easiest place to confirm fit for hinges and drawer configurations. They also play nicely with IKEA’s rail system and spacing, which matters if you’re not trying to re-engineer anything.
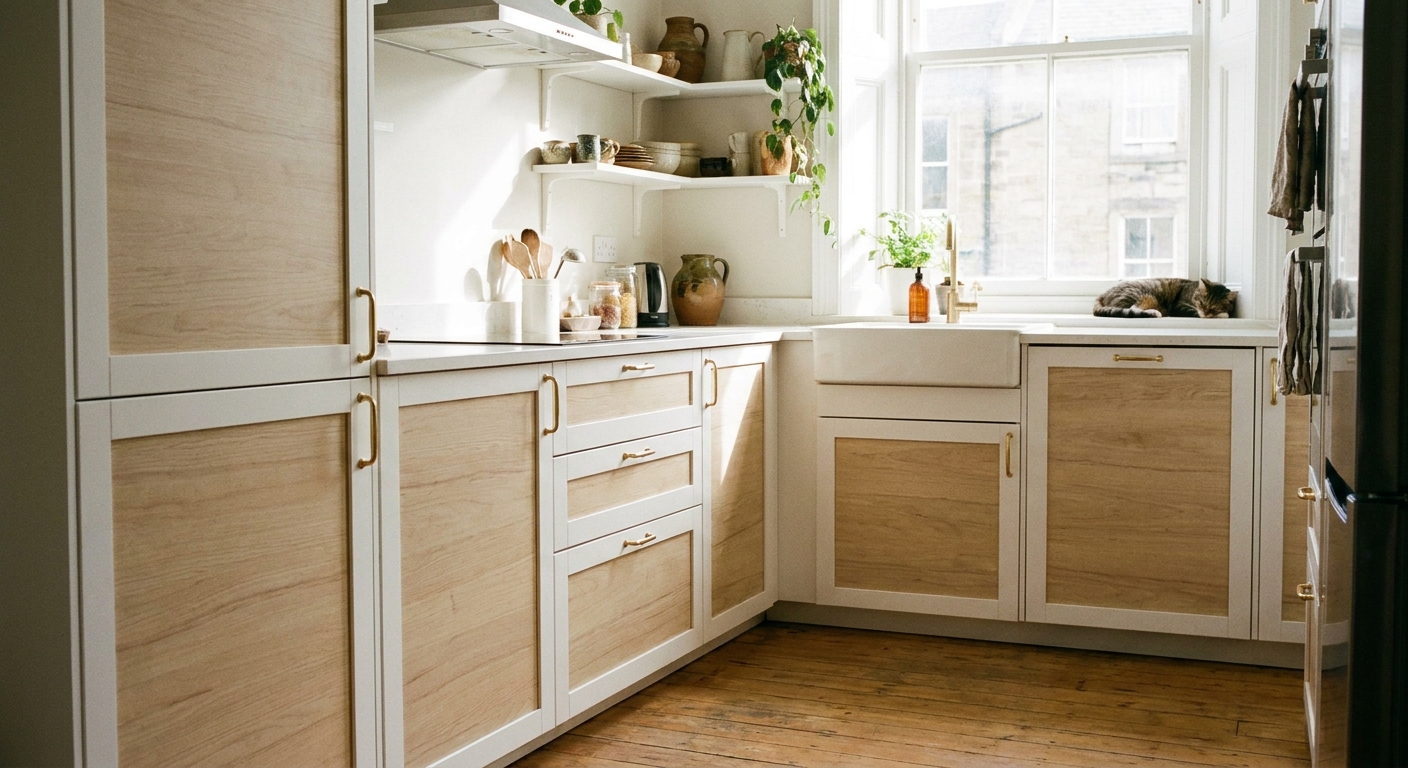
- Slab fronts look modern and calm, especially in matte finishes. They also make mismatched appliances and busy countertops read less chaotic.
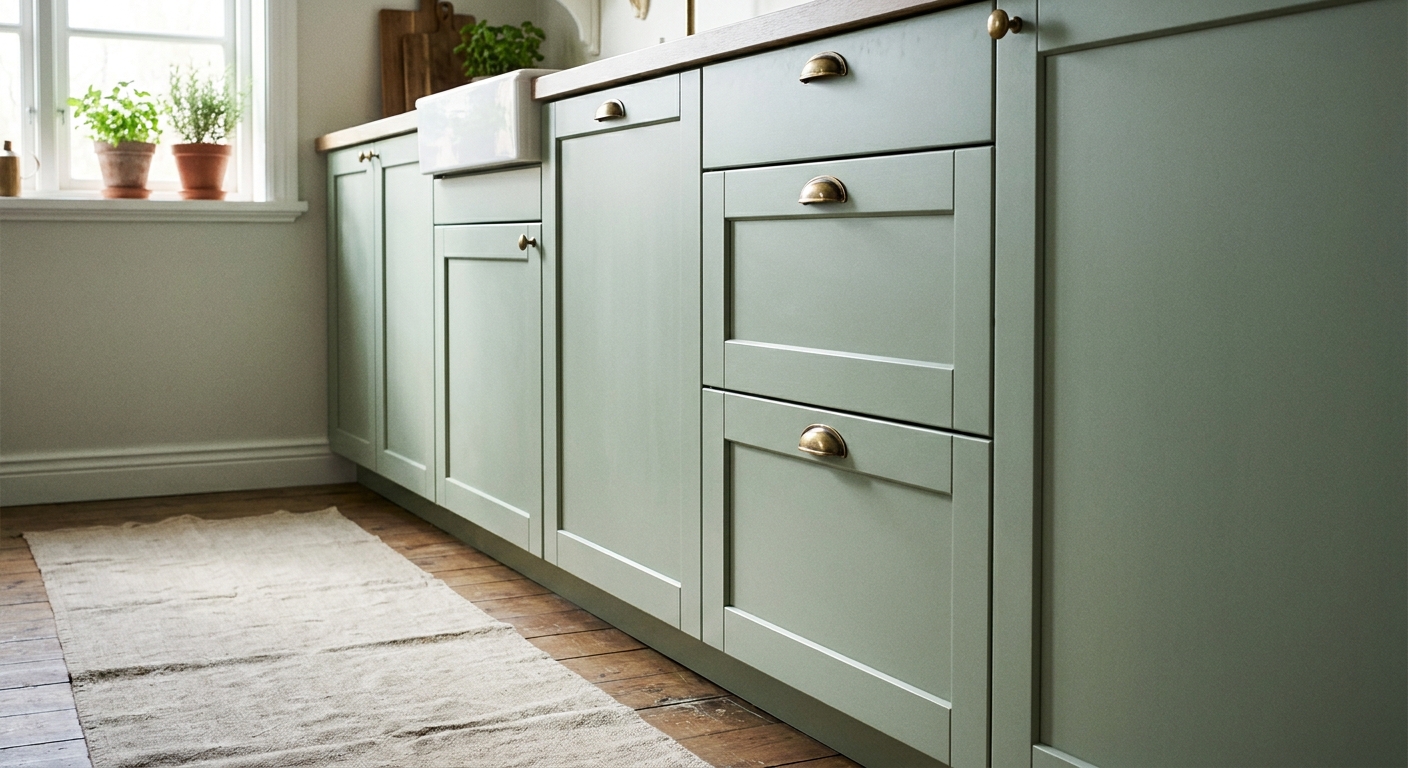
- Shaker-style fronts add instant architecture. If your home leans traditional, vintage, or cottage, this is the easiest bridge between Sektion and “older home character.”
- Glass uppers work best when you can commit to a tidy interior. If your cabinets are a snack museum, consider reeded or frosted glass for softness and privacy.
Option 2: Third-party fronts for a custom look
This is where Sektion gets fun. Many companies make fronts designed specifically for IKEA’s kitchen system. You can find styles like wood veneer, reeded panels, and more nuanced paint colors that look closer to bespoke cabinetry.
If you want a starting point, look at makers like Semihandmade, Reform, and Kokeena. Availability, pricing, and drilling options vary, so confirm the details for your exact layout.
What to double-check before you order:
- Compatibility: Confirm the fronts are made for IKEA Sektion, not older IKEA systems.
- Hinge and pull drilling: Ask whether hinge cups and hardware holes are pre-drilled, optional, or DIY. This affects tools, time, and your margin for error.
- Lead times: Third-party fronts can take weeks, sometimes longer during busy seasons.
- Finish durability: Ask about moisture resistance and cleaning recommendations, especially near the sink and dishwasher.
- Color matching: If you’re keeping any existing IKEA fronts (like a pantry or a hidden panel), match undertones carefully.
Stylist tip: If your budget’s tight, refresh only the uppers or only the island. A two-tone kitchen looks designed when it’s done on purpose.
Panels and fillers: the details that look expensive
If doors are the outfit, cover panels and fillers are the tailoring. They’re not the most exciting line item, but they’re often what separates “IKEA kitchen” from “custom cabinet moment.”
Quick terms, so it’s not confusing: Cover panels finish exposed cabinet sides. Fillers close gaps at walls and help doors and drawers clear. Deco panels (when used) are more about a furniture-style look, like on an island. Edge banding hides raw cut edges on panels and trim.
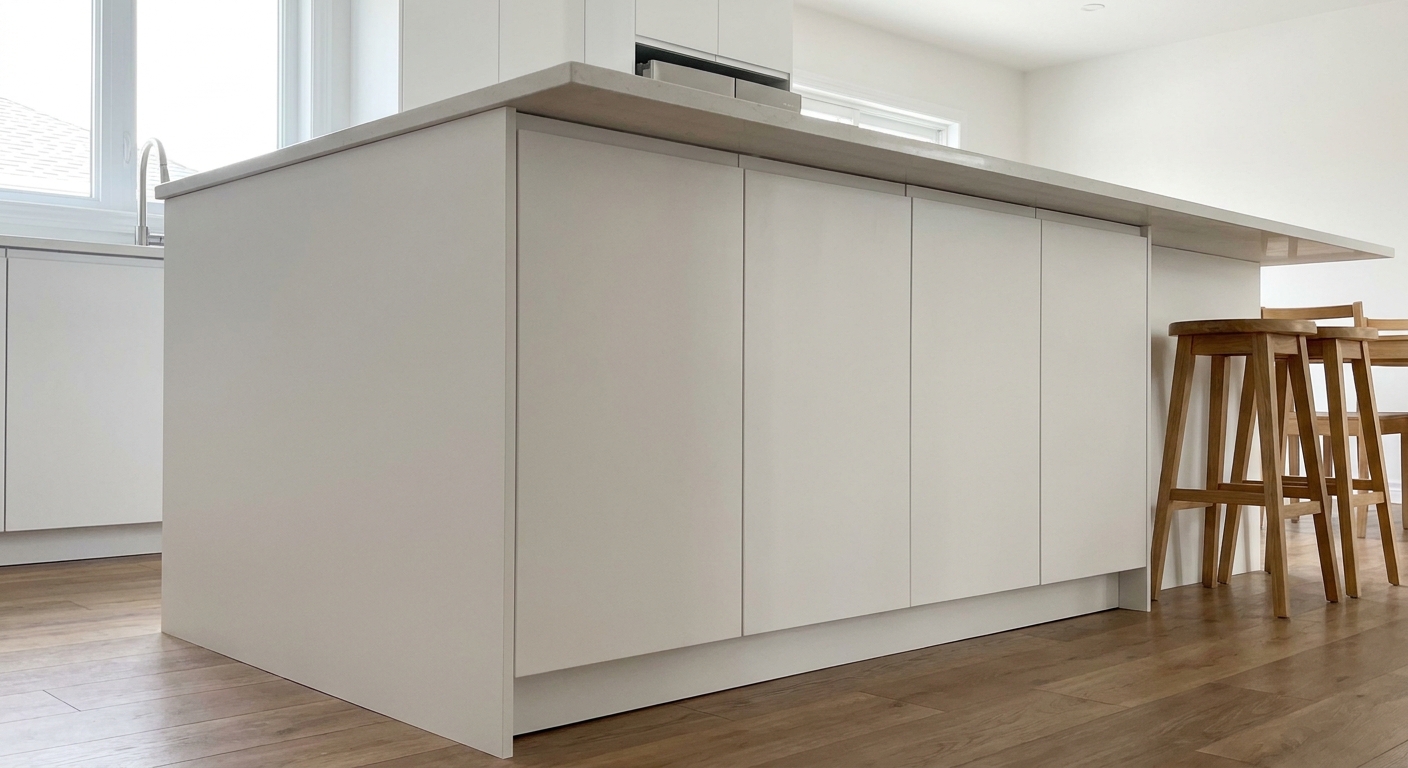
Cover panels
Any exposed cabinet side, especially on an end run or the side of an island, benefits from a cover panel. Without it, the kitchen can look unfinished or pieced together.
- Use panels to hide gaps: A panel can visually simplify tricky transitions near walls, appliances, or open shelving.
- Wrap an island: Panels on all visible sides make an island look more like furniture than a stack of boxes.
- Plan for a clean reveal: A consistent, intentional overhang or a flush finish looks polished. Your installer can help determine what’s realistic in your space.
Fillers that disappear
Gaps happen, especially at walls that aren’t perfectly square. Fillers keep doors from banging into adjacent walls and let drawers fully open. The goal is to make them blend in.
- Keep fillers aligned: A filler that matches the door finish reads as intentional.
- Use width strategically: If you need breathing room, a slightly wider filler can present like a “frame” at the edge of the run.
- Consider a slim open shelf: In some layouts, a narrow open shelf at the end (for cookbooks or olive oil) looks like a design choice.
Edges and end grain
Exposed raw edges around cover panels or trim pieces are a common giveaway. Edge banding, matching paint, or properly finished trim can clean this up fast.
Trim details: instant character
Trim is where you can gently nudge Sektion into whatever style story you want to tell, from Parisian apartment to warm modern to collected vintage. These are “small carpentry” moves with big visual payoff.
Light rail under uppers
A light rail hides under-cabinet lighting and creates a more built-in look. It also gives you a crisp line that makes the cabinets look thicker and more substantial.
Top trim and ceiling gaps
If your cabinets stop short of the ceiling, you’ve got options:
- Go to the ceiling: Adding a top extension and trim can make the kitchen look taller and more custom.
- Create a deliberate cap: A simple top trim detail can make the gap look planned, not accidental.
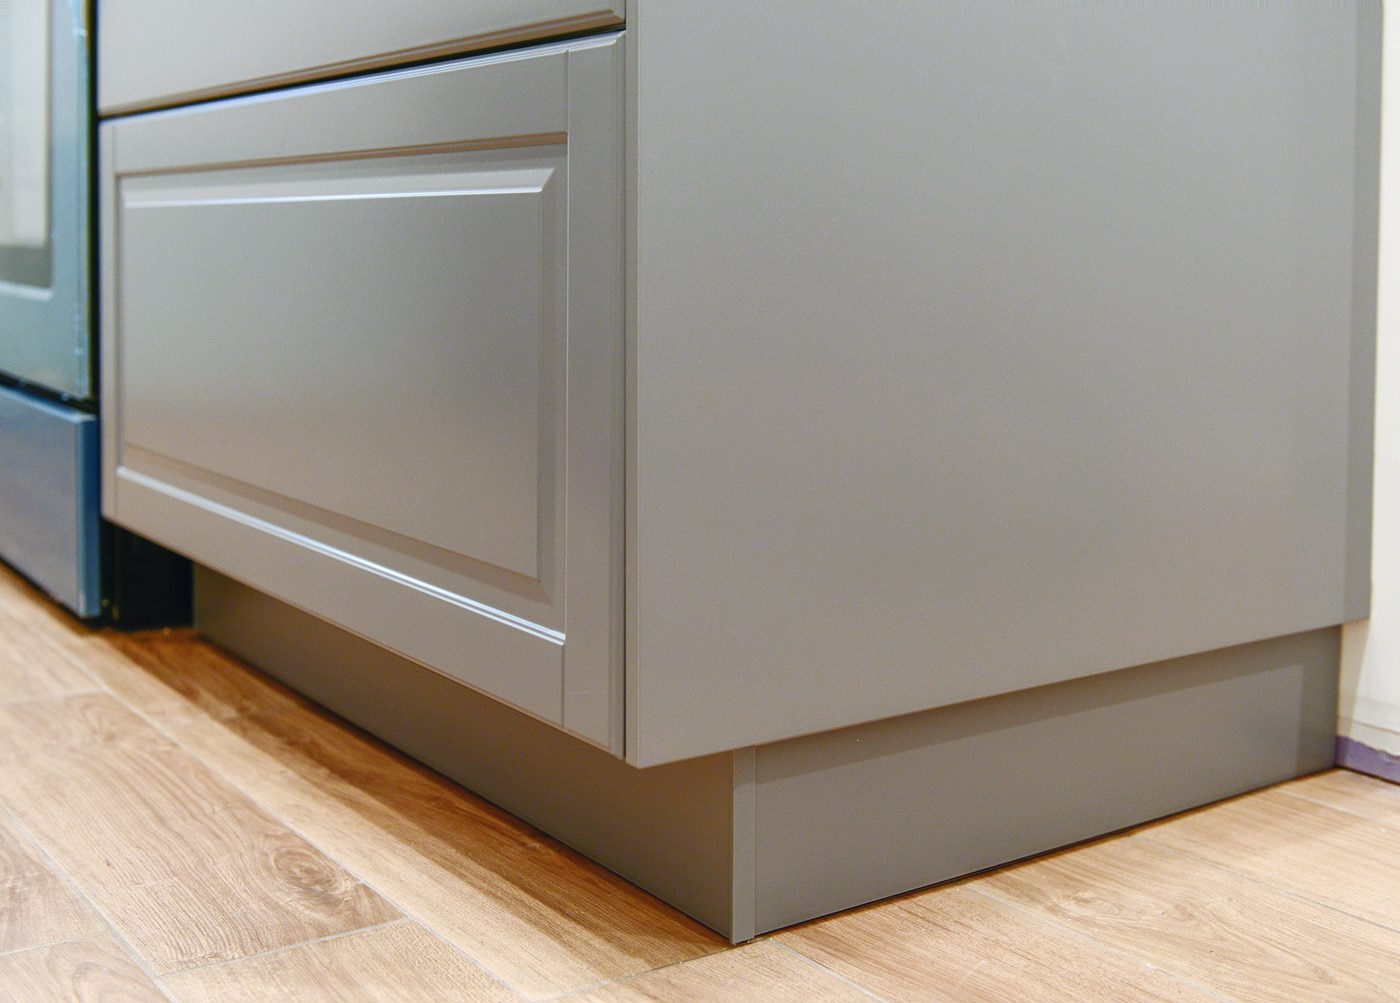
Toe-kick upgrades
The toe-kick is the kitchen’s shoes. If it looks flimsy or mismatched, the whole outfit suffers. Matching toe-kicks and clean base lines quietly elevate everything.
- Match the cabinet color for a seamless, modern look.
- Match the wall color if you want cabinets to look lighter and less blocky.
- Add a furniture-style toe-kick on an island to get a vintage “dresser” vibe.
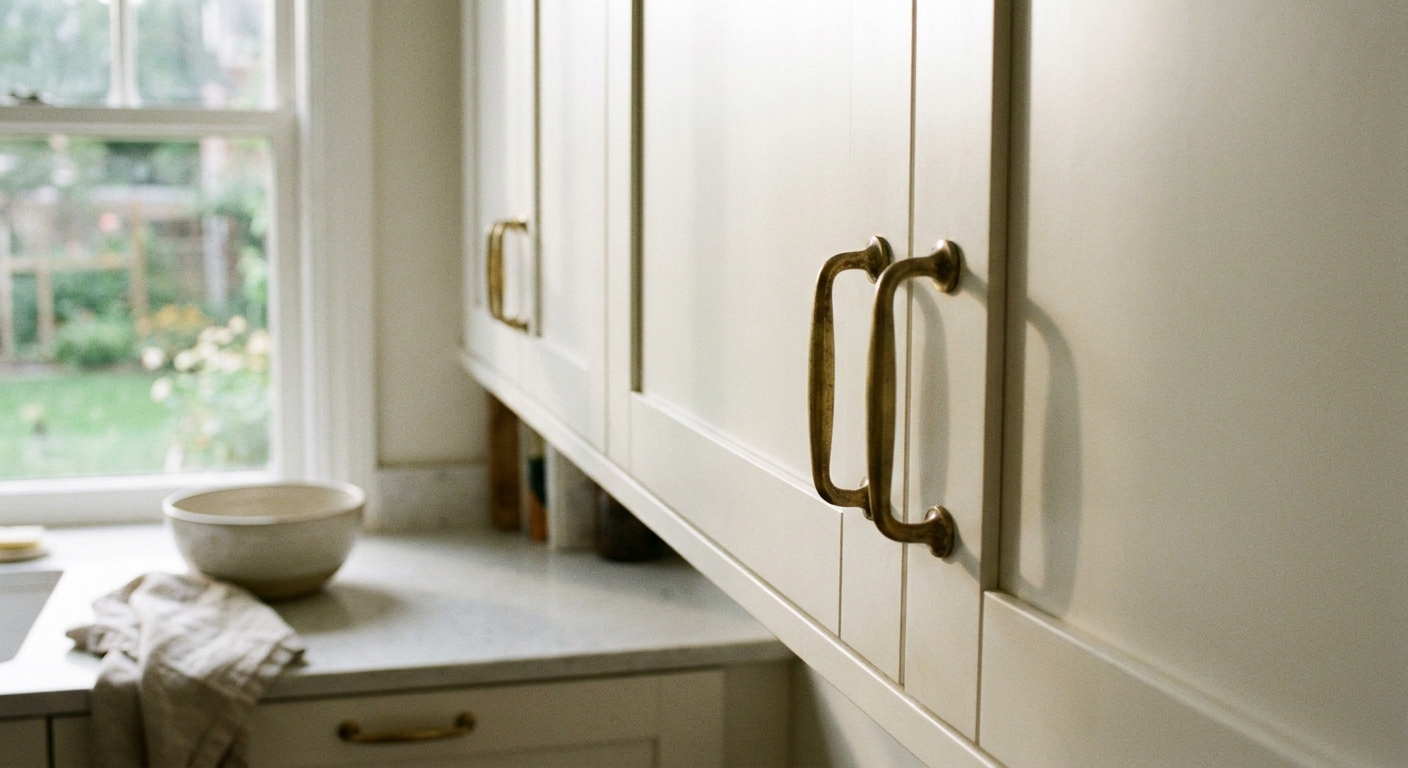
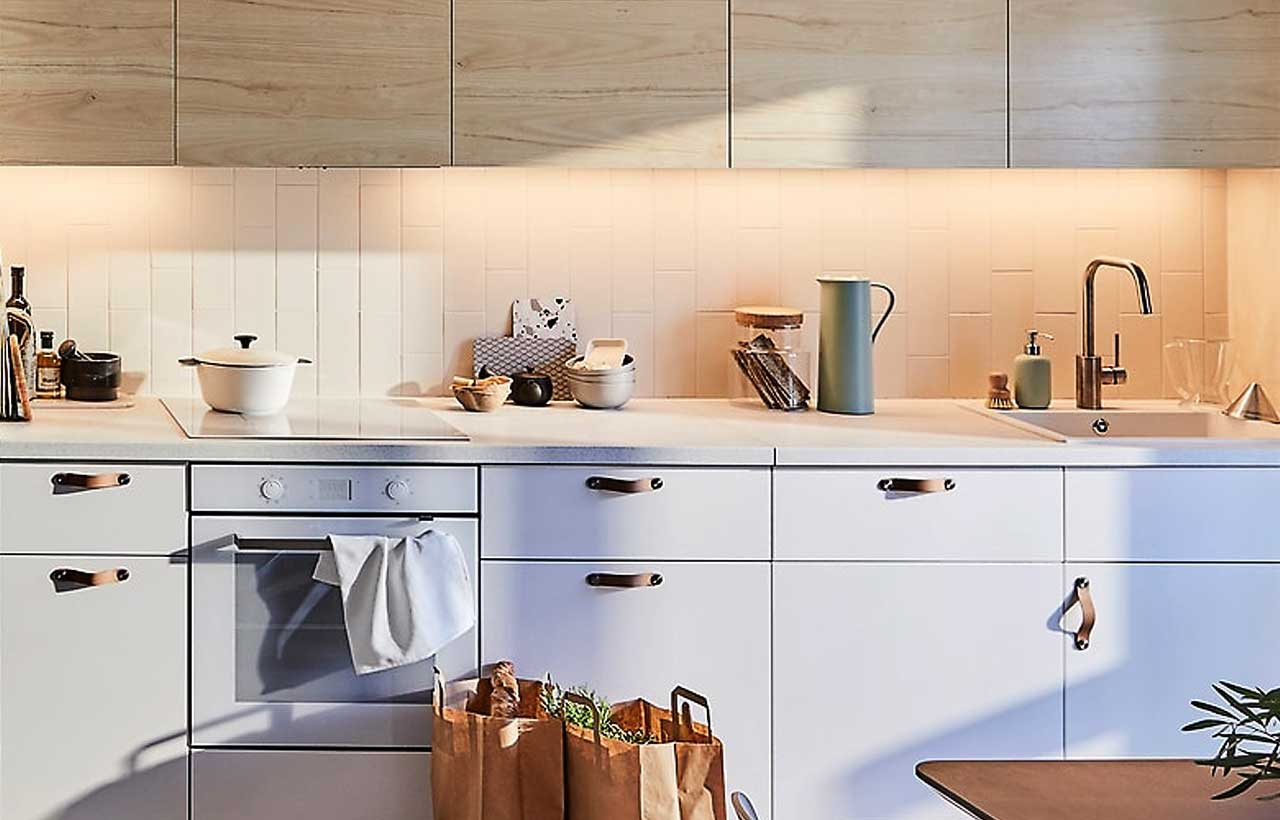
Hardware upgrades (high impact)
Hardware is the quickest change with the most tactile joy. It’s also one of the most reversible updates for renters and commitment-phobes.
Pick a finish that fits your home
- Warm brass: cozy, vintage-friendly, looks beautiful with cream, greige, or deep green fronts.
- Black: graphic and modern, great with white or wood veneer.
- Polished nickel or chrome: classic, especially if your faucet is already in this family.
Get sizing right
Nothing makes new hardware look off faster than inconsistent scale. Use longer pulls on wide drawers and smaller knobs or pulls on doors. When in doubt, slightly oversized reads more “custom” than too small.
Renters: keep it reversible
- Keep the original hardware in a labeled bag.
- Reuse existing holes when possible, so you’re not patching later.
- Use backplates if you need to cover old marks or you’re switching knob to pull.
- Know when tools show up: If hole spacing changes, you might need a drill. It can still be renter-friendly, but it’s no longer a pure “no-tools” situation.
Reversible refresh ideas (renter-friendly)
If you’re renting, you can still make your Sektion kitchen look like you. The key is choosing upgrades that peel off, unscrew, or lift away without leaving a trail behind.
Peel-and-stick, used strategically
- Backsplash: Peel-and-stick tile can look surprisingly convincing from a few feet away, especially in a matte finish. Avoid placing it where it’ll get blasted by high heat or constant steam, and test a corner first. Removal can pull paint if the wall wasn’t prepped well or if paint is fresh.
- Inside glass-front cabinets: Temporary wallpaper behind glass adds charm without dominating the whole room.
- Toe-kick face: A subtle pattern down low can be a quiet design detail.
Lighting that changes the whole mood
Under-cabinet lighting is one of the easiest ways to make any kitchen look more high-end at night. Look for plug-in or battery options if hardwiring isn’t allowed.
- Warm bulbs (not icy white) make countertops and wood tones look richer.
- Diffused strips look more polished than visible dots.
Soft styling: the no-permission layer
Don’t underestimate how much a few thoughtful styling moves can shift the entire vibe:
- A vintage runner that warms up the room and hides imperfect floors.
- A linen cafe curtain to soften a harsh window.
- A wood cutting board and a ceramic crock that live on the counter like still life.
Landlord note: When in doubt, get permission in writing, especially for adhesives. Your future self will thank you.
A refresh roadmap: pick your level
If you’re staring at your kitchen and feeling overwhelmed, choose a “level” and stop there. A refresh works best when it’s contained.
Level 1: One-day upgrade
- Swap hardware.
- Add under-cabinet lighting.
- Style countertops with a simple, cohesive palette.
Level 2: Weekend polish
- Add cover panels to exposed sides.
- Tidy fillers and visible edges.
- Upgrade the toe-kick look (paint or replace visible faces where possible).
Level 3: Big visual shift
- Replace doors and drawer fronts.
- Add trim details like light rail and a clean top treatment.
- Consider a new faucet if yours is dated (and keep the old one if you’re renting).
My rule: Do the faces first (fronts and hardware), then the finishing (panels and trim). That order keeps motivation high because you see results quickly.
Also normal: once new fronts go on, you’ll likely need to tweak hinges and re-level drawer fronts to get even gaps. It’s not you, it’s cabinetry.
Common mistakes to avoid
- Mixing whites without checking undertones: warm cream fronts next to a cool gray backsplash can look accidental fast.
- Skipping panels on an island end: it’s one of the most visible spots in the room.
- Choosing tiny hardware: it can make even beautiful fronts look less substantial.
- Over-styling open shelves: a few good pieces beat a cluttered lineup every time.
- For renters, making changes you can’t reverse: keep original parts, and test removable adhesives on a hidden spot first.
The goal: a kitchen that looks like you
Sektion is a fantastic foundation. You don’t have to gut it to make it look layered, warm, and personal. Swap the faces, finish the edges, add a little trim tailoring, and choose hardware that makes you happy every time you reach for a mug.
Want a cleaner plan before you start ordering? Sketch your cabinet runs, list what’s staying (countertops, appliances, backsplash), and then decide whether your money is best spent on fronts, panels, or lighting first. A contained refresh always looks more intentional than a dozen random upgrades.