IKEA RÅSKOG Cart Hacks for Tiny Kitchens
Clara Townsend
Clara Townsend is an interior stylist, vintage furniture enthusiast, and the creative voice behind Velvet Abode. With over a decade of experience transforming both cramped city apartments and sprawling fixer-uppers, she believes that a beautiful home is built on personal stories rather than massive budgets. When she isn't hunting for the perfect brass sconce at a local flea market, she can usually be found rearranging her living room for the third time this month.
There are two kinds of tiny kitchens: the ones that feel like a charming little Parisian nook, and the ones where opening the fridge means you have to step into the living room. If you’re working with the second type (been there), the IKEA RÅSKOG cart can be a genuine sanity-saver. It’s narrow, it’s vertical, it rolls, and with a few small tweaks it can look less like “utility cart” and more like “custom piece you found at a vintage shop and somehow made work.”
This is my favorite kind of home upgrade: one that respects your budget, your rental agreement, and the fact that you shouldn’t have to sacrifice beauty just because your kitchen is the size of a postage stamp.
Quick note before you start: RÅSKOG comes in a few versions over the years and across markets. Before you plan a “tuck beside the fridge” moment, grab a tape measure and check the current IKEA product page for your model’s dimensions and max load.
Before You Hack
RÅSKOG hacks look more custom when the cart doesn’t wobble. A sturdy base also protects your floors because you’re less likely to drag a crooked wheel.
Assembly tips
- Assemble on a soft surface like a rug or folded towel to avoid scuffing the powder coat while you work.
- Don’t fully tighten screws until the frame is together. Get everything loosely aligned first, then tighten in stages. This reduces racking and wobble.
- Use a hand screwdriver for the final turns. Power drivers can strip hardware fast, especially if you’re tired and rushing.
- Level check: once assembled, set it on a flat floor and gently press each corner. If it rocks, loosen the frame slightly, push it square, and retighten.
How to load it safely
IKEA provides product-specific load guidance (and it can vary by version), so check the product page for your exact cart. In day-to-day renter terms, the rule is simpler: spread weight evenly, keep heavy items low, and avoid overloading the top tier where leverage makes the cart tippy.
- Bottom tier: best for dense items like canned goods, small appliances, or a stack of mixing bowls.
- Middle tier: daily grab items like oils, salt box, coffee pods, snacks, dish towels.
- Top tier: keep it light-ish. Think mugs, a small tray, fruit, or a compact coffee maker. Avoid stoneware stacks or big water jugs up top.
If you have hardwoods, cork, or softer vinyl plank or sheet vinyl, be extra cautious with concentrated weight, like glass bottles and cast iron. The goal is fewer pressure points, not more.
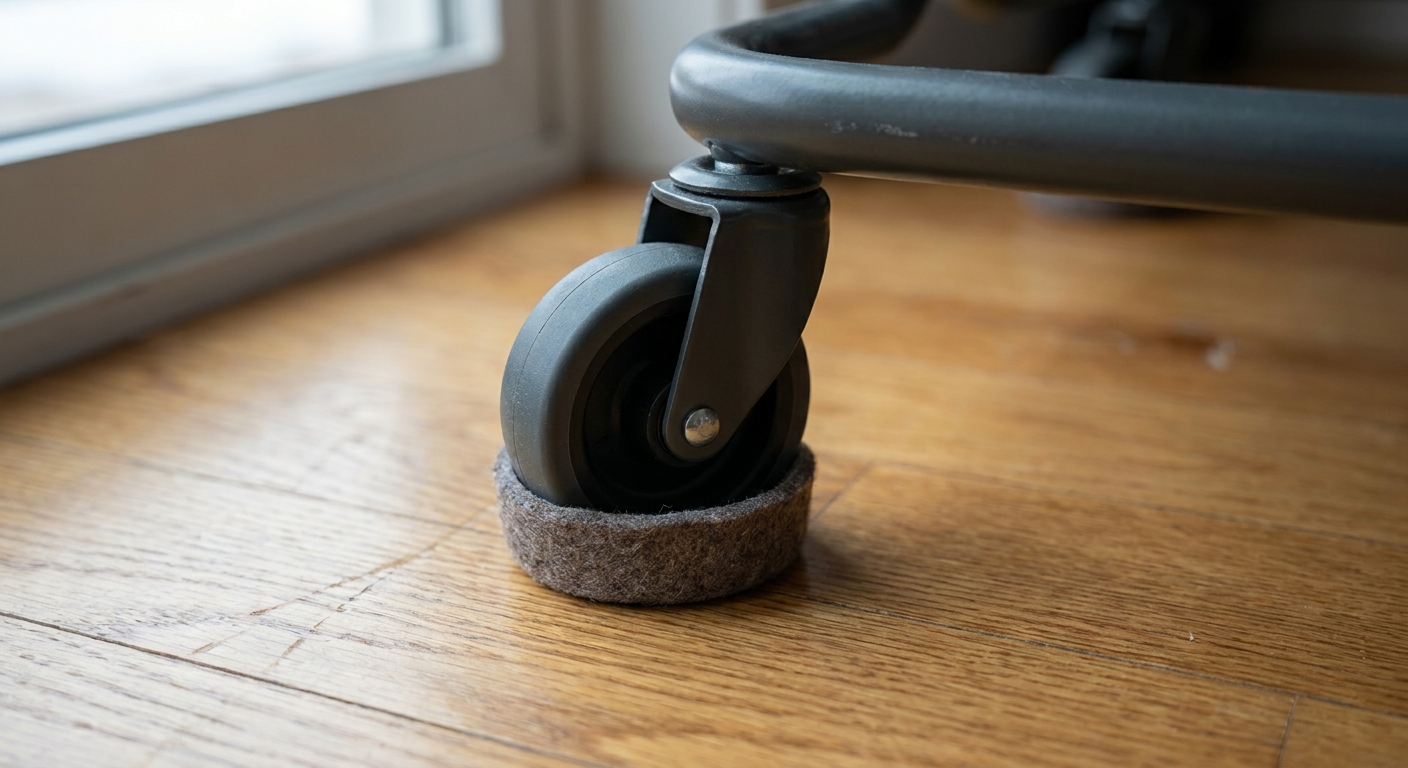
Caster Care
The wheels are the whole point, but they can also scuff or leave dents in softer wood floors if grit gets involved.
Hardwood-friendly habits
- Add a clear floor protector under your “parking spot.” A thin, clear polycarbonate mat or a discreet felt-backed rug keeps grit from grinding into the finish.
- Clean the casters monthly. Hair, crumbs, and dust create drag. Flip the cart gently and pull debris out with tweezers.
- Wipe wheels before crossing rooms. If your kitchen opens to the living room, do a quick wheel check, especially after sweeping.
- Don’t pivot in place on soft wood. Rolling forward and back is kinder than a sharp twist that grinds a wheel edge into the floor.
Optional upgrade: softer casters
If your floors are precious (or your downstairs neighbor is), consider swapping to soft rubber casters. Many RÅSKOG carts use an M8 threaded stem, but don’t assume. IKEA has revised hardware over time.
- Check first: remove one caster and confirm whether it’s a threaded stem (often M8) or a grip-ring stem.
- Measure: stem diameter and stem length, then match replacements to those measurements.
It’s an invisible upgrade that makes the cart feel more “built-in” because it moves smoothly and quietly.
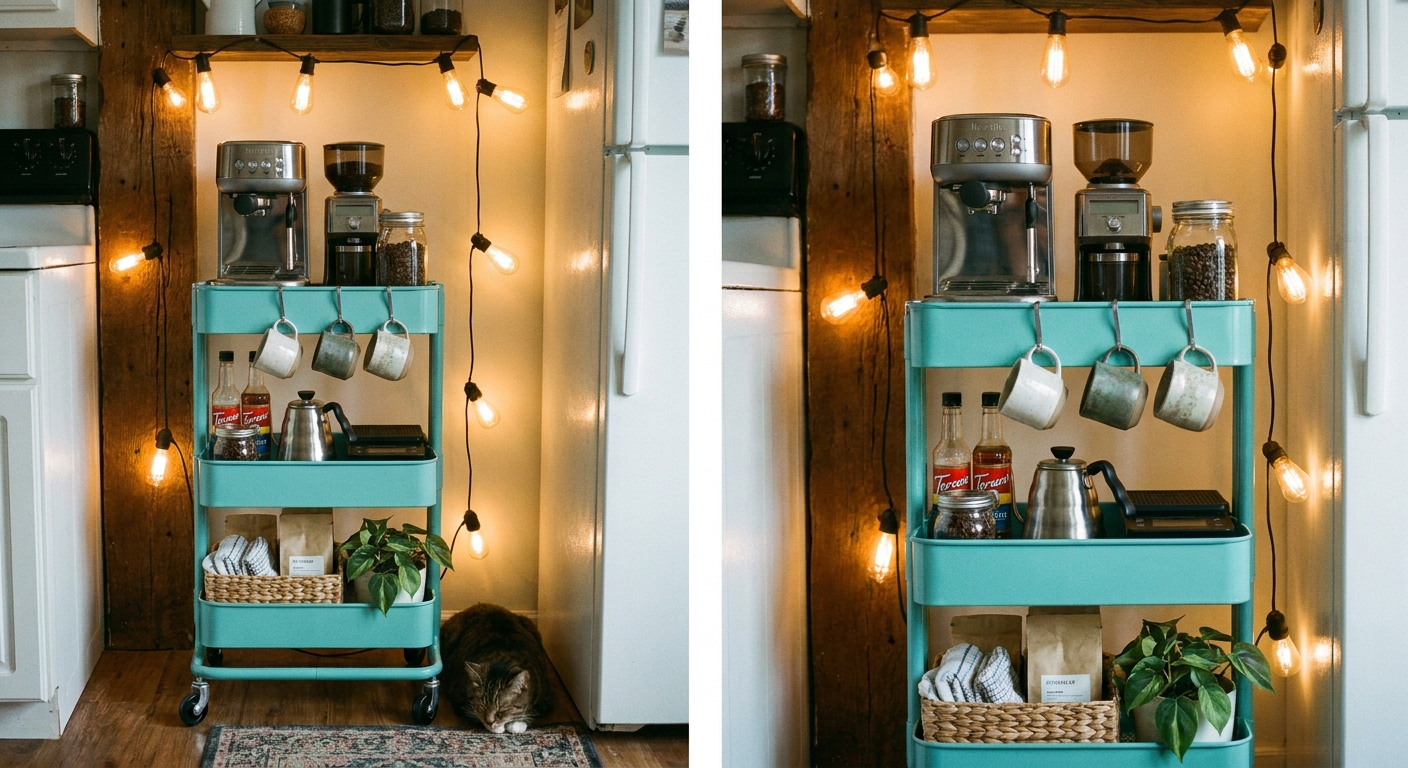
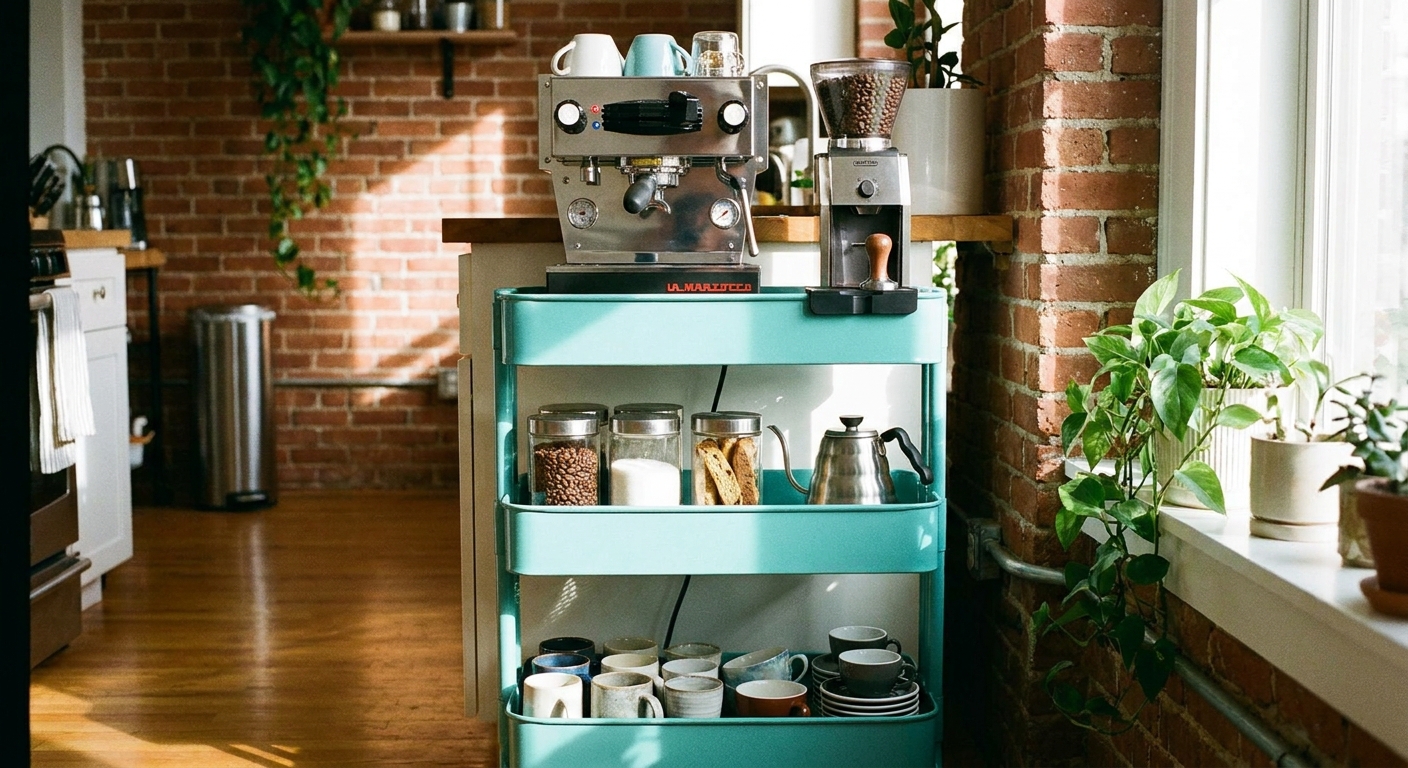
Hack 1: Coffee Bar
A coffee setup on the counter can make a small kitchen feel crowded fast. Putting it on a RÅSKOG cart creates a dedicated zone, and it frees your prep space. The custom-looking trick is to style it like a “station,” not storage.
Set it up
- Top tier: espresso machine or kettle on a small tray (the tray is key, it visually frames the setup).
- Middle tier: canisters for coffee and tea, a sugar bowl, a small jar for spoons.
- Bottom tier: mugs, filters, extra beans, or a basket for syrups.
Make it look custom
- Add a removable top. The easiest official option is IKEA’s HÖGSMA bamboo cutting board, designed to sit on the RÅSKOG as a lid-style top. You can also use a cut-to-size wood panel or butcher-block remnant.
- Keep it from sliding (safely). Museum putty or removable mounting squares can help prevent a top from shifting, but they’re not a structural fastener. If you’re placing a heavier appliance up top, test stability before you trust it, and don’t roll the cart with hot liquids on it.
- Limit visible packaging. Decant pods and tea bags into simple jars. Labels optional, calm is mandatory.
- One warm light source nearby. An amber bulb in a small lamp in the kitchen or adjacent room makes the metal cart feel cozy and intentional.
Best placement
Park it near an outlet and somewhere it won’t block fridge swing or a main walkway. If you’re in a truly tiny galley, a corner “parking spot” helps it land beautifully.
At a glance
Tray, 2 to 3 jars, optional HÖGSMA top, S-hooks or clip-on cup hooks, small basket for backups, heat-resistant mat if using a kettle.
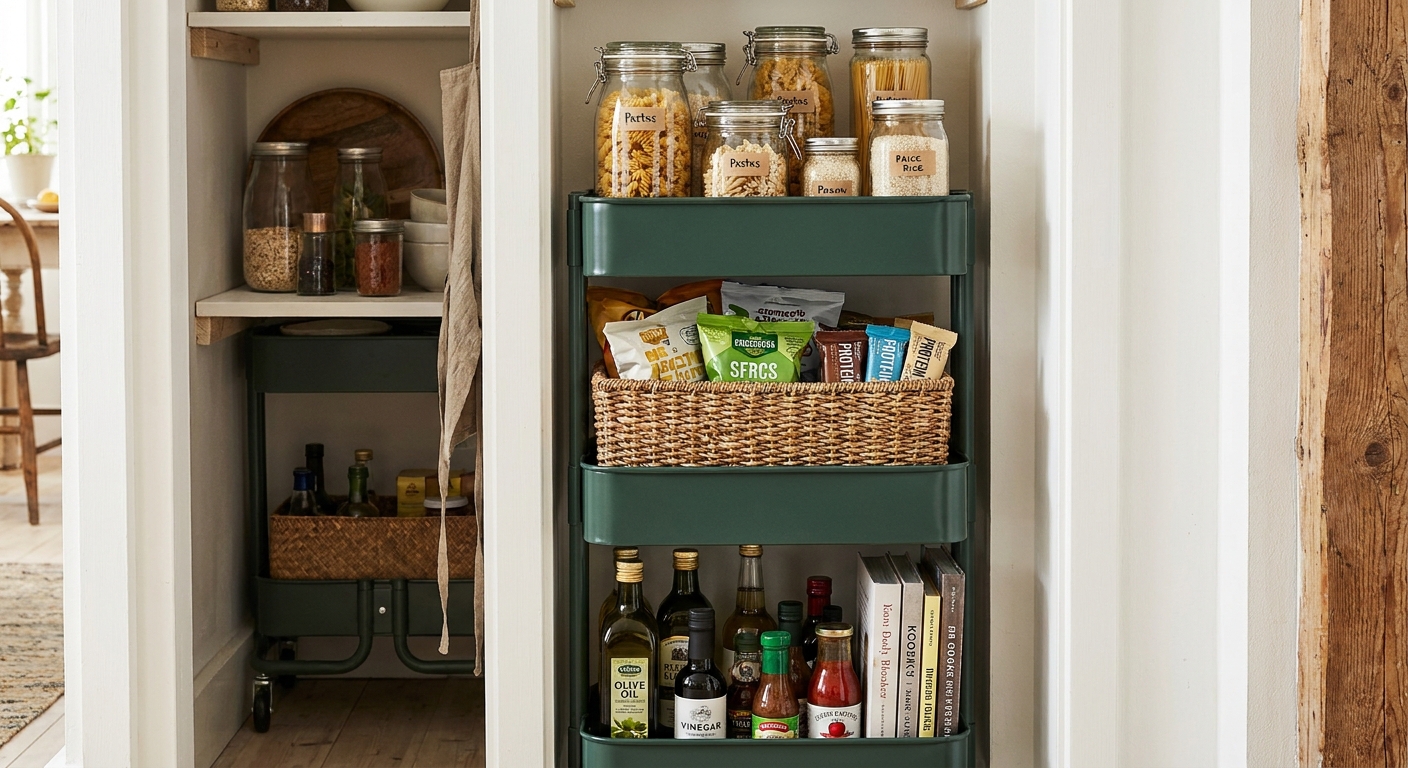
Hack 2: Pantry Cart
If you don’t have a pantry, you end up with chips in the oven drawer and pasta in places pasta shouldn’t be. RÅSKOG is perfect for pantry overflow because it’s narrow enough to tuck beside the fridge or the end of a counter.
What to store where
- Bottom tier: cans, jars, and anything in glass. Add a low bin so bottles can’t tip.
- Middle tier: grains, pasta, crackers in airtight containers.
- Top tier: grab-and-go snacks, fruit, bread, or a small basket for lunch items.
Make it look custom
- Use two or three matching containers. You don’t need a full set. Even a small pod of matching jars reads cohesive.
- Add hooks. If you have IKEA clip-on accessories or renter-safe S-hooks, hang produce bags, measuring spoons, or a small towel.
- Keep one shelf breathable. A little negative space makes it look curated, not crammed.
Best placement
Tuck it where it won’t block appliance doors. If it lives beside the fridge, make sure you can still open drawers and lower freezer doors without doing a shuffle.
At a glance
Airtight containers, low bin for bottles, 1 basket for snacks, labels (optional), hooks.
Hack 3: Prep Station
This is my favorite for truly cramped kitchens. Park the cart where you prep, roll it away when you need to open the dishwasher, and suddenly the room works with you instead of against you.
Set it up
- Top tier: cutting board that fits the cart’s footprint, plus a small crock for your most-used tools.
- Middle tier: mixing bowls, colander, measuring cups, spices you use daily.
- Bottom tier: small appliances you hate looking at but use often, like a blender or toaster.
Built-in effect
Try positioning the cart so it visually caps a run of cabinets, like an end piece. If you can, match one element to your kitchen hardware: a brass tray if you have brass pulls, or a black tray if your faucet is matte black.
Best placement
Keep it close to your main prep zone, but not in the path of the oven door or dishwasher. If you roll it often, keep the top tier extra stable.
At a glance
Cutting board, utensil crock, small tray for oils or spices, shelf liners.
Hack 4: Sink-Side Caddy
Small kitchens often have nowhere to stash dish soap, scrubbers, and microfiber cloths. The cart can live beside the sink and hold the unglamorous stuff without turning your counter into a cleaning aisle.
What to put on it
- Top tier: a small bin for soap refills and sponges, plus a little tray to catch drips.
- Middle tier: folded towels and microfiber cloths in a basket.
- Bottom tier: recycling overflow, paper towels, or bulk refills.
Keep it calm
- Decant dish soap into a glass pump and use a matching spray bottle for all-purpose cleaner.
- Choose one basket material on the cart, like woven seagrass or wire, and repeat it.
Water and rust notes
RÅSKOG’s powder coat is tough, but standing water isn’t anyone’s friend. Use a drip tray, wipe spills quickly, and skip leaving wet sponges directly on the metal if you want it looking nice long-term.
Best placement
Park it where it won’t get splashed constantly. If your sink runs wild, even shifting it a few inches can save you from daily wiping.
At a glance
Drip tray, small bin, matching pump bottles, basket, optional shelf liner.
Hack 5: Multi-Zone Cart
RÅSKOG earns its keep when it pulls double duty beyond the kitchen. If your home is small, you can style one cart to rotate between zones depending on the week.
Bedside stack
- Top: lamp, book, water glass on a coaster.
- Middle: skincare, journal, chargers in a small box.
- Bottom: extra linens or a basket of “stuff that floats” like hand cream and socks.
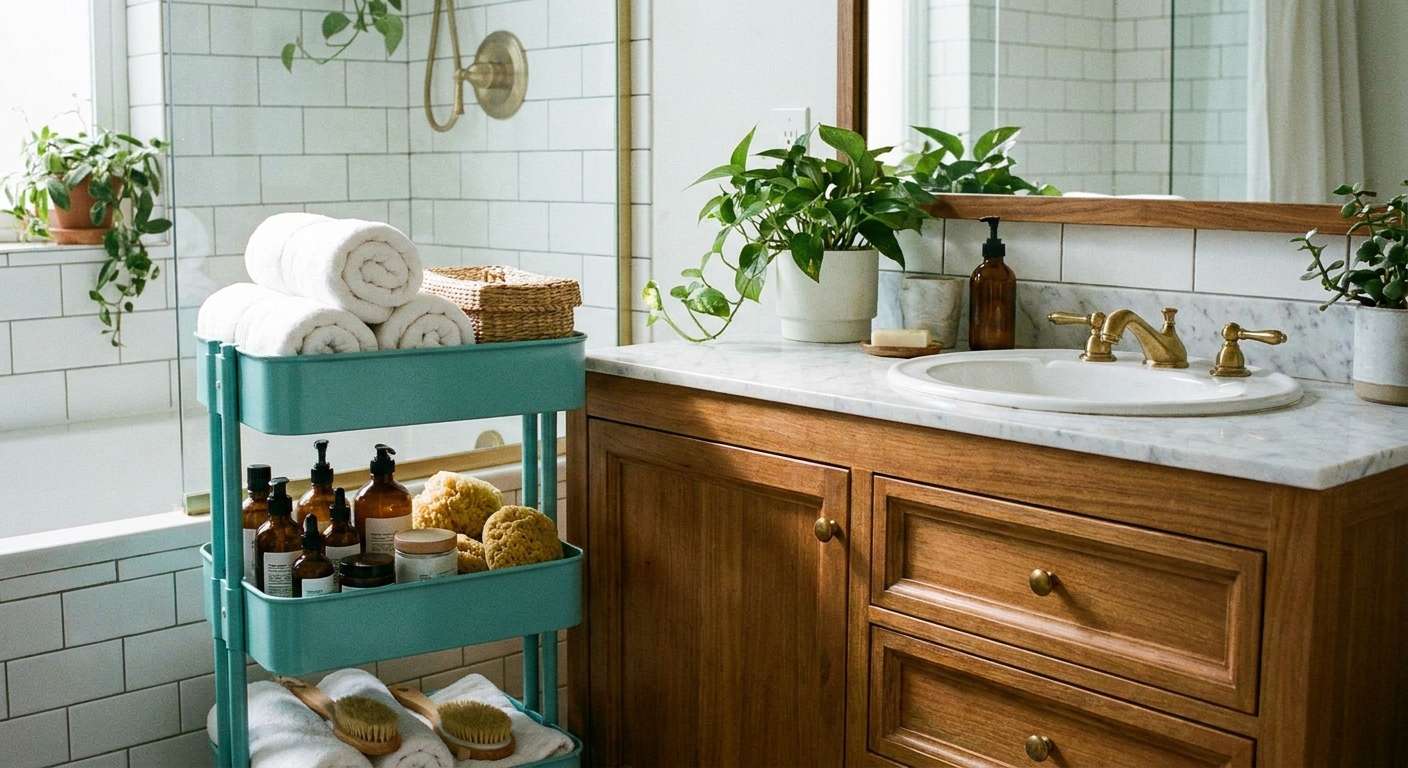
Bathroom storage
- Top: daily skincare and a small dish for rings.
- Middle: rolled washcloths, hair tools in a heat-safe caddy.
- Bottom: toilet paper, refills, cleaning supplies.
Even if you bought it for the kitchen, it’s nice to know your cart can moonlight anywhere you need it.
Paint and Finish Ideas
The default powder-coated metal is practical, but if you want that custom look, finish is everything. The goal is to make the cart feel like it belongs to your home’s palette.
Finish ideas
- Soft matte tonal: paint the cart a shade close to your cabinetry or walls. A near-match reads built-in, especially when parked at the end of a cabinet run.
- Inky and classic: deep charcoal or black with warm wood on top. This gives “vintage bar cart” energy in the best way.
- Warm neutral: a creamy beige or putty color softens the industrial feel and looks lovely with brass and linen textures.
Renter-friendly options
If you can’t commit to paint, do a styling finish instead:
- Add a removable wood top to break up the metal.
- Use woven baskets to introduce texture and hide visual clutter.
- Wrap the handle in removable leather or faux leather. Keep it neat and tight so it looks intentional.
If you paint it
For the most durable finish, lightly scuff-sand, clean thoroughly, then use a metal-appropriate primer and a high-quality enamel. Let it cure fully before loading it up. Dry-to-touch isn’t the same as cured, and carts get bumped.
Details That Help
- Create one moment on the top tier. A tray, a small vase, a candle you actually like. This tells the eye it’s decor, not just storage.
- Repeat a finish you already have. If your kitchen has brass hardware, add a brass-toned scoop or a warm metal tray.
- Use matching linens. A couple of linen towels in the same tone instantly elevates the whole cart.
- Line the shelves. A thin washable liner or a fitted tray makes rattling quieter and cleanup easier.
- Keep the floor underneath clean. The most styled cart in the world still looks messy if crumbs collect under it.
My tiny-kitchen rule: if it rolls, it must also land beautifully. Give your cart a dedicated parking spot where it looks like it belongs.
Quick Troubleshooting
It wobbles
Loosen screws slightly, press the frame square on a flat surface, then tighten gradually in a crisscross pattern. Check that all casters are fully seated.
Wheels squeak or drag
Clean debris from the casters and wipe them down. If they still drag, you may be carrying too much weight up top or rolling over grit. Softer casters can also help, as long as the stem type and size match your cart.
It still looks like a utility cart
Try one of these fast fixes: add a wood top, swap mismatched containers for two matching jars, or introduce one warm-toned texture like a woven basket or linen towel.
Wood top feels stressed
If you’re using a kettle or coffee maker, add a heat-resistant mat and wipe moisture right away. Wood and steam are not best friends.
Closing Thoughts
The RÅSKOG cart is a small-kitchen hero because it’s honest about what it is: practical, compact, and flexible. Your job is to give it a little personality so it feels like part of your home’s story. Start with one use case, style the top shelf like you mean it, and let the cart earn its spot. It will.