IKEA NORDLI Hacks That Look Like Built-Ins
Clara Townsend
Clara Townsend is an interior stylist, vintage furniture enthusiast, and the creative voice behind Velvet Abode. With over a decade of experience transforming both cramped city apartments and sprawling fixer-uppers, she believes that a beautiful home is built on personal stories rather than massive budgets. When she isn't hunting for the perfect brass sconce at a local flea market, she can usually be found rearranging her living room for the third time this month.
If you have ever looked at a wall of custom cabinetry and thought, sure, but not on my budget, NORDLI is your new best friend. IKEA’s NORDLI line was made to be modular, but the real magic is how easily it can be styled to read like built-in millwork once you treat the whole run like one continuous piece. The secret is not complicated. You are aiming for three things: a seamless layout, a deliberate top and base, and hardware that feels intentional.
Below are my favorite NORDLI configurations and built-in style finishing details that push it from “nice IKEA dresser” to “wait, did you have that installed?”
Quick note before you plan: NORDLI availability and module sizing can vary by country and over time. Always double-check what is currently sold in your region and confirm dimensions before you design your layout.
Why NORDLI can look built-in
NORDLI has a few built-in advantages for a faux millwork moment:
- Modularity: You can combine IKEA’s set module sizes to suit your wall length and storage needs.
- Flat, minimal drawer fronts: A clean face is easier to customize with pulls, paint, or a continuous top.
- Low-profile proportions: It sits comfortably under windows or can be stacked to feel like a wardrobe base.
The biggest tell with most IKEA hacks is the “furniture gap” at the sides and the lack of trim. Once you eliminate those, your eye reads the entire run as architecture instead of product.
Reality check (and safety check): You can plan around outlets and awkward corners, but radiators and heat registers are not a styling challenge, they are an airflow and safety issue. Do not block heat sources, and keep clearances that match your local guidance and the appliance manufacturer’s recommendations .
Layouts that feel built-in
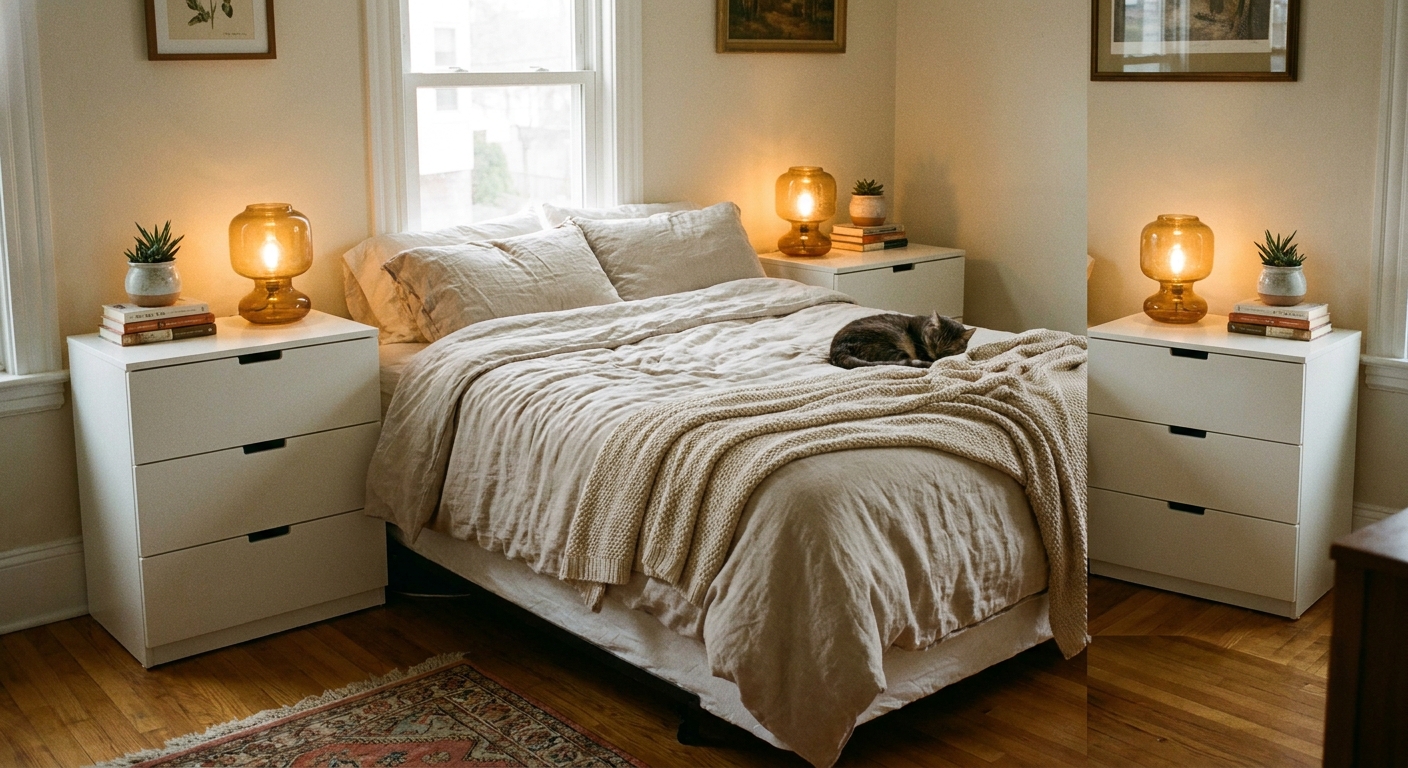
1) Flank the bed
This is my favorite small-room trick because it makes a bed look grounded, like it was designed for the space. Use two identical NORDLI units as nightstands, then visually connect them with a shared element.
- Classic: One 2-drawer unit per side, each with its own lamp and art above.
- Built-in effect: Use taller stacks on both sides and run a single floating shelf (or a bridge shelf) above the headboard line.
- Extra storage: If your bed is centered on a long wall, add a third low unit under a window or along an adjacent wall to make the room feel planned.
Stylist’s note: Keep the tops sparse. One lamp, one small dish, one book stack. Built-ins look calm because they are not styled like a shop display, even when they are full of treasures.
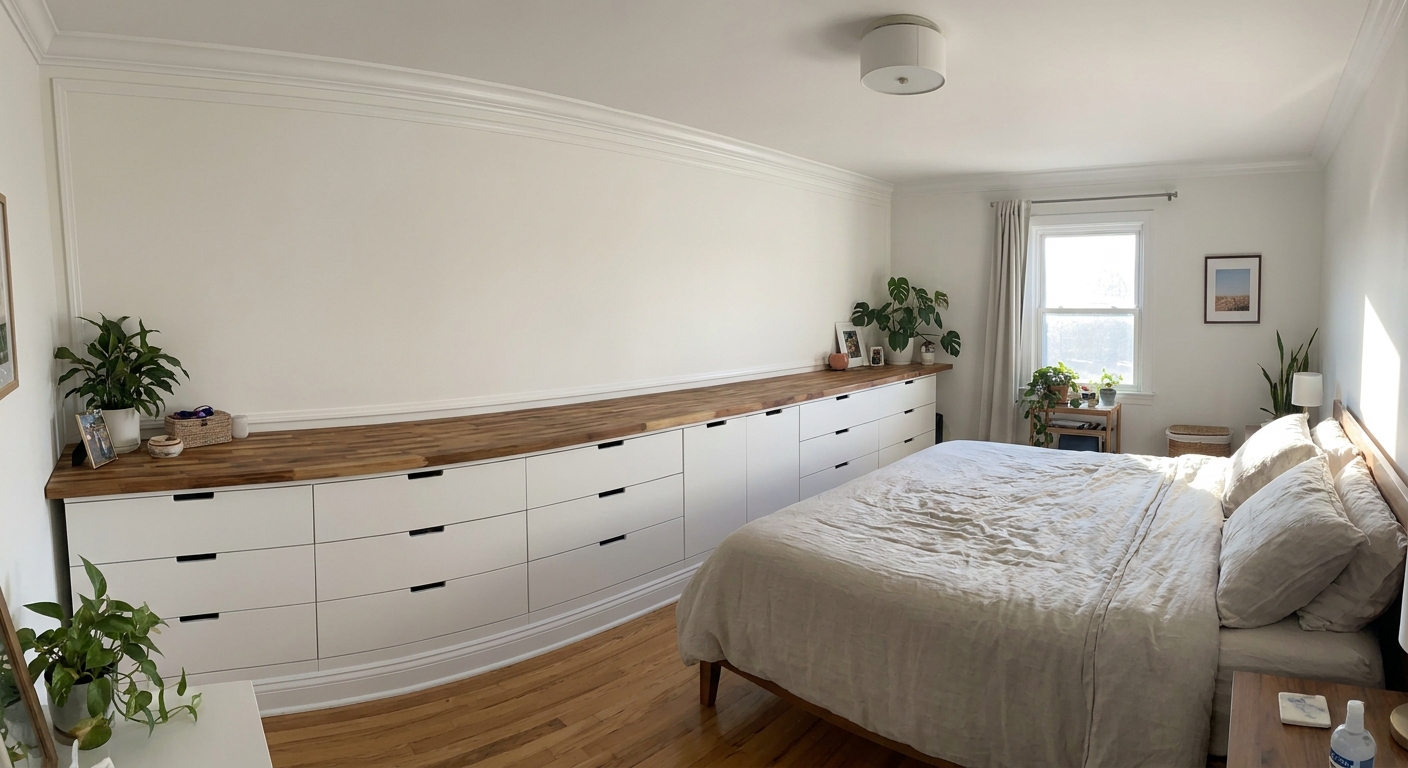
2) Wall-to-wall dresser run
If you have a blank wall, you can build a long, low bank of drawers that looks like a custom dresser built into the room. The key is to plan it like cabinetry, not like separate dressers.
- Measure the wall and decide whether you want a tight fit from corner to corner, or breathing room with scribed fillers on each side.
- Choose a consistent height across the run. Even if you mix module widths, keeping the top level is what reads as built-in.
- Leave intentional clearance for baseboard returns, door swings, and vents.
Pro move: If your wall is slightly longer than your NORDLI combo, do not center the gap. Push the run to one side and use the leftover space for a tall plant, a hamper niche, or a narrow book tower. Symmetry is pretty, but intentional asymmetry looks designed.
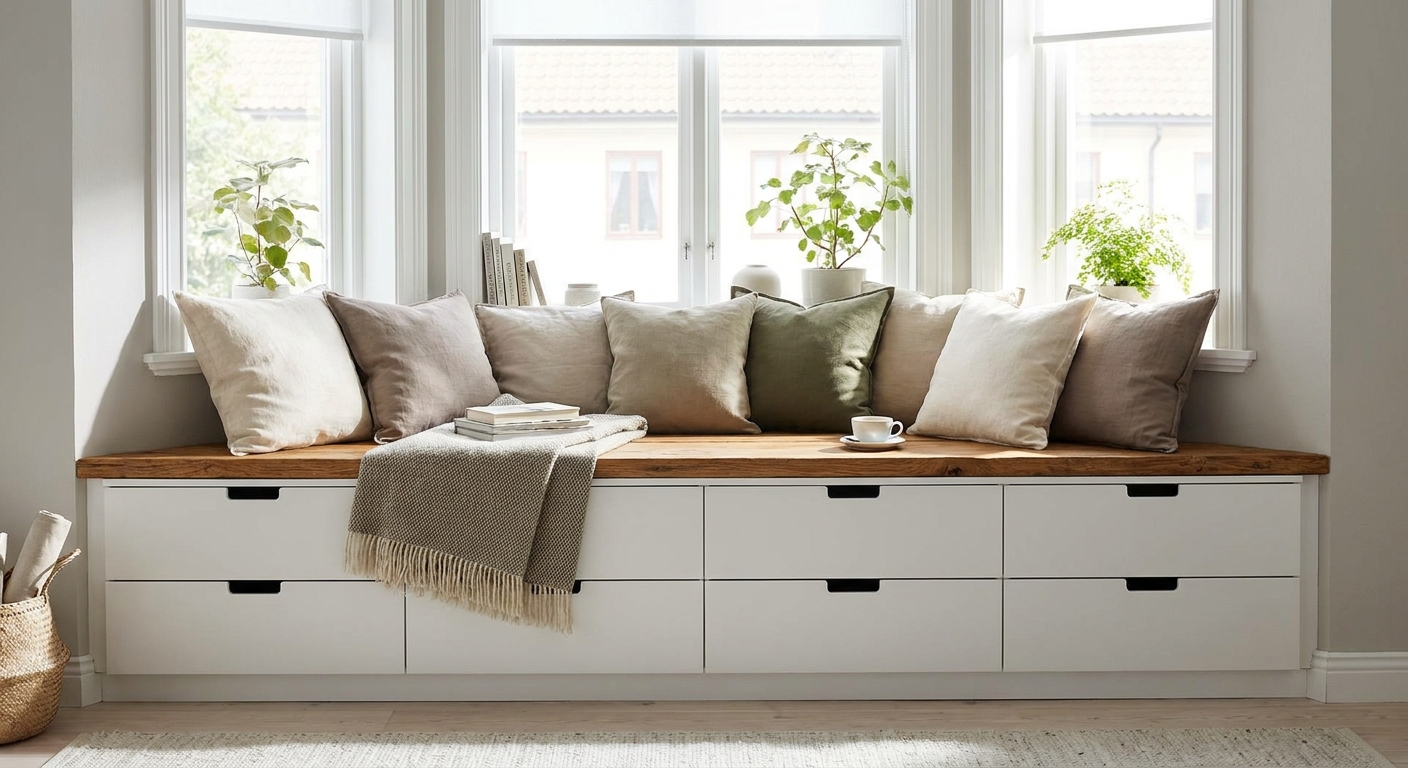
3) Under a window
NORDLI is especially good under windows because the low height can stay below the sill line, letting the window remain the star. This is gorgeous in bedrooms, kids’ rooms, and dining nooks.
- Low and long: Use a continuous run and cap it with a wood top for a bench-like feel.
- Add function: Style with a cushion and two throw pillows to create a reading perch.
- Make it architectural: Run trim up the sides to meet the window casing, so it feels integrated.
4) Two-tier: drawers + shelves
To mimic true millwork, combine the “base cabinet” feeling of NORDLI with something lighter above.
- Option A: Add floating shelves, evenly spaced, and align their ends with the edges of the NORDLI run.
- Option B: Mount a rail and hang art, baskets, or small planters (especially lovely in an office).
- Option C: Add wall cabinets above, but treat them with the same trim and paint so the whole unit reads as one installation.
Visual trick: Repeat one material. If the top is oak, add oak picture frames or a single oak shelf to tie it together.
Finishes that look installed
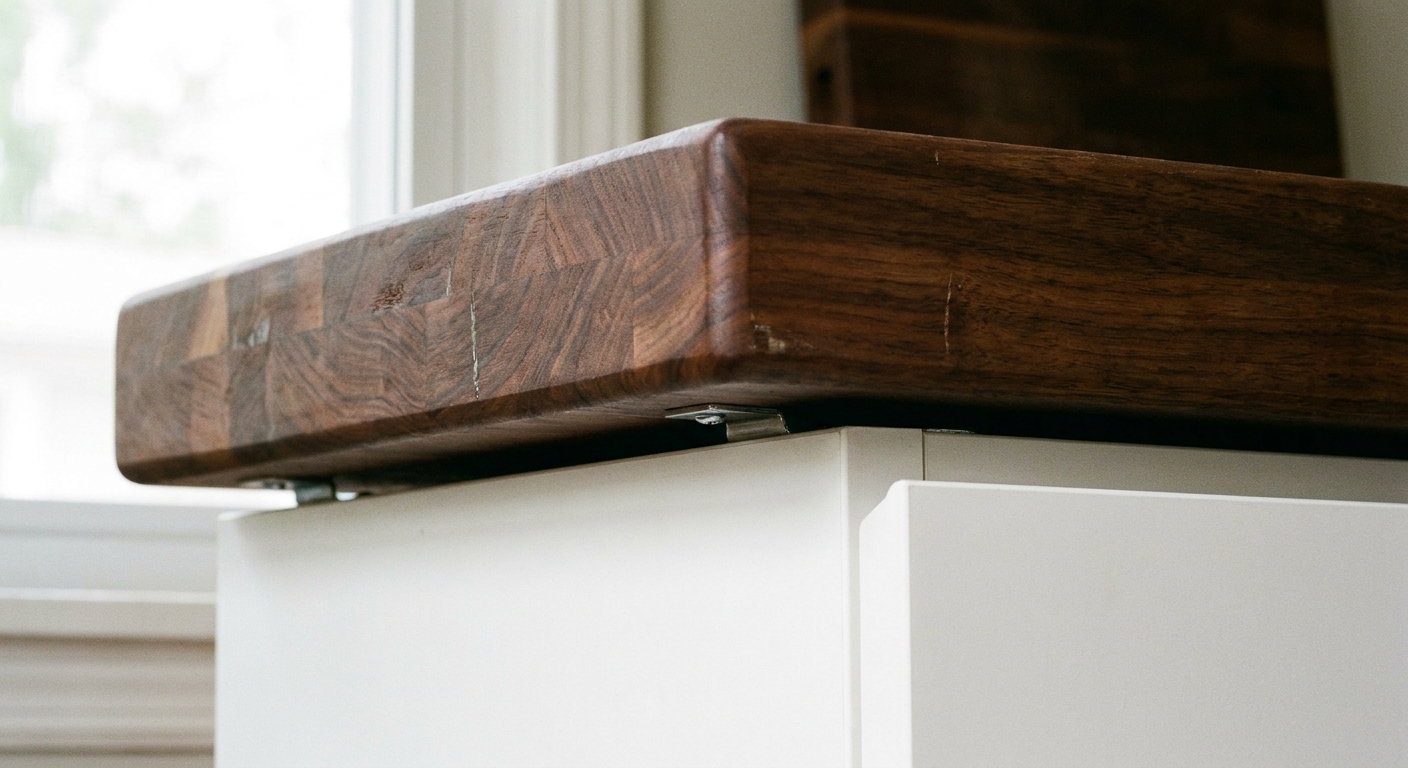
Top caps
A continuous top is the quickest way to unify separate NORDLI modules. It turns the run into something that feels like cabinetry.
- Materials that look high-end: oak or walnut butcher block , plywood with edge banding, or MDF if you plan to paint.
- Thickness matters: A slightly thicker top reads more like millwork than a thin panel.
- Overhang: A small, consistent overhang on the front looks custom. As a starting point, aim for about 1/2 to 1 inch, then adjust to your room and your baseboard depth.
If you are stain-matching to existing floors, test samples in morning and evening light. Wood tone changes dramatically once your lamps are on, and your home is where lamp light lives.
Install note: If the top is real wood, allow a little seasonal movement. Fasten in a way that lets it expand and contract (for example, with figure-8 fasteners or slotted holes), rather than gluing it down edge-to-edge.
Toe-kicks and baseboards
Built-ins look built-in because they meet the floor like they belong there. You can get this look two ways:
- Toe-kick platform: Build a simple 2x4 or plywood platform, level it, then set the NORDLI units on top. Finish the front with toe-kick trim.
- Baseboard wrap: Install baseboard across the face, or add baseboard returns at the ends to connect it to the room’s existing trim.
Design detail I love: If your home has taller baseboards, match that height across the NORDLI run. It is one of those quiet choices that makes the whole thing feel original to the house.
Side fillers and scribing
If your run ends against a wall, you will often have a small gap because walls are rarely perfectly square. That gap is what makes people clock “freestanding furniture.”
- Use filler strips (painted wood or MDF) to bridge the gap.
- Scribe to the wall by trimming the filler to follow the wall’s curve if needed.
- Caulk + paint for a seamless finish.
As a practical planning range, many DIYers leave roughly 1/4 to 3/4 inch per side for scribing, depending on how wonky the wall is. If you do not know, start with more. You can always trim down.
This is also where you can hide cords, especially if you are turning the top into a vanity or media surface .
Hardware choices
Option 1: Pulls
If you want your NORDLI to feel like heirloom millwork, add pulls. This is where you can sneak in personality without adding clutter.
- For a classic built-in look: simple brass knobs, aged bronze cup pulls, or polished nickel if your home leans traditional.
- For a modern millwork vibe: long linear pulls in matte black or brushed stainless.
- For a soft, vintage twist: glass knobs with warm-toned metal bases.
Tip: Keep the pull finish consistent across the whole run. Built-ins look cohesive because the details repeat. Also, order a couple extras. Hardware loves to go out of stock the minute you decide you want matching pieces.
Option 2: Push-latch
Push-latch can look beautifully modern, especially in a calm bedroom or a white-on-white space. Just know what you are signing up for:
- Pros: seamless look, no hardware decisions, easier to wipe down quickly.
- Cons: fingerprints show up, and drawers can feel fussier if alignment is even slightly off.
If you have kids or you cook in the same room, I often prefer pulls. They are friendlier, and they age better.
Join, anchor, and level
Connect modules
Once your layout is set, treat the run like one unit. Many built-in looks fall apart when the modules shift apart over time.
- Attach units together where they meet, so the faces stay aligned. Follow IKEA guidance where provided, or use appropriate fasteners for your specific configuration.
- Check drawer reveals (the gaps around the drawer fronts) before you commit to trim and top caps.
Anchor to the wall
This is non-negotiable. Dressers should be anchored to prevent tip-over, especially if you are stacking units, building a long run, or living with kids or pets .
- Use anti-tip hardware (often included) or heavy-duty furniture straps.
- Anchor into studs when possible, or use wall anchors rated for your wall type and load.
- Follow IKEA instructions for your exact units and your local building standards.
Level on uneven floors
If you live in an older home or a charmingly wonky apartment, leveling is not optional. A run that is even slightly off can cause drawers to rub, sit unevenly, or creep open, which breaks the built-in illusion fast.
Leveling steps
- Start with the floor, not the drawers: If you are building a long run, level a platform first. It is easier to level one base than six separate units.
- Use shims strategically: Composite shims (or good wood shims) under platform corners help you fine-tune without squish.
- Check level in both directions: Front-to-back and side-to-side, especially near where modules meet.
- Secure before finishing: Once everything sits right, connect modules, anchor to the wall, then add the top and trim.
Drawer test: Before you add any trim, open and close every drawer. If anything catches now, it will only get fussier once you lock it in with finishing pieces.
Paint prep (if you paint)
If you plan to paint for a true built-in look, prep is what makes it last. IKEA finishes vary, and some surfaces resist paint if you skip the boring steps.
- Clean: Remove oils and residue with a degreaser.
- Scuff sand: Lightly sand to give primer something to grip.
- Prime: Use a bonding primer suited to laminate and factory finishes.
- Topcoat: Choose a durable cabinet-grade paint, and let it cure fully before heavy use.
Checklist
- Measure wall length, ceiling height, and baseboard depth.
- Confirm the NORDLI module sizes available in your country.
- Decide if you want a tight fit or fillers at the ends.
- Plan a continuous top and choose the finish early.
- Pick hardware before you drill, and order extra.
- Level first, then connect modules, then anchor, then trim.
- Leave access for outlets and cords if the top will hold lamps, a TV, or a vanity mirror.
- Keep clearances around heat sources and vents.
Styling that feels intentional
Once the millwork part is done, styling should be simple and a little tactile. Think linen, ceramic, aged brass, and one good lamp that makes the whole corner glow at night.
- Top styling rule: group items in threes, and keep at least one-third of the surface clear.
- Add softness: a small linen runner or a single woven tray keeps things from feeling too hard and boxy.
- Anchor with art: one larger framed piece reads more built-in than many tiny frames.
If you build a NORDLI run and finish it with a real top, a clean base, and hardware you genuinely love, it stops being an IKEA hack and starts being part of your home’s story. That is the whole point.
Budget reality (quick and honest): The dressers are usually the affordable part. The “built-in” look often comes from the extras: a solid top, trim, filler strips, primer, and hardware. Plan a little cushion for those finishing pieces, because they are what make people believe it was always there.