IKEA Malm Built-In Hack That Looks Like Custom Millwork
Clara Townsend
Clara Townsend is an interior stylist, vintage furniture enthusiast, and the creative voice behind Velvet Abode. With over a decade of experience transforming both cramped city apartments and sprawling fixer-uppers, she believes that a beautiful home is built on personal stories rather than massive budgets. When she isn't hunting for the perfect brass sconce at a local flea market, she can usually be found rearranging her living room for the third time this month.
If you have ever stared at a MALM dresser and thought, you could be so much more than a floating box with tiny legs, you are my kind of person. This hack turns one or more IKEA MALM dressers into a wall-hugging built-in moment that reads like custom millwork, but stays as renter-safe as possible. Think: crisp side panels, a clean “toe-kick,” trim details that fake an inset look, and hardware that makes the whole thing feel intentional.
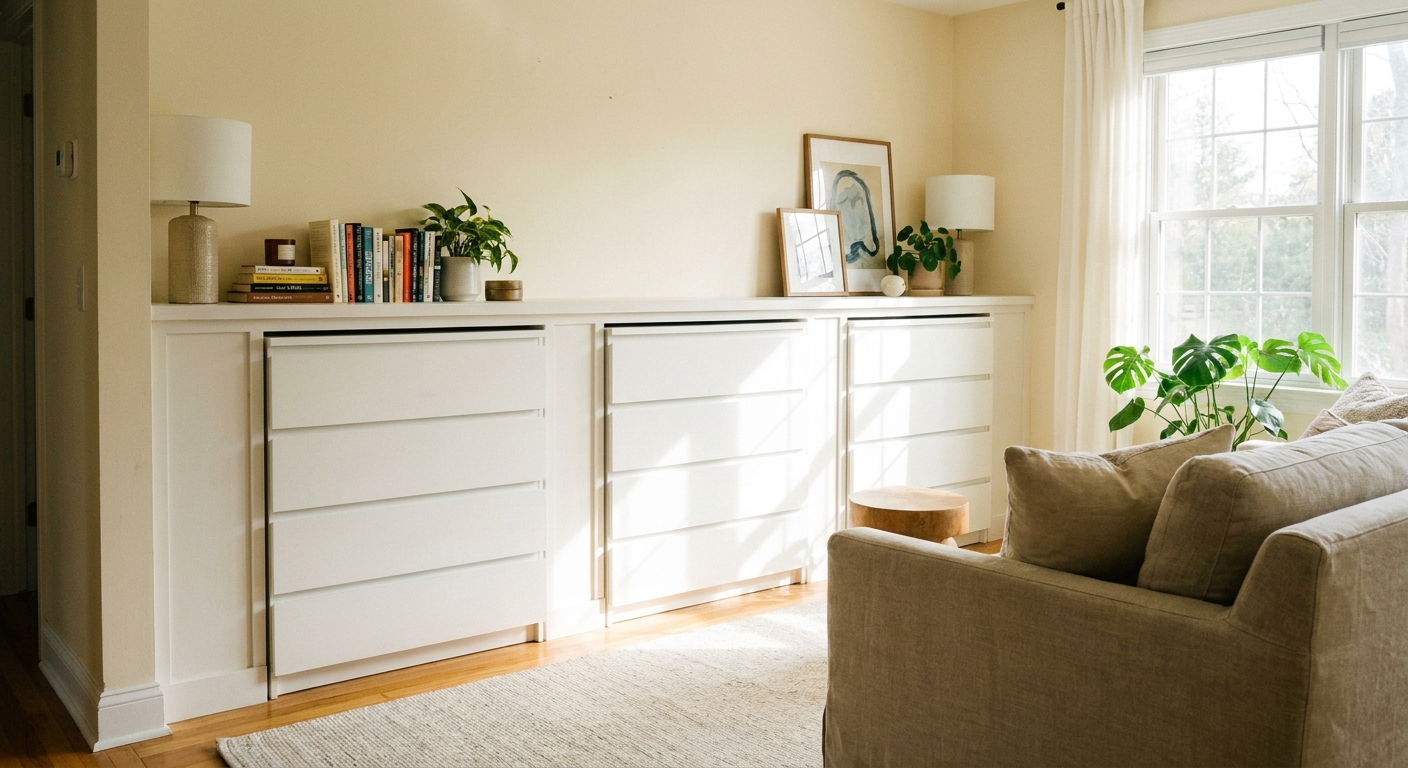
The secret is not one magical molding. It is the combination of: (1) making the units look flush, (2) hiding the gaps, (3) giving the eye a base and a top line, and (4) choosing finishes that look “designed,” not “assembled at midnight.”
Before you start: pick your layout
MALM works beautifully for low, long built-ins because the shapes are so simple. Choose your layout first, then shop materials once you know your total width.
- Media console built-in: Two to four wide MALM 6-drawer dressers (or a mix of 3-drawer) under a wall-mounted TV.
- Bedroom wall of storage: Two wide dressers with a centered gap for a chair or hamper, then bridge the top with a long countertop.
- Hallway “credenza”: One wide dresser with side panels to make it feel furniture-grade and flush to the wall.
Design rule I actually use: It looks most custom when the finished face spans from “visual stop” to “visual stop,” like wall corner to doorway trim, or between two windows. If you cannot reach a stop, add it with vertical side panels that act like pilasters.
Choose the right MALM
Not all MALM set-ups behave the same once you start trimming them out. Two quick notes that save headaches later:
- Pick your widths on purpose: The wide 6-drawer units are great for long runs. The 3-drawer units are easier to fit in tight rooms or to stagger as nightstands. Whatever you choose, measure your wall, then plan your seams so divider trim lands where you want it.
- Plan for hardware up front: MALM fronts are clean and handle-less. If you want pulls, you will be drilling through a finished drawer front. That is totally doable, but it rewards patience: measure twice, use a jig, and consider starting with a smaller pull size if you are nervous about precision.
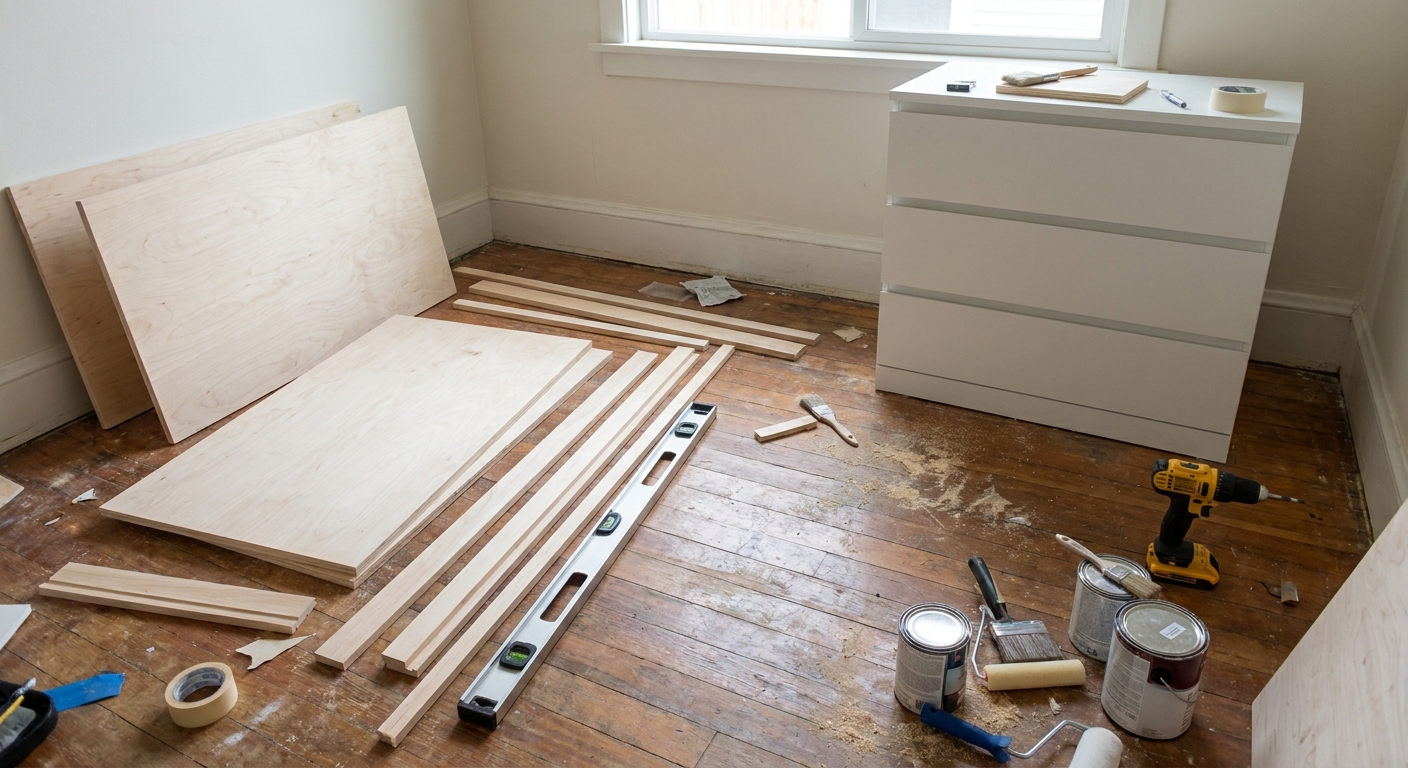
Tools and materials (renter-friendly where possible)
Core materials
- IKEA MALM units (assembled per IKEA instructions, including drawer stops)
- Filler panels: 1/2 in plywood, 3/4 in plywood, or pre-primed MDF (MDF is easiest to paint, plywood is lighter and tougher)
- Trim: 1x2 or 1x3 for face frame look, plus baseboard style trim or shoe molding
- Fastening plan: Screws, brackets, and brads to attach trim and panels to your build. Avoid adhesives on painted rental walls.
- Wood glue for trim-to-panel (only on your build, not on your walls)
- Finish nails or brad nails (into panels, not into rental walls when possible)
- Caulk (paintable) and wood filler
- Primer and paint (or removable wallpaper on panels for the “no paint” crowd)
- Hardware: pulls or knobs, plus optional backplates
Tools
- Stud finder, level, tape measure
- Circular saw or track saw (hardware store cuts are fine for straight panels)
- Brad nailer or hammer and finish nails
- Drill, bit set, and a hardware jig (optional but life-changing)
- Clamps
Step-by-step: make MALM look built-in
Step 1: Measure like a skeptic
Measure your wall width in three spots: floor, mid-wall, and near the top. Old apartments love to surprise you. Then decide your finished built-in width.
- Add 1/2 in to 3/4 in total “wiggle room” if your walls are not perfectly straight.
- Plan for intentional gaps that you cover with filler panels, rather than cramming furniture into drywall.
Step 2: Create a level base
MALM units are unforgiving, especially with drawer alignment. If the floor is even slightly out of level, drawers can start to rub and the whole “built-in” can look like it is leaning. You have two renter-friendlier options:
- Platform base (best): Build a simple rectangle from 2x4s (or 1x4s for a lower profile), top it with plywood, then shim until dead level. The dressers sit on top.
- Shim-only (okay for one unit): Shim under the MALM base, then hide shims later with a toe-kick panel.
Renter note: A platform base is freestanding. It does not need to be attached to the floor.
Step 3: Place and connect the MALM units
Set the dressers on the base, push them tight together, and clamp. Connect them to each other (not the wall) using mending plates or L-brackets inside the carcass where they will not show.
- Pre-drill to reduce splitting and blowout in particleboard.
- Use short screws, do not over-tighten, and consider washers so the hardware does not chew up the panels.
- Important: These connections help keep the fronts aligned. They are not a substitute for anti-tip anchoring.
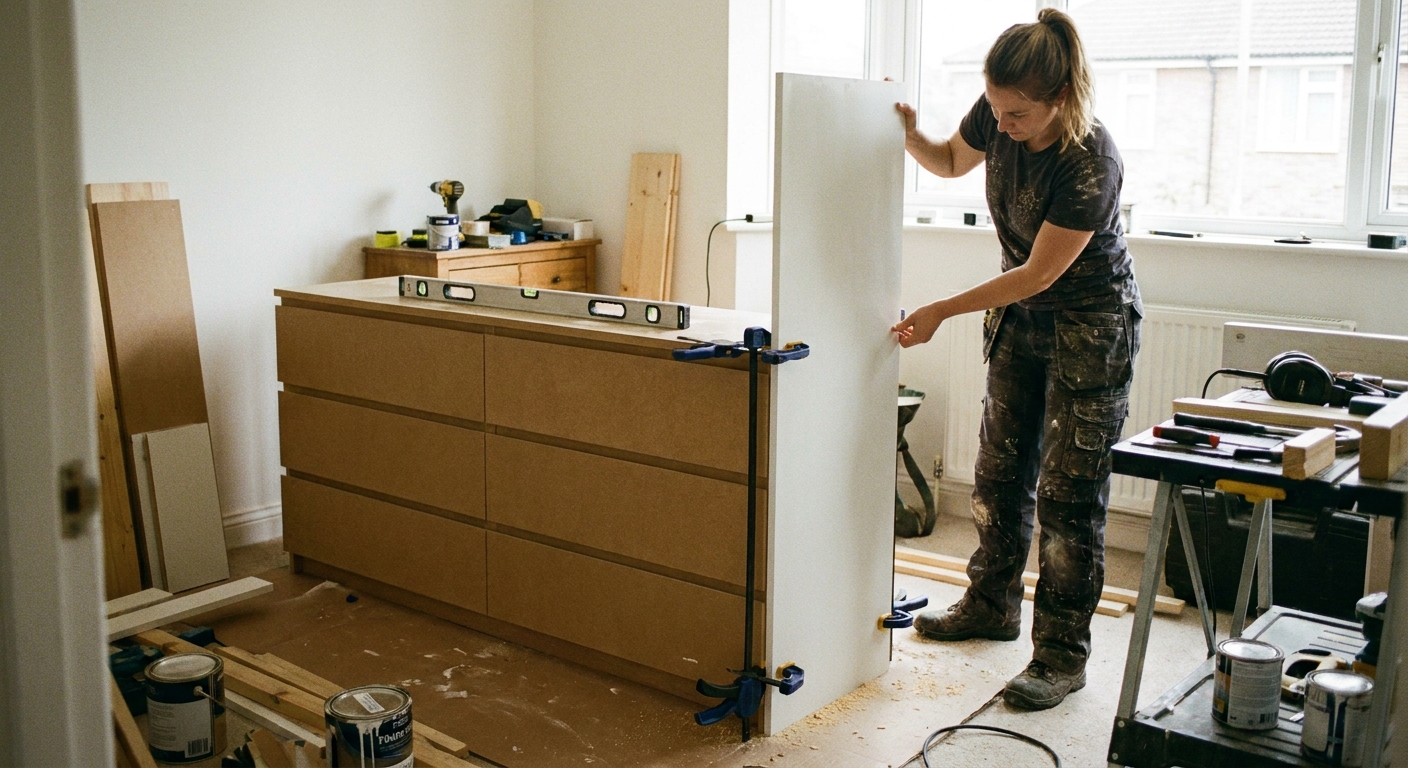
Step 4: Add filler panels
This is the built-in illusion. You are adding vertical panels that extend from floor to your planned top line, so the furniture reads as architecture.
- Define your top line: Decide the finished height first. For most people, that is the height of the final countertop (or the visual “cap” trim if you are not doing a countertop). Everything else gets built to that line.
- Side panels: Install one panel on each end of the run. Scribe if your wall is wavy.
- Backer strips (optional): Attach thin cleats to your base platform so side panels can be screwed into the platform instead of the wall.
- Top filler strip: If there is a gap between the dresser top and your planned countertop, add a strip so everything looks seamless.
Step 5: Add a toe-kick
A toe-kick makes MALM stop looking like a floating box. Cut a long panel to cover the base platform front. For extra realism, add baseboard-style trim along the bottom edge of that panel.
- If your rental already has a chunky baseboard, you can mimic it for a “it was always here” look.
- Keep the toe-kick slightly recessed from the dresser faces, like real cabinetry.
Step 6: Add trim for a face-frame look
Face-frame cabinetry has that crisp, structured look we read as custom. You can fake it by adding 1x2 trim pieces around the outer perimeter and between units.
- Outer frame: Trim the left and right panels, plus a top rail.
- Vertical dividers: Add trim where dressers meet, centered over the seam.
- Optional “inset” illusion: Add a thin strip (like lattice molding) just inside the outer frame for a shadow line.
Attach trim to your panels and base with glue and brads. Avoid nailing into the wall whenever possible.
Step 7: Add a countertop
A top pulls everything together and gives you that built-in credenza vibe.
- Budget top: Sanded plywood with edge banding, painted or stained.
- Mid-range: IKEA countertop slab (like KARLBY style), cut to length.
- Splurge: Local stone offcut or custom butcher block.
Secure the countertop to the panels and the dresser tops with screws from underneath where possible, or with a few small L-brackets hidden behind the trim.
Step 8: Prime, paint, and caulk
Paint is what turns separate ingredients into one believable built-in. Caulk seams where panels meet trim for a continuous line, then paint everything the same color for the most custom look.
- If you are painting MALM fronts: Adhesion varies by finish (foil, laminate, and high-touch drawer fronts are the hardest-working surfaces). Clean with a degreaser, lightly scuff sand, use a bonding primer designed for slick surfaces, then use a durable cabinet paint.
- Cure time matters: Dry is not cured. Give paint the full cure time on the can (often days, sometimes longer) before you treat drawers like they are in a busy household.
- If you are not painting the MALM fronts: Paint only the panels and trim to match the MALM color as closely as you can, then rely on hardware to elevate.
Step 9: Add hardware
MALM is basically a blank slate on the front. That clean, handle-less look is modern, but it can also read a little “temporary.” Adding hardware is the quickest glow-up, especially when you choose pulls with a little weight.
- For modern millwork: Long linear pulls in brushed brass or black.
- For vintage warmth: Aged brass cup pulls or classic bin pulls (yes, even on MALM).
- For a quiet-luxury look: Unlacquered brass knobs with simple backplates.
Tip: Use a jig so every pull lands in exactly the same spot. Precision reads expensive.
Anchoring: safety first
Dressers should be anchored to prevent tip-over risk. This is especially important if you have kids, pets that climb, or drawers that will be opened at the same time.
Safety hierarchy: Best is to follow IKEA’s anti-tip instructions and anchor to the wall or studs. “Fewer holes” is never the same thing as “equally safe” unless it is engineered to be truly tip-resistant.
Option A: Anti-tip to studs
This uses small screws into studs and leaves tiny holes that are typically easy to patch. Many landlords prefer this over unanchored furniture because it is a safety issue.
Option B: Freestanding backer (not a default replacement)
You can create a sturdy backer panel that attaches to the base platform and side panels, forming a rigid “cabinet box,” then attach the MALM units to that backer instead of the wall. This can reduce wall penetrations, but it does not automatically meet anti-tip guidance. If children are present, or if you are unsure, use stud anchoring per IKEA or consult a licensed professional for an alternative that cannot tip.
Option C: Get permission in writing
If you are in a strict lease, email your landlord or property manager a simple summary: “freestanding units, minimal screw holes for anti-tip straps, all holes patched at move-out.” Getting a yes in writing is worth its weight in brass hardware.
My rule: If you can pull it forward with one hand, it needs a better anchoring plan. Built-in style should never come at the cost of safety.
Budget tiers
Tier 1: Sunday afternoon
- One MALM dresser
- Side filler panels only (no trim)
- Added hardware
- Optional removable wallpaper on panels for a no-paint approach
What it looks like: Clean, intentional, furniture-plus. Not full millwork, but a big improvement.
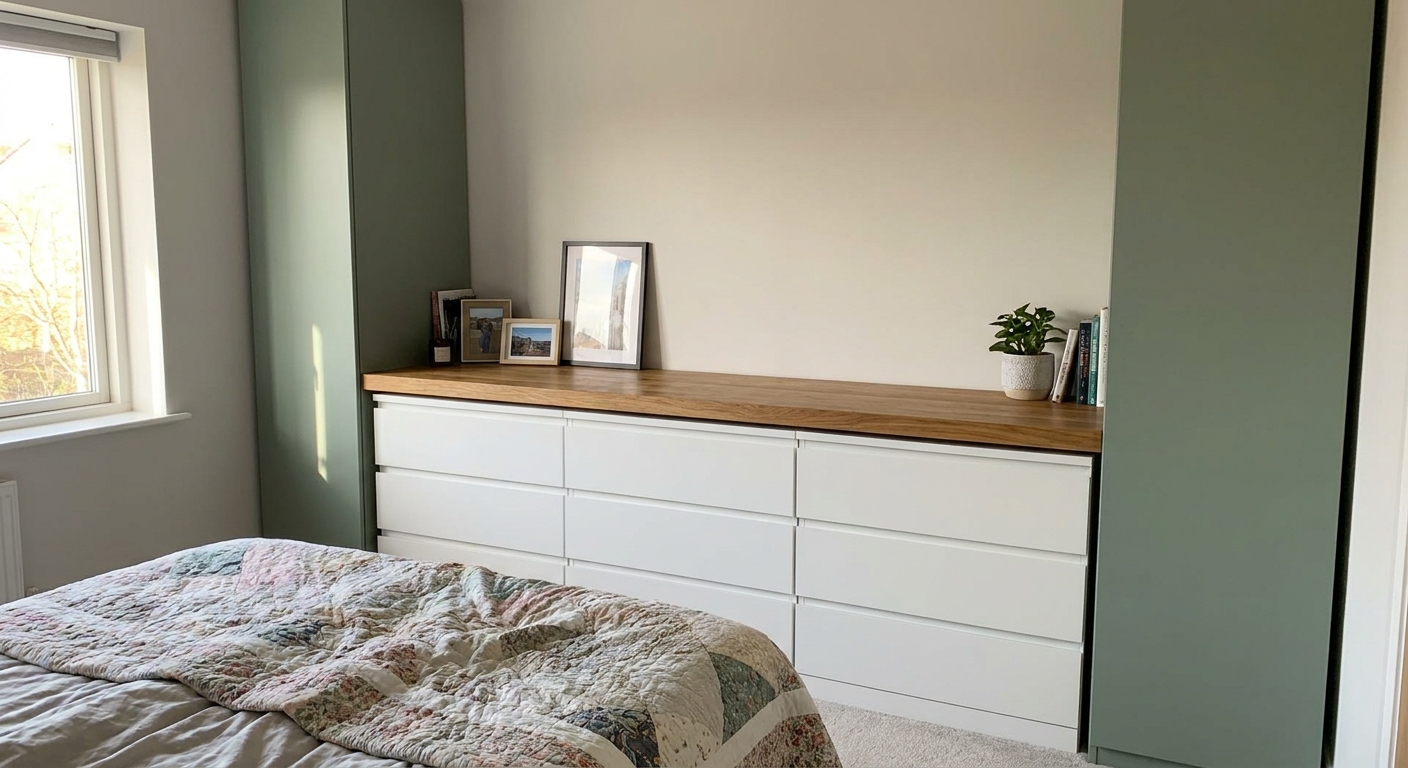
Tier 2: Convincing built-in
- Two to three MALM units
- Platform base + toe-kick
- Side panels + divider trim
- Painted panels and trim
- Butcher block or IKEA countertop
What it looks like: A true built-in illusion from five feet away and honestly, from two feet away too.
Tier 3: Custom millwork
- Three to four units
- Scribed panels (tight to wavy walls)
- Face-frame trim details + shadow line molding
- Upgraded top (thicker wood, edge profile, or stone offcut)
- High-end pulls with consistent spacing
- Paint-matched finish across all components
What it looks like: People will ask who built it. You get to smile mysteriously and say, “Oh, it was a weekend project.”
Common landlord objections
No holes in the walls
Response: “I will use anti-tip straps for safety and patch the small holes at move-out. I can share before-and-after photos.” If they still say no, place the run between two walls if possible and talk through a safer plan, but do not skip safety.
No painting
Response: “I can keep the furniture unpainted and only paint freestanding panels, or use removable wallpaper on the panels. All changes are to my freestanding build, not the apartment.”
It cannot be permanently installed
Response: “This is furniture that sits on a freestanding base. Any attachment is limited to safety straps and will be removed and patched.”
You cannot block baseboards or vents
Response: “I will notch panels around baseboards and keep HVAC vents clear. The piece will sit proud where needed to maintain airflow.”
Move-out checklist
Whenever you do a rental-friendly hack, document it like you are your own attorney. Not dramatic, just wise.
- Before photos: Wide shots of the wall, baseboards, and floor where the built-in will sit.
- Stud and anchor photos: A quick photo of straps installed, plus a close-up of the screw size packaging if you have it.
- During-build photos: Base platform before the units go on, showing it is freestanding.
- After photos: Wide angle of the finished built-in and close-ups of seams and baseboards.
- Move-out photos: The wall after removal, close-ups of patched holes, plus a wide shot in natural light.
- Receipts: Keep a folder with paint, primer, and hardware receipts in case you need color matching or proof of materials.
Troubleshooting
Gaps between the dresser and wall look obvious
Use wider side panels, then add trim on the panel edge to create a strong vertical line. Your eye reads the trim as the “end” of the built-in, not the gap behind.
Drawers rub after installation
Floors are rarely level. Re-check level across the base and add shims where needed. Even a tiny twist can affect drawer alignment.
Paint chips on laminate
This is almost always a prep issue, or a cure-time issue. Clean with a degreaser, lightly scuff sand, use a bonding primer, then let the paint fully cure before heavy use. Even with perfect prep, high-touch drawers can still chip over time, so choose durability over dainty finishes.
It still looks like IKEA
Add one more layer of intention: a thicker countertop, larger hardware, or a face-frame trim detail. Minimalism is beautiful, but it has to feel finished.
My favorite finishing touches
- A small vintage lamp with an amber bulb to soften the hard lines of the cabinetry
- Linen curtains nearby to add movement and texture
- Aged brass pulls that pick up the patina in a thrifted mirror
- A shallow tray on the top for keys and perfume, so the built-in looks lived-in, not staged
That is the whole point, really. You are not building a showroom. You are building a home that feels personal, grounded, and quietly proud of itself, even if it started life as a flat-pack box.