IKEA LACK Wall Shelf Hacks That Look High-End
Clara Townsend
Clara Townsend is an interior stylist, vintage furniture enthusiast, and the creative voice behind Velvet Abode. With over a decade of experience transforming both cramped city apartments and sprawling fixer-uppers, she believes that a beautiful home is built on personal stories rather than massive budgets. When she isn't hunting for the perfect brass sconce at a local flea market, she can usually be found rearranging her living room for the third time this month.
There is a reason the IKEA LACK wall shelf is everywhere. It is simple, lightweight, and it gives you that dreamy “floating” look with almost no visual clutter. The problem is that it can also scream off-the-shelf if it is hung at random heights, anchored poorly, or finished like a temporary fix.
Let’s take the same LACK shelf and make it read intentional, tailored, and quietly high-end. No design gatekeeping, no complicated carpentry, and yes, totally doable in a rental if you plan your anchors wisely.
First, why LACK can look cheap
LACK shelves look expensive when they feel like they belong to the architecture of the room. They look budget when they feel like they were placed wherever the drill landed.
- Inconsistent spacing between shelves or between shelf and furniture.
- Bad alignment with baseboards, door trim, window casings, or the edge of a sofa.
- Visible sag from overload or weak anchors.
- Shiny, factory finish that clashes with your wall paint or other wood tones.
- Edges that chip (especially the corners) and instantly give “temporary.”
Good news. Every single one of those issues has a fix that costs far less than replacing them with custom millwork.
The high-end rule: install like built-in
Pick a datum line
Designers love a quiet line that everything obeys. In normal-person terms, choose one reference and align to it:
- Top of baseboard (great for low shelves or a long run above furniture).
- Top of sofa back (a classic for living rooms).
- Centerline of a wall zone (perfect for a reading nook or desk wall).
- Top of door casing (helps shelves feel integrated in hallways).
Once you choose the line, make your measurements from it, not from the floor. Floors are often uneven, especially in older apartments and “charming” houses.
Spacing formulas (steal these)
- Between stacked shelves: 10 to 14 inches is the sweet spot for books and decor. Go 12 inches if you want it to look polished without thinking.
- Above a sofa or console: bottom of the lowest shelf 8 to 10 inches above the furniture top (or above the sofa back). Lower reads custom. Too high reads accidental.
- Between a shelf and art below: 3 to 6 inches. Tight spacing looks curated.
- From a corner: keep at least 6 inches of breathing room so it does not feel cramped.
A quick measurement example
Say your sofa back is 34 inches high. Start by placing the bottom of your first shelf at 42 to 44 inches. Then stack the next shelf 12 inches above that. This one small bit of math is what makes it feel planned.
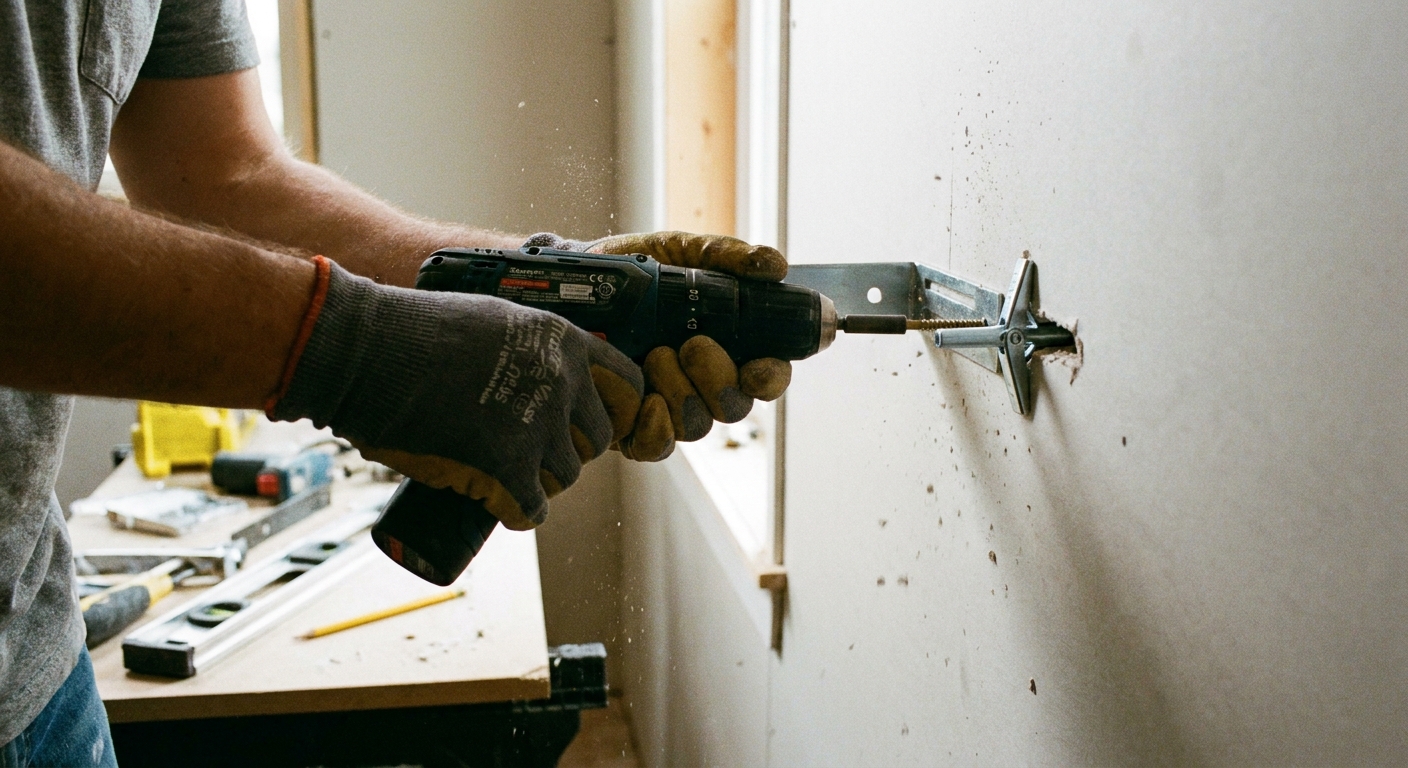
Anchors and walls
I know anchors are not the fun part. They are, however, the difference between a confident, sturdy shelf and that slightly tilted situation you notice every time you walk by.
Find your wall type
- Drywall over studs: best case scenario.
- Drywall with metal studs: common in newer apartments.
- Plaster walls: older homes, harder to drill, but totally doable with the right bit.
- Masonry or concrete: requires masonry bit and appropriate anchors.
Anchor choices that work
- Into a stud: use wood screws long enough to bite securely. This is the strongest option and ideal for heavier styling.
- Drywall without studs: use quality toggle bolts or heavy-duty drywall anchors rated well above your planned load.
- Metal studs: toggles are usually your friend here too.
- Plaster: plaster varies a lot. Plaster over lath often has voids, so toggles can work well. Solid plaster behaves more like masonry and may need masonry-style plugs. When in doubt, finding studs is usually safest.
Velvet Abode safety note: LACK shelves are not meant to hold serious weight. IKEA’s stated max load varies by shelf size and wall type, and across versions, but it is commonly in the range of about 6.6 lb (3 kg) up to about 33 lb (15 kg). Check the manual or packaging for your exact model and do not exceed it. Even with great anchors, style with restraint. Think books, small ceramics, framed photos. Not your cast iron collection.
Bonus safety note: Avoid installing any floating shelf above a crib, bed, or where a fall could cause injury if you are not 100 percent confident in the anchoring.
Alignment tricks
Preview with painter’s tape
This is my favorite low-stakes trick. Put painter’s tape on the wall to mark:
- The shelf length
- The exact top edge height
- The spacing between multiple shelves
Step back. Sit on the sofa. Walk in from the hallway. If it feels too high or too tight, you just saved yourself patching holes later.
Level twice
Even if you own a level, trust me, the wall might not be level. Use this approach:
- Mark your desired height at one end.
- Level across and mark the other end.
- Measure from your datum line to confirm both marks match your plan.
If you are doing multiple shelves, measure each shelf from the same reference, not from the shelf below. Tiny errors stack.
Make it relate to something
High-end rooms have relationships. Try one of these:
- Align the shelf ends with the edge of a console table.
- Center the shelf stack over a chair or desk.
- Match the shelf run to the width of a rug zone or a key art piece.
When shelves float with no visual “reason,” they read like an afterthought.
Do a quick bracket check
Most floating shelf failures are not dramatic, they are tiny: a bracket that is slightly loose or a shelf that is not fully seated. Before you call it done:
- Confirm the wall bracket is tight and not wobbling.
- Slide the shelf on completely so it seats all the way back.
- If your version has locking screws, tighten them.
- Give it a gentle test pull upward and outward. If it moves, stop and fix it now.
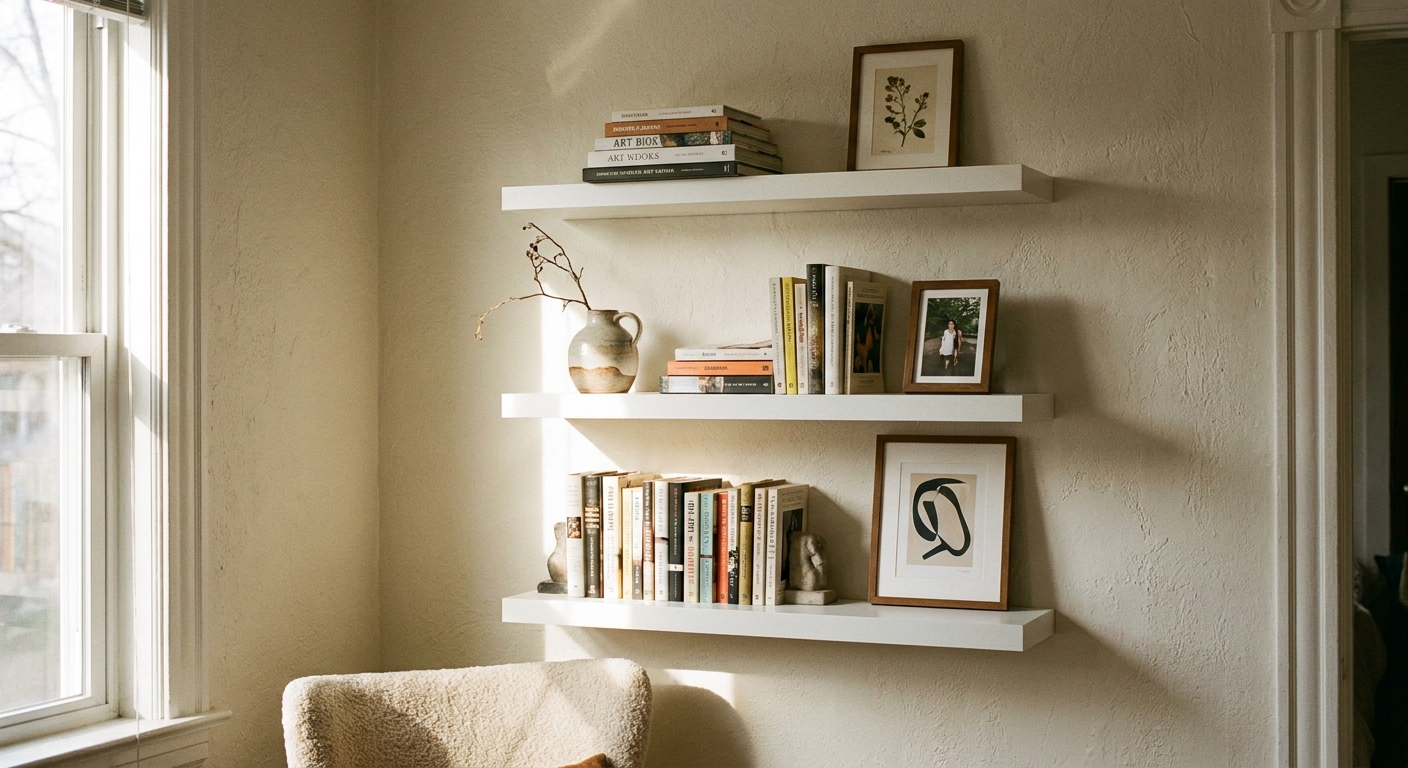
Five LACK hacks that look expensive
1) Paint them the wall color
Want your shelves to look built-in without building anything? Paint the shelves the same color as the wall. It makes them recede so your styling becomes the star. This is especially chic in moody colors like olive, clay, or soft charcoal.
- Prep gently: LACK finishes are thin (often foil or laminate). Instead of aggressive sanding, do a light scuff-sand with fine grit or use a deglosser so primer can grip. Do not try to “sand to raw wood.”
- Use a bonding primer: Choose one that is made for slick surfaces.
- Finish with a durable trim paint in satin or eggshell.
If you are a renter, you can still do this if you are allowed to paint, or if you plan to take the shelves with you later and repaint them white before moving.
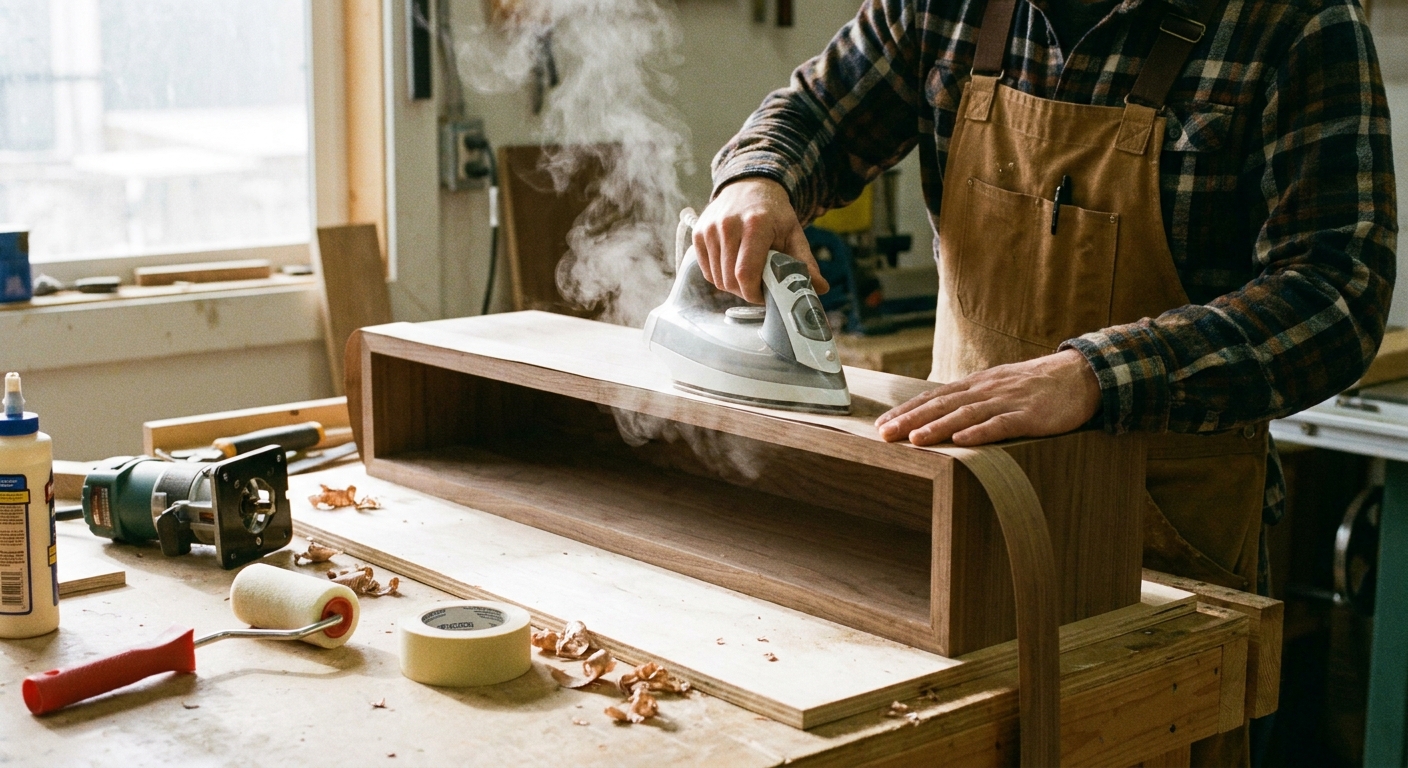
2) Make the edge look thicker
LACK is hollow, which is why it is light, but the edge profile can look thin. If you want a more custom millwork vibe, you have two options:
- Wrap for a cleaner finish: wood veneer edge banding, iron-on banding, or peel-and-stick vinyl wrap. This improves the look, but does not truly add thickness.
- Add a slim face trim: a thin wood strip on the front edge (or a small L-shape along the front and underside) creates the illusion of a thicker shelf. Paint it to match for a seamless look.
My tip: choose a finish that repeats somewhere else in the room, like a picture frame, lamp base, or coffee table tone.
3) Add under-shelf lighting
Nothing makes a basic shelf look more intentional than a warm, soft glow. Use:
- Warm LED strip lights (look for 2700K to 3000K).
- Battery-powered puck lights if you do not want cords.
Keep the light hidden underneath, set slightly back from the front edge, so it reads like a built-in detail instead of a gadget.
Safety and surfaces: Use LEDs (low heat), follow the manufacturer’s instructions, and test adhesive on an inconspicuous spot first. Some tapes can pull paint or finish when removed.
4) Fake an art ledge with a tiny lip
If you like the look of art ledges but you already own LACK shelves, you can fake it by adding a thin trim strip to the front edge. Think of it as a delicate guard rail that keeps frames from sliding and adds dimension.
- Choose a slim lattice strip or quarter-round.
- Paint it to match the shelf for a seamless look.
- Attach with a strong construction adhesive only. LACK shelves have a hollow honeycomb core, so small brads can fail unless they hit the narrow solid perimeter.
Style with layered frames, a small painting, and one sculptural object. Suddenly it is “collected,” not “purchased.”
5) Group them like a built-in
One lonely shelf can look temporary. A grouped installation looks planned.
- Vertical stack: 2 to 4 shelves in a column for a reading corner.
- Long run: multiple shelves end-to-end above a sofa, aligned as one line.
- Offset grid: staggered shelves in a controlled pattern, great for kids’ rooms or studios.
If you are doing an end-to-end look, treat each shelf as its own install. Each LACK shelf needs its own properly mounted bracket and anchors. You are aligning them visually, not asking one shelf to support another. Keep the gap tiny and consistent so your eye reads it as one continuous feature.
Renter-friendly and sturdy
Renters deserve nice-looking walls too. Here is how to keep things secure while minimizing damage.
Use fewer shelves, install them better
Instead of peppering a wall with many shelves and many holes, do one strong composition. Two shelves installed perfectly looks more expensive than five installed nervously.
Find studs the smart way
A stud finder helps, but do not be afraid to confirm. Mark stud centers, then use a tiny pilot hole where the bracket will cover it. It can save you from swiss-cheesing the wall.
Have a second set of hands
For longer shelves, two people makes everything cleaner: one holds the shelf or bracket steady, the other marks and drills. It is the easiest way to keep your level line true.
Plan your patching kit
If you will remove them later, save a small bag with:
- Spackle
- A putty knife
- Fine sandpaper
- Touch-up paint (even a sample jar)
Future you will be so grateful.
Hide cords and chaos
If your shelf styling includes a lamp or speaker, manage the cord. Use paintable cord covers that blend into the wall. Visual calm is a huge part of the high-end effect.
What not to do
- Do not use Command strips or poster adhesive for load-bearing shelves.
- Do not guess on anchor type. Match anchors to your wall, then match your load to the anchor rating and IKEA’s max load.
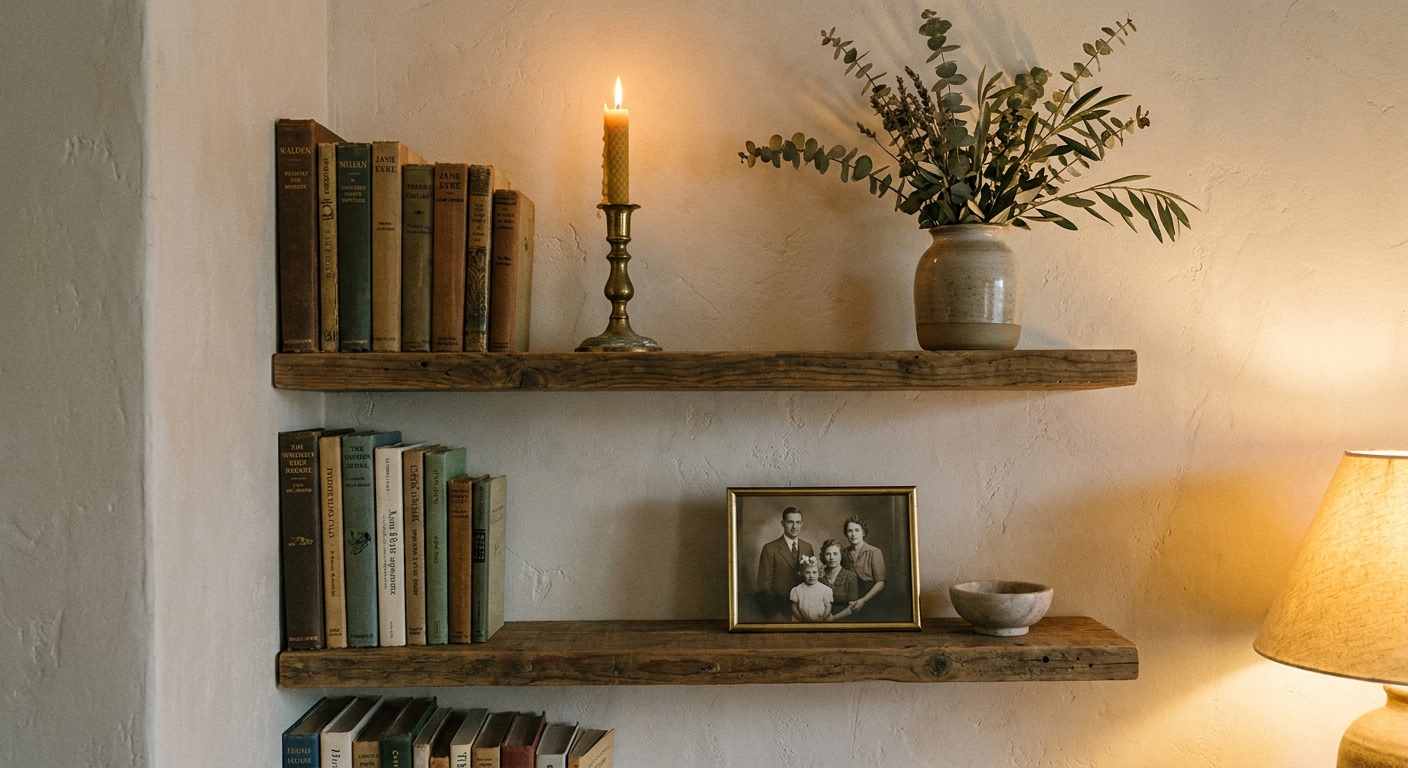
Styling that looks curated
The shelf can be installed perfectly and still look “IKEA” if the styling is too symmetrical or too busy. Here is my cheat sheet.
The 60-second formula
- Start with books (vertical stack plus one horizontal stack).
- Add one sculptural object (ceramic, stone, wood, or brass).
- Add something living (small plant or fresh stems in a vase).
- Add one personal piece (a framed photo, thrifted figurine, postcard in a frame).
Texture reads expensive
Mix matte and shine. Mix rough and smooth. A glossy glaze next to worn linen, a brass candlestick next to a chunky book. Patina is the secret handshake of “collected over time.”
Common mistakes and fixes
- Mistake: Hanging too high. Fix: Drop the whole composition 2 to 6 inches. Most people go too high out of fear.
- Mistake: Overloading the shelf. Fix: Edit down and distribute weight, placing heavier books closer to the wall bracket side.
- Mistake: Not matching finishes. Fix: Repeat one finish at least three times in the room, like black frames, brass accents, or warm wood.
- Mistake: Visible chips on corners. Fix: Touch up with paint, add wrap, or add a face trim for a clean edge.
- Mistake: Shelves that fight the trim. Fix: Align your shelf edges with door or window casing lines so everything feels intentional.
Easy looks for real homes
Entryway drop zone
Install one LACK shelf above a slim shoe cabinet or hooks. Add a tray for keys, a small lamp, and a bowl. Keep it tight, practical, and pretty.
Bedside shelves
If you are short on floor space, two small LACK shelves stacked vertically can act like a nightstand plus a book ledge. Paint them the wall color and add a plug-in sconce above. It will feel like a boutique hotel, even if your laundry basket is quietly judging you from the corner.
Kitchen coffee station
A long line of LACK shelves above a counter can look surprisingly custom if you align it with upper cabinet edges. Use warm under-shelf lighting and keep the styling minimal: mugs, a canister, and one small piece of art.
Quick shopping list
- Painter’s tape and a pencil
- A level (or a laser level if you can borrow one)
- Stud finder (helpful, not mandatory)
- Appropriate wall anchors for your wall type
- Bonding primer and durable paint (optional but high impact)
- Edge wrap or face trim material (optional)
- Warm LED strip lights or puck lights (optional)
- Construction adhesive (optional, for the art-ledge lip hack)
Final note
LACK shelves can look high-end when you treat them like part of the room’s architecture. Measure from a reference line, keep spacing consistent, anchor thoughtfully, and then upgrade one detail: paint, edges, or lighting.
The goal is not to pretend you bought custom built-ins. The goal is to make your home feel like you, just a little more polished, a little more intentional, and a lot more comforting at the end of a long day.