IKEA Hemnes Dresser Hacks for a Built-In Bedroom Look
Clara Townsend
Clara Townsend is an interior stylist, vintage furniture enthusiast, and the creative voice behind Velvet Abode. With over a decade of experience transforming both cramped city apartments and sprawling fixer-uppers, she believes that a beautiful home is built on personal stories rather than massive budgets. When she isn't hunting for the perfect brass sconce at a local flea market, she can usually be found rearranging her living room for the third time this month.
If you have ever stood in your bedroom doorway and wished your dresser wall looked a little more custom, a little more intentional, and a lot less “I pushed furniture against a wall and called it a day,” you are my kind of person. The IKEA Hemnes dresser is a classic for a reason: the proportions are friendly, the style leans timeless, and it plays well with both vintage and modern pieces. With a few thoughtful tweaks, you can make it read like built-in millwork without actually building a full cabinet system.
This guide stays firmly in dresser territory, not TV walls. We are talking legged versus chest layouts, clean baseboard notching templates, anchoring to studs even in rentals, hardware swaps that change the whole vibe, and crown and filler tricks that mimic that dreamy “the house came with this” look. I will also flag what is reversible for move-out, because peace of mind is the most underrated design feature.
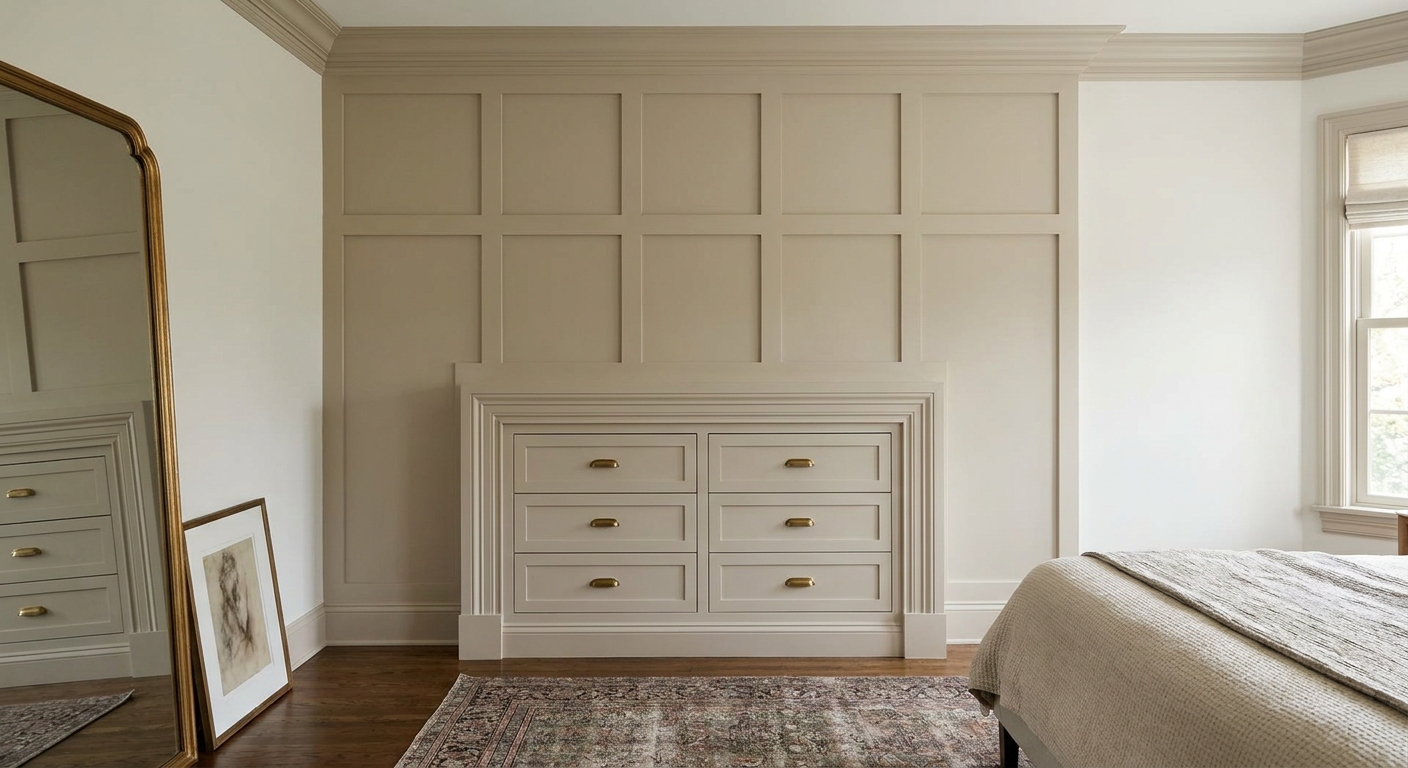
Pick the right built-in layout
Before you buy trim or touch a saw, decide what “built-in” means for your room. Hemnes gives you a few strong options, and the best one depends on your wall length, ceiling height, and how much visual weight you want.
Option A: Legged layout
If you love the look of furniture that feels collected over time, keep the Hemnes legs visible. You can still make it read built-in by adding tight side fillers and a top cap, but you preserve that little shadow line under the piece that makes a room feel less heavy.
- Best for: smaller rooms, low ceilings, or if you want your bedroom to feel breezy.
- Built-in trick: add filler strips on both sides and a snug top board that lands just under a simple crown.
- Styling note: this layout looks gorgeous with a vintage mirror above because the legs keep the reflection from feeling too “wall of cabinet.”
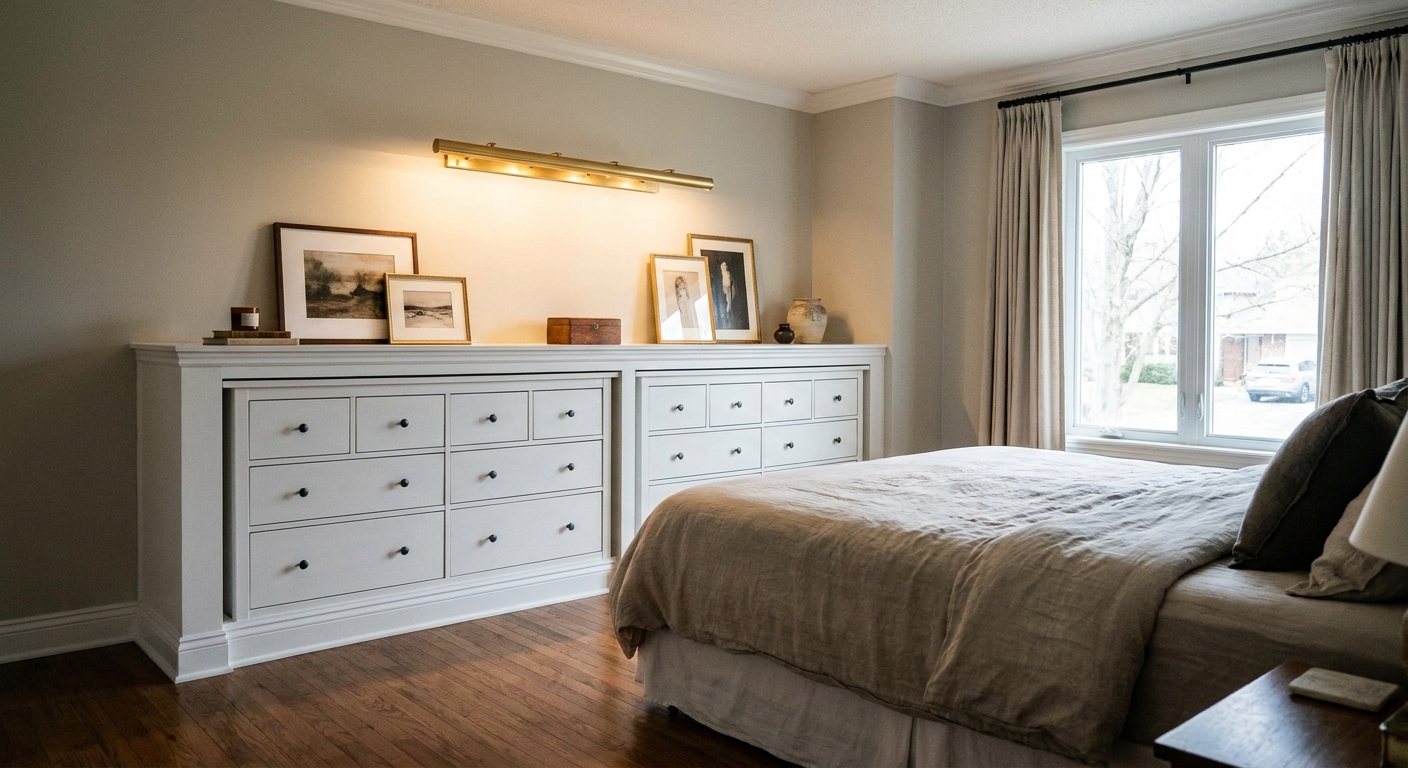
Option B: Chest-style layout
If you want true millwork energy, go chest-style: the dresser looks like it sits on a base, the gaps disappear, and the top meets trim so cleanly your eye reads it as part of the wall.
- Best for: longer walls, higher ceilings, and anyone craving that “custom home” feel.
- Built-in trick: build a simple platform base that is flush to the dresser front, then add baseboard across the front of the platform.
- Practical note: the platform can also help you level the dresser if your floor slopes, which is extremely common in older homes and apartments.
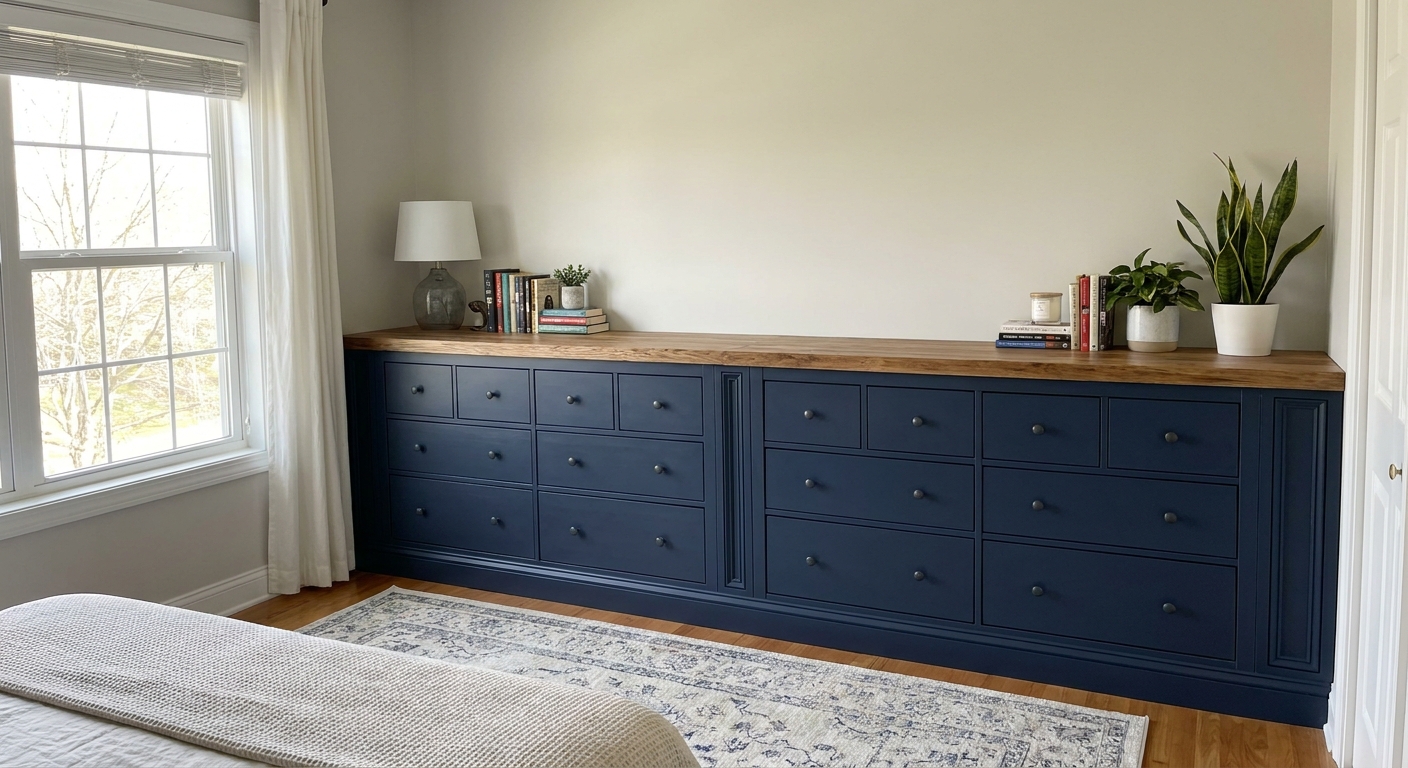
Option C: Double dresser bank
Two Hemnes dressers side-by-side, unified with one continuous top, fillers at the sides, and a single trim story above can look shockingly custom. It reads like a long low dresser built for the room.
- Best for: couples, shared bedrooms, or anyone who wants big storage without tall furniture.
- Built-in trick: align drawer gaps, keep a consistent reveal at the wall, and use one long top that overhangs slightly like a piece of furniture.
Measure like a millworker
The difference between “nice hack” and “wait, is that built-in?” is usually measurement discipline. Not fancy tools. Just patient measuring.
What to measure first
- Total wall width: baseboard to baseboard.
- Usable width: subtract any door casing, window trim, or heat registers that intrude.
- Dresser width: measure the assembled piece, not the box spec, especially if you added new hardware or a top.
- Baseboard height and thickness: you will need both for notching decisions.
- Out-of-square corners: measure the wall width at the floor and again at dresser-top height. If it changes, plan for scribing or flexible filler.
My cozy reality check: most rooms are not perfectly square. That is not a failure, it is why caulk exists.
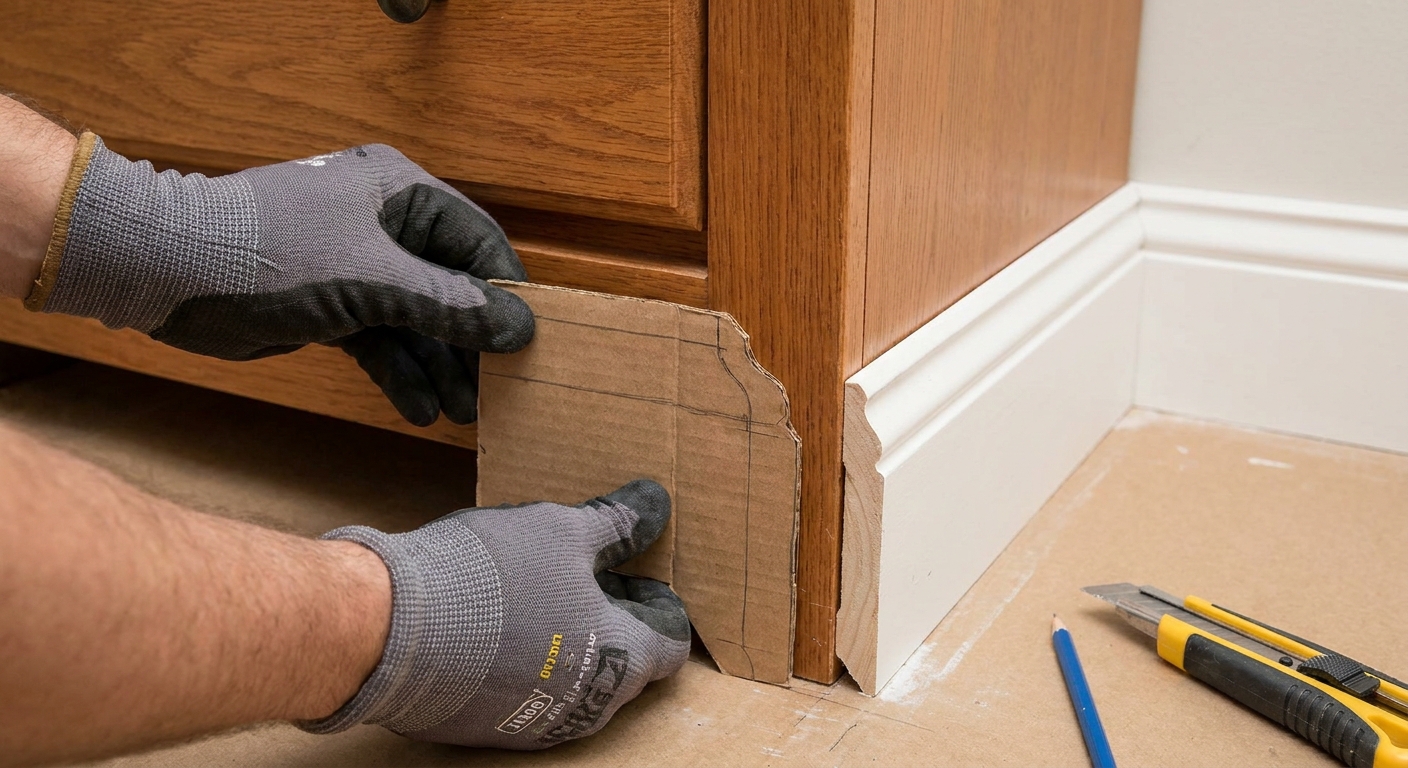
Baseboard notching templates
If you want your Hemnes to sit snug to the wall, baseboards are the usual culprit. You have three common paths: pull baseboard, notch the dresser, or add a spacer. The “built-in” look usually needs the dresser to land closer to the drywall.
Approach 1: Notch the back legs
This is the most common built-in hack approach: you create a notch so the dresser clears the baseboard, allowing the top to sit closer to the wall.
Important Hemnes detail: on the legged Hemnes dressers, you are typically notching the solid back legs or posts (the thick vertical pieces at the rear corners), not just a flimsy back panel. Take your time here, because this is the difference between “tight to the wall” and “why is there a gap I can see from the hallway.”
- Step 1: Slide the dresser into place and note exactly where it hits the baseboard.
- Step 2: Make a template from cardboard or stiff paper. Press it against the baseboard profile and trace the shape.
- Step 3: Transfer the template to the back legs or posts. Mark carefully and double-check before cutting.
- Step 4: Cut with a jigsaw or oscillating tool. Sand lightly so it sits flush.
Template tip: label each template “Left Wall Corner” and “Right Wall Corner.” Baseboards sometimes vary slightly, especially in older spaces.
Anchoring to studs
Dressers should be anchored for safety, especially in bedrooms. The built-in look also benefits because the piece will not creep forward over time when you open heavy drawers. Rental-friendly does not mean “skip the studs.” It means choosing patchable, minimal-hole methods and keeping the hardware tidy.
What you need
- Stud finder
- Level
- Painter’s tape for marking
- Anti-tip kit or L-brackets
- Appropriate screws for studs (usually 2 to 2.5 inches, depending on bracket and drywall thickness)
Rental-friendly method
- Find studs: mark stud centers with painter’s tape.
- Anchor high: use the provided anti-tip bracket position when possible, or a neat L-bracket just under the top back edge where it will be hidden.
- Pre-drill: this reduces splitting and keeps holes clean.
- Use as few holes as possible: one or two well-placed stud anchors beat four random drywall anchors every time.
Move-out note: stud holes are usually easy to patch with spackle and a little touch-up paint. Take a quick photo of the paint brand and sheen if you know it, or keep a tiny jar of matched paint if your landlord allows.
Filler strips that disappear
The built-in illusion lives and dies in the gaps. You want intentional, tight margins, not random air on the left and a huge wedge on the right.
Side fillers
Side fillers are vertical strips that close the space between the dresser and the wall. They can be simple primed pine, MDF, or plywood, depending on your paint plans.
- How wide: measure the gap at the front and at the back. Use the larger measurement, then scribe if needed.
- How to attach (reversible-ish): attach fillers to the dresser, not the wall, when possible. Use small screws from the inside edges or discreet brackets. This reduces wall damage at move-out.
- Finish: wood filler on fastener holes, sand, then paint to match the dresser for a seamless look.
Back spacer
If you cannot notch the dresser or remove baseboard, a back spacer can push the dresser forward so it clears the baseboard. This is less “built-in,” but with a top that overhangs slightly and a good styling moment above, it can still feel intentional.
Top caps and crown
This is the part that makes people squint and say, “Wait, did you have that built?” You are basically creating a trim story that visually connects the dresser to the architecture.
Option 1: Simple top cap
Add a thicker top to the dresser, either wood or MDF, that is slightly deeper than the dresser. That tiny overhang reads like furniture craftsmanship and hides minor wall waviness.
- Look: warm and tailored, especially in stained wood.
- Bonus: gives you a sturdier surface for lamps and trays.
Option 2: Crown above
If your dresser sits in an alcove or you are building a surrounding frame, crown molding or a small cove at the ceiling can make the whole wall read like custom cabinetry.
- Best use: when you are doing a full-width installation with side fillers and a top board.
- Trick: keep the crown profile simple so it looks like it belongs to the house, not like a costume.
Option 3: Picture-frame trim
If you love subtle drama, add picture-frame molding above the dresser to create the feeling of paneling. It visually upgrades the entire wall, not just the furniture.
Clara note: Hemnes has a traditional leaning profile. Pairing it with a little classic trim feels natural, like wearing a vintage blazer with jeans.
Hardware swaps
Hardware is the jewelry. Hemnes can swing modern, vintage, coastal, moody, or cottage depending on what you put on those drawers.
Easy options
- Unlacquered brass pulls: they will patina slowly and look expensive in a very lived-in way.
- Antique bronze bin pulls: cozy and traditional, especially with warm paint colors.
- Black or gunmetal knobs: crisp and modern, great if you are pairing Hemnes with contemporary lighting.
- Glass knobs: a little vintage sparkle, especially sweet in small bedrooms.
Avoid a hardware headache
- Measure the existing hole spacing (center to center) before ordering pulls.
- If you want a different spacing, use a backplate or fill and drill new holes. Backplates can look very intentional, especially in vintage styles.
- Use a simple drill guide or a piece of scrap wood as a template so every pull lands straight.

Paint and finish ideas
You do not need a spray booth to make Hemnes look high-end. You need patience, good prep, and a finish choice that suits your room.
The non-negotiable prep
IKEA’s factory finish is tough and a little slick, which is great for durability and not great for paint adhesion. If you paint without a bonding primer, you are basically inviting chips and peeling later.
- Clean first: wipe down with a degreaser (dish soap and warm water works, or a stronger cleaner if you have years of lotion and dust living on it). Let it fully dry.
- Scuff sand: a light scuff with 150 to 220 grit is enough. You are not trying to remove the finish, you are just dulling the sheen.
- Use a bonding primer: choose a high-adhesion primer designed for glossy surfaces. Shellac-based primers are the classic “this will stick to anything” option. High-adhesion water-based bonding primers also work well if you prefer lower odor and easier cleanup. Either way, this is the step that keeps your beautiful paint job from flaking off around the knobs.
- Light sand again: once the primer is dry, a quick, gentle sand makes the topcoat look smoother.
Two routes that look the most believable
- Match the wall color: painting the dresser and fillers the same color as the wall reduces contrast and makes everything feel built-in.
- Contrast with intention: if your walls are light, a deeper dresser color can feel like a built-in furniture moment. Think inky green, smoky blue, or a muddy mushroom brown.
Finish note: a soft satin often looks the most “real life” in bedrooms. High gloss is pretty but it tells on every bump and brush mark.
Reversible move-out notes
I love a commitment to a home, but I love flexibility too. If you are renting or you simply like knowing you can undo things later, here is what I consider the most reversible path to a built-in look.
Most reversible choices
- Use a top cap that rests on the dresser, secured from underneath with small screws rather than wall adhesive.
- Attach side fillers to the dresser instead of the wall when possible.
- Skip permanent crown that ties into the ceiling if you are renting. Do a top cap plus a styled art moment instead.
- Anchor to studs with minimal holes and keep the brackets hidden for a cleaner uninstall.
Document for future you
- Take photos of bracket placement before you cover anything with trim.
- Save paint color codes and sheens.
- Keep extra hardware, especially original Hemnes pulls, in a labeled bag taped inside the back panel.
Design that feels like a comforting hug is usually the design that makes your daily routines easier. Built-in looks are not just pretty. They keep clutter contained, surfaces calm, and mornings a little less frantic.
Quick checklist
- Choose your layout: legged, chest-style base, or double dresser bank.
- Measure wall width and baseboard profile.
- Create a cardboard template for baseboard notching if needed.
- Set the dressers in place and level them.
- Anchor to studs with an anti-tip kit or hidden brackets.
- Add side fillers and a top cap.
- Swap hardware.
- Caulk seams lightly, touch up paint, and style with one great lamp and a grounded piece of art.
If you want, tell me your wall width, ceiling height, and which Hemnes size you have, and I can suggest the cleanest layout and trim plan for your room.