IKEA Billy Built-In Hack on a Budget
Clara Townsend
Clara Townsend is an interior stylist, vintage furniture enthusiast, and the creative voice behind Velvet Abode. With over a decade of experience transforming both cramped city apartments and sprawling fixer-uppers, she believes that a beautiful home is built on personal stories rather than massive budgets. When she isn't hunting for the perfect brass sconce at a local flea market, she can usually be found rearranging her living room for the third time this month.
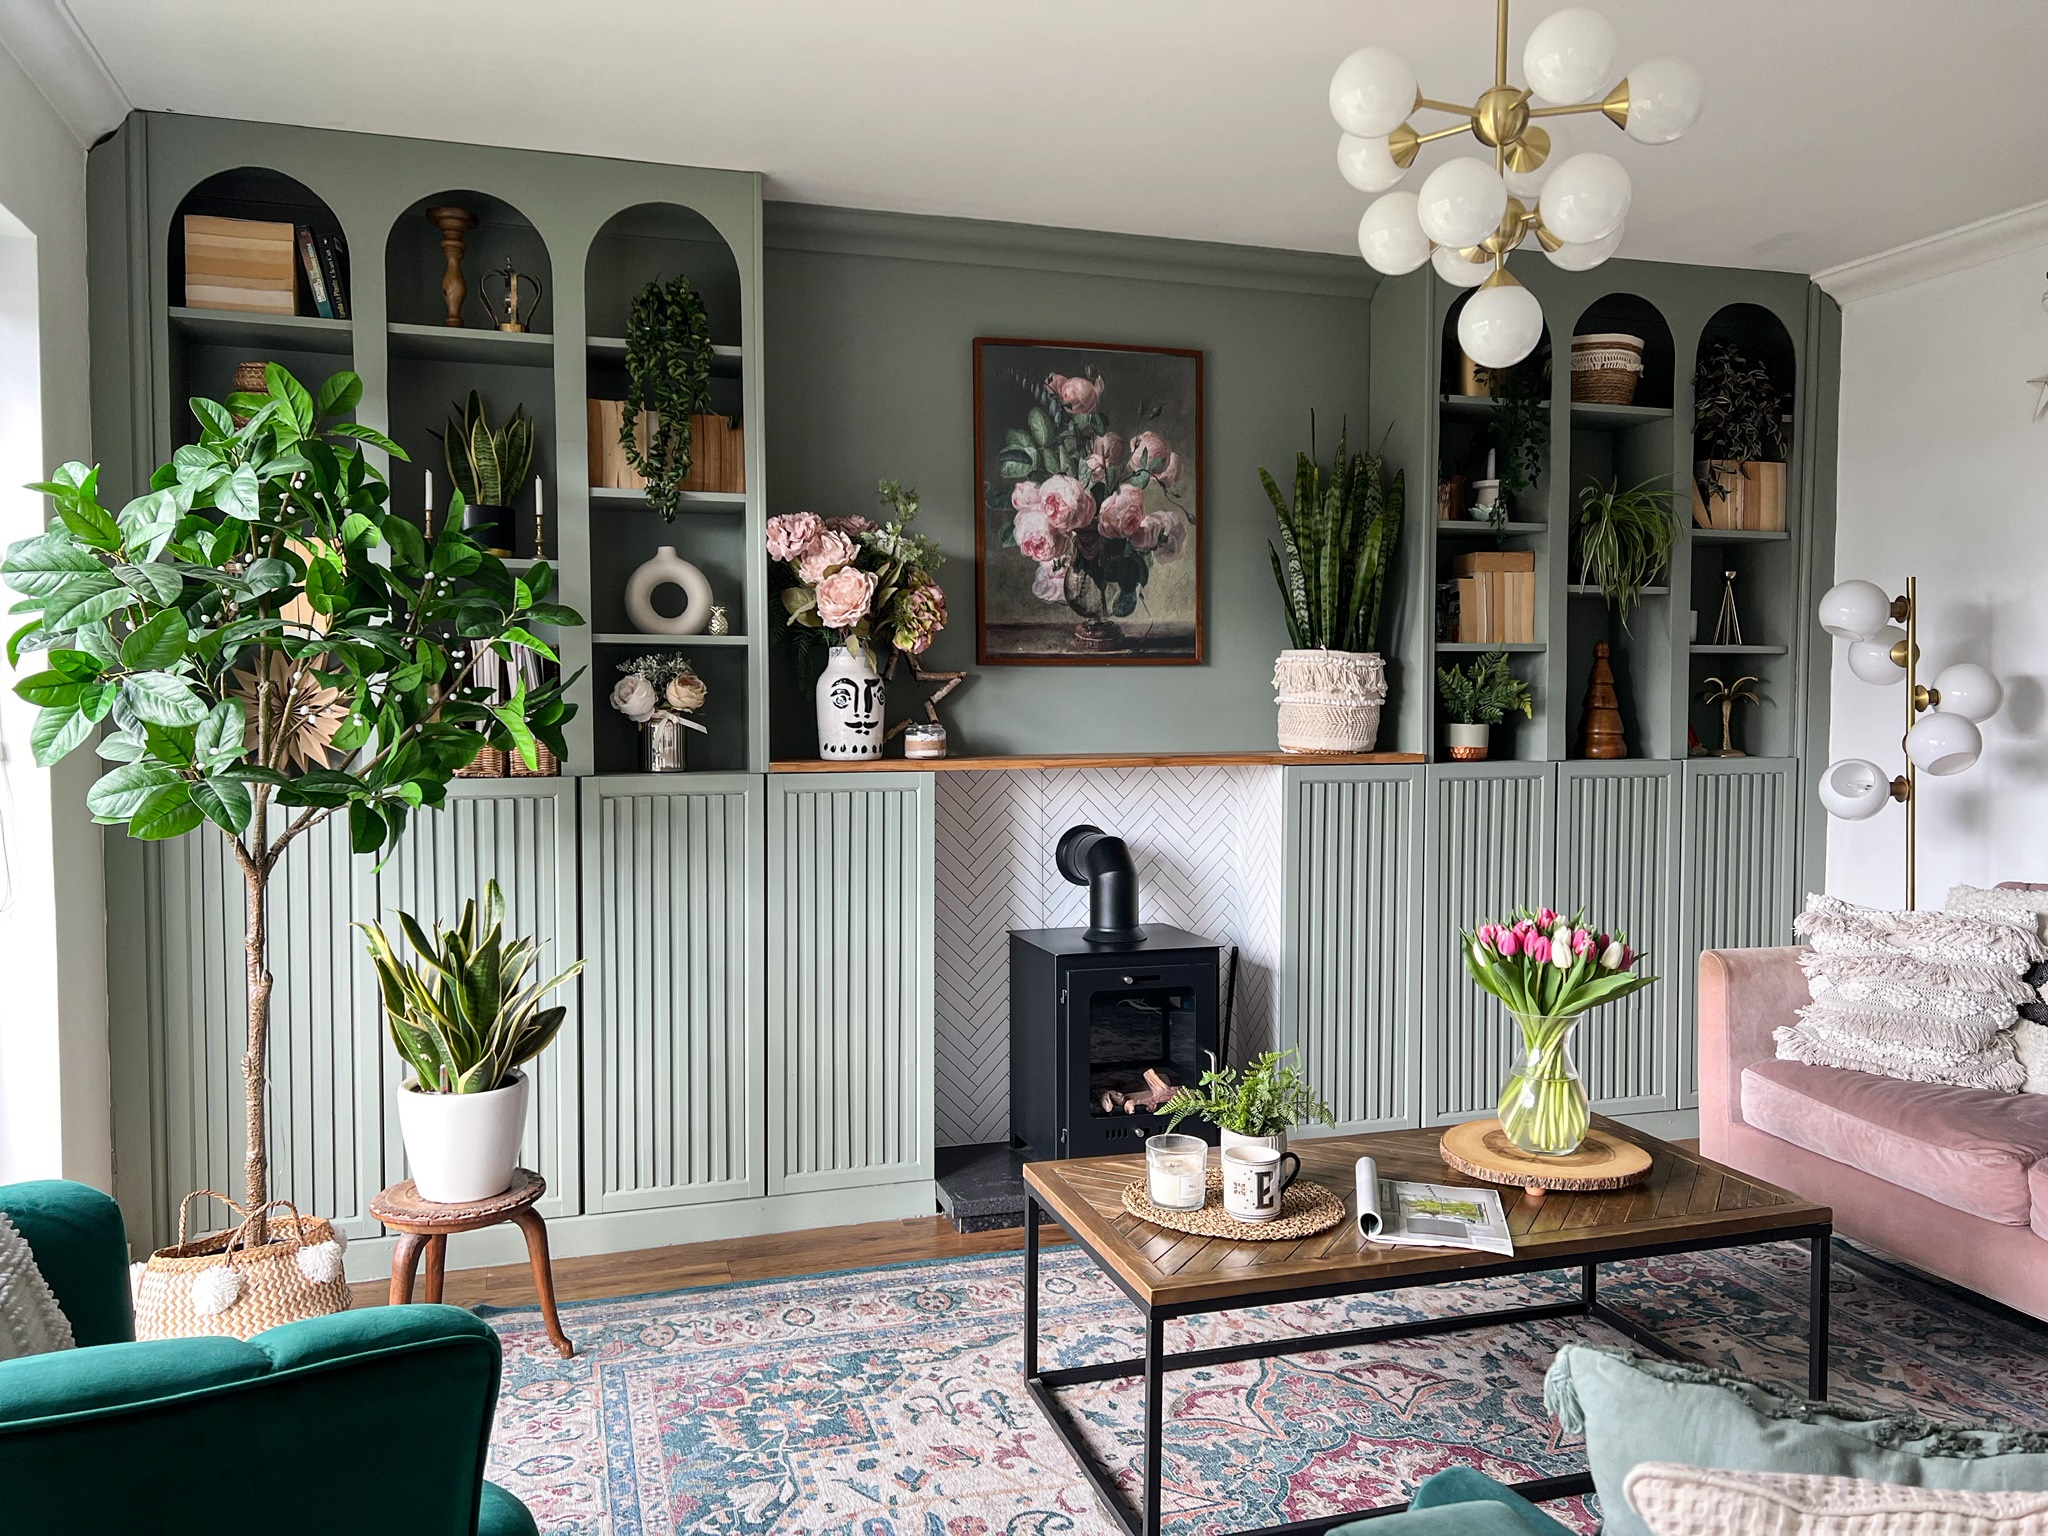
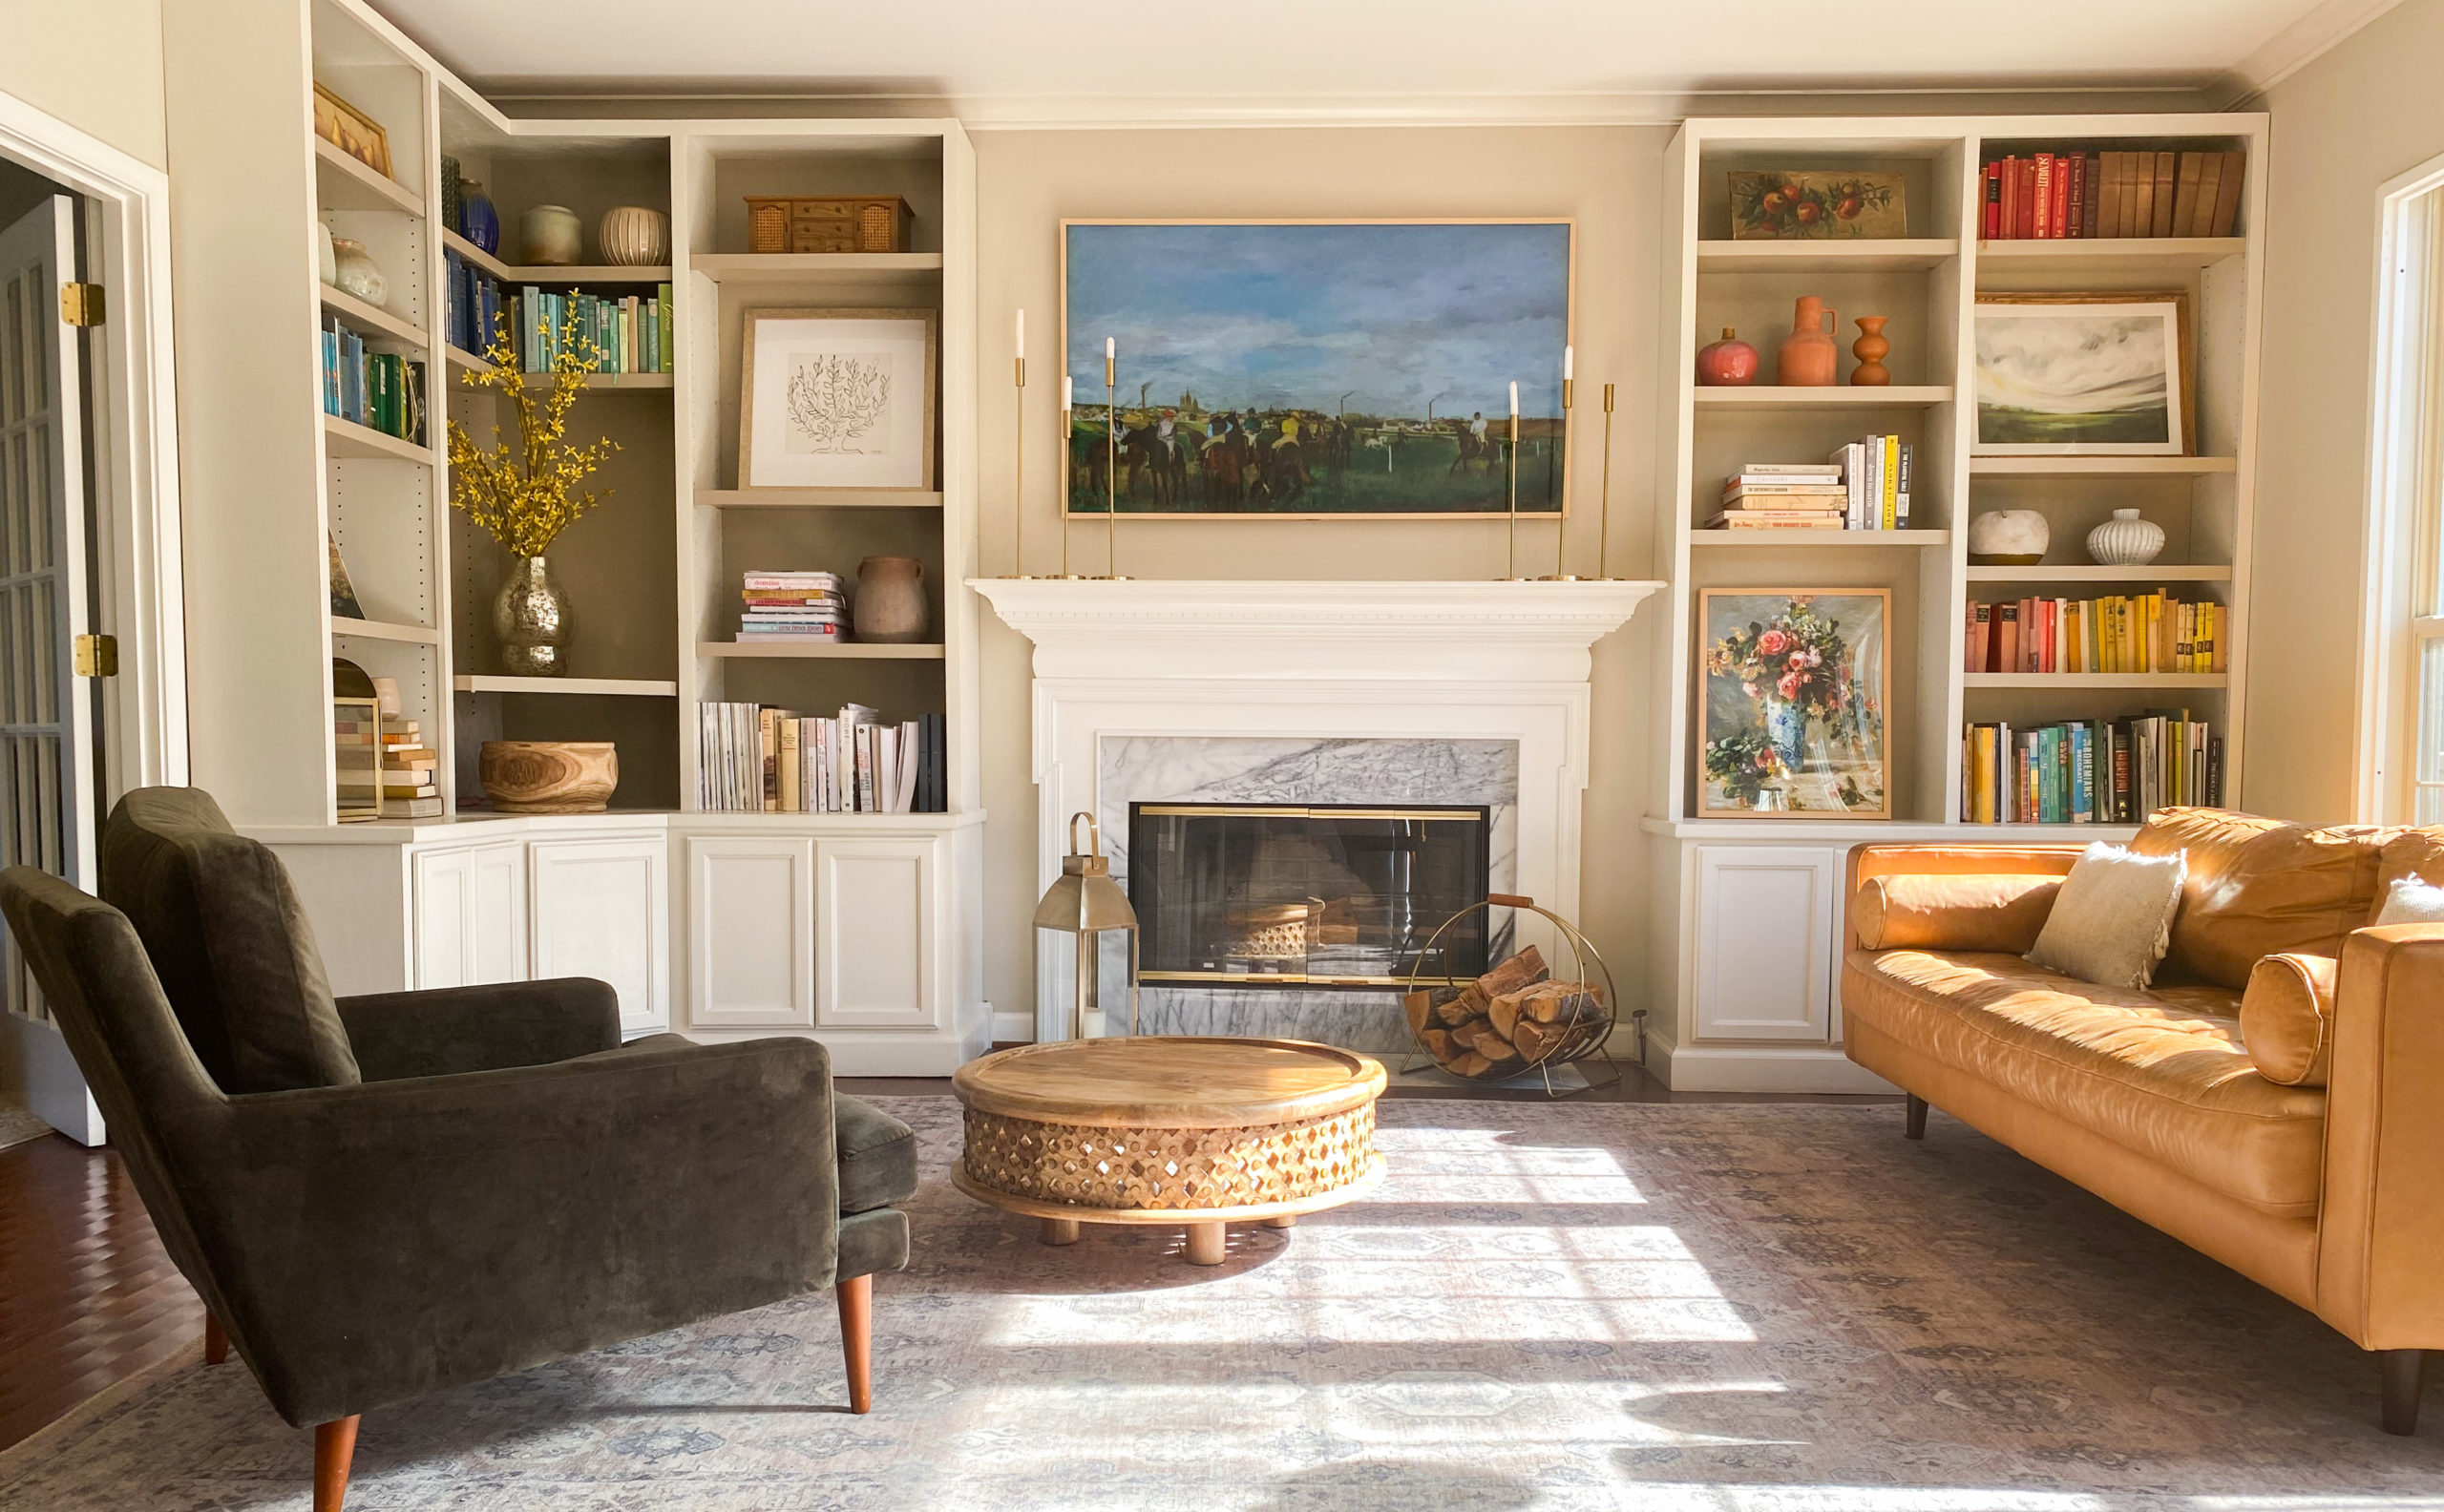
If you have ever looked at those dreamy wall-to-wall library moments and thought, “Sure, but I do not have built-in money,” let me introduce you to my favorite little design loophole: the IKEA Billy bookcase built-in hack. It is part weekend project, part optical illusion, and it can make even a basic room feel intentional and finished.
This is the version I recommend when you want it to look custom, not just “bookcases lined up.” We are talking: planning measurements that work in real houses, a base that makes everything feel architectural, scribing so the edges look tight against imperfect walls, trim and crown that pulls it all together, and paint that makes it read like it has always been there.
Before You Buy: Measure First
The difference between a built-in that looks “custom” and one that looks “pushed together” is almost always decided before the first screw goes in. Grab a tape measure, a pencil, and a little patience.
Measure the wall in three places
Old houses and even brand-new builds love to surprise us. Measure the width of the wall at the floor, mid-wall, and near the ceiling. Do the same for height, especially if you are adding crown molding.
- Width: wall-to-wall at multiple heights
- Height: floor to ceiling in at least two spots
- Depth: check baseboard projection, vents, and outlets
Choose Billy sizes on purpose
The Billy comes in a few common widths and heights that vary by country and over time, so check your local IKEA listings before you finalize your plan. In many US markets, common sizes are roughly 15 3/4 in (about 40 cm) and 31 1/2 in (about 80 cm) wide, and about 79 1/2 in (about 202 cm) tall, plus height extensions.
The goal is to get as close to wall-to-wall as possible, then use filler strips at the ends for a perfect fit.
My rule: plan for at least 3/4 in of filler at each outer edge if you can. It gives you room to scribe to the wall and makes everything look crisp. It also lets you leave a tiny “real house” gap that trim and caulk can cover later.
Decide: flush or floated
If you want the bookcases to sit flush to the wall, plan on removing the existing baseboards behind the units so the backs can sit flat. If your wall has outlets, vents, or baseboards you do not want to cut around, you can intentionally “float” the bookcases forward by building the base slightly deeper. This can also look more substantial, especially in living rooms.
Materials List
You can make this as simple or as ornate as you want, but the best budget builds stick to a short, smart list.
- IKEA Billy bookcases (plus optional height extensions if needed)
- 2x4s for a platform base and wall cleats
- 3/4 in plywood or MDF for the top of the base (MDF is smoother, plywood is sturdier)
- 1x2 or 1x3 boards for face frames and fillers
- Baseboard to match your room (or new baseboard for the whole wall)
- Crown molding (optional but makes it look truly built-in)
- Trim nails or brad nails, wood glue, construction adhesive
- Wood filler for wood and MDF nail holes and seams
- Setting-type joint compound for drywall patches (if you remove baseboards)
- Paintable caulk for change-of-plane seams (trim to wall, trim to trim)
- Sandpaper (120 to 220 grit for scuffing and smoothing)
- Primer (high-adhesion) and paint (trim enamel)
Tool notes: A brad nailer makes this faster, but you can do it with a hammer and finish nails. You will also want a level, a stud finder, and a circular saw or miter saw for clean trim cuts.
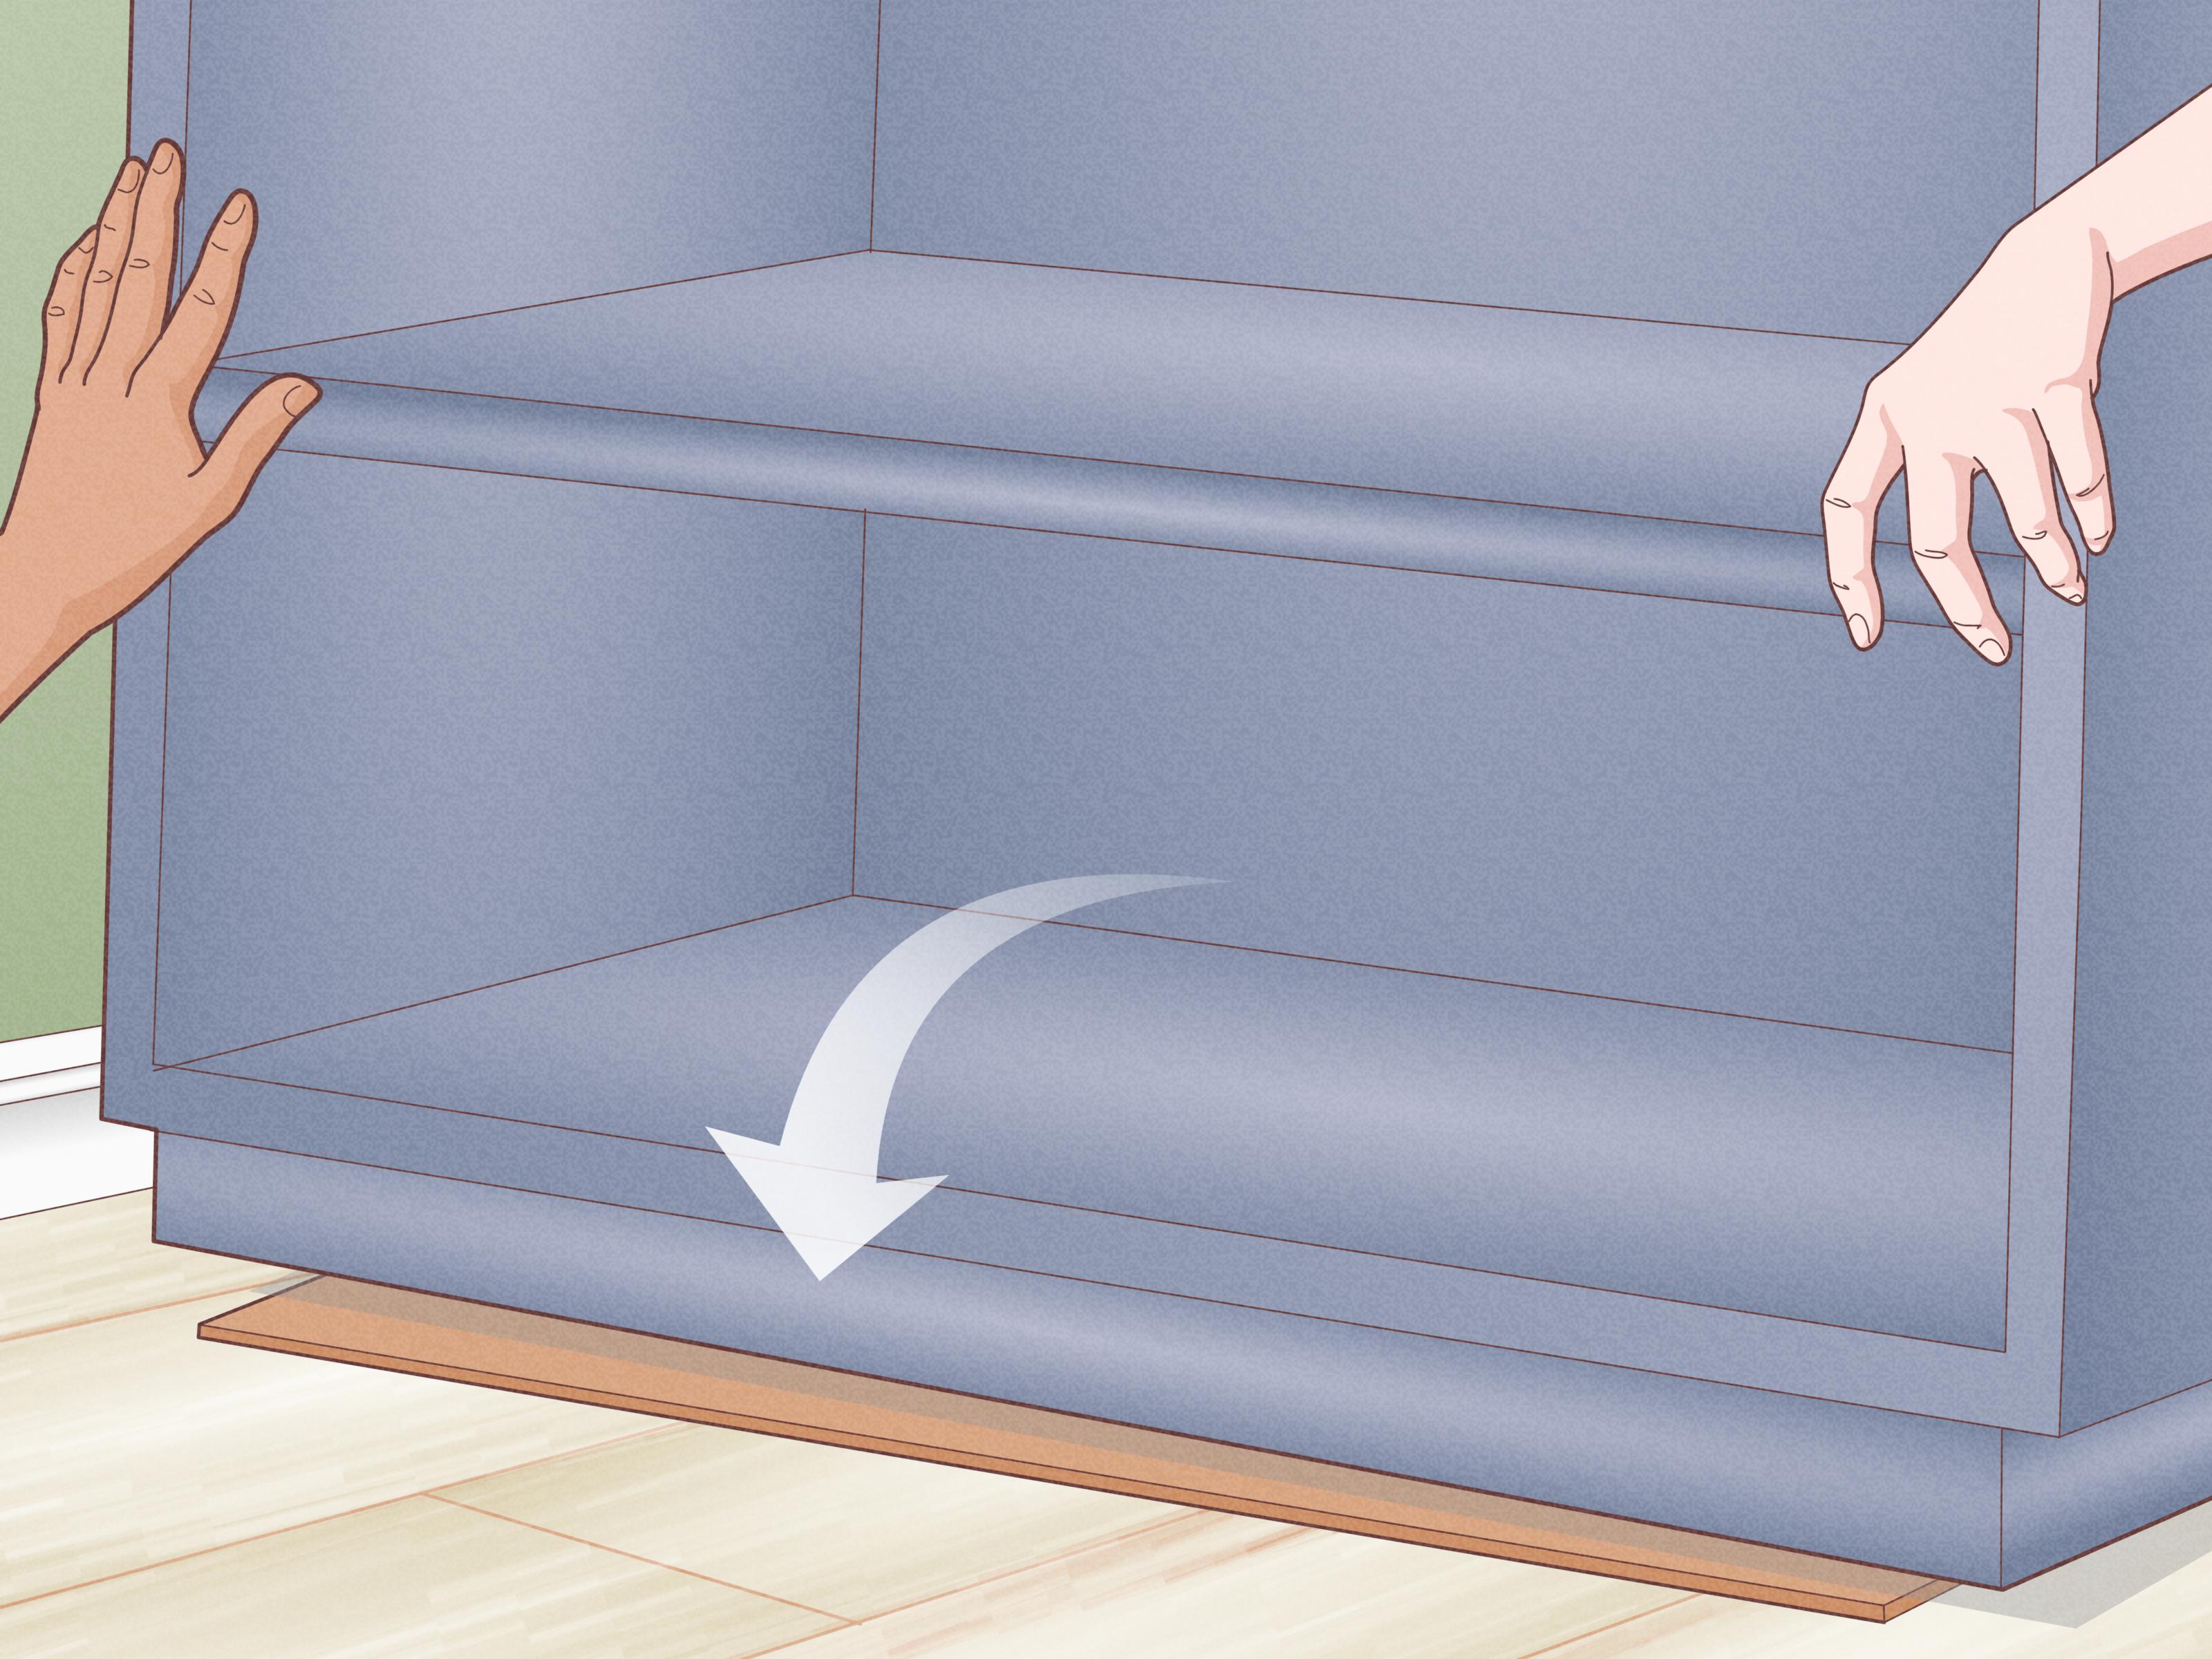
Step 1: Build a Solid Base
If you only do one upgrade beyond “bookcases lined up,” let it be this: raise them onto a platform base. That base creates shadow lines, a furniture-like plinth effect, and makes the whole run feel intentional.
How tall should the base be?
Common base heights are 3 1/2 in to 5 1/2 in. A simple approach is using 2x4s on edge (3 1/2 in tall), then topping with 3/4 in sheet material.
How deep should the base be?
Match the bookcase depth or go slightly deeper if you want to clear baseboards without removing them. Just be consistent across the full run.
Build the platform like a mini deck
- Frame a rectangle with 2x4s
- Add cross braces every 16 to 24 inches
- Level it with shims as needed
- Fasten it in a way that makes sense for your floor: screw into a wood subfloor when appropriate, but do not screw into radiant-heat floors. In condos, rentals, or questionable floors, use construction adhesive plus wall cleats into studs instead
- Top it with plywood or MDF
Clara tip: Floors are rarely perfectly level. Take your time here. A level base makes the scribing and trim work so much easier later.
Carpet note: Built-ins and carpet are not best friends. If you can, cut and remove the carpet under the base so the platform sits on the subfloor. If you cannot, build a wider, well-braced plinth and expect extra shimming.
Step 2: Install and Secure the Bookcases
Assemble the Billy units according to IKEA instructions, then place them on the base. Before you attach anything permanently, do a full dry fit.
Make them look like one unit
- Leave a small, intentional gap (often 1/8 in to 1/4 in where needed) at walls and the ceiling so nothing binds on uneven surfaces. Trim and caulk will cover this later
- Clamp adjacent bookcases together
- Pre-drill and screw through the side panels to connect them
- Check for plumb with a level and shim behind or under as needed
- If you are mixing widths, align shelf pin holes and shelf heights before you lock everything in
Anchor to the wall (do not skip this)
Even if it feels sturdy, a long run of tall shelving should be anchored. Use IKEA’s anti-tip hardware or comparable brackets, and aim for studs. If your trim plan covers the top, consider adding a top cleat or rail behind the header and anchoring through that into studs so everything stays secure after the finish work.
Renters and condos: Check your rules before you start. If you need a lower-impact approach, you can still anchor into studs with fewer holes, then hide the hardware under your top trim.
Step 3: Scribe the Fillers
This is the moment that separates the weekend DIY from the “wait, did you have this custom made?” reaction. Most walls have slight waves, corners are not perfectly square, and ceilings love to slope just enough to be annoying. Scribing is simply shaping your filler pieces so they match the wall’s reality.
Use filler strips at the ends
If you have a gap between the outer bookcase and the wall, fill it with a vertical strip of 1x material or MDF. In some rooms, a small filler between units can also help center a layout or land shelves symmetrically.
Easy scribing method
- Hold the filler strip in place where it will be installed
- Set a compass (or a scribing tool) to the widest gap
- Run the compass along the wall, marking the filler strip
- Cut along the line with a jigsaw or belt sander
- Test fit, adjust, then attach
Clara tip: If you are nervous, leave your cut just a hair outside the line and sand down slowly. You can always remove more material. You cannot put it back.

Step 4: Add Trim and Crown
Trim is where the Billy stops being “a shelf” and starts being “architecture.” Think of trim like the frame around a beautiful painting. It does not need to be ornate. It just needs to be intentional.
Baseboard: keep it continuous
Run baseboard across the face of the platform base so the bookcases look grounded. If your room has existing baseboard, try to match the profile. If you cannot match it, consider replacing the baseboard along that whole wall for a seamless look.
Face frame: hide seams
Add 1x2 or 1x3 trim to the front edges where bookcases meet. This covers small gaps and makes the shelving read like one built piece.
Why 1x2 is the sweet spot: A 1x2 is actually about 1 1/2 inches wide, which neatly covers the seam created by two adjacent 3/4 inch side panels meeting. It is one of those tiny details that makes the front look intentionally “finished” instead of “stacked.”
Crown: connect to the ceiling
Crown at the top is optional, but it is the quickest way to make the run look custom. You will usually add a simple top header board first (a board spanning across the tops), then attach crown to that.
- Install a top board across the front (header)
- Add small vertical returns at the ends if needed
- Attach crown molding and nail into the header and ceiling blocking
- Caulk the top edge for a clean finish
Budget-friendly move: Choose a simple crown profile. Minimal styles look modern and are easier to cut cleanly.
Step 5: Fill, Caulk, Sand
This is the unglamorous part, but it is also where the magic is. Built-ins look high-end because they look seamless.
- Wood filler: nail holes and seams on wood and MDF trim
- Setting-type joint compound: drywall repairs and larger wall imperfections
- Caulk: change-of-plane seams, like trim-to-wall and trim-to-trim
- Sand: once dry, then wipe dust away
Clara tip: Use paintable caulk and smooth it with a damp finger or caulk tool. Clean lines matter more than fancy materials.
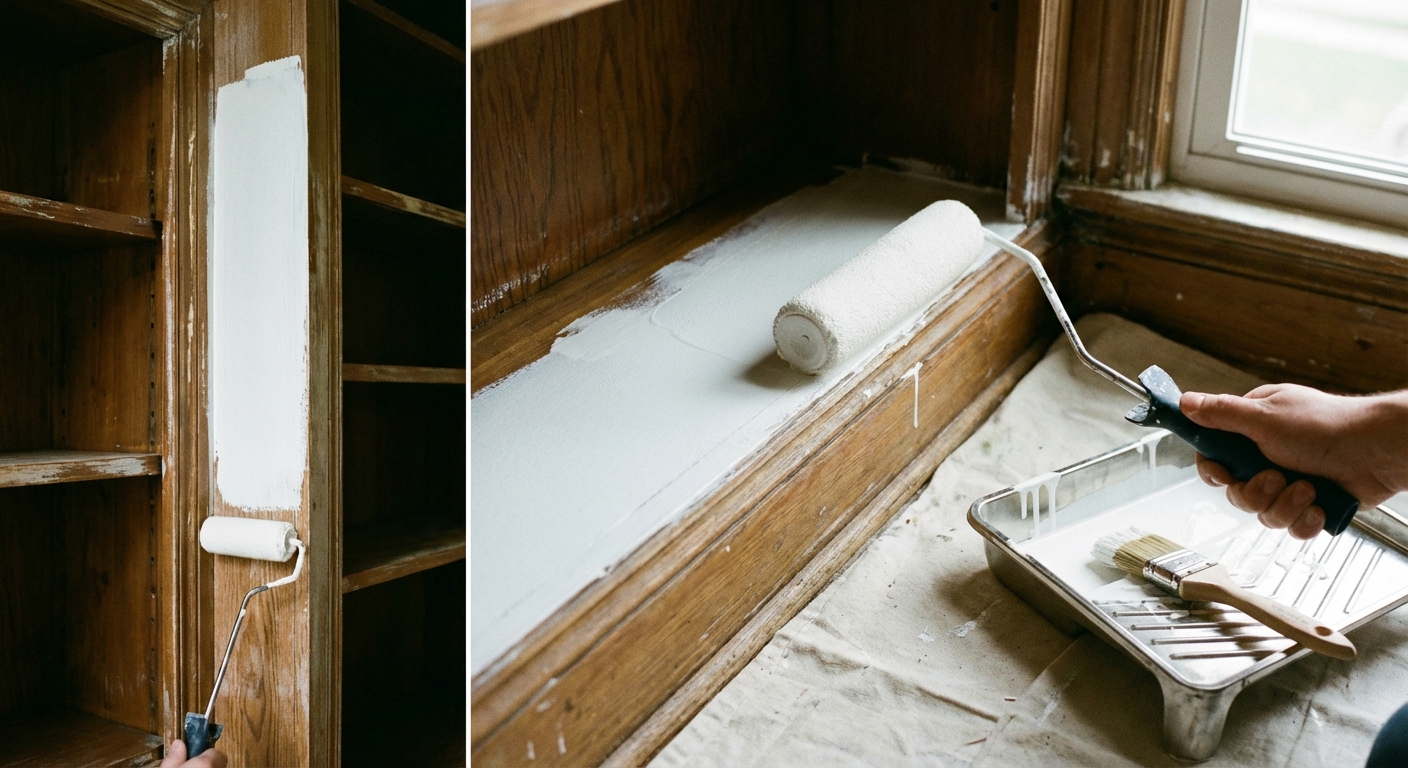
Step 6: Prime and Paint
Paint is what turns “a collection of parts” into one cohesive built-in. You have two classic routes, and both are gorgeous:
Option A: Match the wall
This is my go-to for small rooms or if you want a calm, enveloping look. The shelves feel like they belong to the architecture, and your styling becomes the star.
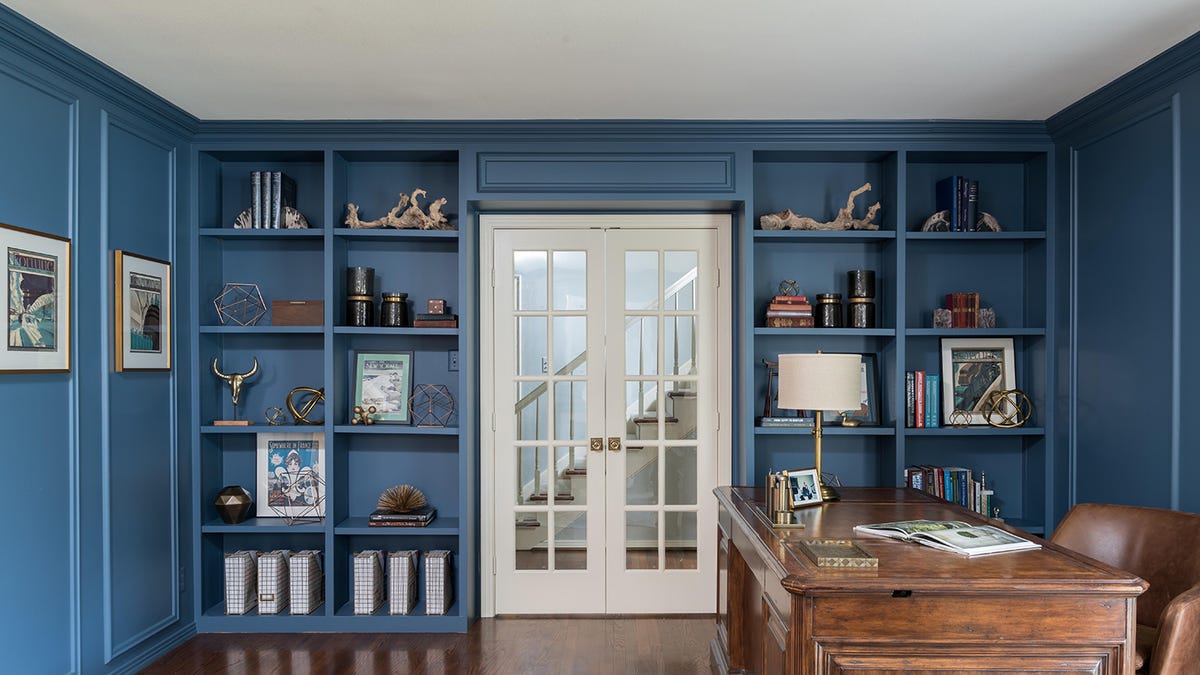
Option B: Make it a feature
Deep olive, inky blue, warm mushroom, or a soft black can make the whole wall feel like a library nook. If your room is neutral, this is instant personality.
Primer matters more than you think
Billy surfaces are often a slick foil, melamine, or laminate-like finish (it can vary by color and production), so confirm what you have and choose a primer made for those surfaces. Use a high-adhesion primer, then top with a durable trim enamel in satin or semi-gloss for wipeable shelves.
- Clean surfaces first (degrease lightly)
- Scuff sand glossy areas with 120 to 220 grit sandpaper
- Prime thoroughly
- Paint 2 coats, sanding lightly between if needed
Finish note: A separate clear topcoat is usually not needed over a quality trim enamel. What helps most is letting the paint cure before you load up the shelves.
Safety and Real-Life Notes
- Weight limits: Billy shelves have a rated capacity. Check IKEA’s current specs for your exact model, distribute weight, and avoid overloading long spans
- Heat and air: Do not block HVAC returns, baseboard heaters, or vents. Plan clearances or relocate registers if needed
- Outlets: If outlets will land inside the built-in footprint, plan ahead for outlet extenders or an electrician-approved solution
Styling Tips
Once everything is painted and cured, styling is the final layer. I like to style built-ins the way I get dressed: a little structure, a little softness, and one thing that feels like a story.
- Repeat materials: a few brass pieces, a few wood tones, a few ceramics
- Use negative space: leave some shelves intentionally airy
- Mix vertical and horizontal books: stacks create rhythm
- Add warm light: a small lamp or picture light elevates everything
- Bring in texture: linen, woven boxes, matte pottery
Common Mistakes
- Skipping the base: without it, the unit often looks temporary. Build the platform
- No filler strips: gaps at the wall scream “not built-in.” Always plan fillers
- Not leveling early: fix level and plumb before trim. Trim cannot hide a leaning bookcase
- Under-priming: the wrong primer can peel. Use high-adhesion primer for melamine or foil surfaces
- Rushing caulk and sanding: this is the high-end step. Take your time
Budget Breakdown
Save: use simple 1x boards for face frames, keep crown minimal, choose MDF for smooth paint, shop trim at a local salvage store if you have one.
Splurge (selectively): quality primer and trim paint, and a good miter saw blade if your cuts are chipping. Clean cuts and durable paint do more for the final look than fancy molding profiles.
Final Thoughts
My favorite thing about the Billy built-in hack is that it does not just give you storage. It gives you presence. Suddenly the room feels anchored, finished, like it is holding your life gently in place.
If you want, tell me your wall width, ceiling height, and which Billy sizes you are considering (link or screenshot from your local IKEA helps), and I can help you plan a layout with realistic filler gaps and trim ideas.