IKEA BESTÅ and HEMNES TV Wall Built-In Hacks
Clara Townsend
Clara Townsend is an interior stylist, vintage furniture enthusiast, and the creative voice behind Velvet Abode. With over a decade of experience transforming both cramped city apartments and sprawling fixer-uppers, she believes that a beautiful home is built on personal stories rather than massive budgets. When she isn't hunting for the perfect brass sconce at a local flea market, she can usually be found rearranging her living room for the third time this month.
If you have ever looked at your TV wall and thought, “This could feel so much more intentional,” you are my kind of person. The good news is you do not need a contractor, a full-room renovation, or a designer budget to get that built-in look. With IKEA BESTÅ and HEMNES, you can create a media wall that feels architectural, polished, and quietly expensive, even if you built it over a weekend.
This is the same magic behind the best Billy and Kallax built-ins : close the gaps, add a proper base, finish the top, swap the hardware, and handle cords like a responsible adult. BESTÅ and HEMNES just have their own quirks, and once you know them, the results are genuinely satisfying.
Safety first
Quick but serious note before we get pretty: any tall cabinet run needs to be installed like it means business.
- Anchor everything tall to studs: Side towers, bookcases, and any top boxes should be secured with anti-tip hardware into wall studs. This is non-negotiable if you have kids, pets, or a house that gets bumped.
- Follow IKEA mounting instructions: Especially for BESTÅ rails and wall attachment points.
- Plan the TV mount: Mount into studs or use proper blocking. Do not assume drywall anchors alone are enough for a TV.
BESTÅ vs HEMNES
Before you buy anything, decide which line fits your home and how you actually live with your TV setup.
Choose BESTÅ for modern
- Best for: Sleek, minimal, floating or low-profile looks, modular layouts.
- Why it works: The boxy shapes make filler panels and trim work straightforward, and you can scale it wide.
- Watch-outs: BESTÅ is lighter visually, so the custom feeling depends heavily on finishing details like side panels, a thicker top, and hardware.
Choose HEMNES for classic
- Best for: Traditional, cottage, and vintage-leaning rooms, especially if you love a piece that feels like real furniture.
- Why it works: It already has more character in the profile and paneling, so you can get away with fewer add-ons.
- Watch-outs: It is less modular than BESTÅ, so your wall is usually built by flanking a central TV bench with tall bookcases or cabinets.
Plan and measure
A built-in media wall looks expensive when it is calm and symmetrical, even if the room is not. Start with three decisions.
- Where does the TV land? Center it on the wall or center it on the seating. In awkward rooms, those are not always the same. Pick the one that feels best from the sofa.
- What is your mass? A low run of cabinets feels airy. Tall side towers feel architectural. A full wall to the ceiling is the most built-in looking, but also the most trim work.
- How much closed storage do you need? If you have consoles, routers, controllers, toys, or a thousand tiny cords, prioritize doors. Open shelves are gorgeous but ruthless.
Pro tip: Tape the outline on the wall with painter’s tape. It sounds fussy, but seeing the footprint in real scale saves you from the classic “why does this feel so squat?” moment.
The built-in formula
No matter which IKEA line you use, built-ins come down to four upgrades. Do these well and people will ask who your carpenter was.
Translation: the base is your toe-kick or platform, the top is your header, soffit, or crown treatment, and the face is trim or a face frame that hides seams and makes it look like one piece.
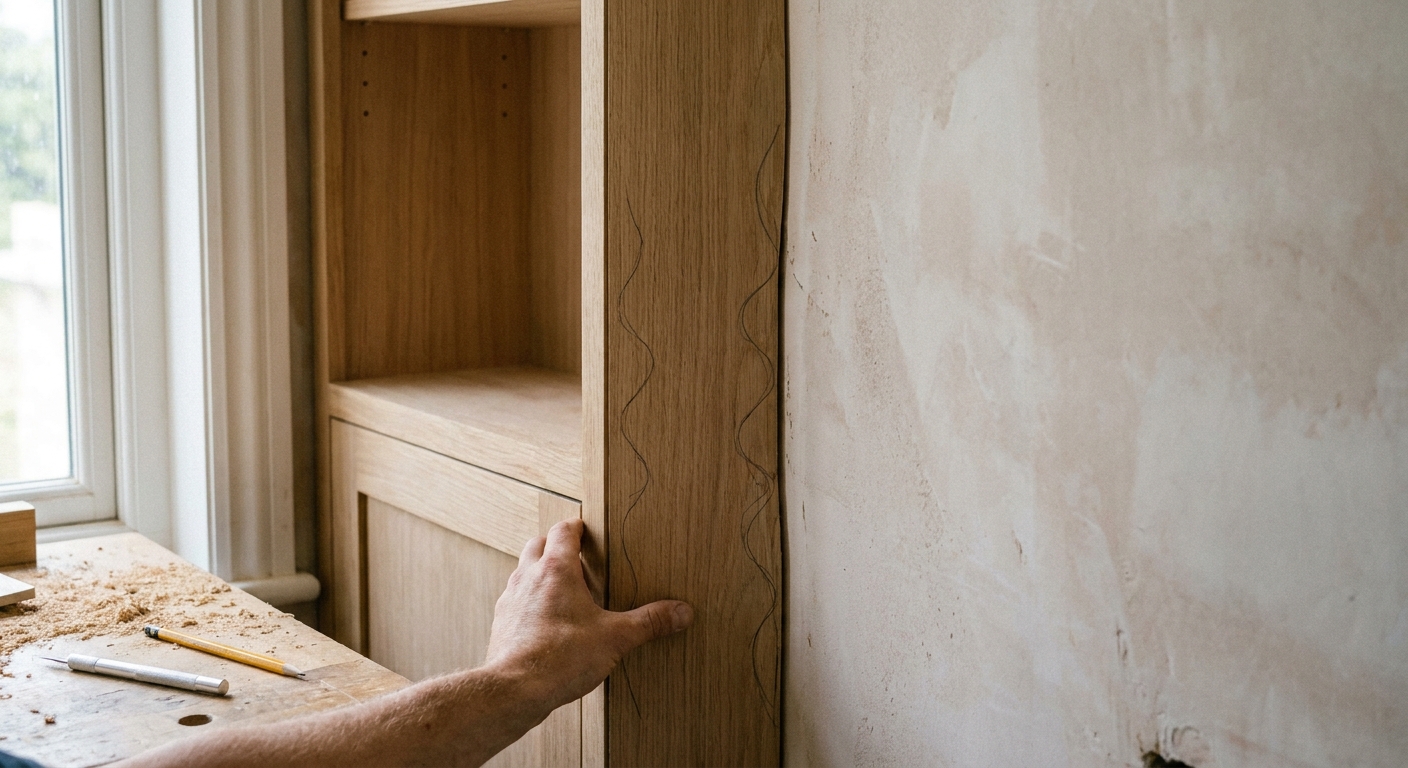
1) Filler panels
Built-ins look built-in because they look like they were made for that wall. That means no weird side gaps, no floating cabinets that end in mid-air, and no dust-catching voids.
- Side filler: Fill the space between the cabinet and the adjacent wall with a vertical panel. This is especially important if your wall is not perfectly plumb.
- Top filler: If you are going up to the ceiling, you will almost always need a horizontal filler strip to bridge the last bit before crown molding.
- Between units: When combining multiple cabinets, use a consistent small gap or butt them tight, then cover seams with a face frame or trim.
Material: Paint-grade MDF is common for filler because it is smooth and affordable. If you are staining wood, use plywood or solid wood that takes stain similarly to your finish.
Pro move: Scribe filler panels to the wall. Walls are rarely straight. A scribed filler is the difference between “DIY” and “did you hire this out?”
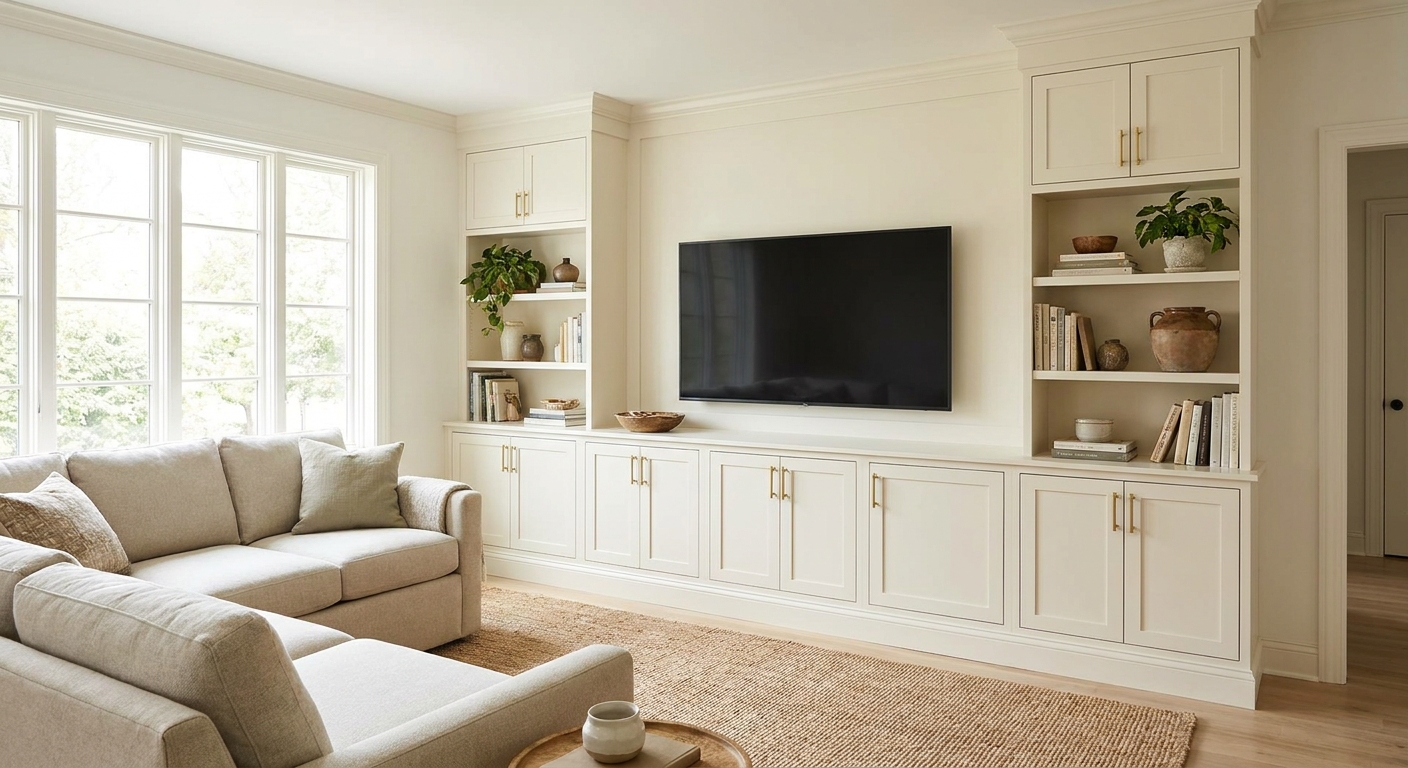
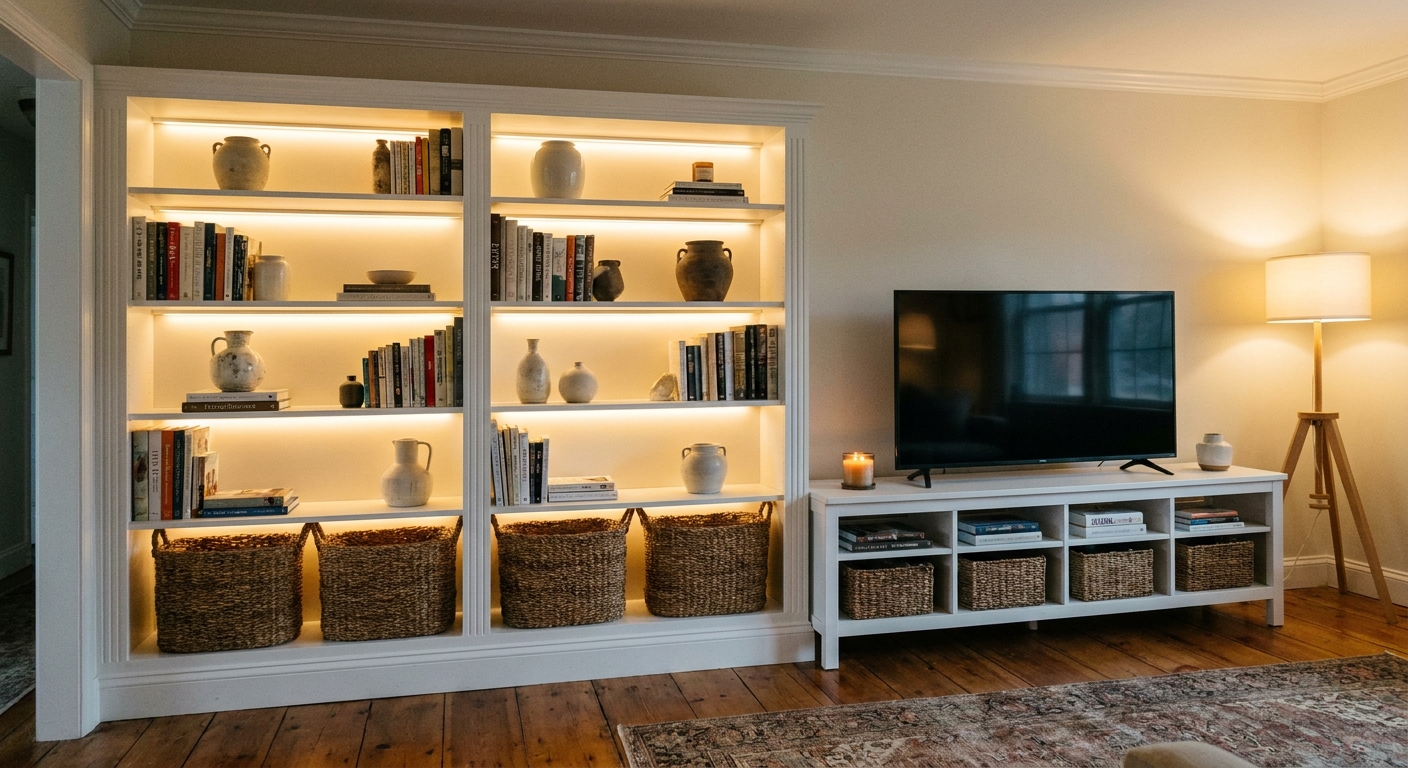
BESTÅ hacks
BESTÅ is basically a blank canvas. The styling is in the finishing.
Add a thick top
A thicker top instantly makes BESTÅ look less like modular boxes. You can:
- Use a butcher block style countertop, sealed in a matte finish for a modern vibe.
- Use a paint-grade MDF top with a routed edge for a more traditional profile.
- Use a stone-look slab if you want that “custom credenza” effect.
Important: BESTÅ components have weight limits, and a heavy slab can exceed what the boxes and fasteners comfortably handle. If you go stone or stone-look, plan to reinforce with a properly supported base, additional internal supports, and a top that is supported across spans. When in doubt, choose a lighter material or get a pro opinion on the structure.
Add a toe-kick base
Floating BESTÅ is clean, but built-ins read more architectural when they meet the floor intentionally. A simple toe-kick base wrapped in baseboard trim makes the whole wall feel grounded.
- Build a 2x4 platform slightly inset from the cabinet fronts.
- Attach cabinets to the platform.
- Wrap the platform with baseboard and shoe molding that matches the room.
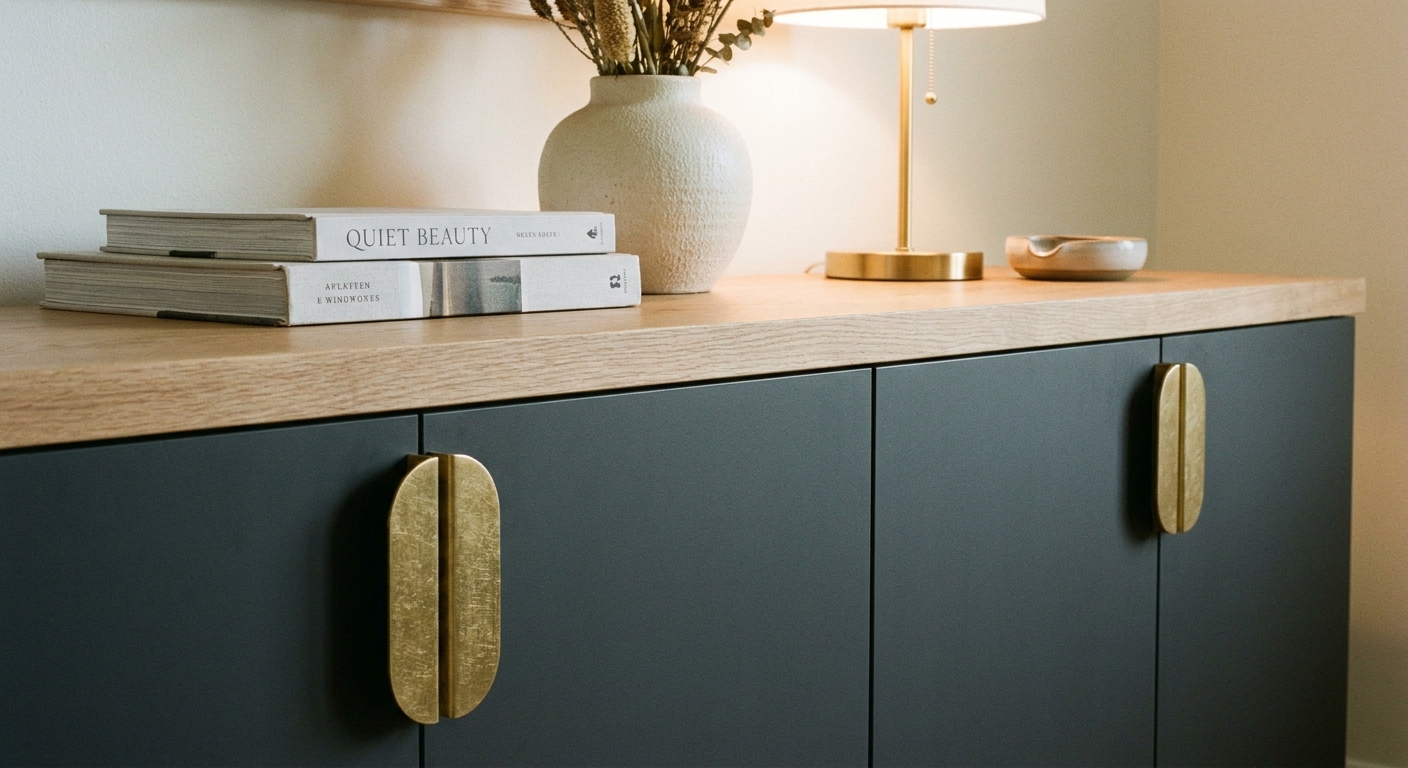
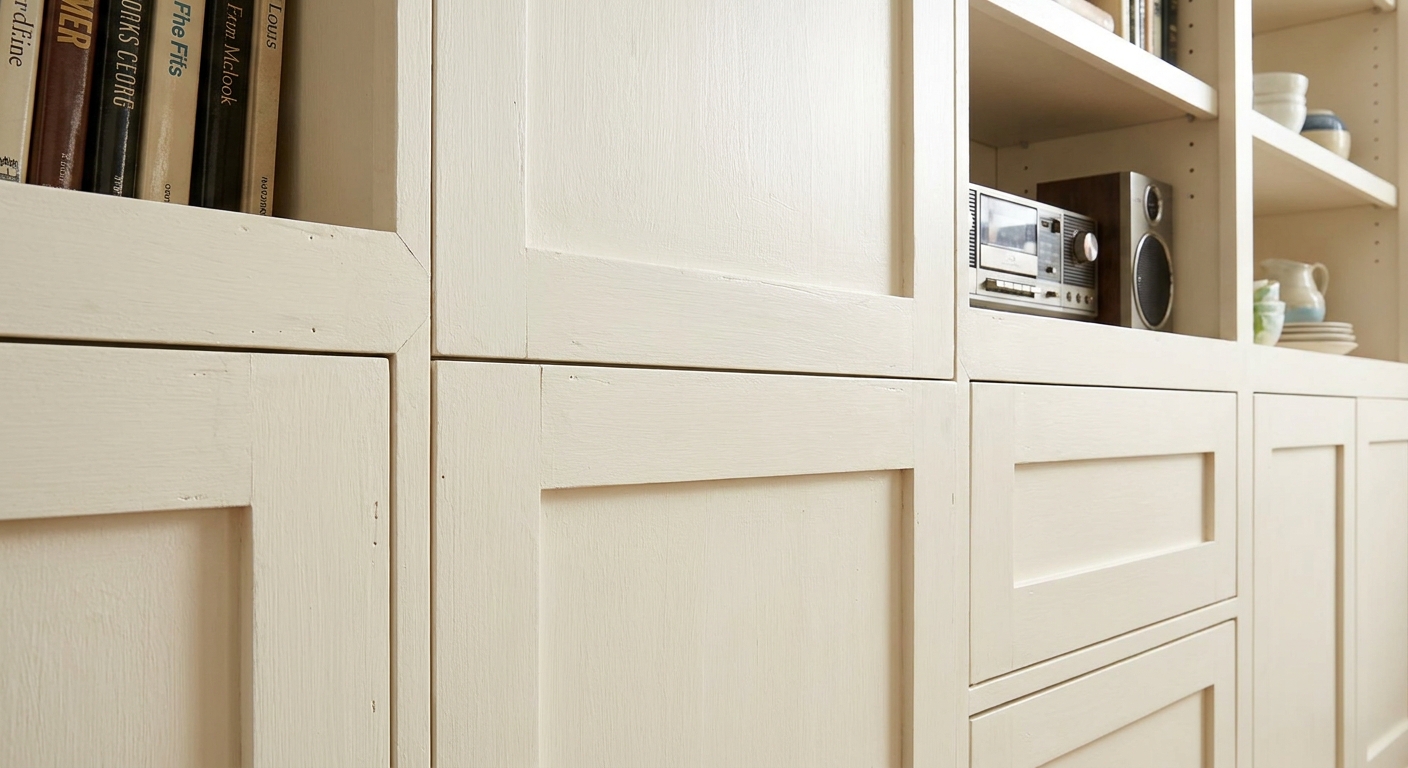
Upgrade fronts and hardware
Door fronts do a lot of visual heavy lifting. Smooth, matte fronts plus the right hardware can read very custom.
- For modern: Flat fronts with long linear pulls in brushed brass or black.
- For soft vintage: Simple round knobs, preferably with a little warmth, like aged brass.
- For a library vibe: Reeded or fluted fronts, then keep hardware understated.
Paint note: BESTÅ fronts vary. Some are foil, some are melamine, some are glass. If you are painting, check the specific surface first. Laminate-like finishes need a high-adhesion bonding primer, and many DIYers get the best results with shellac-based primer for extra bite. If that sounds like a hassle, paintable aftermarket fronts are your sanity saver.
Spacing tip: Keep hardware placement consistent across every door and drawer. Tiny inconsistencies are what make DIY feel DIY.
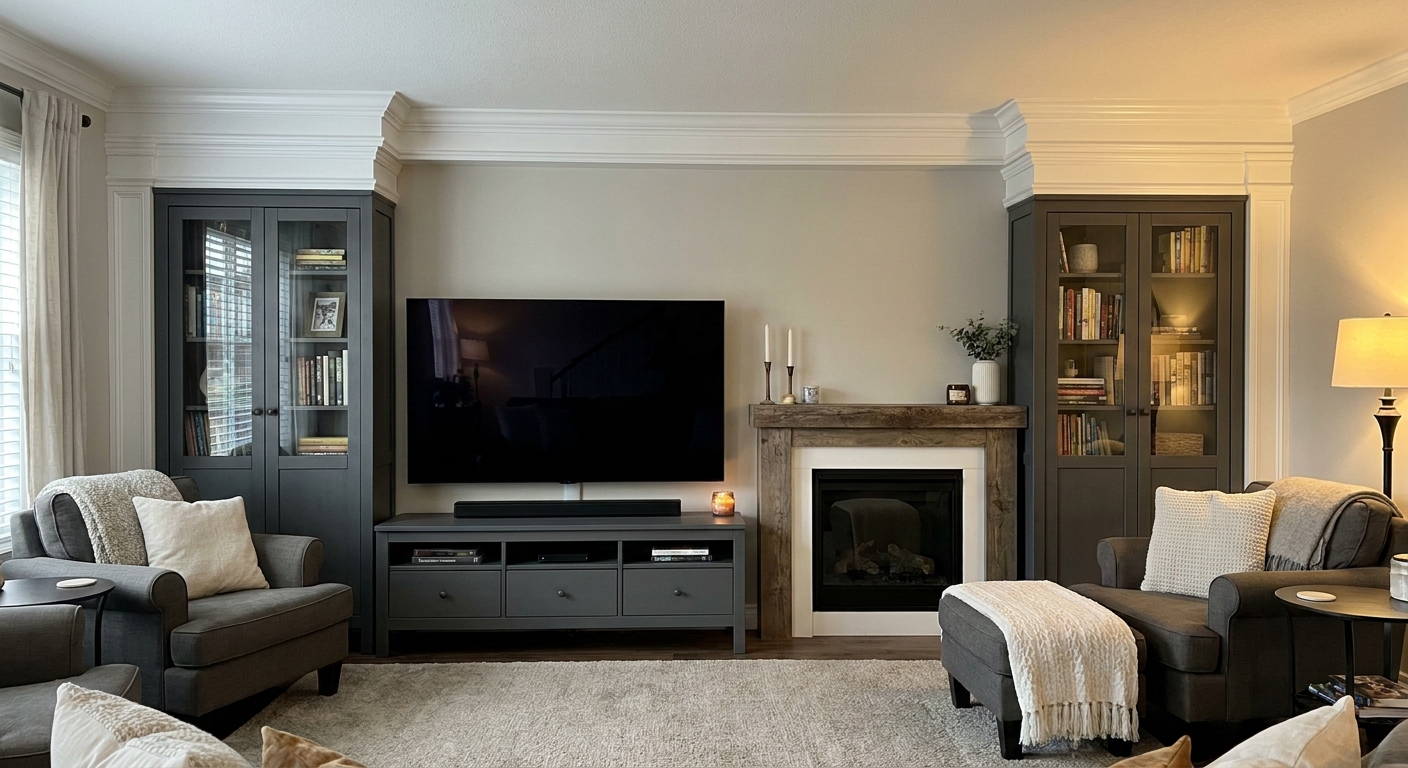
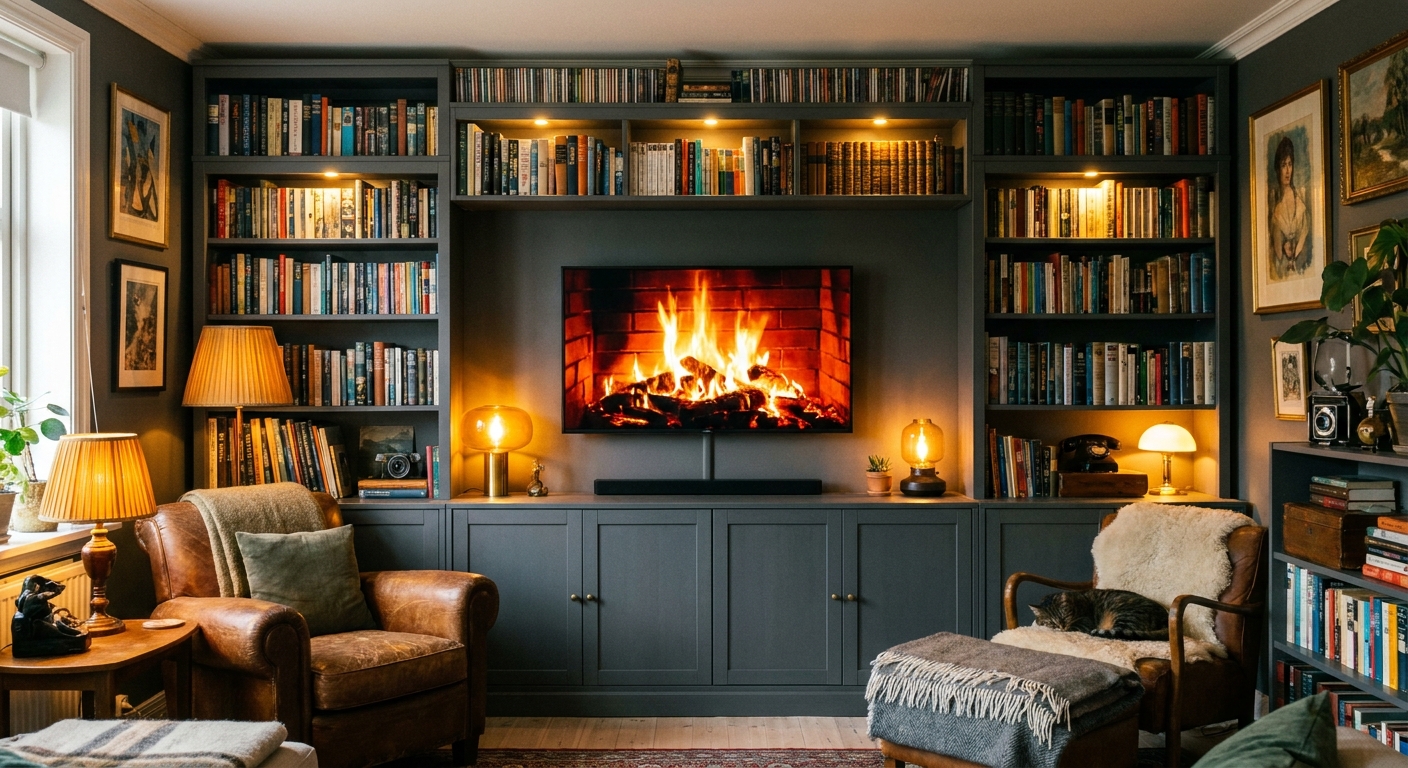
HEMNES media walls
HEMNES already has that “real furniture” presence, so your main job is making multiple pieces look like one continuous installation.
Build symmetry
The most believable HEMNES media wall is a central bench with matching tall bookcases or cabinets flanking it. Aim for equal widths left and right of the TV, even if the room itself is lopsided.
Connect the top
If you stop at the top of the bookcases, it reads like separate furniture. If you connect them visually, it reads like millwork.
- Add a horizontal header board across the top, spanning between the tall units.
- Install crown molding across the entire run, returning it to the wall on both sides.
- Paint the whole assembly one color for a seamless, always-been-here effect.
Style with restraint
HEMNES shelves can turn into visual chaos fast. Keep it calm:
- Group books in stacks, then add one object with texture, like a woven box or a vintage brass candlestick.
- Repeat materials across the wall: a little brass, a little black, a little warm wood.
- Leave breathing room. Empty space is not wasted space, it is what makes the rest look intentional.
Trim details
This is the part that makes your media wall look like it came with the house.
Crown and ceiling
- If your units stop below the ceiling: Add a painted soffit or a simple top box to close the gap, then run crown across.
- If you go to the ceiling: Use a small filler strip if needed, then install crown so it reads continuous.
Baseboard match
Match the baseboard profile already in your space whenever possible. Continuity is what sells the illusion. If your existing baseboard is very thin and modern, keep it consistent and do not suddenly install a chunky colonial profile under the built-in.
Face frames
If you have multiple BESTÅ boxes or multiple HEMNES pieces, a face frame can unify them. Think of it as a picture frame around the whole arrangement.
- Use 1x2 or 1x3 paint-grade boards.
- Cover vertical seams between units.
- Run a continuous frame around the perimeter for a built-in look.
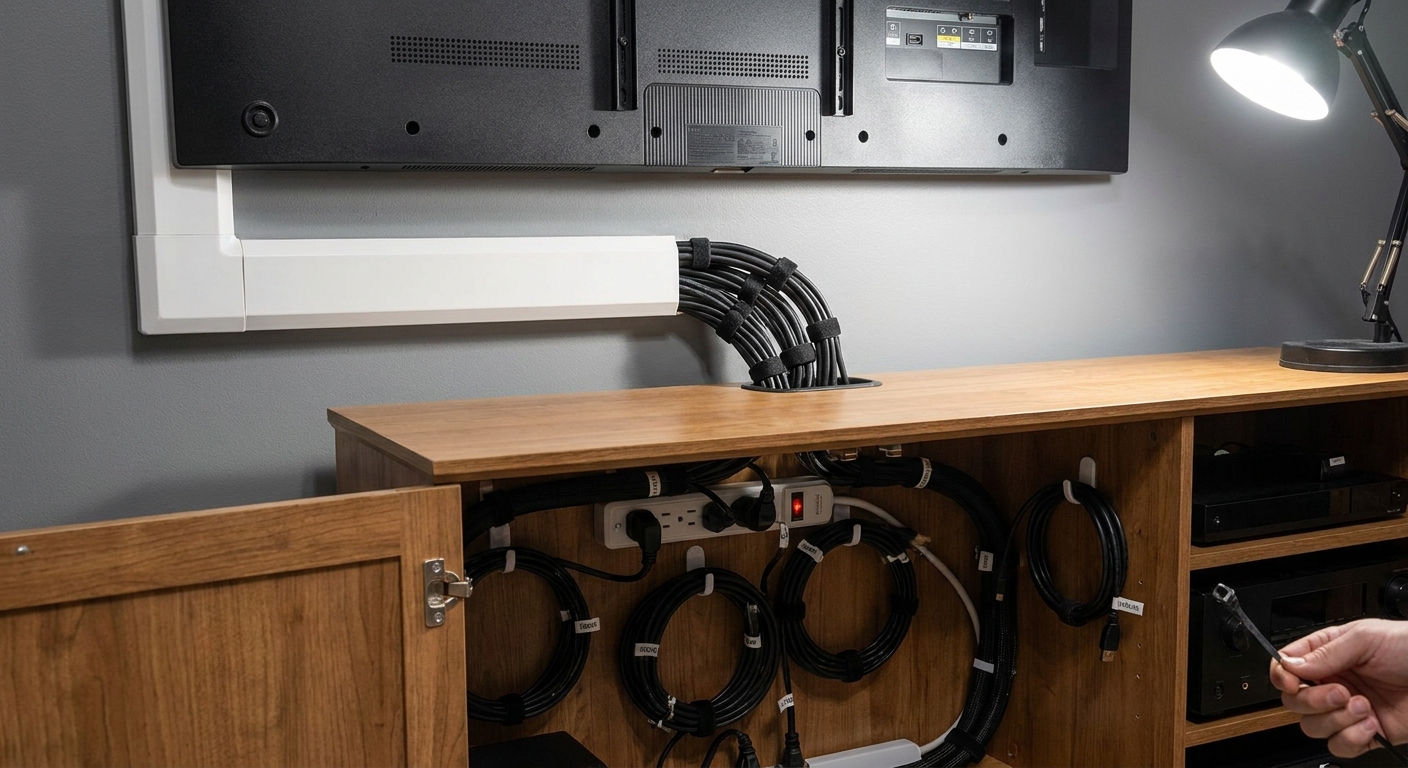
Cord management
The fastest way to make a gorgeous built-in feel messy is a tangle of cords. The second fastest is a router blinking like a tiny nightclub in your living room.
Plan power early
- Decide where the TV power cord will go. Ideally, behind the TV and straight down into cabinetry.
- Decide where your consoles will live and make sure those shelves have access to power.
- Use grommet holes at the back of cabinets for clean pass-throughs.
Code note: Do not run a standard TV power cord inside the wall. If you want a truly hidden look, use a recessed TV box or a code-compliant in-wall power kit, or hire an electrician.
Cable channels
A paintable cable channel on the wall can be renter-friendly and visually quiet. Paint it the wall color and it disappears.
Rental note: Some adhesive strips can pull paint on removal. Test a small spot first, follow the brand’s removal instructions, and use heat if recommended.
Hide the router
- Place the router in a cabinet with ventilation space, not shoved behind a stack of board games.
- Know that an enclosed cabinet can reduce signal. Test Wi-Fi speed and reliability before you commit to the final spot.
- Consider mesh Wi-Fi nodes if your home is larger or has thick walls.
- Use a ventilated door insert or leave a discreet gap at the back if heat is an issue.
Paint and finish
If you want the built-in to read as part of the architecture, paint is your best friend. If you want it to read as furniture, keep a wood tone and focus on trim precision.
Color drench
Painting the units, trim, and even the wall behind them the same color creates depth without visual noise. Deep olive, smoky blue, warm taupe, and soft black are all extremely forgiving for media walls.
Match existing trim
Painting everything in the same white as your existing trim gives that classic, bright built-in vibe.
Prep by material
- BESTÅ (foil or melamine finishes): Treat it like a slick surface. Clean thoroughly, scuff sand if the finish allows, then use a high-adhesion bonding primer. Many DIYers swear by shellac-based primer for the most reliable grip before an enamel topcoat. Always test on a discreet spot first, and check your exact door or front material.
- HEMNES (solid pine): Pine knots can bleed through paint. Use a stain-blocking primer designed to lock down tannins and knots before your topcoat. Spot prime knots if needed, then finish with a durable enamel.
My rule of thumb: if you can see a gap, your eye will keep returning to it. Caulk is cheap confidence.
Layouts that work
Low BESTÅ with tall sides
This is the best of both worlds: a long, low cabinet for consoles and hidden storage, plus two taller towers to add height and balance. Add a connected top treatment and it reads custom immediately.
Full BESTÅ wall
If you love a sleek, modern built-in, go full wall: cabinets below, storage above, and a centered space for the TV. Keep the doors simple and let texture come from styling and lighting.
HEMNES bench plus bookcases
Flank the TV bench with bookcases, add a header board and crown, and style with books and warm lighting. It is cozy, classic, and forgiving if your TV is not perfectly centered on the wall.
Parts checklist
If you want this to feel like a true weekend project, shop once and build calmly.
- Install essentials: stud finder, level, shims, cabinet mounting screws, anti-tip hardware, drill and bits
- Trim and build: paint-grade MDF for fillers (common: 1/2 inch or 3/4 inch), 1x2 or 1x3 for face frame, baseboard and shoe molding to match the room, crown molding, header board material
- Finish: paintable caulk, wood filler, primer matched to your surface (bonding or stain-blocking), durable enamel paint
- Scribe help: compass or scribing tool, block plane or sander
- Cords: grommet kit, cable ties, cable channel
Budget checklist
Spend here
- Trim and filler panels: Straight, smooth materials make everything easier.
- Hardware: It is the jewelry, and it is what your hand touches daily.
- Paint and primer: Better finish, fewer touch-ups, less regret.
Save here
- Interior shelves: Nobody is admiring the shelf thickness inside a closed cabinet.
- Decor: Thrifted books, vintage frames, and flea market finds beat big-box filler every time.
- Lighting: You can start with plug-in options and upgrade later.
Common mistakes
- Ignoring uneven floors or walls: Shim your base and scribe your fillers. This is non-negotiable for a polished look.
- Skipping the top treatment: Stopping below the ceiling can look unfinished unless it is intentionally designed with a soffit or header.
- Overstuffing the shelves: Give objects space so the wall feels calm.
- Forgetting ventilation: Consoles, receivers, and routers need airflow. Plan for it.
- Mounting the TV too high: Try to keep the center of the screen near seated eye level. Your neck will thank you.
- Not checking clearances: Confirm door swing, hinge side near walls, and access to outlets before you commit to the final layout.
Weekend game plan
- Day 1 morning: Measure, locate studs, level, and assemble units.
- Day 1 afternoon: Set units, attach to each other where needed, anchor to wall studs, build the base platform if using one.
- Day 2 morning: Install filler panels, header boards or soffit pieces, and face frame trim.
- Day 2 afternoon: Caulk, prime, paint, install hardware, then manage cords.
If you do nothing else, do the filler panels and the trim. That is the point where your IKEA pieces stop looking like separate purchases and start looking like one confident design choice.