IKEA Alex Drawer Unit Hacks That Look Built-In
Clara Townsend
Clara Townsend is an interior stylist, vintage furniture enthusiast, and the creative voice behind Velvet Abode. With over a decade of experience transforming both cramped city apartments and sprawling fixer-uppers, she believes that a beautiful home is built on personal stories rather than massive budgets. When she isn't hunting for the perfect brass sconce at a local flea market, she can usually be found rearranging her living room for the third time this month.
There is a reason the IKEA Alex drawer unit shows up in so many real homes. It is hardworking, it is compact, and it quietly fixes the “where do I put all this stuff?” problem. The only downside is that it can read a little… stock. A little too perfectly rectangular. A little too “I assembled this at 10 pm with an Allen key and a prayer.”
The good news is that Alex is also one of the easiest pieces to fake built-in with. With the right proportions, a few finishing details, and some smart safety moves, you can get that tailored, made-for-the-room look without paying custom-cabinet prices.
What makes an Alex hack look built-in
Before we go room-by-room, let’s talk about the “secret sauce.” Built-ins feel intentional because they follow the architecture of the room. You are basically teaching a freestanding box to behave like millwork.
- Flush edges: Close gaps between the unit and the wall, or hide them with filler strips.
- A base and a top: Real built-ins have toe-kicks and finished tops. Alex does not, so we add them.
- One continuous line: A single long countertop or desktop makes multiple units read as one.
- Consistent details: Trim, paint, and (if you choose) added pulls help move Alex out of “basic office furniture” territory.
- Light control: Warm, layered lighting makes everything look more expensive, including IKEA.
Room-by-room Alex hacks
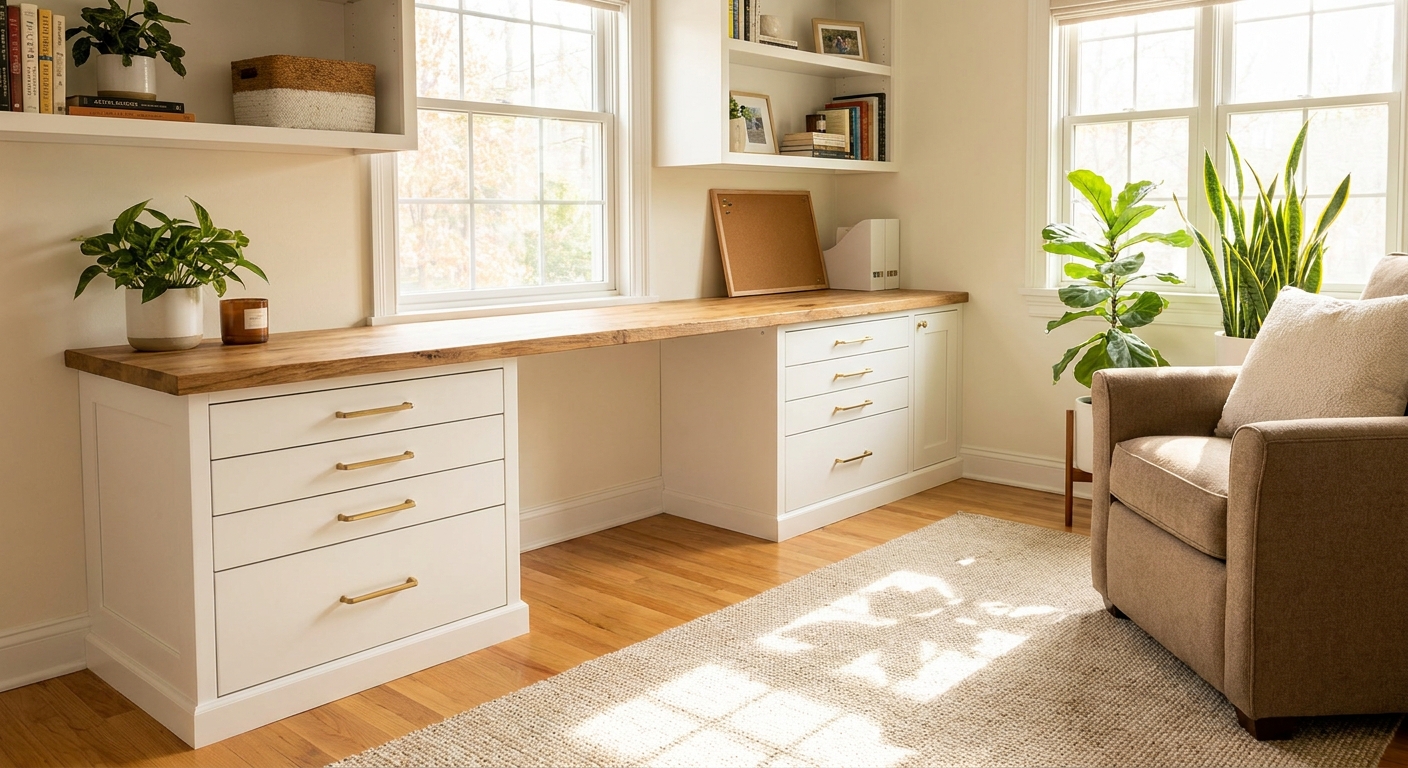
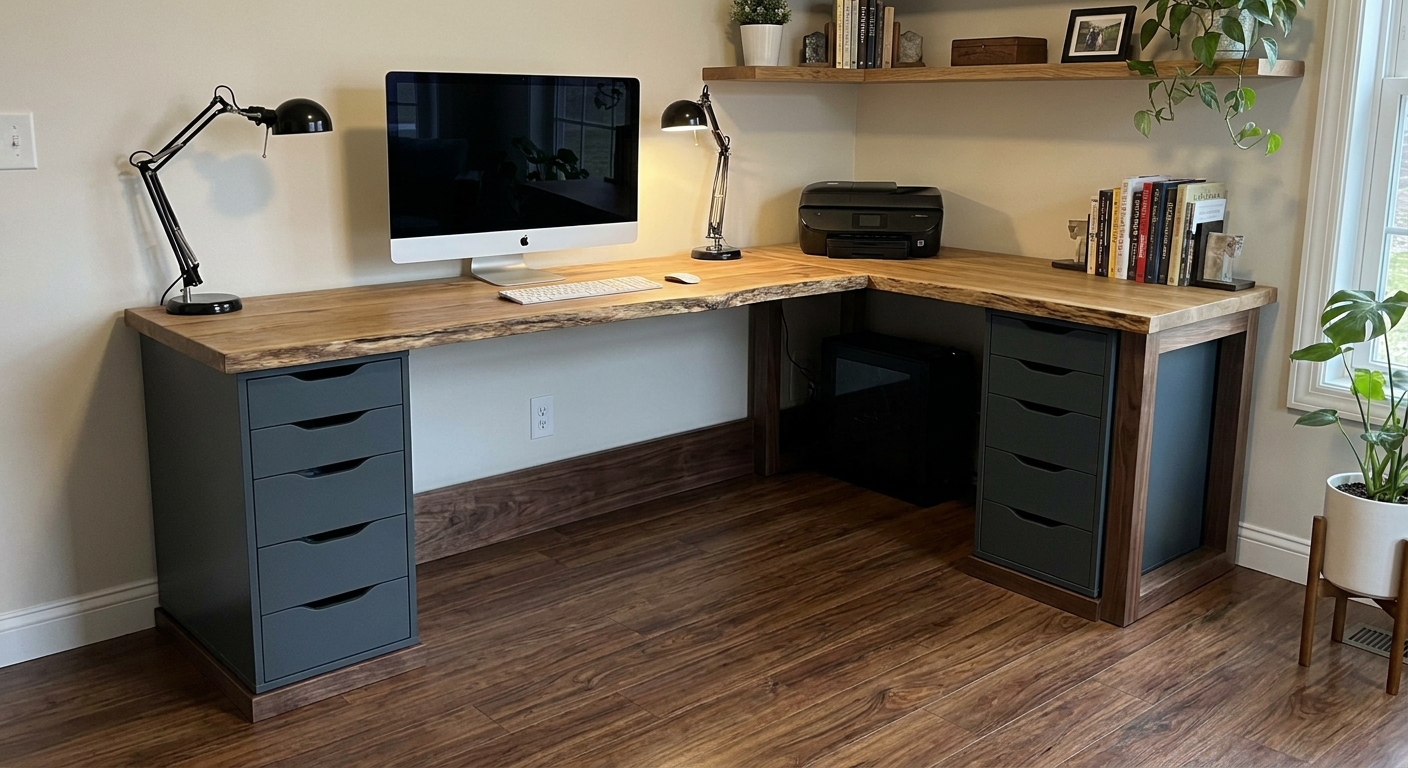
1) Custom-looking desk return
If you want that built-in office vibe, a “desk return” is the move. It is the side section that turns a straight desk into an L shape, giving you extra surface area for a printer, a lamp, or the pile of notebooks you swear you will organize.
How to do it:
- Use one Alex unit as the return support on the short side of the L.
- Run a single desktop across the main span (often between another Alex, a leg, or a wall cleat).
- Add a second piece of desktop perpendicular for the return, then connect the two tops with mending plates from underneath.
- Hide the “gap triangle” at the inside corner with a small fitted corner shelf or a tidy desk mat moment.
Built-in upgrades that matter:
- Side panels: Add a finished end panel on the exposed Alex side. Even a simple MDF panel painted to match makes it read like cabinetry.
- Toe-kick: Build a shallow base platform (2x4 or ripped plywood) so the Alex sits slightly recessed. That shadow line is what your eye reads as “custom.”
- Wall trim: If your desk runs wall-to-wall, add small filler strips and caulk the seams for a seamless look.
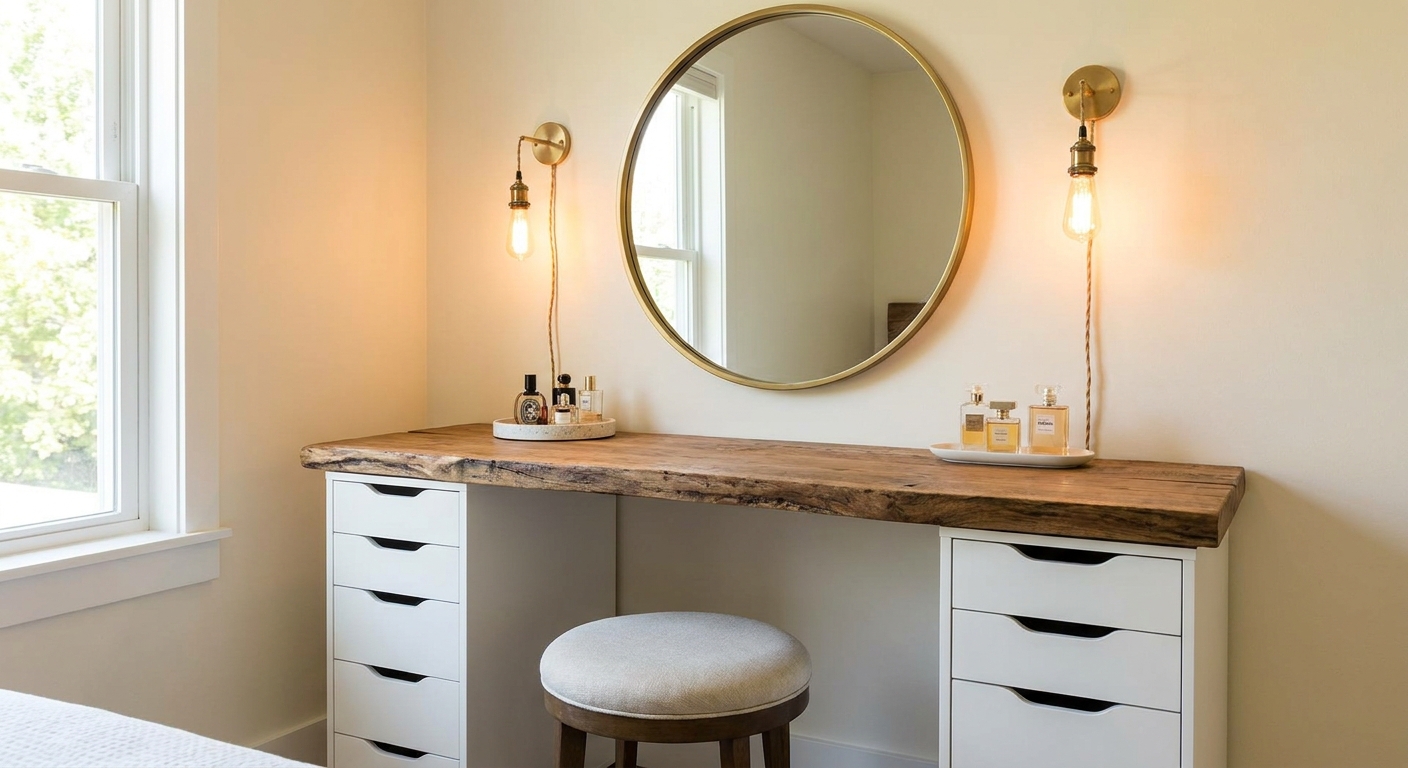
2) Vanity flanks
Two Alex units flanking a center kneehole is one of my favorite “it looks expensive but it is not” moves. Think of them as the bookends that make a vanity look grounded and intentional.
Layout ideas:
- Classic vanity: Alex on the left, Alex on the right, one continuous top, stool in the center.
- Skincare station: One Alex plus a slim open shelf on the other side for pretty baskets and daily-use items.
- Shared vanity: Two mirrors, one long top, Alex units on the outer edges with a wide center span.
Finishing details that elevate:
- Countertop choice: A thick wood top (butcher block) or a stone-look laminate instantly shifts the vibe.
- Mirror height: Hang your mirror so it feels aligned with the “cabinetry,” not floating randomly. A good rule is to keep the bottom of the mirror about 6 to 8 inches above the countertop.
- Sconces: If you can, flank the mirror with plug-in sconces. Warm bulbs make skin look lovely and the whole setup feels more “suite at a charming hotel.”
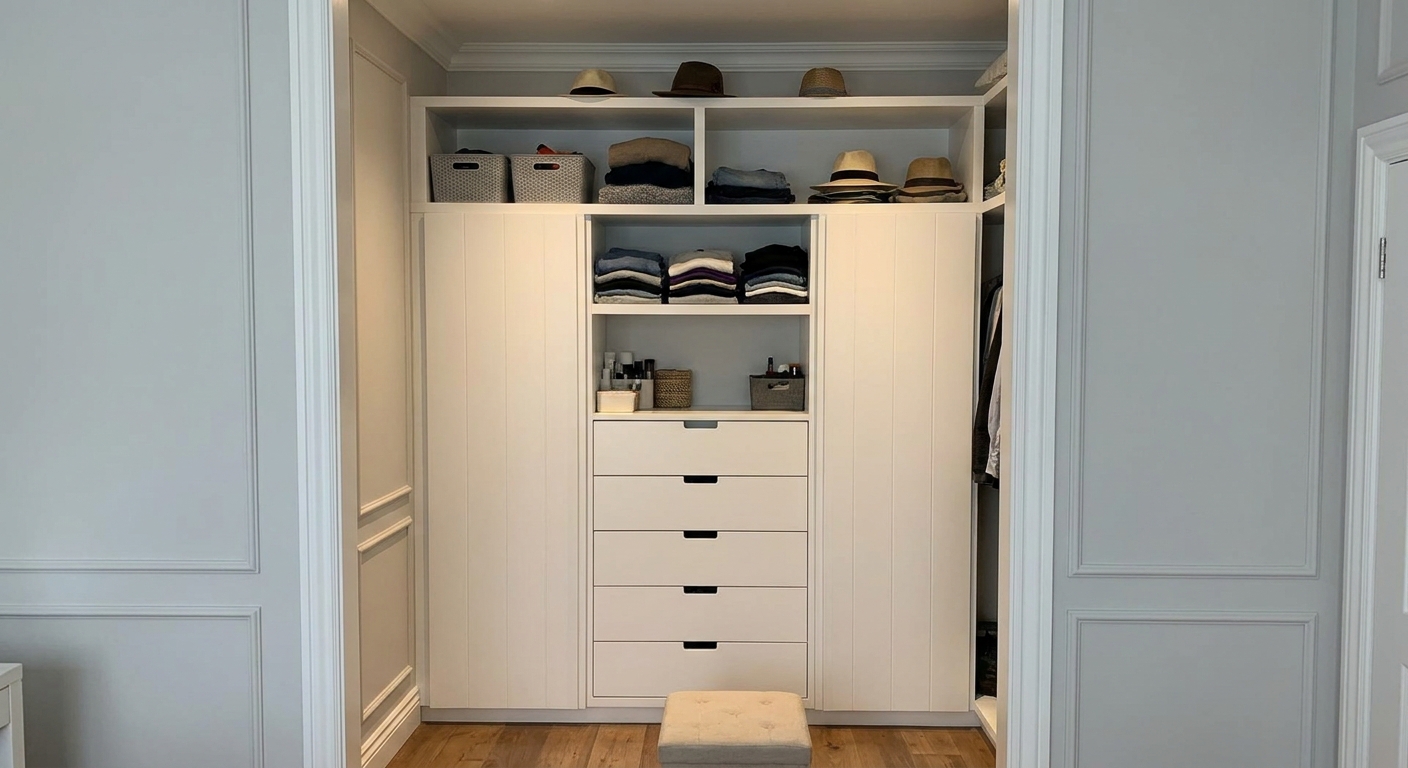
3) Closet tower
Alex shines in closets because the drawers are shallow enough for accessories, tees, and workout gear. If your closet is a blank box, an Alex “tower” can make it feel like a mini dressing room.
Two ways to build it:
- Single tower: One Alex with shelves above. Add a side panel and trim to make it feel integrated.
- Double stack look: Use one Alex on the floor and add a matching cabinet or shelves above, then wrap the whole vertical section in trim so it reads as one unit.
Pro tips for closet realism:
- Match the closet rod finish: If your rod is chrome, choose added pulls with a similar sheen. If your rod is brass, go brass. That small consistency reads as “designed.”
- Use drawer organizers: Built-ins are tidy because they are divided. Add inexpensive tray dividers so the drawers do not become a sock soup situation.
- Add a tiny lamp or LED strip: A warm LED strip under the shelf above the Alex makes the whole closet feel intentional and high-end.
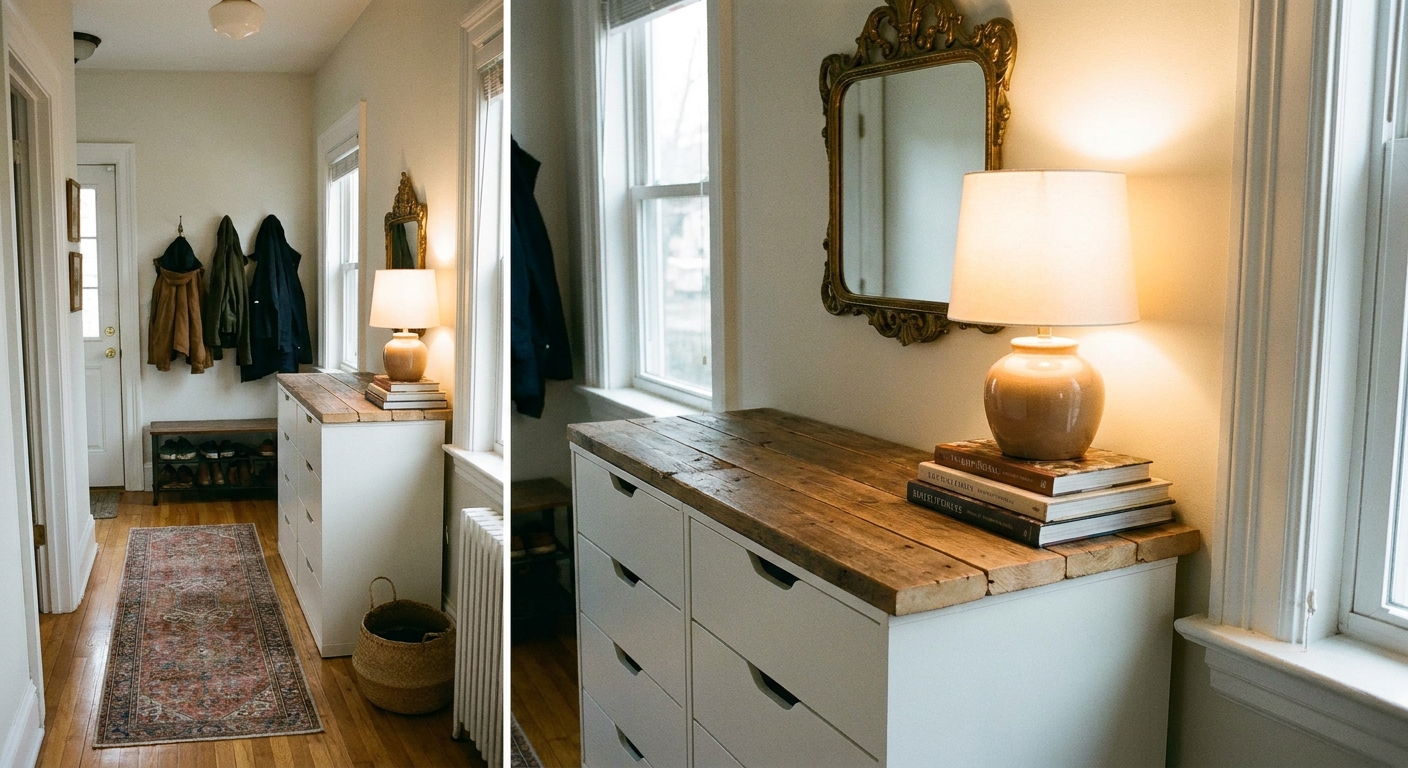
4) Entry drop zone
Yes, Alex can work in an entry, especially in narrow apartments where you need drawers for keys, dog gear, batteries, and all the little life debris.
Make it feel entry-appropriate:
- Top it with a slimmer counter depth surface (12 to 16 inches deep) so it does not overwhelm the walkway.
- Add a wall-mounted coat rail above and a mirror centered over the “console.”
- Use one or two decorative baskets on top to soften the lines.
Styling tip: If your Alex is white, pair it with warm wood, a textured lamp shade, and an aged brass mirror. Soft contrast keeps it from feeling too clinical.
Trim tricks to remove boxiness
If you do only one thing, do this: add a base and panels. It is the difference between “furniture placed against a wall” and “this belongs here.”
Option A: Quick toe-kick
- Build a simple platform from plywood or 2x material.
- Set it back 2 to 3 inches from the front edge to create a recessed toe-kick.
- Paint it to match the Alex, the wall, or the trim for a seamless read.
Option B: Panels and fillers
- Add a panel to any exposed side (especially if the Alex ends a run).
- Use filler strips between the Alex and the wall if there is a gap.
- Caulk seams and touch up paint. This is where the “built-in magic” happens.
Option C: Top trim for tall builds
If you are building a closet tower or adding shelves above, run trim along the top edge where the unit meets the wall. It gives that finished, architectural cap you see on real built-ins.
Renter-friendly wall securing
Safety first, always. Drawer units can tip, especially if you pull multiple drawers out at once. If you have kids, pets, or a habit of using the top as a perch while you hunt for socks, please anchor it.
Best practices for renters
- Use the included anti-tip hardware if possible: Many leases allow small holes that can be patched at move-out.
- Ask your landlord: A quick email can save stress later. Anchoring is often encouraged for safety.
- Choose anchors based on your wall: Drywall needs toggles or molly bolts if you cannot hit a stud. Plaster and masonry require different hardware.
- Patch-friendly approach: When you move, fill holes with spackle, sand smooth, and dab matching paint. It is usually less noticeable than you fear.
What I do in rentals: I anchor into studs whenever I can. If I cannot, I use a high-quality toggle anchor rated well above the furniture weight. This is not the place to go bargain-bin.
Note: Avoid relying on adhesive strips for anti-tip. They are great for lightweight decor, but not for securing a drawer unit that can be loaded with heavy items.
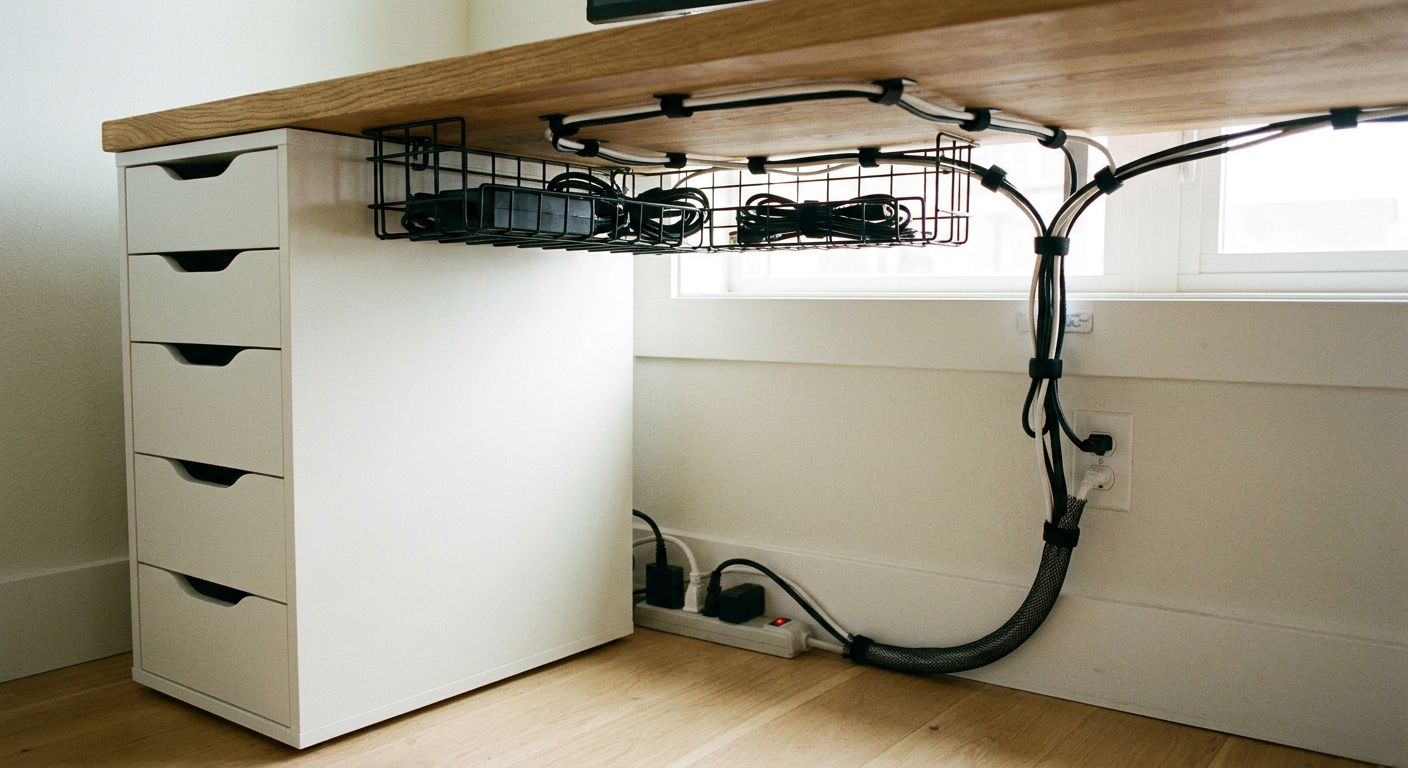
Cable management
Nothing breaks the custom look faster than a tumbleweed of cords. If your Alex is part of a desk or vanity, plan your cable path the way you would plan lighting in a room. It is invisible when done well, and obvious when ignored.
Easy cable upgrades
- Under-desk cable tray: Mount a tray under the desktop to hold the power strip.
- Adhesive cable clips: Run cords along the underside of the top, then down the back corner.
- Grommet hole: If you are comfortable, drill a clean grommet hole in the desktop for monitor and lamp cords.
- Cord cover raceway: Paintable raceways blend into the wall, especially behind a desk return.
- Charging drawer: Designate the top drawer for charging. Drill a small hole in the back of that drawer and feed a cable through to a hidden power source.
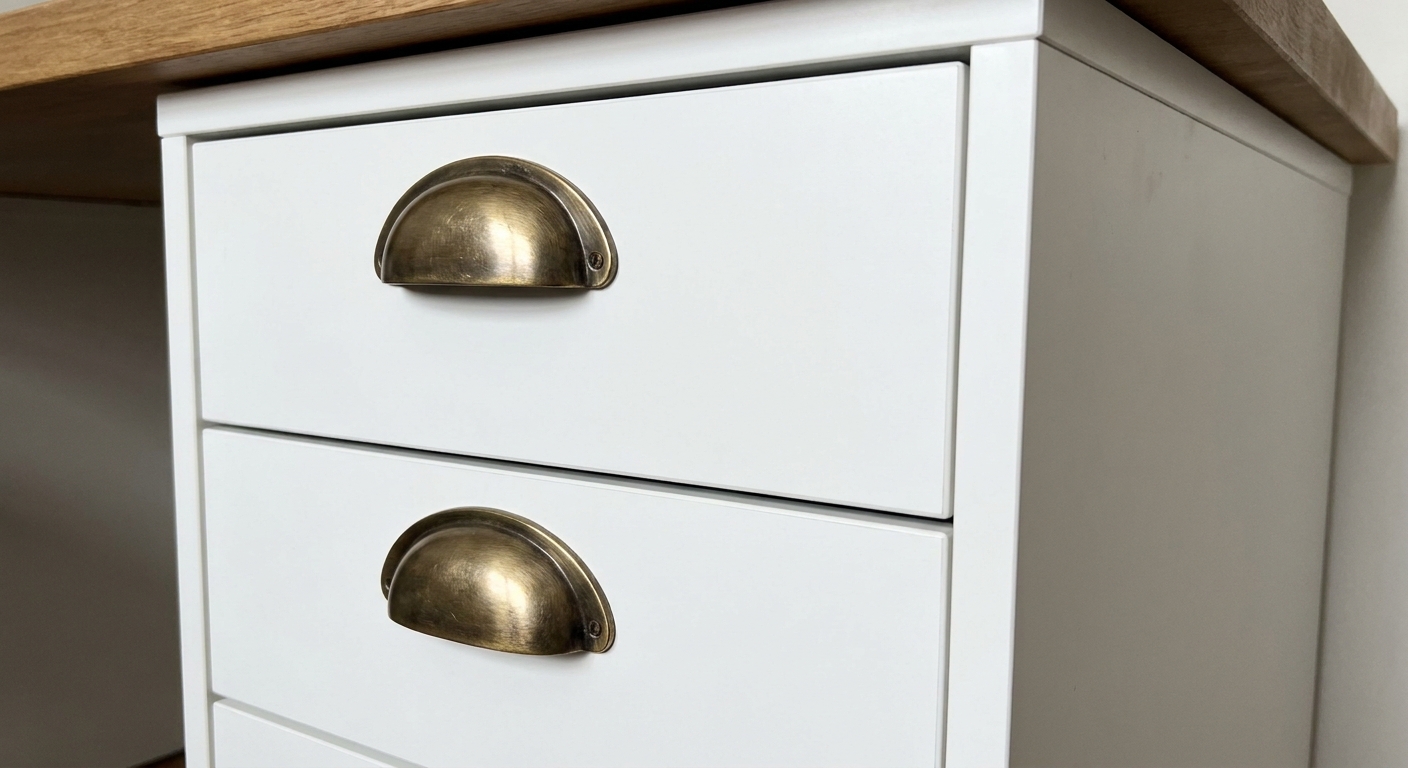
Adding hardware to Alex
Think of hardware like jewelry. The same simple outfit looks completely different with the right earrings. Alex is the outfit. Your added pulls are the earrings.
Important Alex detail: Most Alex drawer units do not come with separate knobs or pulls. They have integrated finger-pull cutouts, which means “upgrading hardware” usually means adding it by drilling fresh holes into the flat drawer faces.
What to choose
- Warm brass pulls: Best for vintage-leaning spaces and creamy paint colors.
- Matte black: Crisp, modern, and great with white Alex units.
- Aged bronze: Cozy, traditional, and especially pretty with wood tops.
- Leather tabs: Softens the look and adds texture, perfect for Scandinavian or relaxed spaces.
Tips so it looks intentional
- Scale matters: Longer pulls can make the fronts feel more “cabinet-like.” Tiny knobs can look a bit juvenile on wide drawer fronts.
- Consistency matters: Match your nearby finishes when you can, like desk lamp, mirror frame, or closet rod.
- Template it first: Use painter’s tape and a paper template (or a cabinet hardware jig) to keep spacing consistent.
- Drill cleanly: Drill from the front, back the hole with scrap wood to reduce blowout, and measure twice. Nothing says “IKEA hack” like crooked pulls you have to stare at forever.
Paint and finish ideas
If you want the most built-in look, color is your best friend. Matching the unit to the wall color is a classic designer trick because it reduces visual breaks.
- Wall-match paint: Paint side panels and any trim pieces the same color as the wall so the whole run recedes and feels integrated.
- Moody built-in vibe: Deep olive, inky navy, or warm charcoal makes Alex feel like “real cabinetry,” especially with brass hardware.
- Wood top warmth: A wood countertop adds instant richness and keeps the look from feeling too flat.
Finish note (do not skip this): Alex has a slick foil or melamine-like surface, and standard primer can peel. For a paint job that actually lasts, do a light scuff-sand (think 180 to 220 grit), wipe off dust, then use a true bonding primer. Popular go-to options are a shellac-based primer like Zinsser B-I-N or a high-adhesion bonding primer like Zinsser Bulls Eye 1-2-3 or INSL-X Stix. Let it cure properly before you put the drawers back into hard daily use. A rushed paint job chips quickly and that ruins the illusion faster than anything.
Mini shopping list
You do not need everything on this list, but these are the pieces I reach for again and again when I want the “how is this IKEA?” effect.
- MDF or plywood panels (for sides and fillers)
- Baseboard trim to match your home
- Caulk and wood filler
- Quality bonding primer (see paint notes) and paint for trim pieces
- Pulls or knobs (plus a template or hardware jig)
- Under-desk cable tray and cord clips
- Wall anchors appropriate for your wall type
Common mistakes
- Skipping the base: Without a toe-kick or platform, Alex reads like a standalone box. Add that shadow line.
- Ignoring gaps: A 1 inch gap by the wall will always look like “furniture pushed into place.” Fill and caulk.
- Too many finishes: Keep it to two to three finishes in the zone. Example: white, warm wood, aged brass.
- Cords everywhere: Handle cable management early, before you load drawers and style the surface.
- No anchoring: Built-ins are stable. Fake built-ins should be, too.
- Wrong primer: If your paint scratches off with a fingernail, it is not “character.” It is a prep problem. Scuff-sand and use a real bonding primer.
A cozy final thought
The most convincing built-ins are the ones that look like they have always been part of your life, not like a showroom set. Let your Alex hack hold your real routines: your favorite pens, your skincare you actually use, the receipts you mean to file, the camera you pick up on Sunday mornings. When function is honest and the details are thoughtful, even the simplest IKEA box starts to feel like it belongs.
If you try one of these, start with the smallest upgrade that makes the biggest impact: a continuous top, a toe-kick, and hardware you love (yes, added, not swapped). That trio gets you 80 percent of the way to “custom.”