How To Remove Caulk From a Shower
Clara Townsend
Clara Townsend is an interior stylist, vintage furniture enthusiast, and the creative voice behind Velvet Abode. With over a decade of experience transforming both cramped city apartments and sprawling fixer-uppers, she believes that a beautiful home is built on personal stories rather than massive budgets. When she isn't hunting for the perfect brass sconce at a local flea market, she can usually be found rearranging her living room for the third time this month.
Old shower caulk has a way of turning from “barely noticeable” to “why is this suddenly my whole personality” overnight. The good news: removing it is more about patience than muscle. Take your time and you can get a clean edge that makes new caulk look sharp and stay put.
Time + difficulty: Plan on 30 to 90 minutes for an average shower, longer if the silicone is thick, layered, or moldy. Difficulty is usually “annoying but doable.”
Below, I’ll walk you through the exact process I use when I’m refreshing a shower: how to soften stubborn silicone, how to lift it without gouging your surround, and how to prep so the new bead actually bonds.
Before you start: what kind of caulk is it?
Knowing what you’re removing helps you choose the right approach.
- Silicone caulk: Flexible, rubbery, and usually shinier. Common in showers because it handles water well. It’s also the most stubborn to remove cleanly.
- Latex or acrylic caulk (sometimes “siliconized”): More paint-like, often used outside wet zones. It tends to scrape off easier, but it doesn’t always belong in a shower.
Quick clue, not a guarantee: If it peels off in stretchy strips, it’s often silicone. If it crumbles or powders, it’s often acrylic or latex. Age, mildew, and cheap products can make either type behave weirdly, so if you can, check an old tube, a receipt, or the label from what you plan to replace it with.
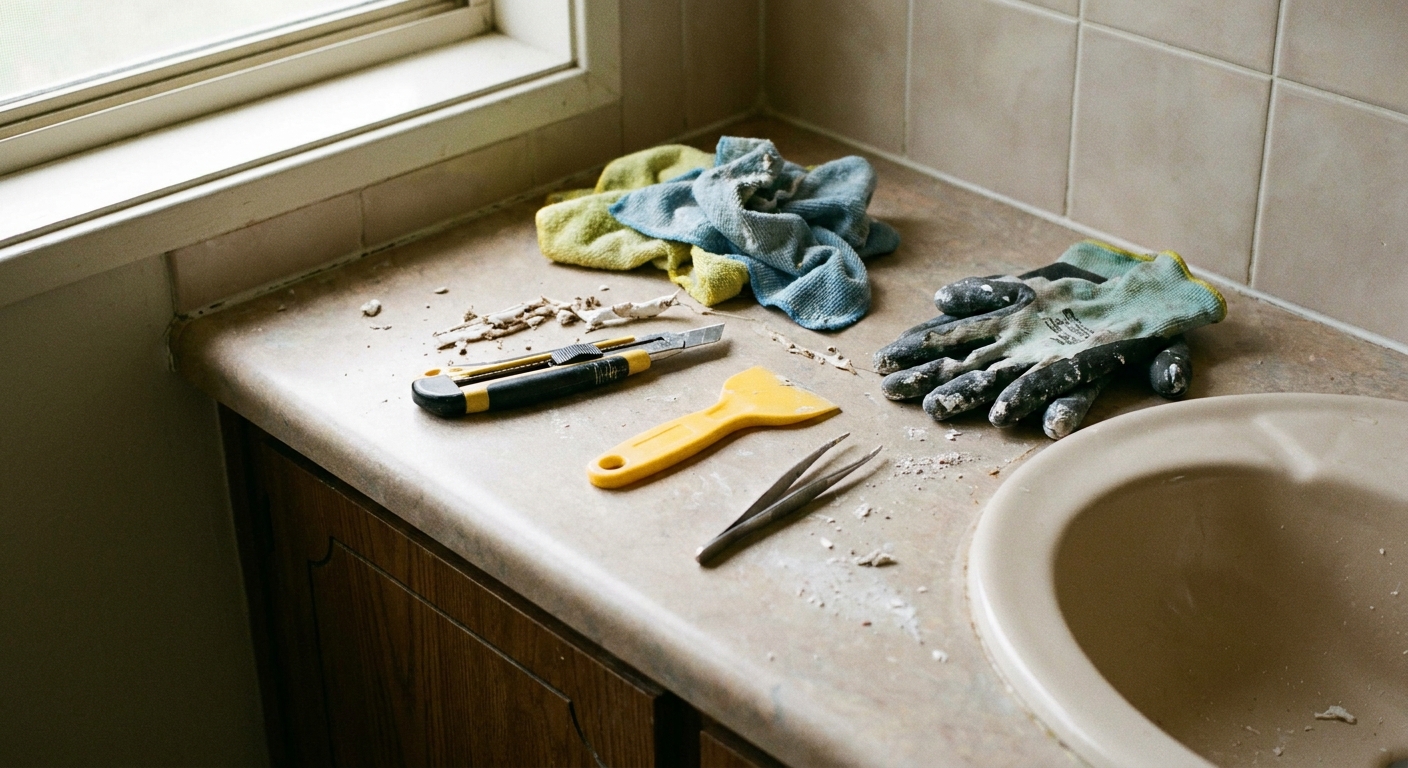
Tools and supplies
You don’t need a fancy kit, but the right basics make this a calmer project.
What I recommend
- Utility knife with a fresh blade or a caulk removal tool
- Plastic scraper or old credit card (safer on fiberglass and acrylic)
- Needle-nose pliers or tweezers (for grabbing strips)
- Silicone caulk remover gel (optional but very helpful for silicone)
- Rubbing alcohol (for final cleaning and soap film)
- Non-scratch scrub pad
- Microfiber cloths or paper towels
- Painter’s tape (for the new caulk stage, optional)
- Nitrile gloves
- Good ventilation and a small fan if possible
Surface safety notes
- Tile and porcelain: A razor scraper can work, but some finishes can scratch. Keep blades flat and test in a low-visibility spot first.
- Fiberglass or acrylic surrounds: Skip metal scrapers whenever possible. Use plastic tools and gentle cleaners. Avoid acetone, which can haze or craze plastics.
- Natural stone (marble, travertine): Avoid acidic cleaners and be cautious with solvents because they can affect sealers. Test in a hidden spot.
One quick safety note: Read product labels (and follow ventilation guidance). Keep solvents away from flames and don’t mix cleaners.
Step-by-step: remove shower caulk
1) Dry everything out
Caulk comes off more cleanly when the area is dry. If you can, do this after the shower hasn’t been used for several hours. Wipe down corners and seams, then let them air dry.
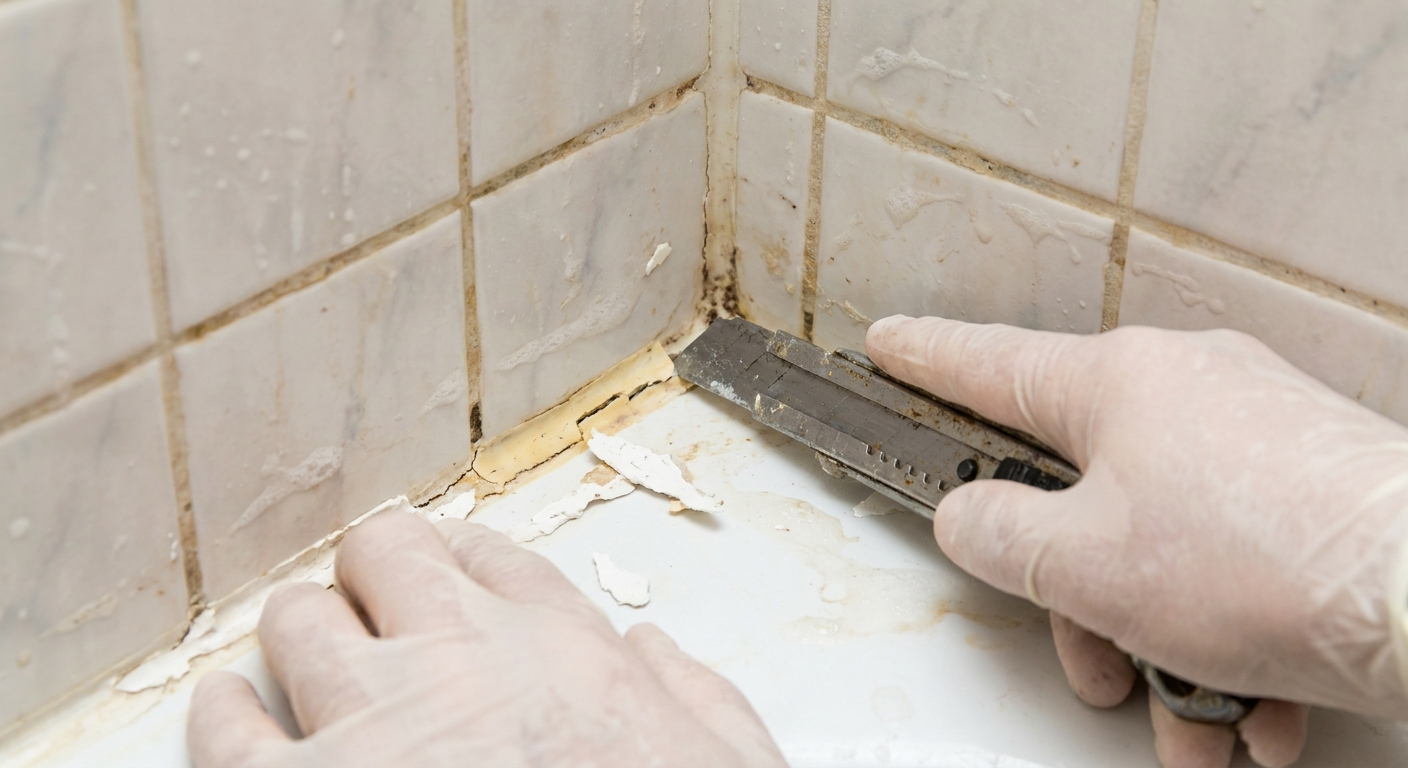
2) Score the edges
This is the secret to not ripping paint, pulling grout haze, or tearing paper (in areas outside the shower). Run your blade along both sides of the caulk bead where it meets the surfaces. You’re cutting the bond, not carving the tile.
- Hold the blade at a shallow angle.
- Use light pressure and a few passes instead of one aggressive cut.
- Keep the cut as close to the caulk as possible so you don’t scratch the shower wall.
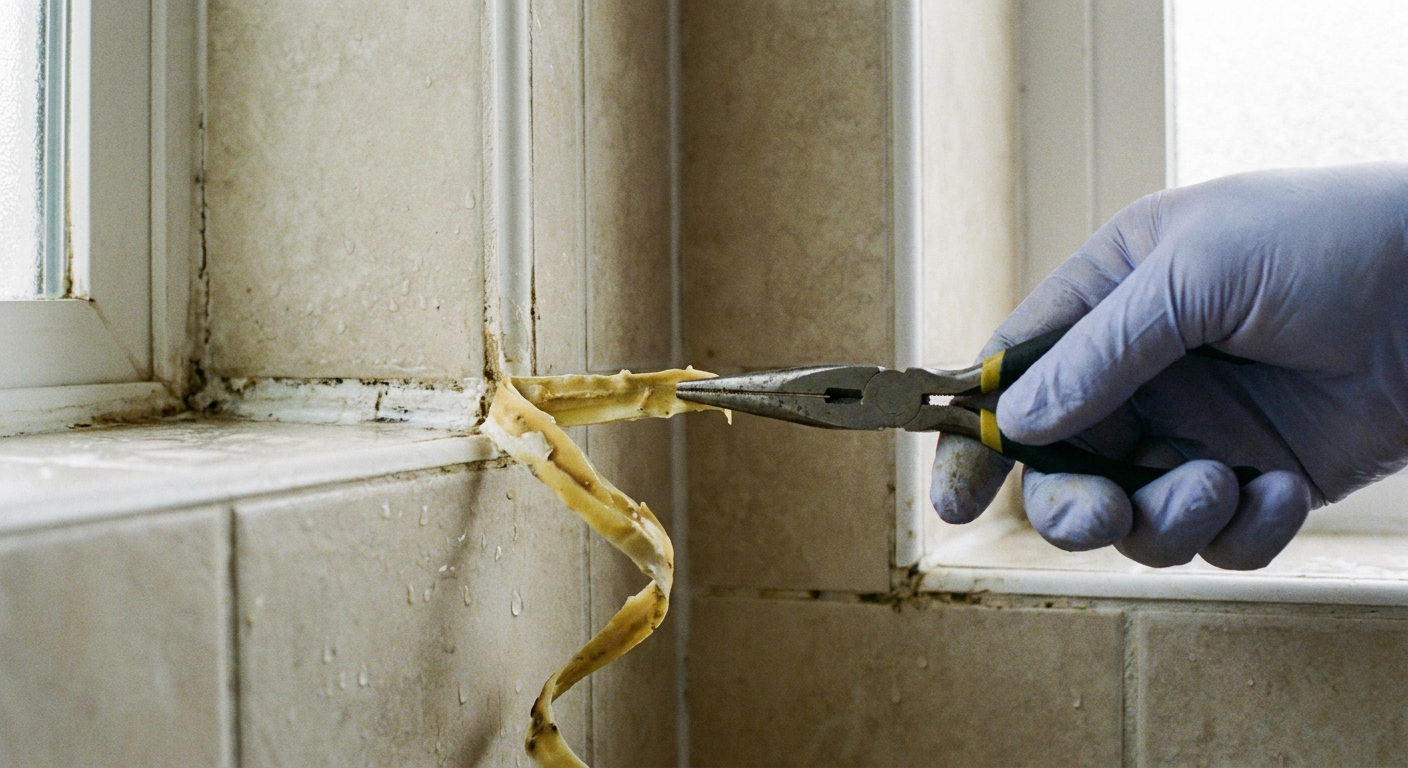
3) Lift and peel the bead
Once both sides are scored, use a plastic scraper or the corner of your caulk tool to lift an end. When you can grab it, pull slowly. Rush it and it snaps, and then you’ll spend the next hour playing “find the edge.”
Tip: Needle-nose pliers are great for gripping slippery silicone without shredding your fingertips.
4) Use remover gel for stubborn silicone
If thin films of silicone stay behind, you’re not failing. That leftover residue is normal, and it’s exactly what remover gel is made for.
- Apply silicone remover according to the label.
- Let it sit for the recommended time. This is where patience pays off.
- Scrape softened residue with a plastic scraper.
- Repeat if needed, especially in corners and around fixtures.
5) Scrub off the last haze
After scraping, you’ll often have a faint, tacky layer. This is the layer that ruins adhesion for new caulk, so don’t skip this step.
- For most surfaces: Wipe with rubbing alcohol to remove soap film, body oils, and cleaner residue.
- Important reality check: Alcohol and most household solvents don’t dissolve cured silicone. If you’ve got silicone film, remover gel plus gentle scraping is the reliable way.
6) Kill mildew, then final clean and full dry
If you had black spotting, treat the bare joint before you re-caulk. Dish soap cleans grime, but it won’t kill lingering spores.
- Choose a mold-killing cleaner that’s appropriate for your surface (a dedicated bathroom mildewcide is the easiest).
- Bleach solution can work on non-porous tile, but it’s not right for every surface and it shouldn’t be mixed with other cleaners. Follow label directions and ventilate well.
- Vinegar is sometimes used, but avoid it on natural stone and don’t mix it with bleach.
After treatment, wash the seam with a gentle cleaner or dish soap and warm water, rinse well, then dry thoroughly. New caulk needs a clean, dry surface to bond and cure properly.
Surface-specific tips
Tile and grout
Tile is forgiving, grout is not. Avoid digging into grout lines with a blade. Keep your scraper parallel to the surface and aim for the caulk only. If you nick grout, don’t panic, but light pressure is always the goal.
Fiberglass and acrylic surrounds
These scratch more easily than you think. Use plastic tools, and if you use any chemical product, do a small test in an inconspicuous spot first. Avoid abrasive pads labeled “heavy duty.” A non-scratch pad is your friend.
Glass doors and metal frames
On glass, a razor scraper can work well, but keep the blade flat and clean. On metal frames, avoid harsh scraping that can remove finishes. A remover gel plus plastic scraper is usually safer.
Also: Don’t caulk over manufacturer weep holes (those tiny drain paths in some door frames). Blocking them can trap water where you really don’t want it.
Natural stone
Stay gentle. Some chemicals can discolor stone or damage sealers. Use a plastic scraper, minimal product, and test first. If the stone is high-end or already showing etching, consider calling a stone pro for guidance.
Common mistakes
- Skipping scoring. Pulling caulk without cutting the edges first usually leaves more residue behind.
- Using a dull blade. Dull blades need more force, and more force leads to scratches.
- Caulking over old caulk. It rarely bonds well and usually fails faster. Remove it fully.
- Not removing soap scum. Even if the seam looks clean, soap film can prevent adhesion.
- Re-caulking too soon. If the area is damp, new caulk can trap moisture and invite mold.
- Caulking the wrong spots. In many showers, corners and change-of-plane joints should be caulked (not grouted), but some assemblies and door frames have weep paths you shouldn’t seal shut.
Prep for new caulk
Once the old caulk is truly gone and the seam is clean and dry, you’re ready for the satisfying part.
Quick checklist
- Surface is clean, dry, and residue-free
- No loose grout or crumbling edges
- Ventilation is set up for cure time
- You’re not blocking any weep holes
Choose the right caulk
- Use 100% silicone labeled for kitchen and bath, ideally with mold resistance.
- Match the finish: clear, white, almond, or color-matched to grout if available.
Tile note: In most tile installations, corners and other changes of plane are meant to be caulked because they move a bit. Grout tends to crack there over time.
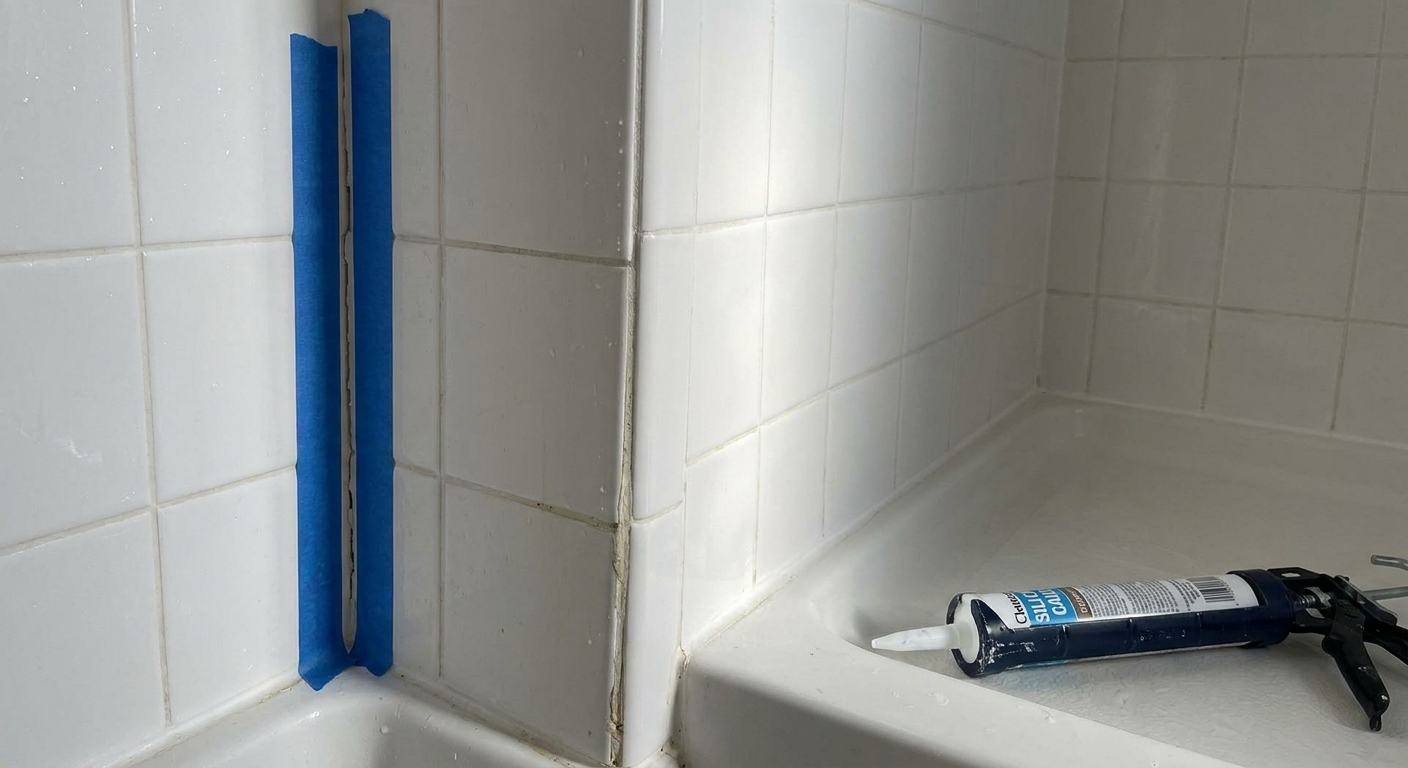
Make it look neat
If you want that clean, designer line, run painter’s tape on both sides of the seam before caulking, leaving the gap you want to fill. Smooth the bead, then pull tape while the caulk is still wet for crisp edges.
FAQ
Do I have to remove every bit of old caulk?
For best results, yes. New caulk bonds to the surface, not to old, failing caulk. Any leftover silicone film can cause the new bead to lift or gap.
What dissolves silicone caulk best?
Cured silicone doesn’t really “dissolve” with typical household solvents. The most reliable combo is mechanical removal (scoring, peeling, scraping) plus a silicone remover gel for the residue.
How long should I wait before using the shower?
Wait until the seam is fully dry before you even apply new caulk. After you caulk, most products are shower-ready in about 24 to 72 hours depending on bead size, humidity, and the specific formula. Follow the cure time on the tube.
Why does my shower caulk keep turning black?
Black spotting is usually mold or mildew, often caused by trapped moisture, poor ventilation, or caulk that’s failing and letting water sneak behind it. Removing and replacing it is step one. Before you re-caulk, treat the cleaned joint with a mold-killing product (appropriate for your surface), rinse, and let it dry fully. After that, help it stay clean by running your fan, improving airflow, and squeegeeing or towel-drying the edges when you can.
Final note
Fresh caulk isn’t glamorous, but it’s one of those tiny upgrades that makes a bathroom feel quietly cared for. Like pressing a linen duvet or polishing a vintage mirror, it’s the kind of detail that changes the whole mood. Put on a podcast, take it slow, and let the clean lines do their thing.