How to Fix a Squeaky Sofa Frame
Clara Townsend
Clara Townsend is an interior stylist, vintage furniture enthusiast, and the creative voice behind Velvet Abode. With over a decade of experience transforming both cramped city apartments and sprawling fixer-uppers, she believes that a beautiful home is built on personal stories rather than massive budgets. When she isn't hunting for the perfect brass sconce at a local flea market, she can usually be found rearranging her living room for the third time this month.
There are few sounds more irritating than a sofa that complains every time you shift your weight. The good news is that most squeaks are not a sign of doom. They are usually just wood rubbing on wood, a loose bolt, or a metal bracket flexing a little too enthusiastically.
Let’s fix it, quietly and confidently, with a few basic tools and a little detective work.
First, find what is squeaking
Before you tighten every screw you can find, do a quick diagnosis. It saves time and helps you avoid overtightening something that is not the culprit.
Frame squeak (very common)
- Sound: A sharp squeak or creak when you sit, stand, or shift left to right.
- Feel: A tiny wobble or movement, especially near arms, corners, or the front rail under your knees.
- Where it comes from: Joints where wood meets wood, or brackets where metal meets wood.
Spring squeak
- Sound: A higher-pitched “eeek” that seems to come from the seat center.
- Feel: Bouncier seat movement, squeak happens even with gentle pressure.
- Where it comes from: Sinuous springs rubbing at clips, or a coil spring shifting in its seat.
Cushion noise (not a frame issue)
- Sound: Rustling, crunching, or a zipper pull tapping the frame.
- Feel: No structural wobble, noise changes when you rotate or swap cushions.
- Where it comes from: Cushion inserts, loose piping, zipper pulls, or fabric rubbing on a dry wood edge.
It might be the floor
- Sound: A creak that changes when you slide the sofa a few inches or when you step near the sofa.
- Clues: Uneven legs, a rug that bunches, or hardwood that creaks in that spot even without the sofa.
- Quick fixes: Add felt pads under legs, level the legs (if adjustable), and use a grippy rug pad so the rug is not sliding and “chirping” under load.
Quick test: Take the seat cushions off and sit on the support deck (gently). If it still squeaks, it is likely the frame, springs, or support system underneath.
Tools and supplies you will use
You do not need a full workshop. Grab what you have, then add one or two inexpensive helpers.
- Phillips and flathead screwdriver
- Allen keys (some sofas use hex bolts)
- Adjustable wrench or socket wrench
- Wood glue (for loose wood joints)
- Clamps (optional but helpful for glued joints)
- Felt pads or thin adhesive-backed felt sheets
- Washers (small assortment)
- Paste wax or candle wax (for wood-on-wood squeaks)
- Zip ties (for some spring and cable fixes)
- Work gloves and a flashlight
A note on spray lubricants: Avoid soaking upholstery with oils. If you use a spray, apply it very lightly on metal-to-metal contact points only, and shield fabric with a towel or cardboard. For longer-lasting results on metal linkages, a silicone or PTFE lubricant is usually a better choice than an oily penetrant.
Warranty note: If your sofa is new, check the warranty before you modify anything (especially opening the dust cover, adding brackets, or lubricating internal mechanisms). Tightening accessible legs and bolts is often fine, but it is worth a quick look at the fine print.
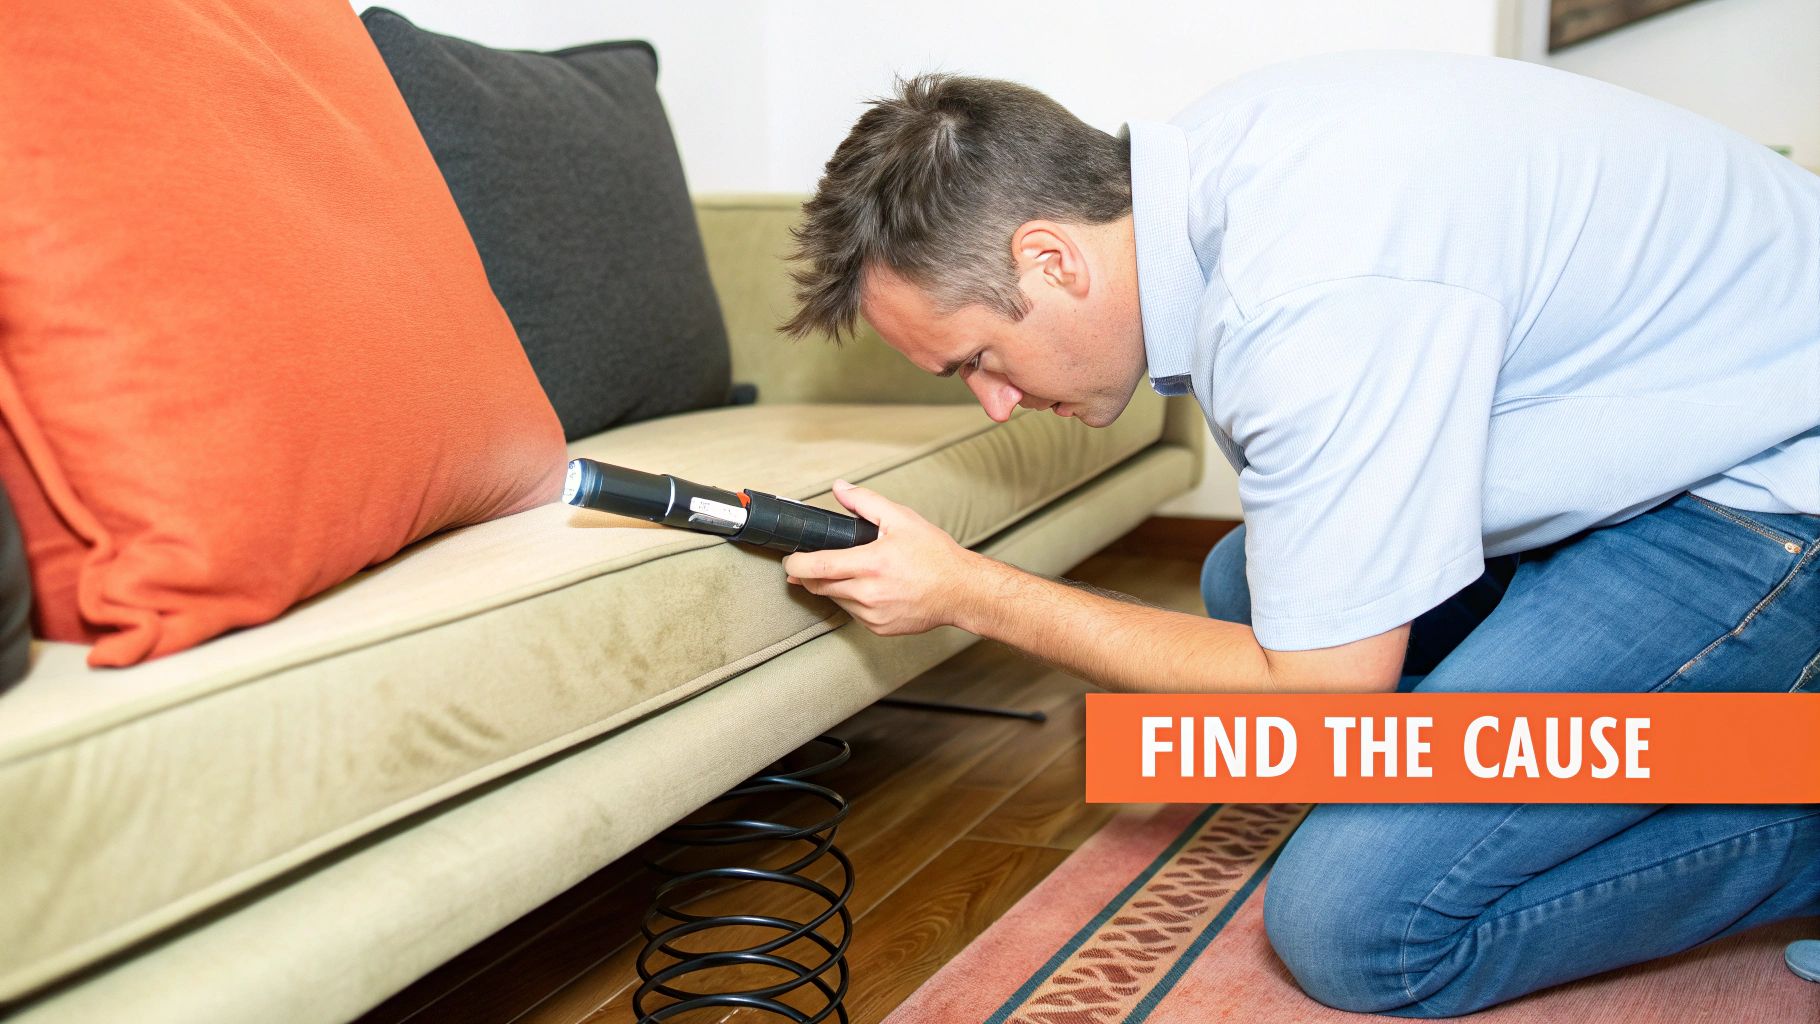
Step-by-step: find the culprit
This part is strangely satisfying. Like finding the one floorboard that tattles when you sneak to the kitchen at midnight.
- Clear the area. Pull the sofa away from the wall so you can access the back and sides.
- Remove cushions. Set them aside so you can hear more clearly.
- Recreate the squeak. Press down on the arms, then the front corners, then the center front rail. Shift your weight side to side.
- Listen closely. Put your ear near the arms and front corners as you press. The loudest point is usually very near the problem joint.
- Flip for access (safely). If possible, tip the sofa forward onto its front edge or carefully onto its back so you can see the underside. Use a blanket to protect fabric and floors.
Safety note: Recliners, sleeper sofas, and sectionals can be surprisingly heavy and awkward. If you are alone, do not tip a big sofa. Remove detachable sections, pull-out mattresses, or modular pieces first if you can. When in doubt, recruit a helper.
Pro tip: If you have a helper, have them rock the sofa gently while you place a hand on joints and brackets. You can often feel the vibration exactly where things are rubbing.

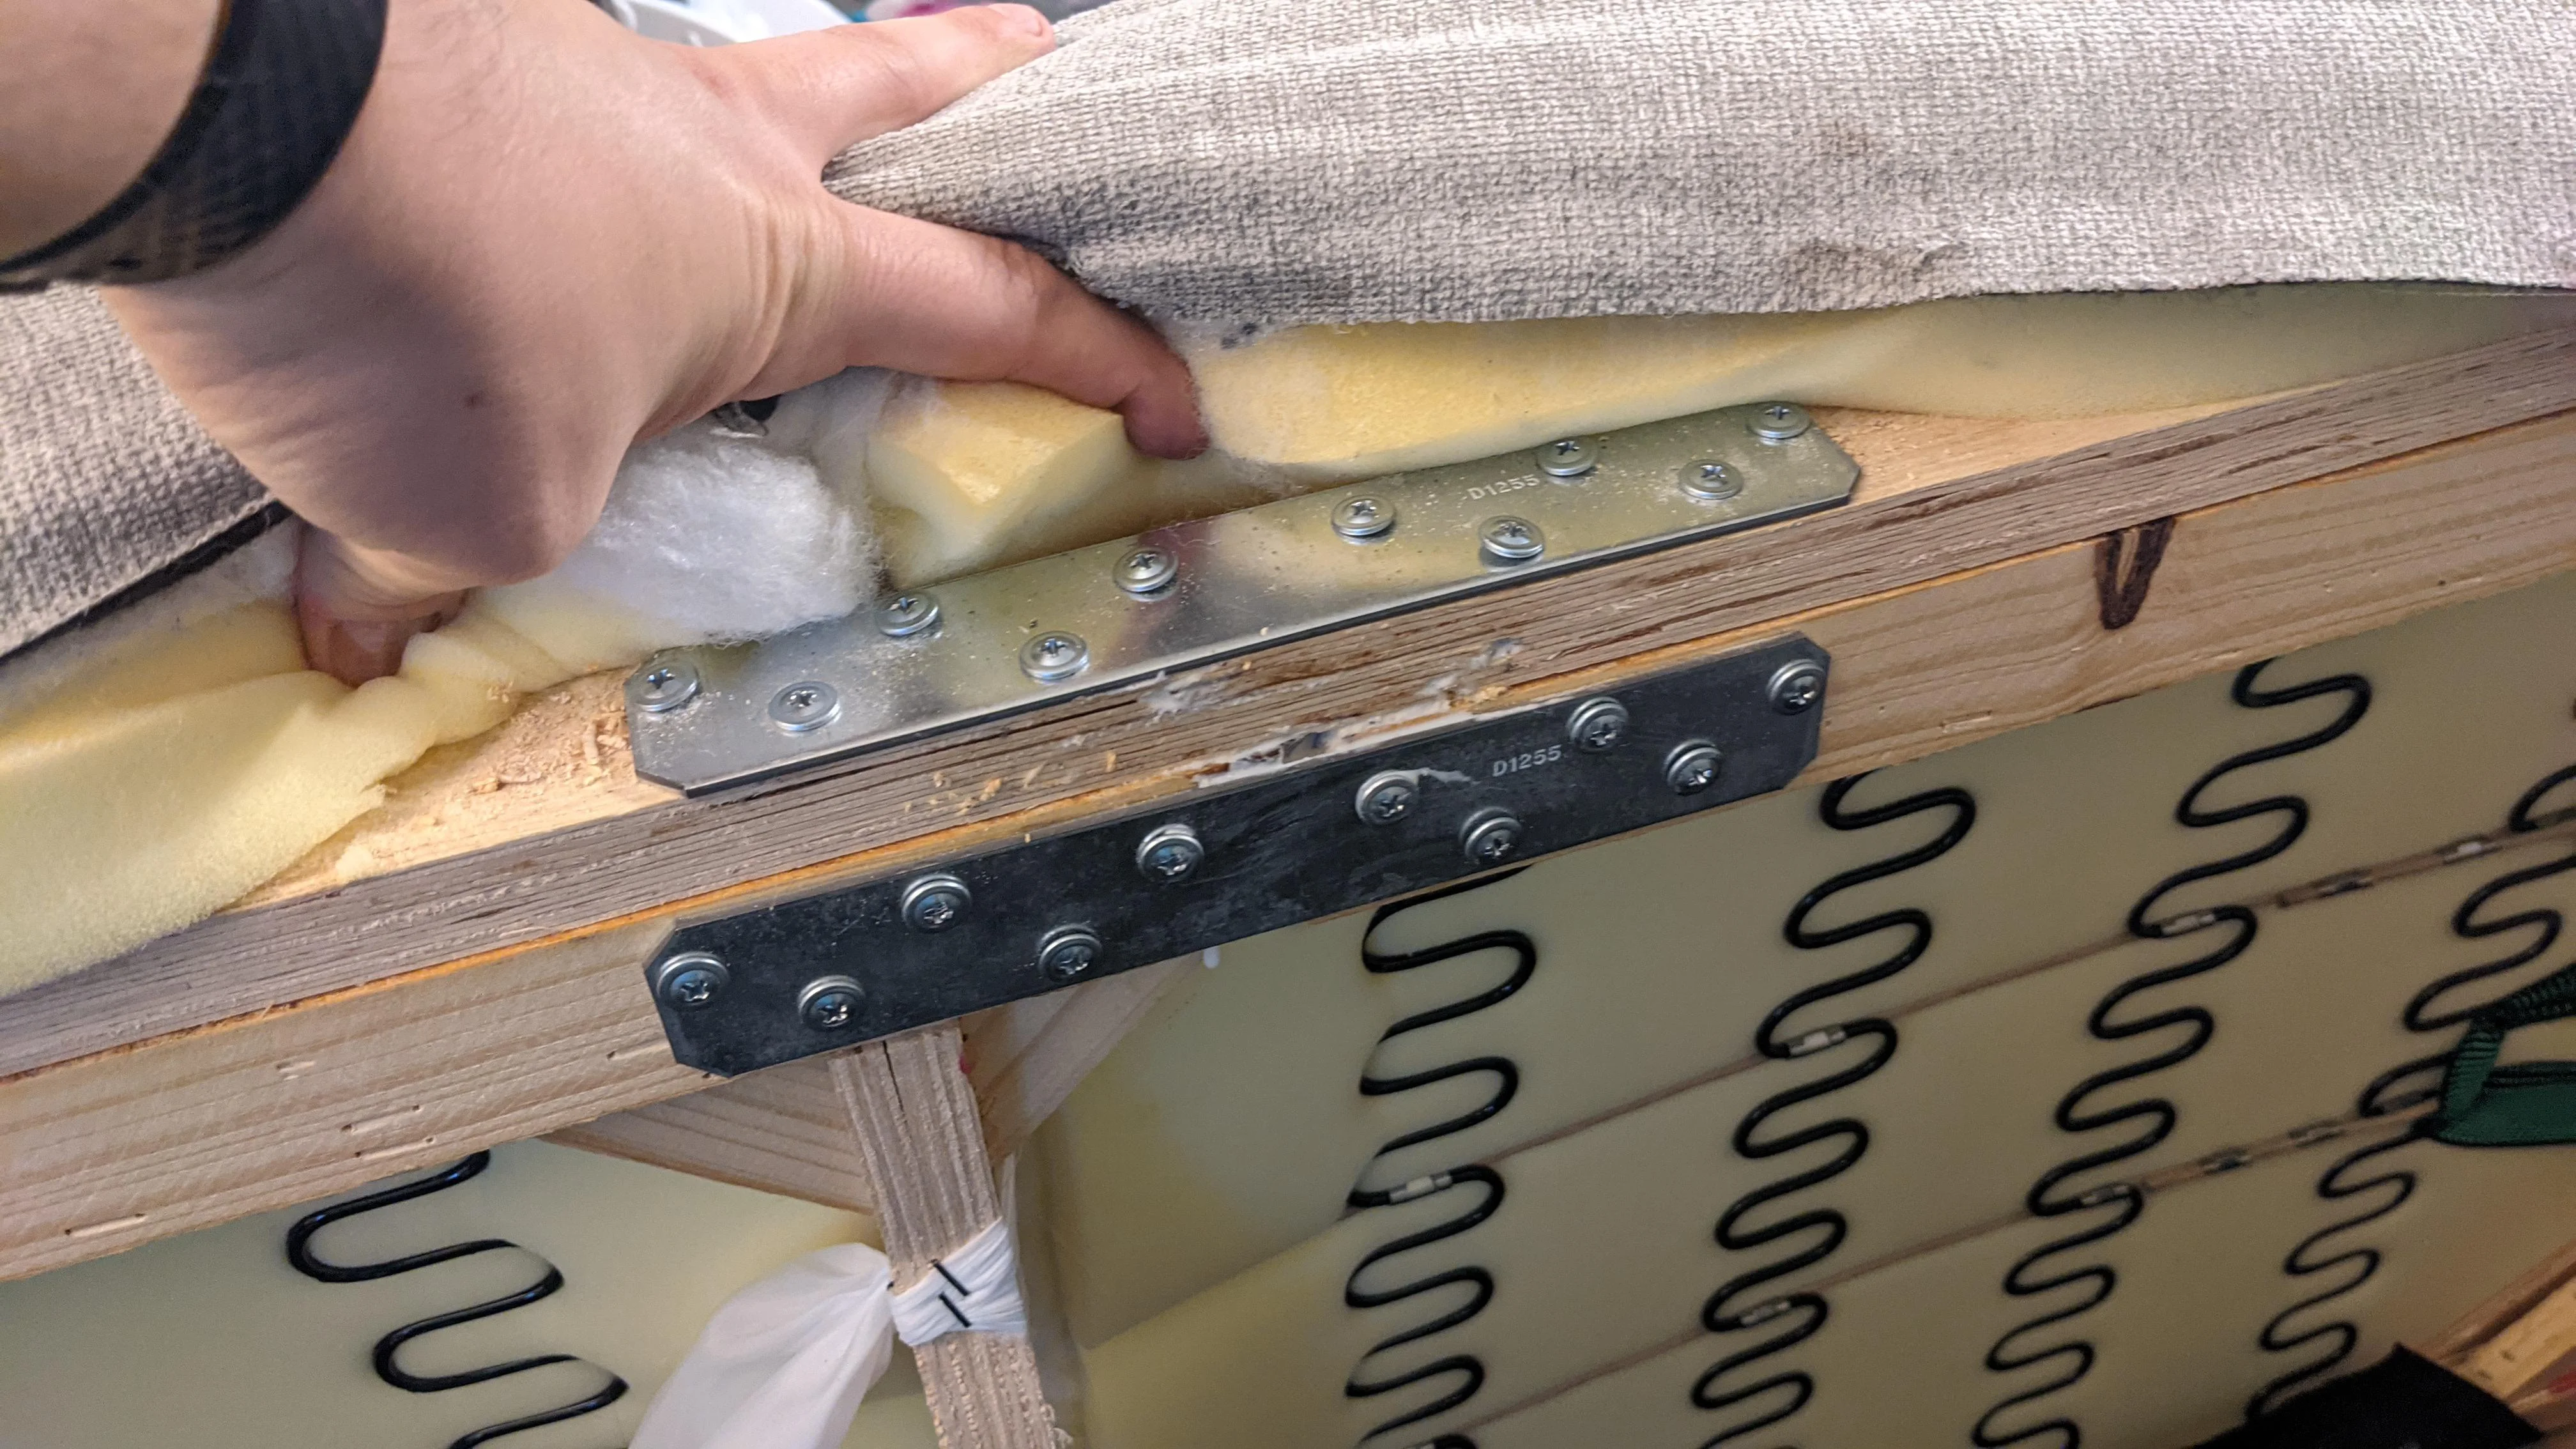
Fix 1: Tighten hardware
Loose bolts and screws are one of the most common reasons a solid-looking sofa suddenly gets chatty.
What to tighten
- Corner brackets (often L-shaped metal pieces)
- Bolts that connect arms to the base
- Screws along the front rail and center support
- Leg bolts and threaded inserts
How to do it
- Tighten each fastener a little at a time, moving around the frame rather than cranking one screw all the way down immediately.
- If two pieces are pulling together unevenly, loosen slightly, align, then retighten.
- If a screw just spins, it may be stripped in the wood. Use the stripped screw fixes below.
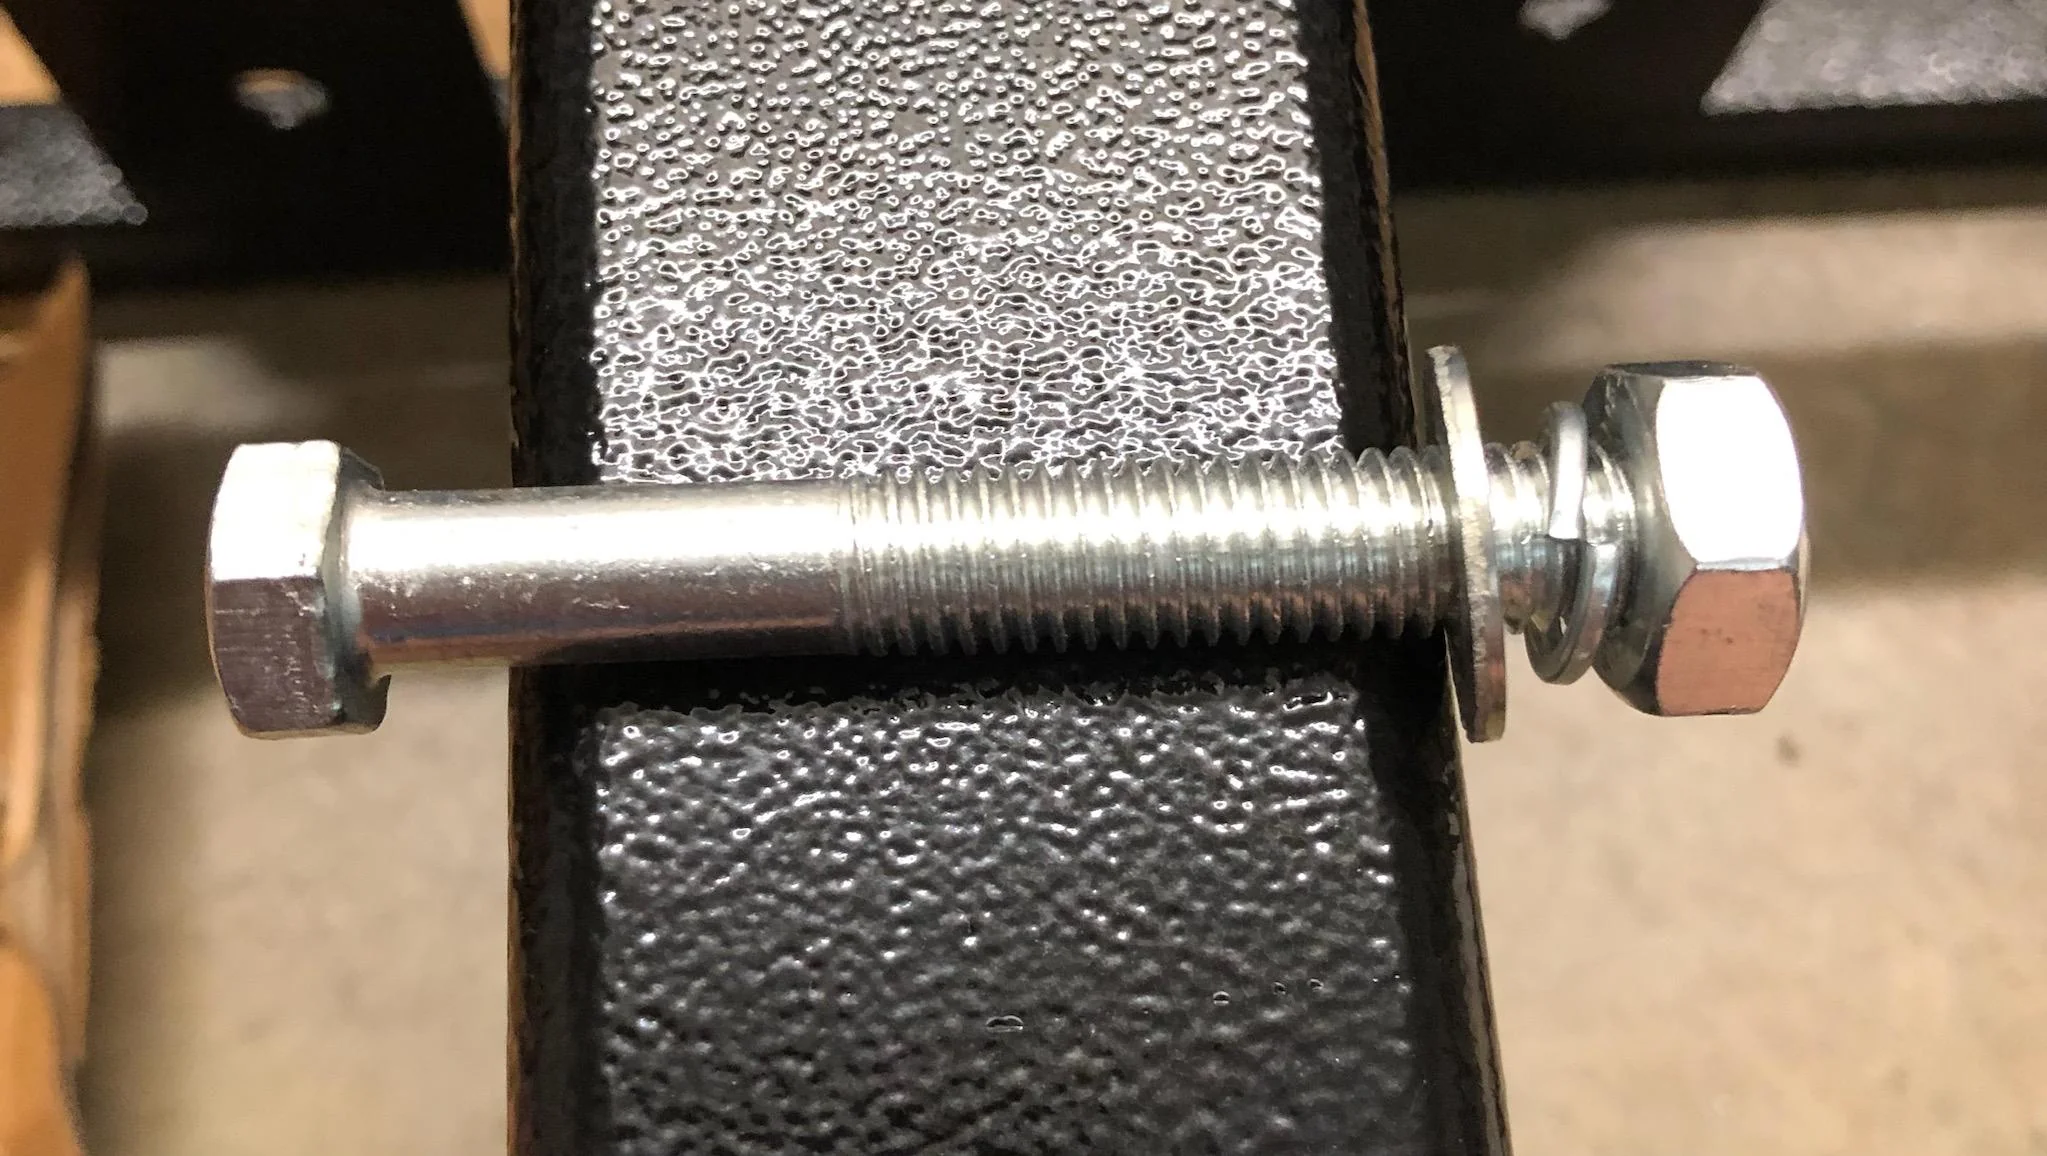
Small but mighty upgrade: If a bolt tightens but still squeaks, add a washer between the bolt head and the bracket. This reduces metal flex and friction.
Fix 1B: Fix a stripped screw hole
If a screw spins and never tightens, the wood fibers in the hole are worn out. You have a few solid options that do not require rebuilding the sofa.
- Toothpicks and glue: Remove the screw. Pack the hole tightly with wooden toothpicks (or a small wood dowel shaved to fit) plus a little wood glue. Let it dry, then re-drive the screw.
- Go up a size: If there is enough solid wood around the hole, use a slightly thicker or longer screw.
- Add a proper insert: For repeated stress points (like legs), a threaded insert or T-nut can create a stronger, more permanent grip.
Tip: If you open the underside dust cover to reach a stripped hole, take a quick photo first so you can put everything back the way you found it.
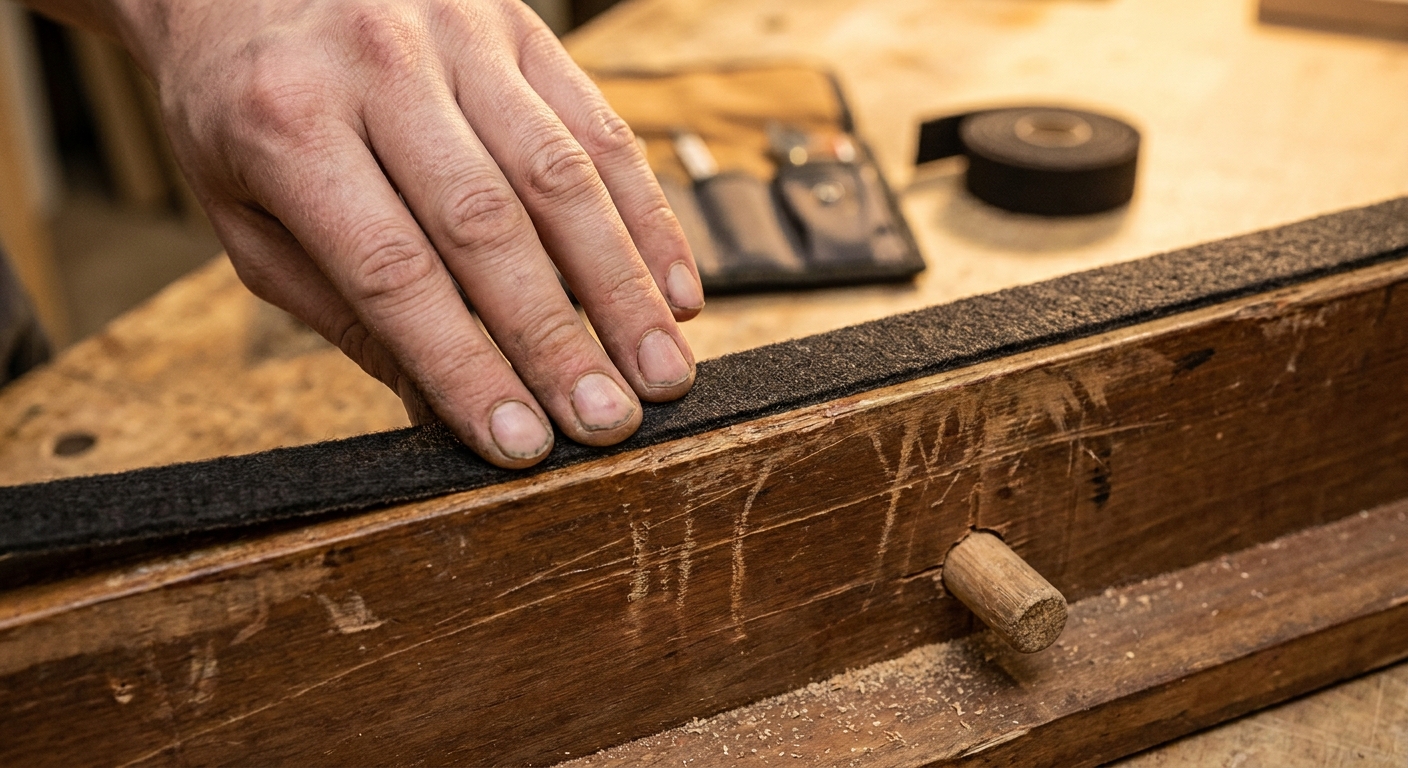
Fix 2: Stop wood squeaks with felt or wax
When two dry surfaces rub, they squeak. Felt and wax are the quietest, least dramatic ways to interrupt that friction.
Use felt when
- A bracket rubs the frame
- Two wood rails touch at a seam and you can see slight movement
- A fabric dust cover rubs a wood edge and makes a “chirp”
How to apply felt
- Clean the contact area so the adhesive sticks.
- Cut a thin strip of felt and press it between the rubbing surfaces.
- Re-tighten hardware if needed, checking that the felt is not bunched up.
Use wax when
- A wooden joint is squeaking but still structurally sound
- You can reach the seam and work wax into the gap
Rub paste wax (or even a plain candle) along the seam where the wood meets, then rock the sofa to work it in. Wipe away excess.
Fix 3: Quiet squeaky springs
If your squeak is spring-related, you can often improve it without opening up the seat.
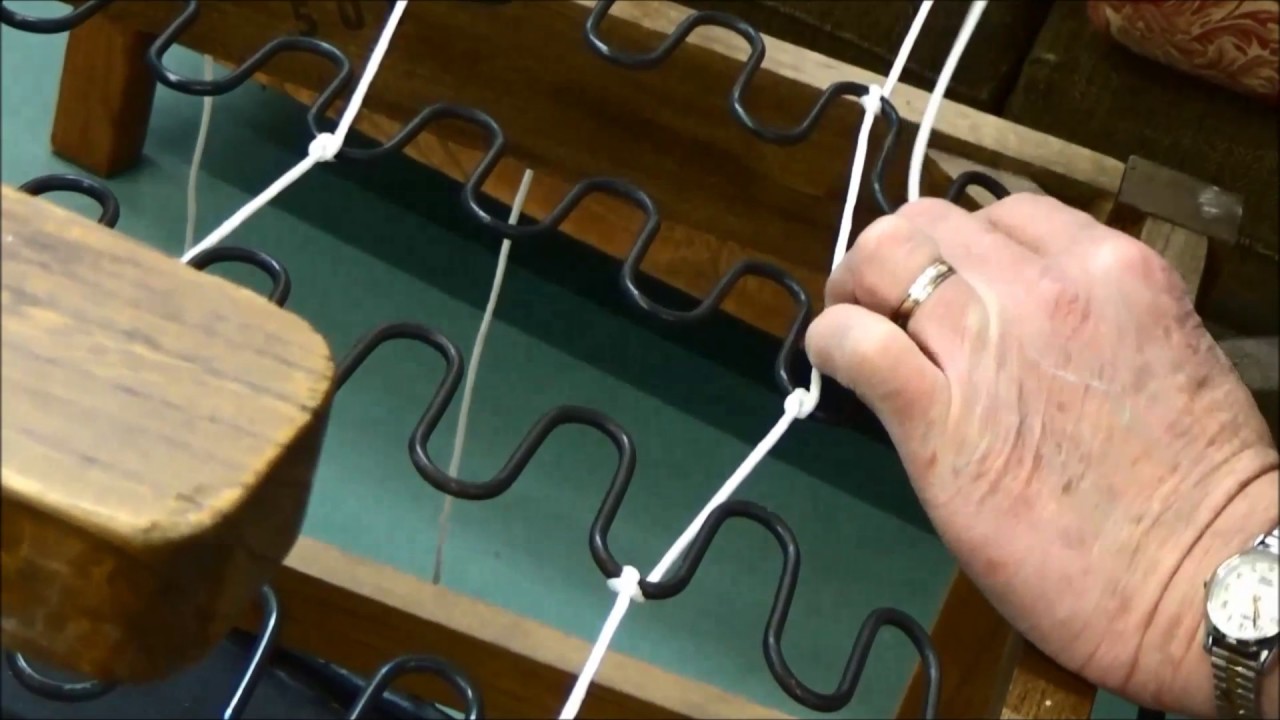
Sinuous (zigzag) springs
- Check the clips: Springs sit in metal or plastic clips attached to the frame. If a clip is loose, tighten its screws.
- Reduce friction: A tiny dab of silicone or PTFE spray on the spring where it meets the clip can help. Shield any nearby fabric.
- Stabilize with a zip tie (temporary): If two springs rub, a zip tie can keep them from touching. Keep it loose enough that it does not change the spring tension. Trim the tail cleanly so it does not create a new rubbing point, and check it occasionally for wear.
Webbing or support straps
- Listen for squeaks where straps meet staples or frame edges.
- Add felt between strap and frame edge if you can access the contact point.
If the sofa has coil springs: Persistent squeaks can mean a loose spring tie or a shifted spring. That fix usually requires opening the bottom dust cover at minimum.
Fix 3B: Recliners and sleepers
If your sofa reclines or has a pull-out bed, the squeak may be coming from the metal mechanism instead of the wood frame.
- Where to look: Pivot points, hinges, and linkages where two metal parts move against each other.
- What to do: Tighten accessible bolts first. Then apply a light lubricant meant for metal-on-metal (silicone or PTFE) at the pivot points only. Wipe off excess so it does not attract dust.
- Best next step: If you can, check the manufacturer manual for lubrication points and warnings.
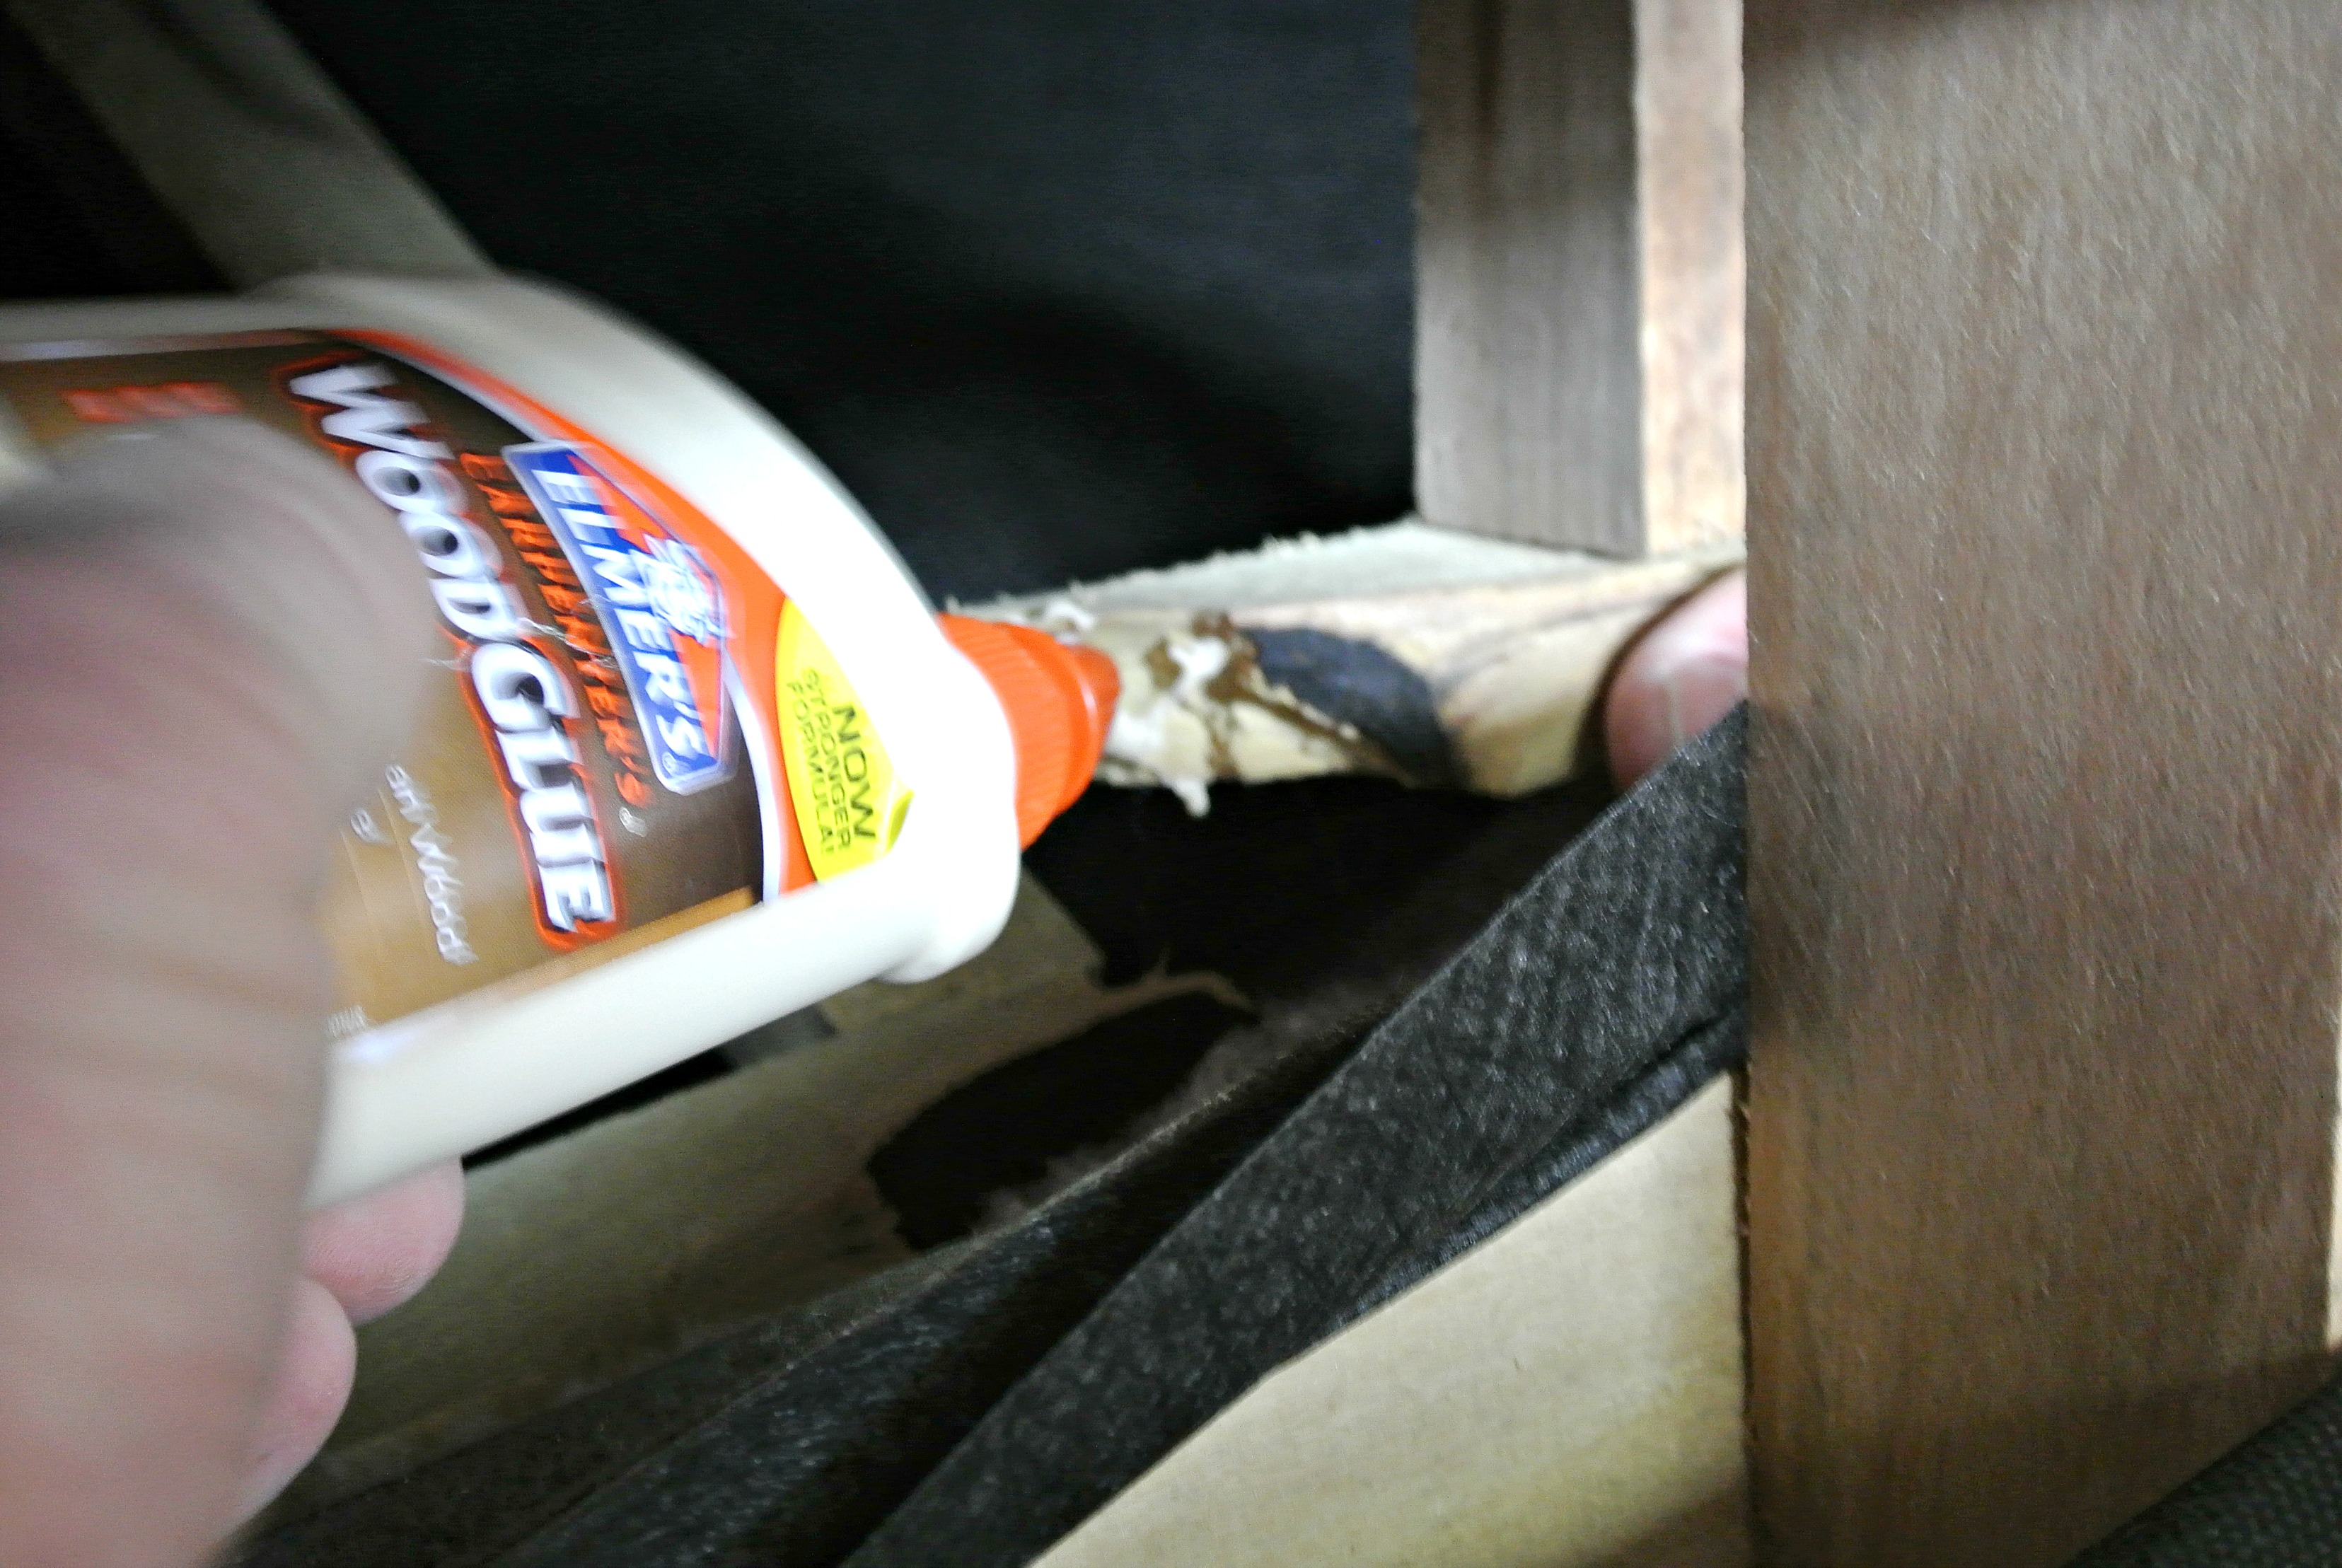
Fix 4: Re-glue a loose joint
If you can see a wooden joint separating, or you can wiggle it by hand, tightening alone will not last. Glue is your friend.
- Expose the joint. If there is a thin black fabric dust cover underneath, it is often stapled on. Take a quick photo, then peel back just the section you need and re-staple later.
- Clean out old debris. Vacuum or brush away dust so the glue bonds.
- Apply wood glue. Work it into the joint as best you can.
- Clamp. Clamp the joint snugly (not crushingly) and wipe excess glue.
- Let it cure. Follow the glue instructions. Usually you want at least several hours, ideally overnight.
Extra stability (optional): If the joint was originally stapled and now feels weak, adding a small L-bracket can reinforce it, but only if you can screw into solid wood.
When it is actually broken
Sometimes the sound is your sofa waving a tiny white flag.
Red flags
- A cracked rail or split plywood near a corner
- A center support beam that is bowed, broken, or detached
- Stripped screw holes that will not hold tension anymore (especially after trying the fixes above)
- Springs that have popped out of their clips or snapped
- The frame feels lopsided, dipping on one side even after tightening
What you can do at home: A basic reinforcement with a new bracket or a sistered piece of wood (a new piece screwed alongside the broken one) can work if you are comfortable drilling and you can access solid structure. If the break is major or near a load-bearing corner, consider a furniture repair pro. It can be cheaper than replacing a good sofa, especially a vintage one with great bones.
If the sofa makes a loud crack (not a squeak) when you sit, stop using it until you inspect the frame. A broken support can fail suddenly, and it is not the kind of surprise anyone needs.
Renter-friendly flow
If you cannot replace the whole piece, and you want the simplest path to “quiet enough,” try this order.
- 1) Confirm it is not the floor: Slide the sofa slightly and test again. Add felt pads under legs if the sound changes. If you are on a rug, make sure the rug pad is not slipping.
- 2) Remove cushions and test: If squeak remains, it is frame or springs.
- 3) Tighten what you can reach: Legs, corner brackets, visible bolts.
- 4) Add felt at rub points: Anywhere you see shiny wear marks on wood or metal.
- 5) Wax accessible wood seams: Especially at arm-to-base joints.
- 6) If still squeaky: Document the issue with a quick video and contact your landlord or furniture provider if it is a furnished rental.
Floor-saving note: Always lift, do not drag. If you are working on hardwood, put a blanket under the legs while you reposition.
Keep it quiet
- Retighten seasonally: Wood expands and contracts with humidity. A quick check every 6 months helps.
- Do not “plop” on the arms: Arms take more stress than you think, especially on older frames.
- Keep legs snug: Loose legs amplify movement and make everything noisier.
- Use pads under legs: Felt pads protect floors and reduce micro-movement that can trigger creaks.
Quick FAQ
Can I use WD-40 on a squeaky sofa?
Only cautiously, and only for metal-to-metal contact points. WD-40 is primarily a water-displacing penetrant, not a long-term lubricant, and it can stain fabric and attract dust. For metal mechanisms, a silicone or PTFE lubricant tends to last longer. For wood joints, wax or felt is usually cleaner and more reliable.
My sofa only squeaks on one side. Why?
That often points to a loose corner joint, a shifting bracket near that arm, or a center support that is not doing its job. Start by tightening hardware on that side and checking the center rail.
Do I need to remove the bottom fabric?
Not always. Try tightening legs and accessible bolts first. If the squeak persists and you suspect a joint, peeling back a small section of the dust cover can give you the access you need. Take a photo first so re-stapling is easy.