How to Clean a Fabric Home Office Chair
Clara Townsend
Clara Townsend is an interior stylist, vintage furniture enthusiast, and the creative voice behind Velvet Abode. With over a decade of experience transforming both cramped city apartments and sprawling fixer-uppers, she believes that a beautiful home is built on personal stories rather than massive budgets. When she isn't hunting for the perfect brass sconce at a local flea market, she can usually be found rearranging her living room for the third time this month.
Your office chair is basically the hardest-working piece of fabric in your home. It quietly absorbs sweat, body oils, hand lotion, coffee drips, and that mysterious dusty film that shows up whenever life gets busy. The good news is you don’t need a steam machine or a professional visit to make it feel fresh again. You just need the right order of operations and a little respect for the chair’s mechanics.
This guide walks you through cleaning mesh, non-mesh fabric upholstery, and padded seats without soaking the foam or gunking up the tilt mechanism and casters.
Before you start: what to check
I know it’s tempting to jump straight to the suds, but two quick checks can save you from water rings, sticky residue, and squeaky wheels.
1) Look for a care tag or brand notes
Check under the seat, along the underside of the back, or in the manual. Some chairs have no tag at all, so the manufacturer site is sometimes your best bet. If you do see a tag, you may see codes like:
- W: Water-based cleaner is OK.
- S: Solvent-based cleaner only (avoid water).
- WS: Either water-based or solvent-based is OK.
- X: Vacuum only. No liquids.
If you can’t find a code, treat the chair as delicate: use minimal moisture, test everything in an inconspicuous spot, and dry thoroughly.
2) Identify what’s actually dirty
- Body oils and sweat: darkened headrest, arm caps, and the front edge of the seat.
- Dust and crumbs: creases, seam lines, and the gap where the seat meets the back.
- Spills: coffee, tea, soda, and the occasional soup situation.
- Odors: a “gym-bag lite” smell that clings to mesh and foam.
Knowing the main culprit helps you choose a cleaner that lifts grime without saturating fabric.
Your simple cleaning kit
You probably already have most of this. If I had to pick only three, I’d choose a vacuum, microfiber cloths, and a gentle dish soap.
- Vacuum with upholstery brush and crevice tool
- Soft toothbrush or small soft-bristle brush
- 2 to 4 microfiber cloths (light-colored so you can see grime lifting)
- Small bowl of warm water
- Gentle dish soap (degreasing but not harsh)
- White vinegar (optional, mainly for odor)
- Baking soda (optional for deodorizing)
- 70% isopropyl alcohol (optional for quick-dry spot cleaning on many synthetics)
- Cotton swabs for seams and hardware edges
- Old towel to protect the floor
Avoid: bleach, heavy fragrances, and “miracle” cleaners that leave a sticky film. Sticky residue is basically a dust magnet.
Quick safety notes
- Test first: Pick a hidden spot. Dab your cleaner on a white cloth and rub lightly. If dye transfers or the fabric fuzzes up, stop and switch methods.
- Be gentle with brushing: Aggressive scrubbing can pill some fabrics.
- Skip harsh chemistry on unknown fabrics: Avoid alcohol or vinegar on leather, suede, velvet, rayon, acetate, or anything that feels delicate.
- Keep liquids out of the chair’s guts: Don’t let cleaner drip into the frame, controls, or mechanism.
Step 1: Vacuum like you mean it
If you do only one thing today, do this. Vacuuming removes grit that would otherwise turn into muddy paste the moment you add moisture.
Where to vacuum (in order)
- Seat creases and piping: run the crevice tool along every seam and edge.
- Backrest junction: the gap where the seat meets the back collects everything.
- Armrests: especially where your thumb rests and where skin oils transfer.
- Underside lip: dust clings to the underside edge of the seat like it pays rent.
- Casters : hair and fuzz wrap around the wheels and drag grime across your floor.
Pro tip: Tilt the chair and vacuum with the light coming from the side. Side lighting reveals the little crumbs you miss head-on.
Step 2: Golden rules
Most fabric chair disasters come from using the right cleaner in the wrong way. Keep these in mind and you’ll be fine.
- Less water than you think: Aim for “barely damp,” not “rainstorm.”
- Soap lifts oils: Dish soap is your main degreaser.
- Vinegar is for odor: It can help freshen, but it’s not a reliable oil-cutter.
- Rinse-wipe matters: A quick plain-water wipe prevents residue that attracts new dirt.
- Blot and airflow: Pull moisture back out with a towel, then dry with air.
Step 3: Clean by material
Below is the safest approach for each common type. When in doubt, start with the mildest mix and do a second pass instead of soaking.
Mesh backs and mesh seats
Mesh is wonderful because it dries quickly, but it likes to hold body oils in the tiny weave, especially at the lumbar area and headrest.
- Mix: 2 cups warm water + a few drops of dish soap.
- Optional for odor: add 1 tablespoon white vinegar.
- Optional for stubborn grime on many synthetics: use a separate cloth lightly dampened with 70% isopropyl alcohol.
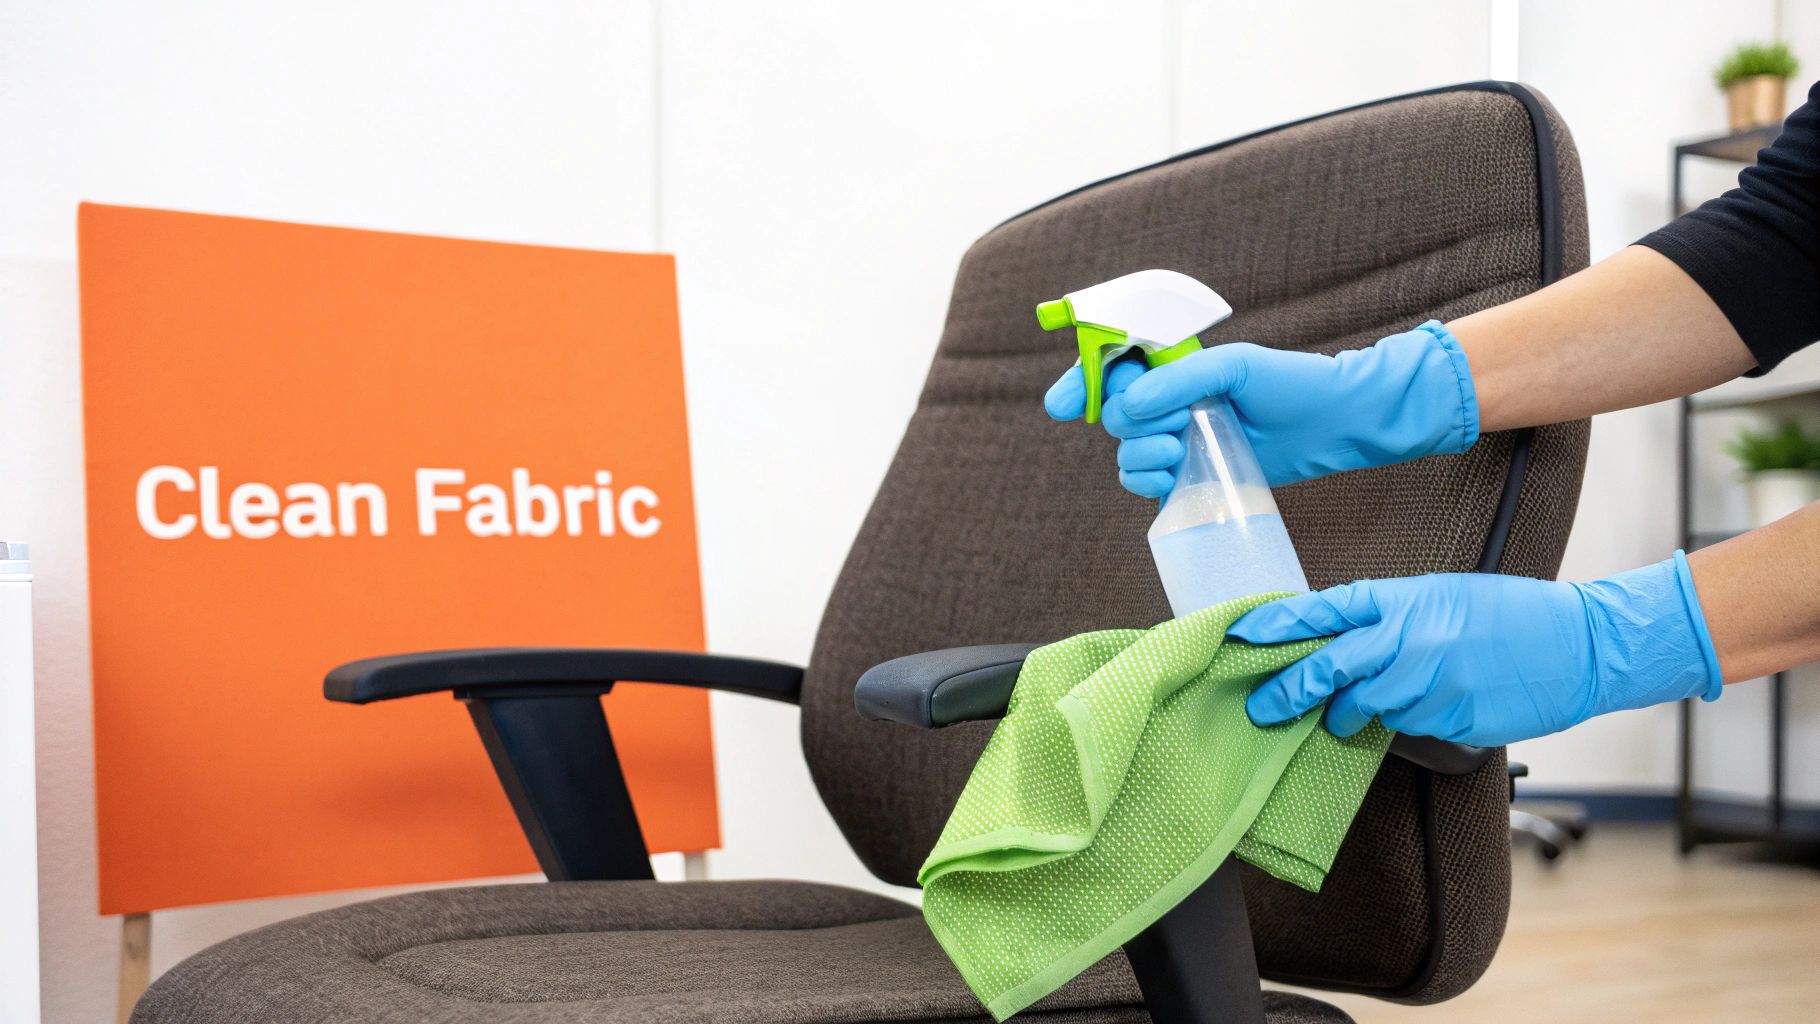
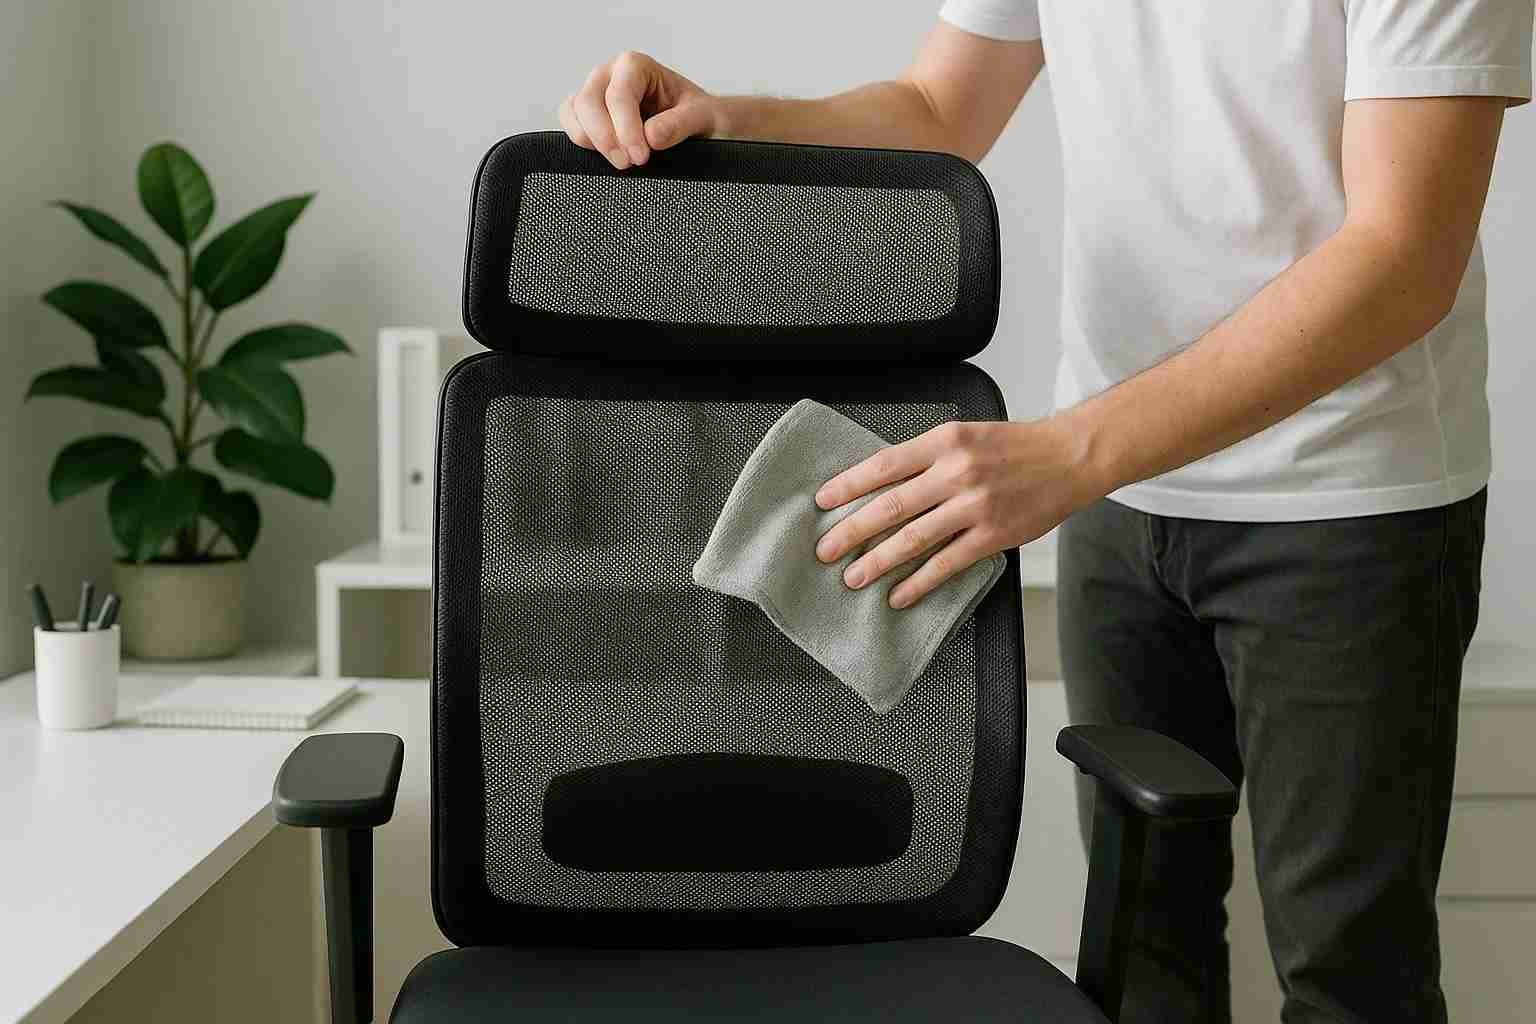
How to clean: Dampen a microfiber cloth, wring it out hard, and wipe the mesh in one direction. Follow with a soft brush in gentle circles for stubborn grime, then wipe again with a clean damp cloth to remove soap residue.
Alcohol caution: Test for colorfastness first. Avoid painted, lacquered, or coated parts, and don’t overdo it on plastics since repeated alcohol exposure can dry some finishes over time.
Non-mesh fabric upholstery
This includes most office-chair seat fabrics that aren’t mesh, like polyester weaves, knits, and performance blends. It’s often tougher than it looks, but it can still water-spot if you over-wet small areas.
- Mix: 2 cups warm water + a few drops of dish soap.
- Optional for odor: a very light vinegar-water wipe (1:4 vinegar to water) after cleaning, then a plain-water wipe.
How to clean: Work in sections about the size of a dinner plate. Lightly dampen your cloth, blot and wipe, then immediately blot with a dry towel. If you spot-clean only one dot, you can create a ring. Feather your cleaning out beyond the stain edges so it dries evenly.
Padded seats and upholstered backs
This is where most people accidentally create a musty chair. Foam holds water, and once it’s damp deep down, it dries slowly and can smell sour.
- Mix: 2 cups warm water + a few drops of dish soap.
- For the front edge oil line: a tiny extra dot of dish soap on a damp cloth, followed by a plain-water wipe.
How to clean: Use a cloth that’s damp, then wrung out until it feels almost dry. Blot and lightly wipe, then immediately press with a dry towel to pull moisture back out. If your chair is very grimy, do two light passes rather than one soaking pass.
Removable covers
If your chair has a zip cover or a removable pad, check the label or manual. If it’s machine-washable, wash cold on gentle and air-dry. Skip the dryer unless the label specifically says it’s safe.
Step 4: Spot-treat stains and buildup
For the chair you sit in daily, the most common stains aren’t dramatic spills. They’re slow, invisible buildup that eventually looks like a shadow.
Sweat and body oils
- Vacuum first.
- Dampen a cloth with warm water and a drop of dish soap, then wring well.
- Blot and wipe gently. Don’t scrub aggressively, especially on non-mesh fabric.
- Wipe again with a separate cloth dampened with plain water to remove soap.
- Blot dry.
If oils are stubborn: On mesh or durable synthetics, a light wipe with 70% isopropyl alcohol on a cloth can cut through residue and evaporates quickly. Test first, stop if you see color transfer, and keep it away from painted finishes and coated plastics.
Coffee or tea drips
- Blot with plain water first to dilute.
- Then use your mild soap mix and blot from the outside in.
- Rinse-wipe with plain water and blot dry.
Ink marks
Ink is tricky and fabric-dependent. For many synthetic office chair fabrics, a small amount of isopropyl alcohol on a cotton swab can help. Dab, don’t rub, and stop as soon as color lifts to avoid spreading.
Food stains
If it’s a food or protein stain (milk, yogurt, sauce), an enzyme-based upholstery cleaner can help. Use it sparingly, follow the label, and rinse-wipe afterward if the product recommends it.
Odor without soaking
- Sprinkle baking soda lightly over the seat and back, let it sit 30 to 60 minutes.
- Vacuum thoroughly using the upholstery brush.
This is my favorite “reset” step for chairs that smell like long meetings.
Step 5: Clean the forgotten parts
A chair can have a freshly cleaned seat and still feel grimy if the touch points and wheels are coated in skin oils and dust.
Armrests
If your arm caps are fabric, clean them like the seat. If they’re plastic or polyurethane, wipe with a lightly soapy cloth, then a clean damp cloth, then dry.
Controls and mechanism area
Use a barely damp cloth around levers and adjustment knobs. Avoid dripping anything into the mechanism. If grime is lodged around edges, use a cotton swab that’s only slightly damp.
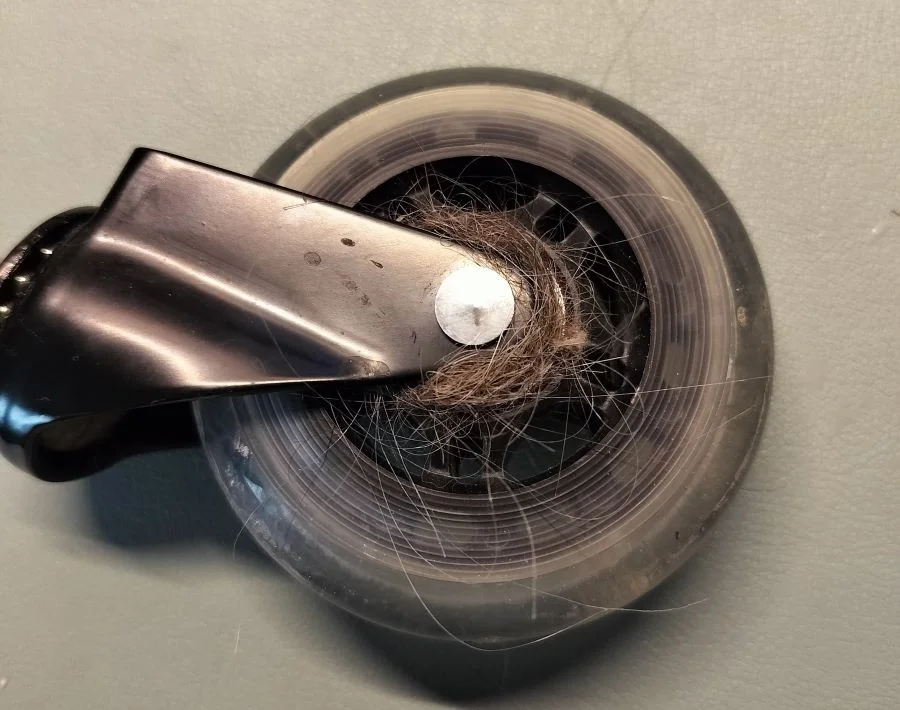
Casters (wheels)
- Flip the chair carefully on a towel.
- Pull out hair and fuzz from the caster axles by hand or with tweezers.
- Wipe wheels with a damp cloth, then dry completely.
Why it matters: Clean casters roll better, protect your floors, and keep you from tracking chair-grime across the room.
Drying: protect your chair
Drying isn’t just about comfort. It prevents odors, protects adhesives, and keeps moisture away from metal components.
The safest routine
- Blot first: Press a clean dry towel into the fabric to pull out as much moisture as possible.
- Airflow is everything: Aim a fan toward the chair for 1 to 3 hours.
- Let it breathe: If possible, keep the chair in a well-ventilated room with a window cracked.
- Don’t sit until fully dry: Sitting compresses damp foam and slows drying, which invites odor.
What not to do
- Don’t use high heat from a hair dryer up close. It can warp plastics and worsen some stains or cause texture changes.
- Don’t soak the seat. If you already did, keep airflow on it for the rest of the day.
- Don’t spray cleaner directly into mesh where it can drip into the frame.
Easy cleaning schedules
I’m a big fan of maintenance that takes less time than choosing a podcast episode.
Weekly (3 minutes)
- Vacuum the seat creases and the backrest junction.
- Wipe armrests with a damp cloth, then dry.
Monthly (15 minutes)
- Full vacuum: seat, back, underside edges, and casters.
- Spot-clean the seat front edge and headrest area.
- Baking soda deodorize if needed.
Seasonal (30 to 45 minutes)
- Gentle overall wipe-down appropriate to your fabric type.
- Deep caster clean and base wipe.
Troubleshooting
“I got a water ring.”
This usually happens when only the center got damp. Lightly dampen a wider area around the ring with plain water, then blot evenly outward and dry with airflow. The goal is to blend the moisture line so it dries uniformly.
“It still looks dingy.”
That’s often body oil that needs a second gentle pass. Repeat with the same mild soap mix, then make sure you rinse-wipe afterward. Residue can make fabric look gray.
“Now it smells weird.”
That’s trapped moisture. Add fan time, increase airflow, and once fully dry, use baking soda for 30 to 60 minutes and vacuum.
“Can I use a steam cleaner?”
On many office chairs, I skip it. Steam adds a lot of moisture fast and can push water into foam or down into the mechanism area. If you do use steam, keep it very light, don’t linger, and dry aggressively with airflow.
When to call a pro
Sometimes the kindest choice is admitting the chair is asking for more than a Saturday wipe-down.
- Persistent odor even after full drying and baking soda treatment
- Mold or mildew visible in seams or under the seat
- Large spill that soaked deep into foam
- Mechanism issues (sticking levers, grinding sounds) after a cleaning mishap
A professional upholstery cleaner can often extract moisture properly. And if your chair has a removable seat pad, replacing that single component can be more cost-effective than replacing the whole chair.