Hardwood Floor Care
Clara Townsend
Clara Townsend is an interior stylist, vintage furniture enthusiast, and the creative voice behind Velvet Abode. With over a decade of experience transforming both cramped city apartments and sprawling fixer-uppers, she believes that a beautiful home is built on personal stories rather than massive budgets. When she isn't hunting for the perfect brass sconce at a local flea market, she can usually be found rearranging her living room for the third time this month.
Hardwood floors are a little like vintage leather bags. They are tough, yes, but they also have a “skin” you can ruin if you scrub the wrong way or soak them in the wrong thing. Most floor damage is not from dirt; it is from cleaning methods that quietly eat away at the finish until the boards look hazy, dry, or weirdly streaky in certain light.
This is a finish-first guide, because your finish is the real protective layer. Keep it happy, and your floors will look softly luminous for years, even in a busy home with pets, kids, and a thousand daily trips to the coffee maker.
Know your finish first
Before you buy a single bottle, figure out what is on top of your wood. The same cleaner that is perfect for one finish can be a disaster for another.
Quick clues
- Polyurethane (most common): Looks like a sealed coating over the wood. Water often beads a bit. The surface feels smooth and “closed.”
- Waxed floors (often older homes): Soft glow, not shiny-glossy. Can feel slightly tacky or draggy if you rub with your palm. A drop of water may darken the wood briefly.
- Oiled floors (penetrating oil, hardwax oil): Matte to satin, very natural look. Feels like wood, not plastic. Often spot-repairable.
The simple water-drop test
Put a small drop of water in an inconspicuous spot and wait 10 minutes.
- If it beads and wipes away cleanly, you likely have polyurethane.
- If it slowly absorbs and darkens the wood, you may have an oil or wax finish, or a worn-through polyurethane layer.
This test is a hint, not a diagnosis. Some well-maintained oil and hardwax-oil floors can bead water, and worn polyurethane can absorb it. When in doubt, check paperwork from the installer or manufacturer, ask a flooring pro, and test any product in a closet corner first.
If you are not sure
If you are renting, just moved in, or inherited a mystery floor, default to the gentlest plan: dry clean often, use minimal moisture, and choose a cleaner labeled for your floor system when possible.
- Do: Dust mop, vacuum in hard-floor mode, spot-clean spills fast, and use a small amount of residue-free cleaner.
- Skip: steam, vinegar mixes, and random “shine” products until you know your finish.
What to avoid
There are two “natural” cleaning trends that routinely dull hardwood finishes: vinegar and steam. They can make a floor look great for a week, then slowly steal clarity from the finish over time.
- Vinegar: It is acidic. Frequent use, strong mixes, or letting it sit can dull or haze some polyurethane finishes and strip wax over time.
- Steam mops: Heat plus moisture can push vapor into seams and micro-gaps. Over time, this can contribute to cupping, swelling, and edge wear. How quickly that happens depends on your finish, installation, and how wet you run the machine.
- Soapy bucket mopping: Too much water and residue. Soap film is a magnet for grime, so the floor gets dirtier faster.
- Abrasive powders and scrub pads: They scratch the finish, which then holds onto dirt and looks dull.
- “Shine” or polish products used constantly: Many leave acrylic buildup. That buildup turns cloudy, gets slippery, and can complicate refinishing. Some factory-finished floors have specific refreshers that are fine, but random polish products can void warranties.
If a cleaning method involves a lot of water, a lot of heat, or a promise to “make your floors shiny again” overnight, pause. Your goal is a clean finish, not a coated one.
Daily and weekly routine
This is the routine that protects your finish long-term. Think of it as keeping sandpaper out of your home.
Daily: dry clean first
- Dust mop or microfiber mop high-traffic areas. Microfiber grabs grit without pushing it around.
- Spot clean spills immediately with a barely damp cloth, then dry.
Weekly: vacuum the right way
- Use a vacuum with hard-floor mode or a soft brush head. Avoid beater bars on hardwood.
- Make sure wheels are clean and soft. Grit stuck in a wheel can scratch like a tiny rock.
- Run it along baseboards and under dining chairs where grit loves to hide.
Grit is the main culprit behind those spiderweb scratches you see when the sun hits the floor just right.
Deep cleaning
Deep cleaning should still be low-moisture. The difference is that you are lifting stuck-on residue and restoring clarity to the finish.
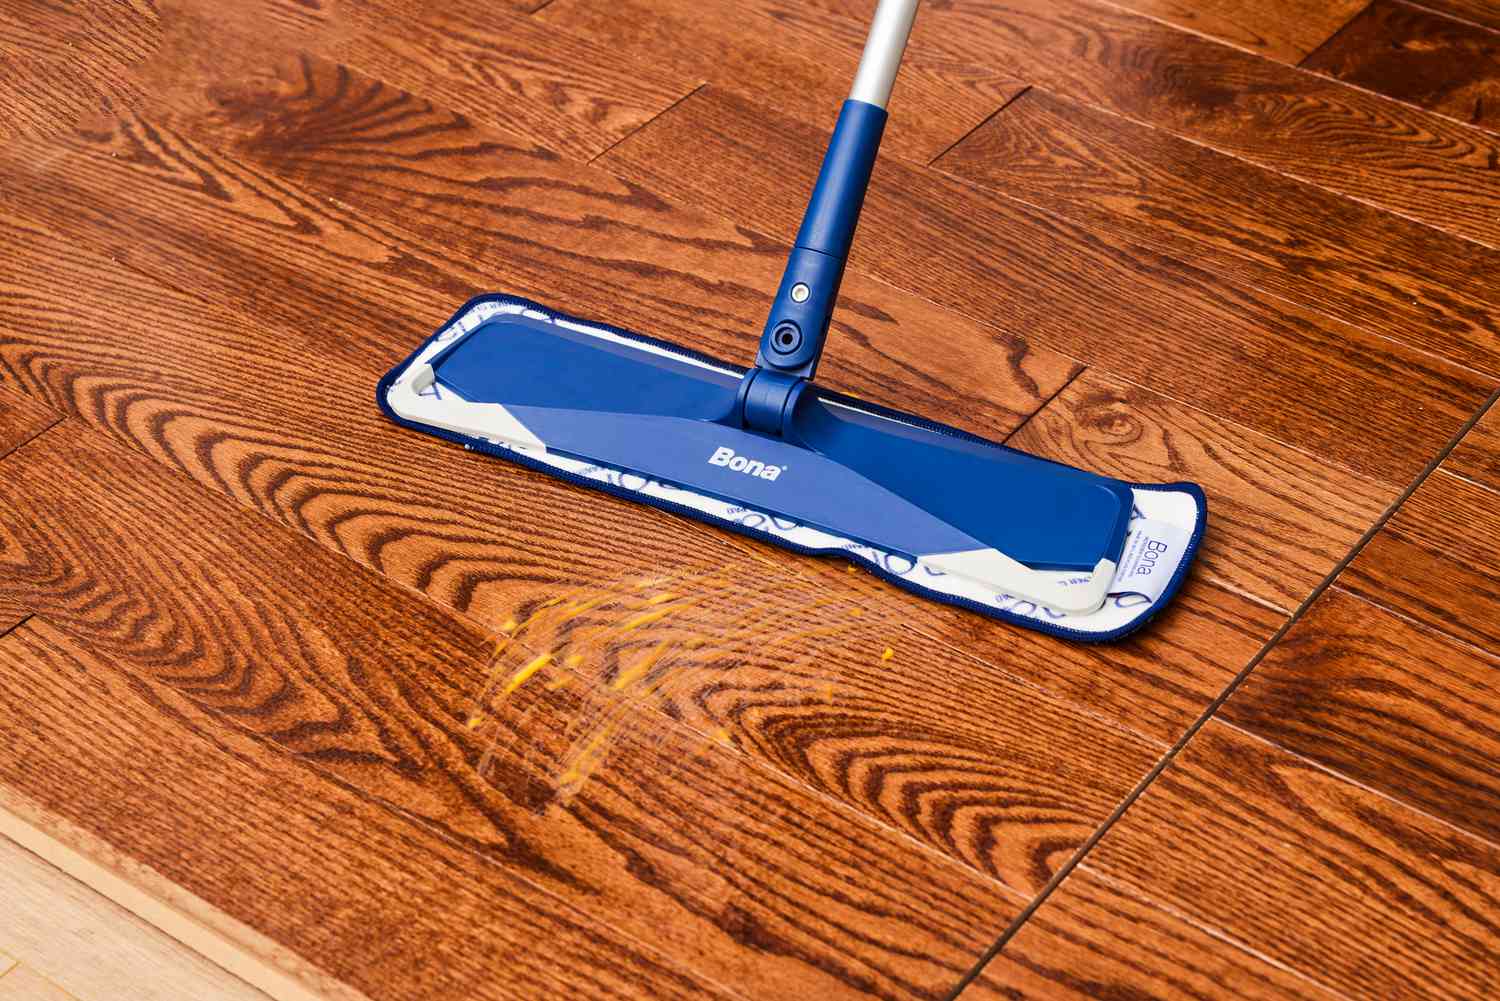
The method for most sealed hardwood
- Step 1: Vacuum thoroughly.
- Step 2: Use a pH-neutral cleaner for sealed hardwood or a cleaner recommended by your floor manufacturer.
- Step 3: Spray cleaner onto the mop pad, or lightly onto the floor, one small section at a time.
- Step 4: Mop with the grain. Flip or change pads as they get dirty.
- Step 5: Buff dry with a clean microfiber cloth if you see any streaking.
If your mop pad is coming up gray, do another pass with a fresh pad. Dirty pads just redeposit grime.
Best cleaners by finish
The safest choice is always a cleaner designed for your finish. Here is how to pick without getting lost in the cleaning aisle.
Polyurethane-finished floors (sealed)
What to use: pH-neutral cleaners labeled for sealed hardwood. Look for “no-rinse” directions and a residue-free promise.
- DIY option: Warm water with a tiny drop of gentle dish soap in a spray bottle, about 2 to 3 drops per quart. Mist lightly and wipe dry. Use this sparingly, not as your forever routine, because too much soap can leave a film.
- Store-bought type: “Hardwood floor cleaner” for sealed floors, pH-neutral, non-wax, non-polish.
Avoid: oil soaps (can leave residue), vinegar, ammonia, and anything that says “polish” unless your flooring brand specifically recommends it.
Waxed floors
What to use: Dry cleaning is your best friend. Waxed floors hate water. When they need more, use a wax-safe cleaner and maintain with wax occasionally rather than scrubbing harder.
- DIY option: Dry microfiber mop, then spot-clean with a barely damp cloth and immediately dry.
- Store-bought type: Products labeled for waxed wood floors, often a gentle cleaner plus a compatible paste wax for maintenance.
Avoid: standard hardwood cleaners meant for polyurethane, vinegar, and steam. Also avoid acrylic polishes that create a slick layer over wax.
Oiled floors (penetrating oil, hardwax oil)
What to use: Cleaners made for oiled wood, sometimes called “soap,” that are formulated for oil finishes. Many are designed to clean without stripping the finish, and some are formulated to help maintain that oiled look over time.
- DIY option: Usually not ideal here. Many household soaps can strip oil over time. If you must, use plain water very sparingly and dry immediately, then return to a proper oil-floor cleaner.
- Store-bought type: Oil-floor soap or cleaner from the same system as your finish when possible.
Avoid: vinegar, strong degreasers, ammonia, and most one-size-fits-all hardwood sprays.
Prefinished vs. site-finished floors
Prefinished planks often have tiny micro-bevels between boards. Those grooves can hold residue and moisture, so use an extra-light spray, change pads often, and do not let cleaner pool along seams. Site-finished floors are often smoother wall-to-wall, but the same low-moisture, residue-free rules apply.
Scuffs and sticky spots
Most “damage” is actually on top of the finish. That is good news. Go gently and escalate slowly.
Rubber scuffs
- Start with a dry microfiber cloth.
- If needed, use a tiny bit of hardwood cleaner on the cloth and rub gently with the grain.
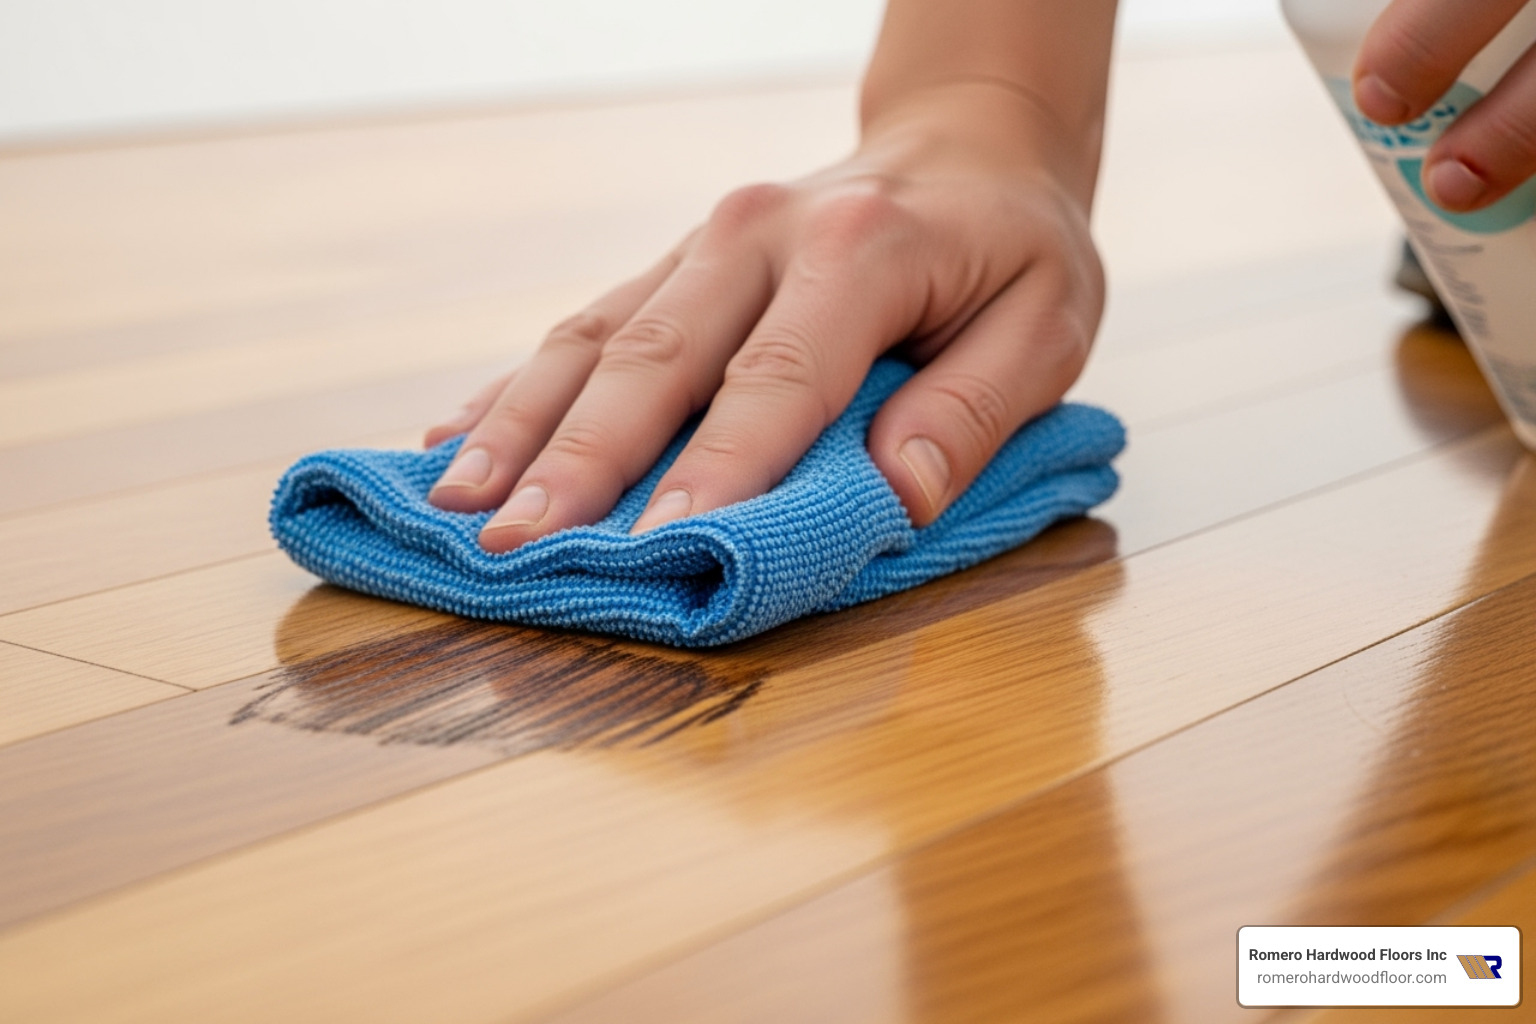
Sticky residue
- Lay a slightly damp warm cloth over the spot for 30 to 60 seconds to soften.
- Wipe with hardwood cleaner and dry.
- If it is still stubborn on a sealed floor, a small amount of mineral spirits on a cloth can help, but spot-test first and ventilate well. Never pour it directly on the floor. Keep it away from flames, and dispose of used rags safely. Avoid this on waxed or oiled floors unless the manufacturer explicitly says it is safe.
Dark heel marks or unknown grime
- Try a dedicated hardwood cleaner first.
- Avoid magic erasers unless you use them extremely lightly, because they are micro-abrasive and can dull the sheen in one patch.
Scratches and dull spots
There is a difference between a scratch in the finish and a scratch into the wood itself.
Finish-level scratches
- Clean first. Dirt trapped in a scratch makes it look deeper.
- For sealed floors, consider a touch-up kit made for polyurethane floors (often a blending marker plus a clear coat pen).
- For oiled floors, many brands offer a maintenance oil or spot repair product that blends beautifully.
Deeper scratches into bare wood
- Use a color-matched wood filler or wax repair stick appropriate for your finish type, then protect the area.
- If you have lots of these, it may be time for a screen and recoat (for polyurethane) or a refresh oil (for oiled floors).
When not to DIY
- If boards are cupping, lifting, or gapping widely.
- If the finish is peeling or you see widespread gray, raw-looking wood in traffic paths.
- If you suspect wax but are not sure. Mixing systems can make refinishing complicated.
Protect the finish
Cleaning helps, but protection is what keeps your finish from wearing out early.
Felt pads and smart rugs
- Put felt pads on chair and table legs. Replace them when they get gritty.
- Use doormats outside and inside entry doors. This is your grit filter.
- Add a rug in high-traffic zones, but make sure the rug pad is safe for hardwood and non-staining.
Shoes and pet nails
- If you can, adopt a “no shoes” habit in the house. Even a small pebble can do a number on a finish.
- Keep pet nails trimmed. It is not about perfection, it is about minimizing constant micro-scratches.
Sunlight control
UV light can change wood color and fade stain. Curtains, shades, and rotating rugs seasonally help your floor age more evenly.
Seasonal schedule
If you do one thing from this whole article, let it be this: schedule small care so you never need frantic, expensive rescue.
Every day
- Dry dust mop high-traffic areas.
- Wipe spills immediately, then dry.
Every week
- Vacuum with a hard-floor setting.
- Check felt pads under chairs and replace any that look dirty or flattened.
Every month
- Deep clean with a finish-appropriate cleaner and fresh mop pads.
- Inspect entryways and kitchen pathways for early dulling or grit.
Spring and fall
- Rotate rugs to balance sunlight and wear.
- Do a more detailed clean along baseboards and under furniture edges.
- Consider a professional screen and recoat for polyurethane floors if wear is noticeable but wood is not exposed.
Winter and summer
- Aim for 30% to 50% indoor humidity when possible. Extremes can cause gapping (too dry) or swelling (too humid).
- Use a humidifier in winter if floors are gapping noticeably, and a dehumidifier in very humid summers if boards feel swollen.
FAQ
Can I use Swiffer WetJet on hardwood floors?
On sealed polyurethane floors, many people do, but I prefer a residue-free cleaner and a washable microfiber pad so you can control moisture. On waxed or oiled floors, skip it unless the manufacturer explicitly approves it.
Why do my floors look cloudy after cleaning?
Cloudiness usually comes from residue buildup (too much cleaner, soap, or polish) or micro-scratches scattering light. Switch to a residue-free hardwood cleaner, use less product, change mop pads often, and buff dry.
Is it okay to use vinegar once in a while?
Occasional, very diluted use is less risky than frequent mopping with a strong mix, but vinegar can still dull certain finishes over time. If you want the simple route, stick with a cleaner made for hardwood and keep your routine dry-forward.
Do engineered and solid hardwood need different care?
For everyday cleaning, the same finish-first rules apply because you are cleaning the top surface, not the core. The two practical differences are that engineered floors can be more sensitive to moisture at seams, and they may have limits on how many times they can be sanded and refinished. So clean them the same way, just keep water even more minimal and follow manufacturer guidance.
A gentle closing note
The best-looking hardwood floors are rarely the ones that are scrubbed the hardest. They are the ones that are treated like a surface worth protecting. Keep grit under control, keep water minimal, choose a cleaner that matches your finish, and your floors will keep that quiet, warm glow that makes a room feel finished, even before you hang the art.