Furniture Anti-Tip Straps for Renters
Clara Townsend
Clara Townsend is an interior stylist, vintage furniture enthusiast, and the creative voice behind Velvet Abode. With over a decade of experience transforming both cramped city apartments and sprawling fixer-uppers, she believes that a beautiful home is built on personal stories rather than massive budgets. When she isn't hunting for the perfect brass sconce at a local flea market, she can usually be found rearranging her living room for the third time this month.
There is a very specific kind of adult panic that happens when a drawer is open, a toddler decides to climb, or your cat launches itself onto a top shelf like it is auditioning for a stunt job. Tall furniture can and does tip, especially dressers with multiple drawers extended. The fix is simple and wildly worth it: anti-tip straps.
If you rent, the next worry is usually, “Am I allowed to put holes in the wall?” Many leases and landlords treat small nail and screw holes as normal, patchable wear from living in a space, but it is not universal. Check your lease language and local rules, and when in doubt, ask in writing. The good news is that a safe anti-tip setup can be very low-impact: often two small screw holes in the wall and two in the furniture for a single strap, and sometimes double that if you use two straps for a wide piece (which is often better). All of it is patchable at move-out if you keep it neat.
One more easy win before you buy anything: check the box and the back of your furniture. Many newer dressers and bookcases ship with a CPSC-compliant anti-tip kit. It is not always perfect, but it is usually a solid starting point and it is designed for that specific piece.
Start with the high-risk pieces
If you are not strapping everything today, prioritize the pieces most likely to tip and most likely to be climbed.
Top priorities
- Dressers and chests, especially wide ones with smooth drawers that glide easily.
- Bookcases and tall shelving, especially anything tall, narrow, or top-heavy. Height alone is not the only factor.
- TV stands with a television on top, particularly if the stand is narrow or the TV is large.
- Entry cabinets where people lean, tug, or stash heavy bags in the top drawers.
Quick self-check
Stand to the side and gently pull the top front edge of the furniture toward you with two fingers. If it lifts or rocks at all, treat it as a strap-now piece. Even if it feels stable today, drawers loaded with clothes, kids learning to climb, or an uneven floor can change the math fast.
Quick safety tweak
Even with straps, make tipping less likely: keep heavier items in lower drawers and lower shelves, and avoid storing the densest stuff up high.
Hardware vs adhesive
In renter-land, we all love the idea of “no holes.” But with anti-tip safety, strength matters more than convenience. Here is the honest breakdown.
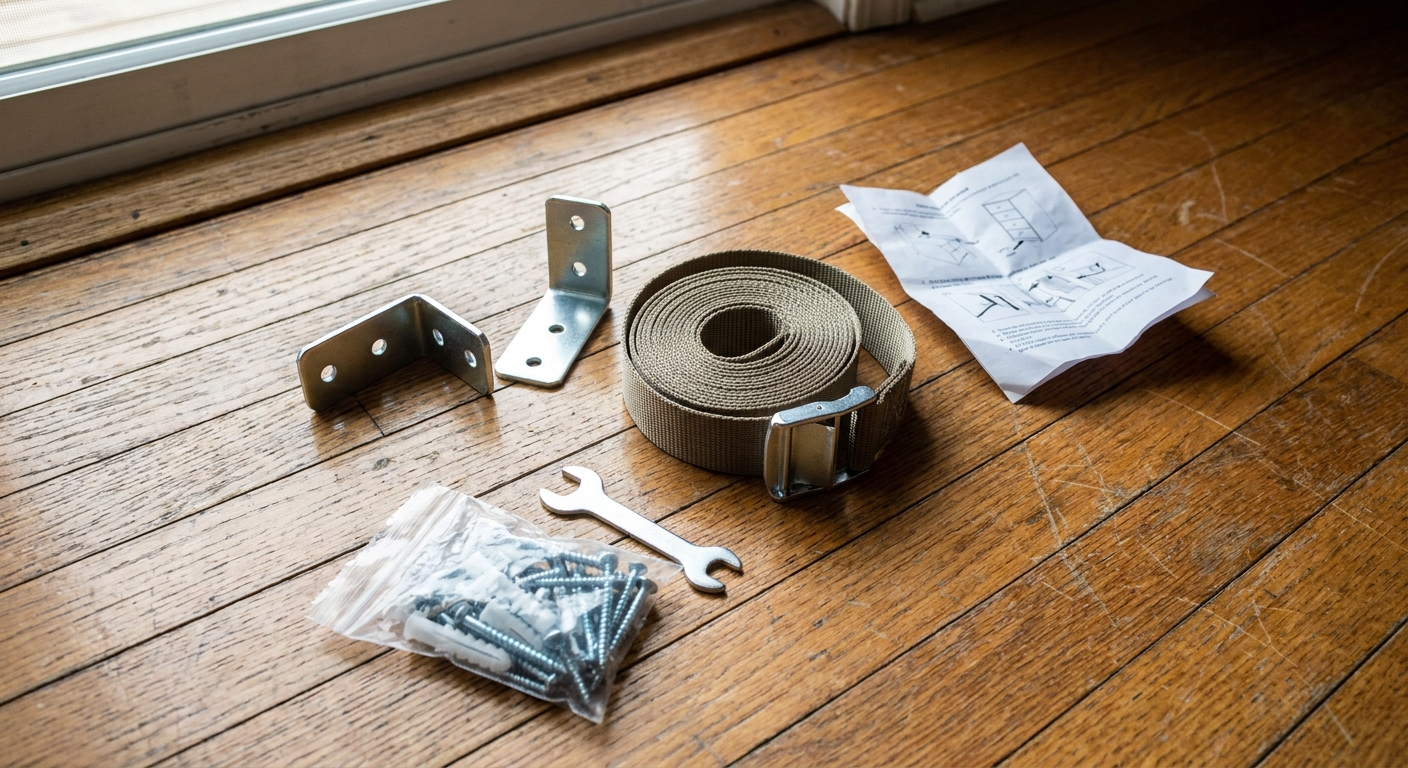
1) Screw-in hardware kits (best for safety)
These are the classic anti-tip sets that include wall brackets, furniture brackets, and either straps or a rigid tether. When anchored into a stud, they provide the most reliable hold.
- Pros: Strongest option, widely available, inexpensive, works for heavy dressers and tall shelving.
- Cons: Requires drilling small holes. Needs patching later.
My take: If you have kids, pets, or a top-heavy vintage dresser, this is the option I trust. I would rather patch a few small holes than gamble with a tip-over.
2) Toggle bolts or heavy-duty hollow-wall anchors (when studs are not possible)
If a stud is not where you need it, you can use heavy-duty hollow-wall anchors. The best category here is a toggle-style anchor, which spreads the load behind the drywall instead of relying on soft drywall threads.
- Pros: Stronger than basic plastic anchors, can be placed where studs are not.
- Cons: Bigger holes to patch, strength depends on proper installation and wall condition.
Important caveat: Even the best toggles still depend on the drywall itself. Drywall can fail if it is old, damp, damaged, or if the leverage event is extreme (think: a very heavy, fully-loaded dresser with multiple drawers pulled out). If you can hit a stud, hit the stud.
When I use them: Narrow furniture where the strap location will never line up with a stud, or on walls with odd framing. If you can hit a stud, hit the stud.
3) Adhesive anti-tip options (limited use cases)
There are adhesive straps and furniture-to-wall adhesive plates marketed as renter-friendly. They can help with very light furniture, but they are not my first choice for dressers or tall shelves.
- Pros: No drilling, quick install, easy to remove when done carefully.
- Cons: Adhesive can fail with humidity, textured paint, dust, or time. Some adhesives pull paint or the paper facing off drywall. Many are not rated for the loads that matter in a real tip scenario.
If you go adhesive: Look for a product with clear weight and safety ratings, follow cure times exactly, and test gently. Use it as an extra layer, not your only line of defense for heavy pieces. And skip command-strip style solutions for dressers. They are not built for leverage.
Find studs without guesswork
You do not need contractor energy to find a stud. You need one of these methods, a calm five minutes, and a pencil.
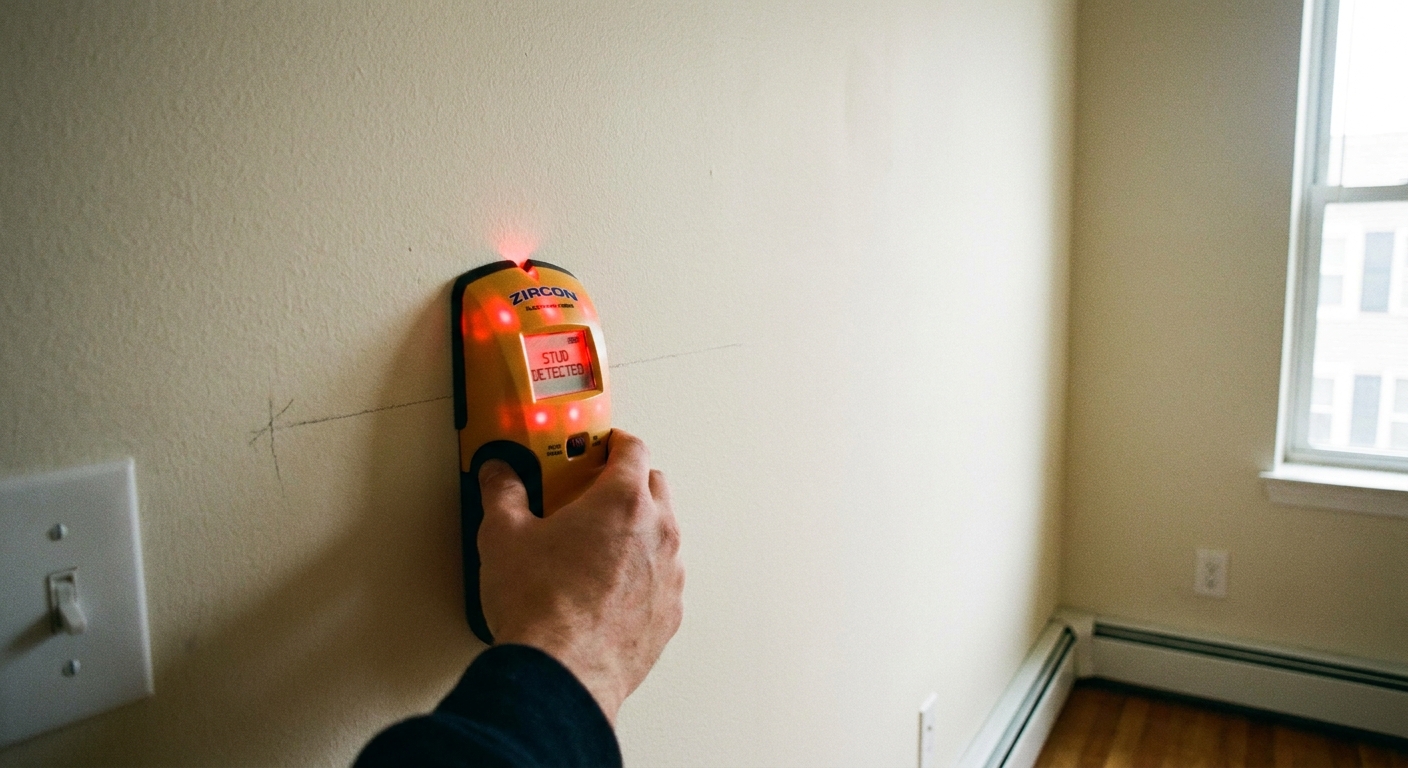
Method A: Use a stud finder
- Run the stud finder slowly along the wall at the height you plan to anchor.
- Mark both edges of the stud, then mark the center point.
- Do a second pass a few inches higher to confirm the location is consistent.
Method B: Use a magnet
A strong magnet can locate drywall screws that attach the drywall to the studs. Slide the magnet across the wall until it catches on a screw head. Find a vertical line of catches and you have a stud line.
Method C: Use outlet logic
Many outlets are mounted to the side of a stud. If you remove the outlet cover plate, you can often see which side the electrical box is fastened to. That gives you a stud edge, then measure 16 inches on center for typical framing.
Safety note: Turn off the breaker before removing the cover plate if you are not fully comfortable, and do not insert tools or fingers into the electrical box. You only need the cover off, not the wiring touched.
The tiny test hole trick (my renter secret)
If you are unsure, drill a very small pilot hole where it will be hidden behind the furniture. If you hit solid wood, you found a stud. If you hit hollow space, patch that tiny hole later. A 1/16-inch test hole disappears with one swipe of spackle.
Install straps the renter-friendly way
Most kits are similar, but the installation details are what keep it sturdy and easy to repair later. Always follow your specific kit instructions, especially if your furniture came with its own anti-tip hardware.
Tools you will want
- Stud finder or magnet
- Drill and drill bits
- Screwdriver
- Tape measure
- Pencil
- Level (optional, but satisfying)
Step-by-step (stud-mounted)
- Empty the top drawers or shelves. Lighter furniture is easier to position safely.
- Pull the piece 2 to 4 inches from the wall. You need working space behind it.
- Locate and mark the stud center. Aim to place the wall bracket into the stud.
- Mount the wall bracket first. Drill a pilot hole, then drive the screw(s) in snug. Do not over-tighten.
- Mount the furniture bracket. Choose a solid area of the frame, not thin backer board.
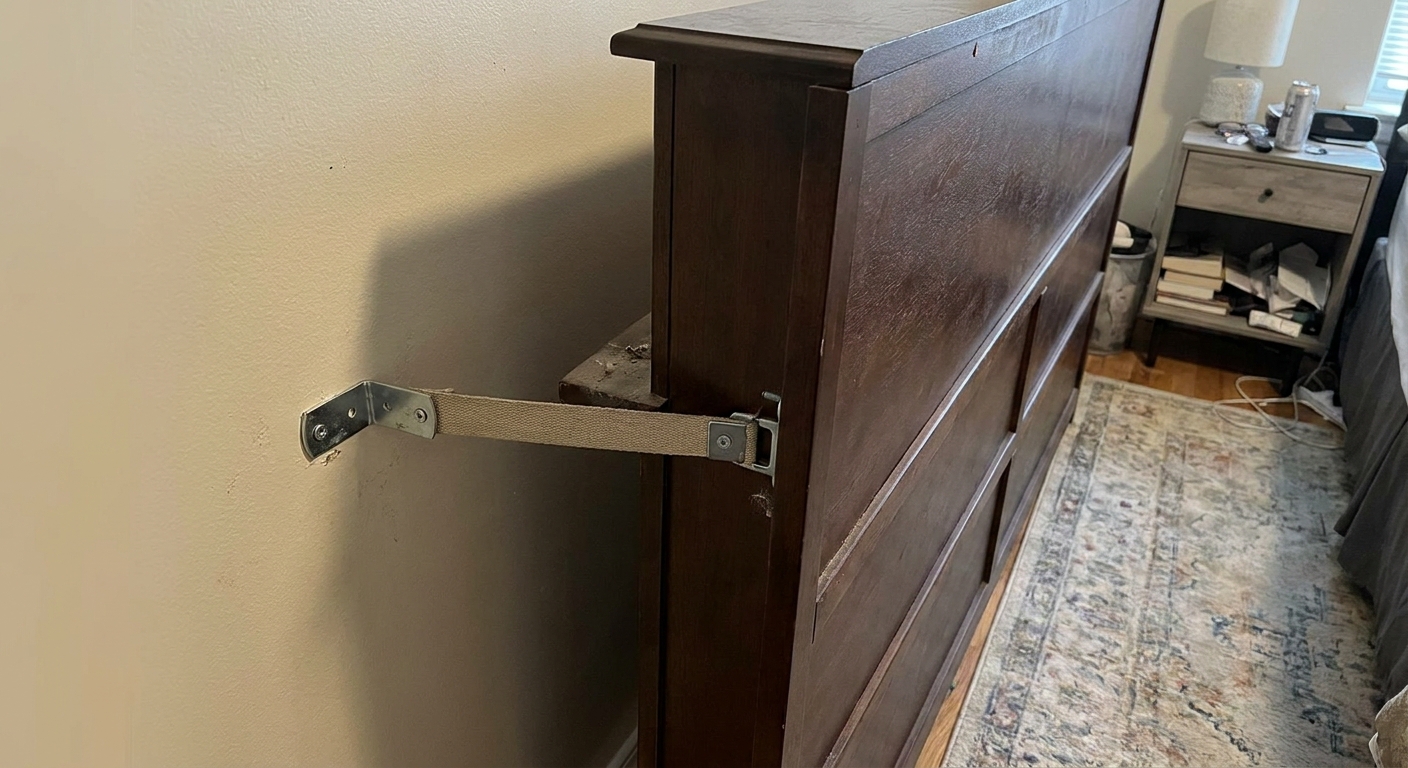
- Attach the strap. Keep it slightly taut once the furniture is pushed back, but not so tight it bows the unit.
- Test gently. With drawers closed, pull forward near the top. You should feel the restraint engage quickly.
Placement tips that prevent wobble
- Go high on the furniture. Near the top rail is ideal.
- Use two straps when possible. One on each side reduces twisting, especially for wide dressers.
- Keep the unit level. If your floor is uneven, add felt pads or shims under the low corners.
- Handle baseboards and gaps. If the baseboard keeps the furniture from sitting flush, the strap can end up long and angled. Use the kit’s spacing hardware if provided, or add a small spacer block at the wall bracket so the strap path stays clean and straight.
If you love vintage furniture: many older dressers have thinner backs. Do not anchor into the back panel alone. Look for a sturdy frame member you can screw into without splitting.
Furniture quirks to watch for
- Flat-pack and IKEA-style pieces: The thin hardboard backing is not a structural anchor point. Aim for the side panels, top rail, or a solid internal brace.
- Particleboard: Pre-drill to reduce splitting and keep screws snug, not crushed-in.
- Metal cabinets: Use the recommended hardware for metal (often machine screws with washers) if your kit supports it.
What not to do
- Do not anchor only into thin hardboard backing.
- Do not rely on adhesive strips alone for heavy furniture.
- Do not over-tighten screws into particleboard.
If you cannot hit a stud
Sometimes the stud is just not where it needs to be, especially with narrow furniture or awkward layouts. Your goal is still a strong connection, and your choice depends on your wall type.
Drywall
- Best: Toggle bolt style anchors rated for heavy loads.
- Avoid: Basic plastic expansion anchors for tall furniture. They can pull out under leverage.
Even with toggles, keep expectations realistic. If the drywall is compromised or the furniture is extremely heavy and fully loaded, the safest move is still a stud or a professional solution.
Plaster walls
Older plaster can crack or crumble, and it does not behave exactly like drywall or masonry. Start with a small pilot hole, drill slowly, and avoid hammer-drill mode. Use anchors designed for plaster and lath when needed, and stop if the wall starts to break out around the hole. In some older buildings, a professional install is worth the peace of mind.
Masonry, brick, or concrete
Use masonry screws or anchors designed for solid walls. This is very secure, but confirm your lease rules first because holes in brick or tile can be a bigger deal than drywall.
Patch small holes at move-out
This is the part renters fear, but it is also the part that is genuinely easy if you keep it small and neat. Most anti-tip brackets leave small screw holes that patch beautifully.
Patch kit checklist
- Lightweight spackle
- Putty knife
- Fine sandpaper (180 to 220 grit)
- Small foam roller or brush
- Matching wall paint (or a paint sample card)
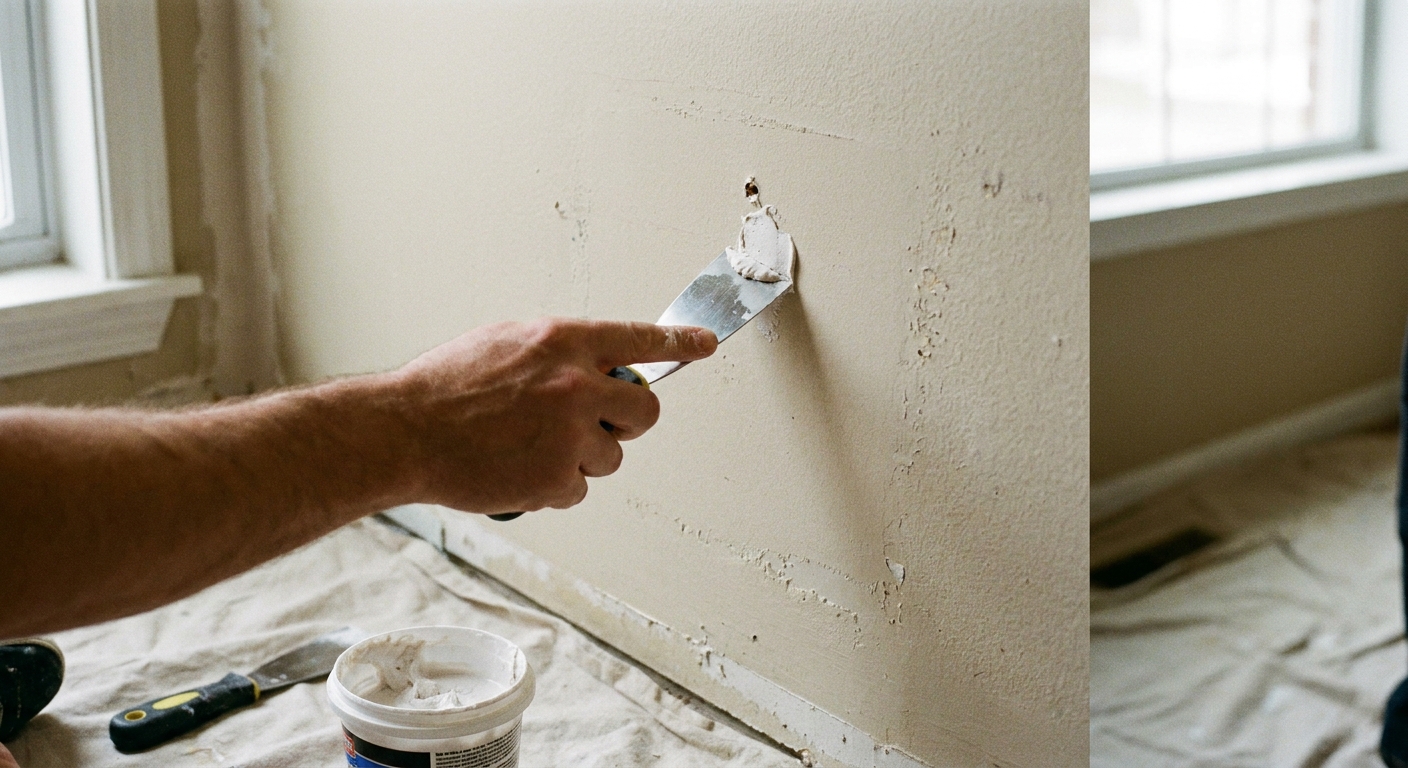
How to patch
- Remove hardware slowly. Back screws out cleanly so you do not tear the paper face of drywall.
- Fill the hole with spackle. Press it in, then skim the surface smooth.
- Let it dry fully. Dry time depends on depth and humidity.
- Sand lightly. Aim for flush with the wall, not a crater and not a bump.
- Touch up paint. Use a tiny roller for a more seamless texture match than a brush.
If the drywall paper tears (it happens)
Do not keep pulling. Trim loose paper with a utility knife, seal the exposed brown paper with a stain-blocking primer if you have it, then spackle, sand, and paint. This prevents that fuzzy paper bubble from showing through later.
Lease and landlord notes
I am not a lawyer, but here is the practical reality: many rentals expect minor wall repairs like small nail and screw holes. What landlords dislike are large unpatched holes, ripped drywall paper, and unapproved drilling into tile or masonry. Policies vary, so it pays to be tidy and transparent.
- Check your lease for language about wall mounting and alterations.
- Keep hardware minimal and install neatly. One or two straps, a handful of screws, done.
- Photograph the install and the patching at move-out. It is a simple way to avoid confusion.
- If in doubt, ask in writing. A quick email like “I am installing child safety anti-tip straps with small screw holes that will be patched at move-out” is usually well received.
Renter-friendly safety checklist
- Strap dressers and tall shelves first.
- Check whether the manufacturer already included an anti-tip kit and use it as directed.
- Choose screw-in kits anchored to studs whenever possible.
- Use toggle anchors only when you cannot hit a stud, and remember they still rely on drywall condition.
- Avoid relying on adhesive alone for heavy furniture.
- Use two straps for wide furniture to prevent twisting.
- Keep heavy items low to reduce tipping force.
- Patch and paint small holes cleanly before move-out.
A home that feels like a comforting hug can still be a safe home. Anti-tip straps are not fussy or fancy, but they are quietly one of the most loving things you can do for the people and pets who live with you.