Fix Scratches and Scuffs on LVP and Laminate
Clara Townsend
Clara Townsend is an interior stylist, vintage furniture enthusiast, and the creative voice behind Velvet Abode. With over a decade of experience transforming both cramped city apartments and sprawling fixer-uppers, she believes that a beautiful home is built on personal stories rather than massive budgets. When she isn't hunting for the perfect brass sconce at a local flea market, she can usually be found rearranging her living room for the third time this month.
If your heart sank the moment you noticed a chair leg scuff or a mystery scratch running across your “wood look” floor, take a breath. Many scratches and scuffs on LVP (luxury vinyl plank) and laminate can be softened, disguised, or blended well enough that you stop noticing them, without replacing a plank. The trick is choosing the right kind of fix for the right kind of damage, and staying far away from anything that could make a landlord or warranty situation messier.
Below, I will walk you through renter-safe options, what to avoid, and how to tell whether you are dealing with a harmless surface scuff or a deeper gouge that needs filler.
Not sure if it is LVP or laminate?
Lots of renters genuinely do not know, and that is normal. Before you buy repair products, try one of these quick checks:
- Ask maintenance or your landlord: Fastest and most accurate.
- Look for a leftover plank: Sometimes a spare box is tucked in a closet or utility area.
- Check an exposed edge: At a floor vent cover, threshold, or where the floor meets a closet track. Laminate often shows a brown, fiberboard-like core on an exposed underside, while LVP is vinyl-based and more uniform.
- Water behavior clue (do not soak it): Laminate is generally less forgiving around seams if water sits. Still, do not “test” by pouring water.
If you are not sure after that, use the most conservative approach in this guide: minimal moisture, no heat tricks, and spot testing everything.
LVP vs. laminate: why the fix depends on the material
LVP and laminate floors can look similar, but they behave differently when they get damaged.
- LVP: Vinyl with a printed design layer and a clear wear layer on top. It is more water-resistant than laminate, but deep scratches can cut through the wear layer and leave a pale line that catches the light. If the print layer is damaged, the repair may improve the look, but it may not disappear completely.
- Laminate: A photo layer over a dense fiberboard core. It is sensitive to water at seams and chips. If moisture gets into exposed core, swelling can start, and that is where small damage can turn into a bigger problem.
Why this matters: Many “miracle fixes” involve solvents, heat, steam, or lots of water. That is risky on both floors, and especially risky on laminate. We are going for small, controlled repairs that keep the protective top layer as intact as possible.
First: identify what you are actually seeing
Before you buy anything, do this two-minute check. It saves time and prevents over-fixing.
Step 1: Clean the spot gently
Use a slightly damp microfiber cloth with a drop of pH-neutral cleaner (or a tiny bit of dish soap in water). Dry immediately. A lot of “scratches” are just rubber transfer, dried-on grime, or a dull patch of residue.
Step 2: The fingernail test
- If your nail does not catch: It is likely a scuff or a micro-scratch in the finish. Gentle cleaning and light buffing can help.
- If your nail catches: It is a true scratch or gouge. You will usually get better results with a color fill (wax filler) plus careful blending.
Step 3: Check the edges and seams
If you see lifting, gaps, bubbling, or darkening near seams, pause DIY and jump to the “When not to DIY” section. Those clues can point to moisture or installation issues that surface fixes will not solve.
Your renter-safe repair toolkit
You do not need a garage full of supplies. You need the right product for the damage, plus a light hand. Also, for anything you put on the floor, spot test in a hidden area and let it fully dry before deciding if it is a match.
1) Light buffing for scuffs and dull marks
Best for: Rubber scuffs, heel marks, faint haze, tiny surface scratches that do not catch a nail.
- Microfiber cloths
- Soft white nylon pad (non-scratch) or a melamine sponge used very gently (spot test first)
- A pH-neutral floor cleaner
Why it works: Many marks sit on the surface of the wear layer. Gentle friction lifts transfer without cutting into the finish.
2) Touch-up markers for hairline scratches
Best for: Thin scratches that look white or ashy, especially on darker “wood” tones.
- Use on dry flooring only.
- Choose a marker designed for floors or furniture touch-ups. Avoid “craft” markers that can bleed, stay tacky, or look shiny.
- Pick a shade slightly lighter than you think you need. You can layer, but it is harder to undo a too-dark stripe.
Heads up: Markers add color but do not rebuild missing material. If the scratch is a valley you can feel, go with wax filler instead.
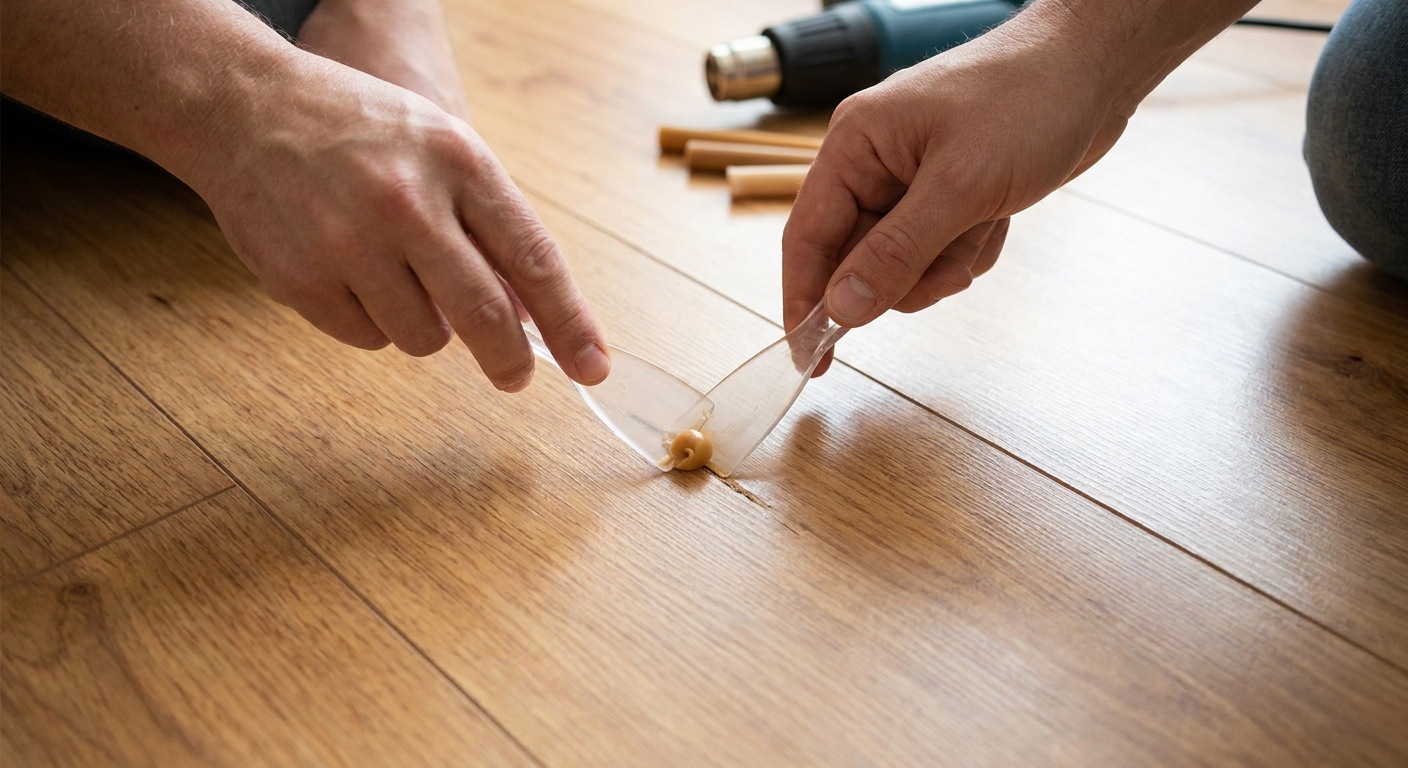
3) Wax filler sticks for scratches and small gouges
Best for: Scratches you can feel, small chips, shallow gouges, and pet-claw lines that broke through the top layer.
- Look for a floor repair wax filler stick or kit (often sold as wax crayons or soft wax fillers).
- Wax fills the low spot, then you level it so the repair stops catching light.
4) Repair putty for deeper chips (use cautiously)
Best for: Deeper missing spots on laminate, especially if the core is exposed, and you need a firmer fill than wax.
Use caution: Some putties cure hard and can look obvious if you overfill or choose the wrong tone. For high-visibility areas, a pro can often color-match better.
What can void warranties (and create landlord drama)
Always check your floor brand’s care guide if you have it. In rentals, you may not know the brand, so the safest path is to avoid common “nope” moves.
- Abrasives: Steel wool, gritty powders, sanding, or aggressive scrub pads can permanently dull the wear layer.
- Steam mops: Often not recommended by manufacturers for laminate and many LVP products because heat and moisture can stress seams, weaken adhesives (if present), and encourage edge swelling. Some LVP brands allow them under specific conditions, so check your specific care guide if you can.
- Solvents: Acetone, paint thinner, strong degreasers, and some “adhesive removers” can soften vinyl or haze finishes.
- Waxing the whole floor: Many LVP and laminate floors are labeled “no wax.” Coatings can attract dirt, create streaks, and complicate future maintenance.
- Shine products and polish: Many leave a film that looks great for a week and then turns into a cloudy traffic lane. If you use anything like this, stick to manufacturer-approved products only and spot test in a closet first.
- Heat tricks: Hair dryers, heat guns, and “warm it up to erase it” advice can deform vinyl and make the texture look worse.
My renter rule: If you cannot easily reverse it, do not do it without written permission.
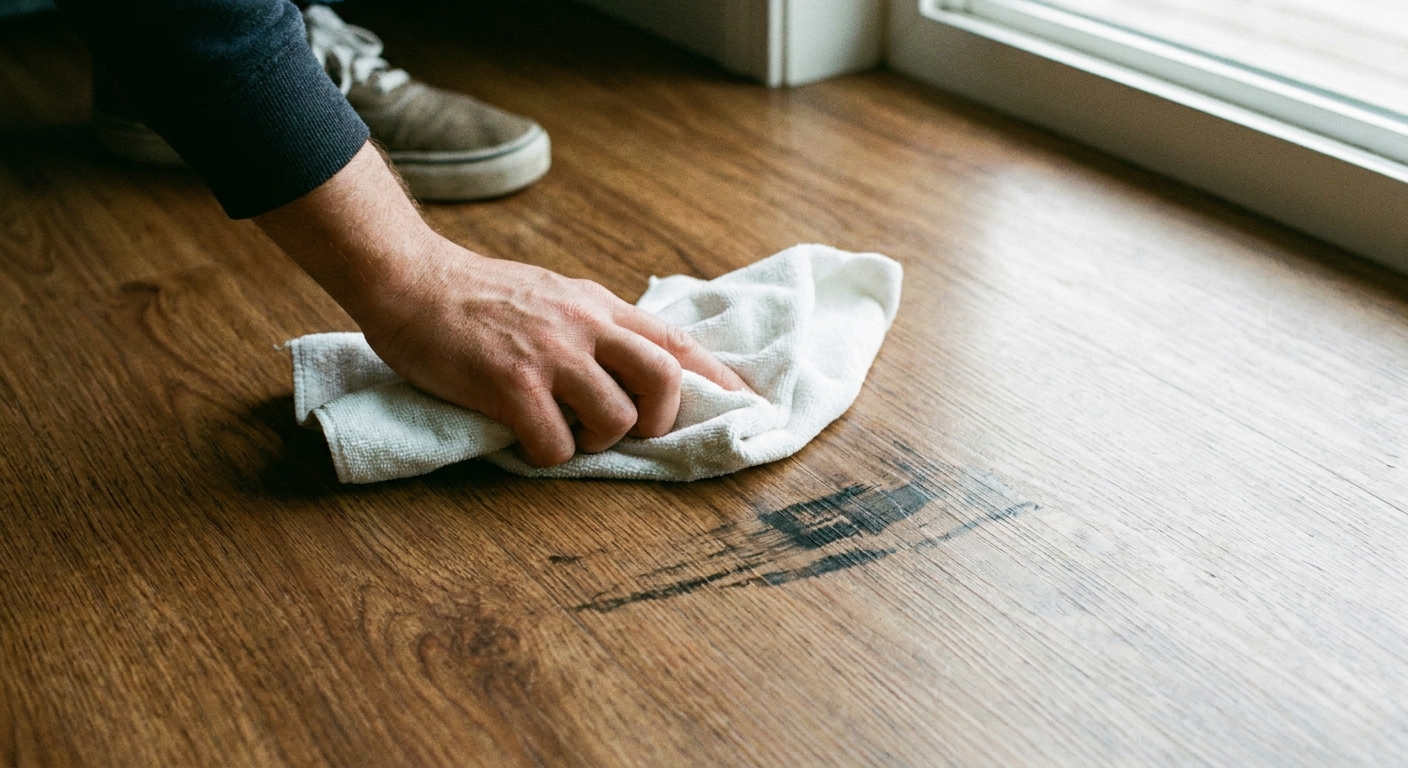
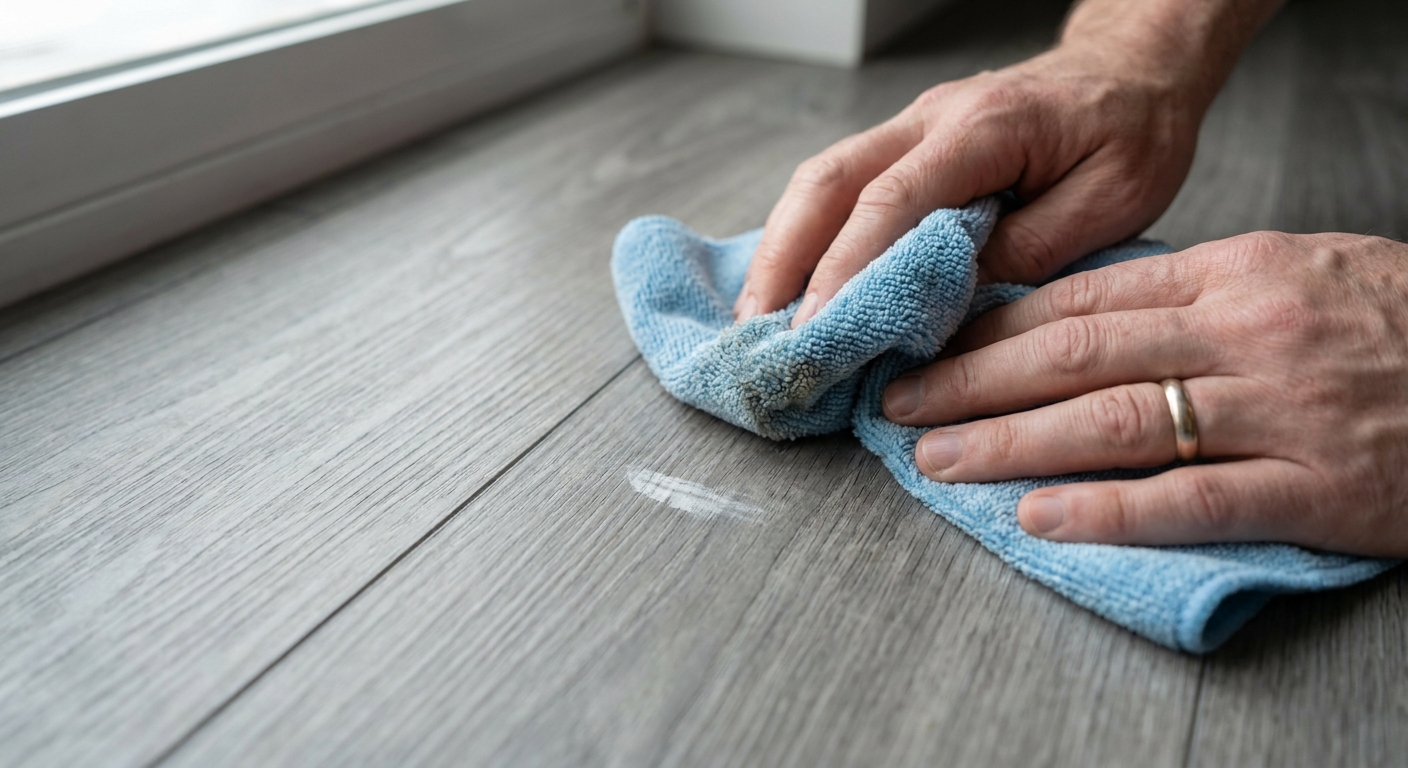
Step-by-step: remove scuffs and superficial marks
1) Clean and dry
Wipe with a damp microfiber cloth and pH-neutral cleaner. Dry completely. Repair products stick best to clean, dry surfaces.
2) Try the gentlest lift first
- Buff with a dry microfiber in small circles.
- If the mark is rubber transfer, a slightly damp cloth often takes it right off.
3) If needed, use a non-scratch pad
Light pressure only, and keep the area small. You are lifting the mark, not scrubbing the finish away.
4) Re-check once fully dry
Turn on a lamp and stand so light skims across the floor. If the mark is gone but looks dull, stop and re-check after the area is fully dry. Overworking a spot is how you get a patch that catches your eye forever.
Step-by-step: touch up a shallow scratch (marker method)
This is the “my dining chair did one dramatic scrape” fix.
- Clean and dry the scratch so the pigment does not smear into grime.
- Test the marker in a hidden spot like under the sofa or inside a closet corner.
- Apply with a feather-light hand following the grain direction. Do not flood it.
- Immediately blot with a clean cloth to remove excess and soften edges.
- Layer if necessary after a minute or two, rather than trying to hit full color in one pass.
Blending tip: If your floor has variation (most “wood look” planks do), use two similar marker tones and dab between them. Real wood is never one flat color, and your repair should not be either.
Aftercare tip: Give it time to dry and set before you wet-clean the area. Follow the marker’s label for dry time when possible.
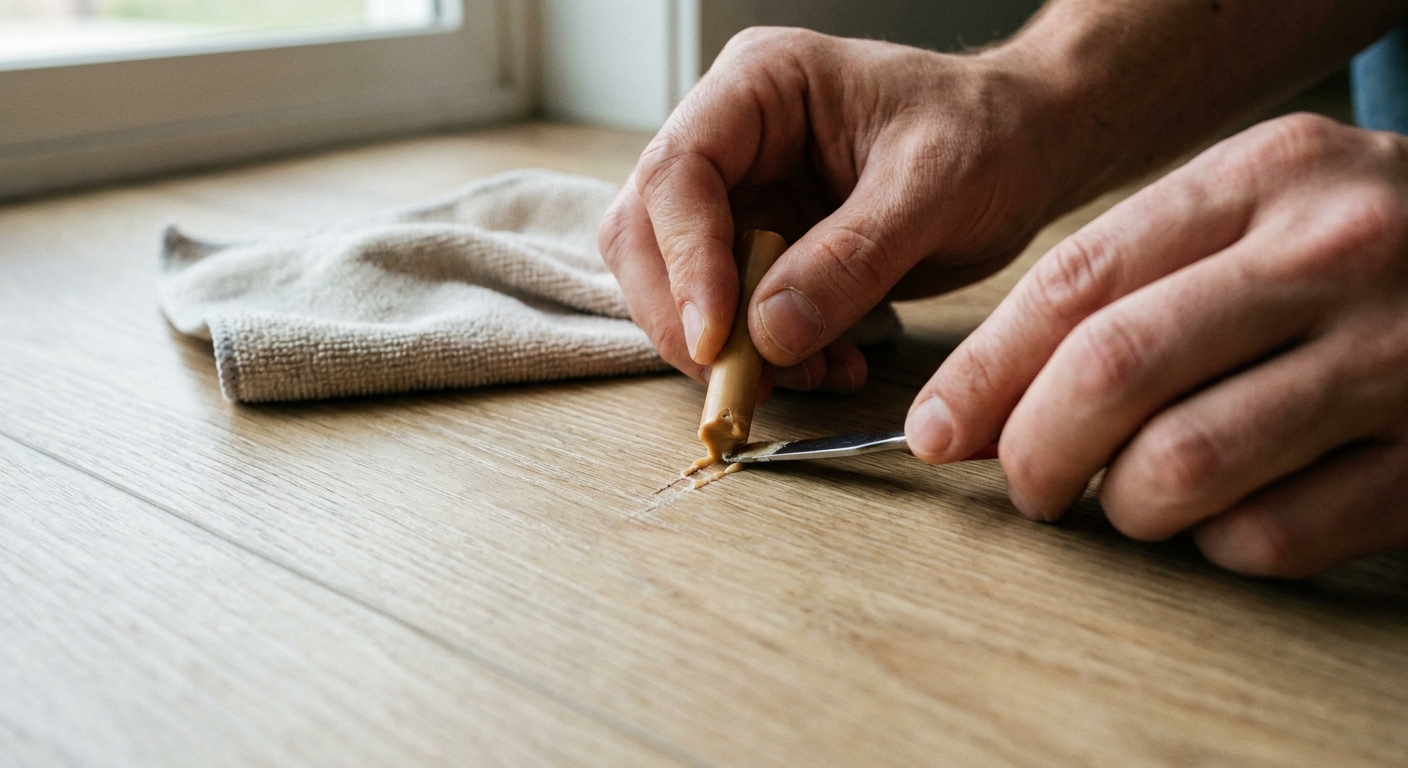
Step-by-step: fill a deeper scratch or gouge (wax filler method)
Wax filler is my favorite renter-friendly fix because it is low-drama and usually reversible with gentle scraping if you hate the first attempt.
What you need
- Color-matched wax filler stick(s) or a floor repair wax kit
- Plastic scraper, old gift card, or the leveling tool from the kit
- Microfiber cloth
- Optional: cotton swab for tiny detail work
How to do it
- Clean and fully dry the area.
- Pick your colors. Start with the lightest tone that matches the plank base. You can add a darker tone for grain lines.
- Press wax into the groove. Work across the scratch to pack it in, not along it.
- Level the surface. Use your plastic scraper at a shallow angle to remove excess wax until it is flush with the floor.
- Buff lightly. A microfiber cloth will help remove haze and blend sheen.
- Add “grain” only if needed. For wood-look patterns, a tiny swipe of darker wax or marker can mimic a line. Less is more.
Reality check: On very textured floors (deep embossing), the goal is not perfection. The goal is “you stop noticing it every time the sun hits at 4 p.m.”
Step-by-step: fix a small chip on laminate (putty plus seal approach)
If laminate is chipped enough that you see a rough, lighter core, treat it like a tiny open door for moisture. The goal is to cover and protect.
- Vacuum the chip with a soft brush attachment so there is no grit.
- Apply color-matched repair putty sparingly, pressing it into the missing area.
- Level it flush with a plastic card.
- Wipe away excess immediately so it does not leave a halo.
- Let it cure fully based on product instructions before walking on it or mopping.
Optional but smart for laminate: If the chip is at a seam or feels vulnerable, a tiny amount of laminate seam sealer specifically intended for click-lock/laminate seams can help block moisture. Use a product made for this purpose, follow directions closely, and keep it out of the joint as much as possible so you do not interfere with how the seam sits. This is also where it can be wise to ask your landlord first, because sealing products can count as “alterations.”
Color matching tips
- Match undertone first: Is your floor warm (gold, red), cool (gray), or neutral? A perfect “brown” in the wrong undertone will shout.
- Think in layers: Base color first, then a whisper of darker for grain, then buff.
- Check in two lights: Overhead lighting hides a lot. Side lighting exposes everything.
- Stop before it looks perfect up close: Floors are meant to be read from standing height. If you chase perfection inches from the plank, you can over-darken the repair.
When not to DIY
DIY is great until it is not. These are the moments to tap out and protect your deposit.
- Water damage: Swelling, bubbling, soft spots, darkened seams, or a “cupped” look along edges.
- Lifting or separating planks: Click-lock joints failing, corners popping up, or gaps that keep returning.
- Large-area damage: Multiple deep gouges across several planks, especially in a high-traffic path.
- Damage near appliances: Dishwashers, fridges, and washing machines can hide leaks. Fix the leak first, always.
- Texture is destroyed: If the embossing is scraped flat in a noticeable patch, a fill may still look like a “smooth scar.” Plank replacement might be the cleanest solution.
If you are renting, it is often worth sending a simple, calm message with photos before attempting anything permanent. Many landlords prefer to handle repairs with their installer, and you do not want a well-meant DIY to become a “you altered the floor” situation.
Renter tip: document the fix
- Take before photos in good light and one close-up.
- Take after photos once the area is fully dry.
- Keep product receipts (and the exact color name) in case you need to touch it up later.
Quick prevention
- Add felt pads to chair and table legs, and replace them when they get gritty.
- Use a doormat and a shoes-off zone if you can. Tiny grit is basically sandpaper.
- Lift furniture when moving it. Dragging is one of the fastest ways to create a long scratch.
- Trim pet nails regularly, especially if your floor has a glossy finish.
And if you are anything like me, keep one extra pack of felt pads in a drawer. The moment you need them, you will not want to go hunting.
Mini FAQ
Can I use olive oil or coconut oil to “hide” scratches?
I would skip it. Oils can temporarily darken a scratch, but they attract dirt and can leave a slippery, blotchy patch that is harder to clean later.
Will a magic eraser fix scuffs on LVP or laminate?
Sometimes, but use extreme caution. Melamine sponges are micro-abrasive. If you press hard, you can change the sheen of the wear layer and create a permanent dull spot. Always spot test.
Why does the scratch look worse after cleaning?
Because dirt was filling it in. Once it is clean, the scratch reflects light again. That is actually good news, because now you can color-match more accurately.