Fix Pet-Chewed Baseboards and Door Casings
Clara Townsend
Clara Townsend is an interior stylist, vintage furniture enthusiast, and the creative voice behind Velvet Abode. With over a decade of experience transforming both cramped city apartments and sprawling fixer-uppers, she believes that a beautiful home is built on personal stories rather than massive budgets. When she isn't hunting for the perfect brass sconce at a local flea market, she can usually be found rearranging her living room for the third time this month.
There are few things that scream we have a puppy quite like baseboards that look like they lost a tiny battle. The good news is you don't have to live with gnawed trim or lose your security deposit. With the right filler, a patient sanding sequence, and a calm approach to paint, you can make pet-chewed baseboards and door casings look quietly normal again.
This is the exact kind of fix I love because it's not fancy. It's practical, a little dusty, and very satisfying when the light hits the trim and you can't spot the patch.
Assess the damage first
Before you buy anything, take two minutes to figure out what you're actually repairing. The best product depends on depth, edge shape, and whether you're dealing with painted MDF, painted wood, or stained wood.
Quick damage checklist
- Light surface tooth marks: shallow scratches and fuzzing, no missing chunks.
- Small chips and divots: missing bits up to about the size of a dime, usually along the top edge of the baseboard or casing.
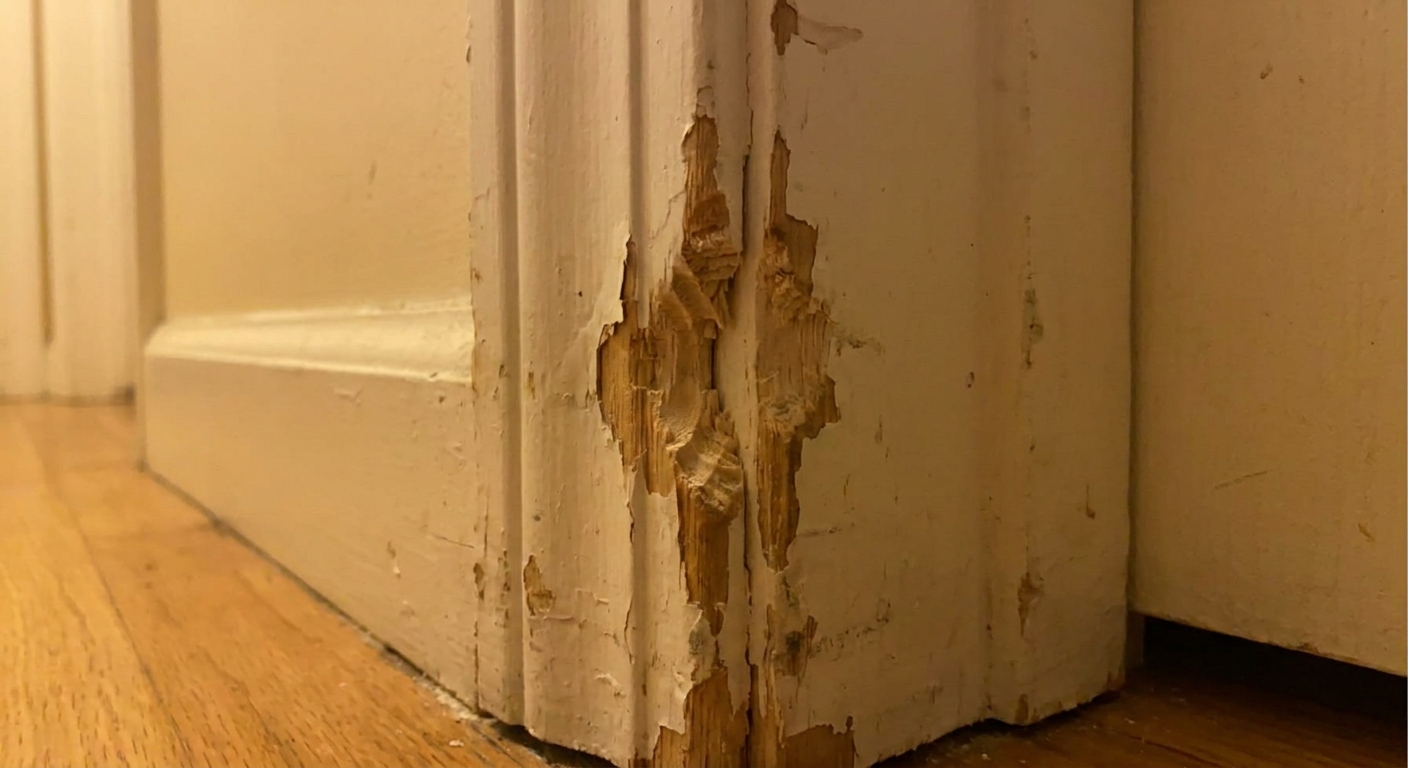
- Deep gouges and missing corners: the profile is gone, the edge is rounded off, or the MDF is crushed and crumbly.
- Swollen or soft MDF: looks puffy or spongy, often from drool plus repeated chewing. This is harder to “pretty up” without sealing well.
Rule of thumb: if you can rebuild the original shape with filler and it won't get hit again, you can repair it. If the trim is actively being chewed today, address that first or you'll be doing this twice.
Choose your filler
This is where most DIY repairs either disappear beautifully or stay visible forever. The filler has to match the job.
When wood filler works
Wood filler is ideal for small, shallow damage on painted trim. It's easy to spread, sands nicely, and is plenty strong for minor dings.
- Best for: tooth dents, small chips, shallow grooves.
- Pros: simple, low odor, forgiving.
- Cons: can shrink as it dries, may crack if applied too thick in one pass.
When to use Bondo or two-part epoxy
Bondo-style auto body filler and two-part epoxy fillers are my “serious repair” options. They cure hard, rebuild corners like a champ, and shrink far less than many lightweight wood fillers. This is the move for deep gouges and missing edges, especially on MDF baseboards that have turned furry and crushed.
- Best for: deep bites, missing corners, rounded-off profiles, crumbly MDF.
- Pros: very strong, fast cure, holds crisp edges.
- Cons: short working time, stronger odor, sands to a very fine dust you don't want in your lungs.
My stylist’s take: If you're repairing a prominent area like a doorway where your eye naturally lands, the harder two-part option often looks more “factory” once painted because it lets you sculpt a clean line.
Tools and materials
You don't need a workshop. You need the right basics, plus one thing that makes sanding feel less like punishment.
- Putty knife (a flexible 2 inch works well)
- Utility knife or sharp chisel (for trimming ragged fibers)
- Wood filler or two-part filler (Bondo-style or epoxy)
- Sanding block or sanding sponge
- Sandpaper: 80 or 100 grit, 120 or 150 grit, 220 grit
- Vacuum and tack cloth or damp microfiber cloth
- Primer (stain-blocking is best for chewed MDF and tannin-prone wood)
- Paint to match your trim (usually satin or semi-gloss)
- Small angled brush and a mini foam roller (optional but great for smooth trim)
- Painters tape and a drop cloth
- Disposable gloves (especially for two-part fillers)
- Dust mask or respirator (strongly recommended for MDF dust and sanding fillers)
- Safety glasses
- Paintable caulk (optional finishing step for the top seam)
Safety note: If your home was built before 1978 and you're sanding old paint, pause and take lead paint precautions. When in doubt, test first and use a HEPA vacuum and a respirator.

Prep: clean and stabilize
Prep is the difference between a repair that lasts and a repair that pops off the first time you bump it with a vacuum.
Step 1: Clean the area
Wipe the trim with warm water and a drop of dish soap, then let it dry. If you've got drool residue or oily grime, a gentle degreaser helps. Filler doesn't love sticking to sticky.
Step 2: Remove loose material
Use a utility knife to cut away fuzzy MDF fibers and flaking paint. You want solid edges, even if that makes the damaged area look slightly larger at first. This is a trust-the-process moment.
Step 3: Scuff the surrounding paint
A quick pass with 120 to 150 grit around the damage helps primer and paint feather later. Don't go wild. You're just knocking the shine down.
Fill and rebuild
Wood filler method
- Apply in thin layers: Press filler into tooth marks and divots, then skim the surface.
- Overfill slightly: You want a tiny “proud” ridge so sanding brings it flush.
- Let it dry fully: Dry times vary by product and thickness, but plan on 30 minutes to several hours. If it feels cool or soft, wait. Sanding too early causes crumbles and drag marks.
Bondo or two-part filler method
Work in small batches. Two-part fillers have a short open time, and you want to apply while it's creamy.
- Ventilate: Open a window, run a fan, and wear gloves. These products can smell strong, and you don't want to breathe the fumes.
- Mask nearby surfaces: Tape the wall and floor if you're nervous. This stuff sticks.
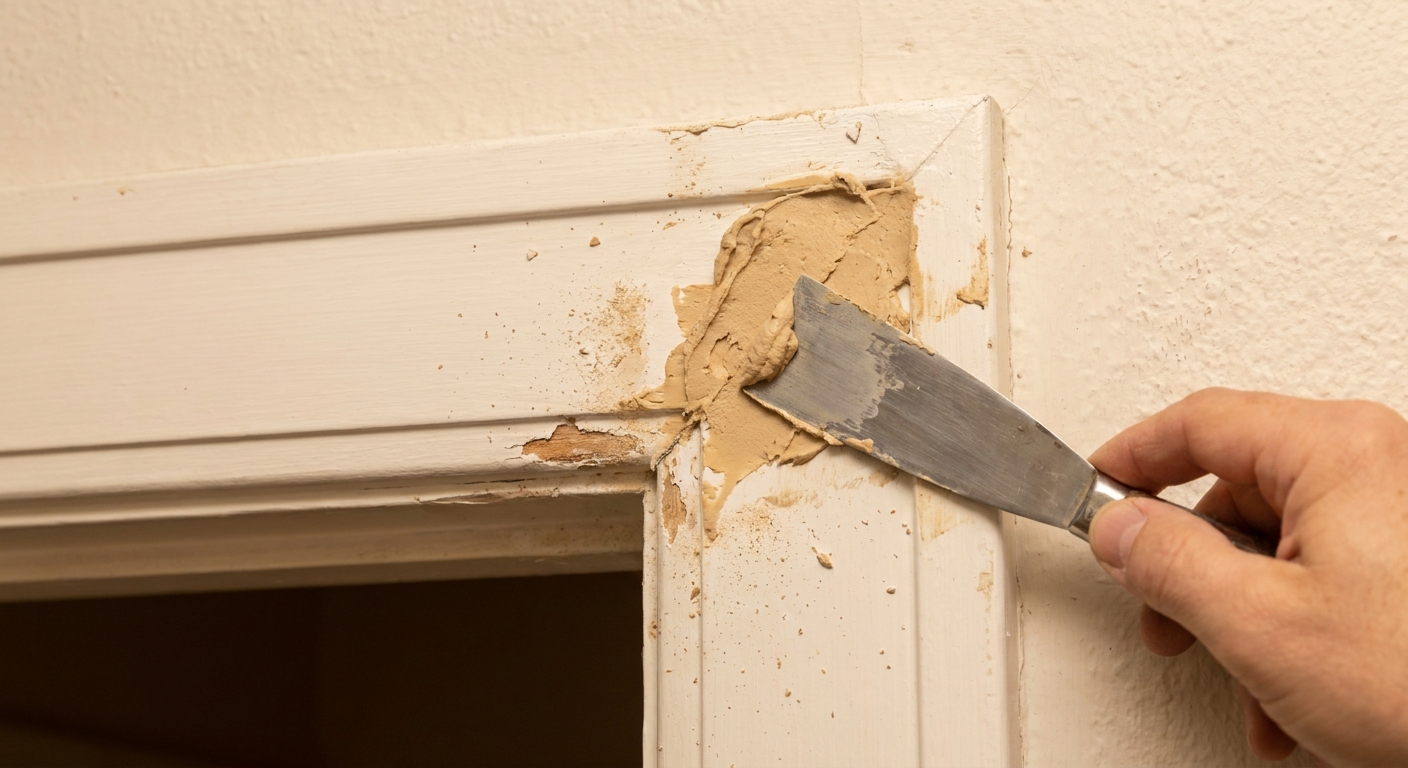
- Pack and sculpt: Press filler into the void, then use the putty knife to roughly recreate the corner or edge.
- Trim at the “green” stage: When it firms up but isn't rock hard yet, you can gently shave it with a knife to refine the shape before sanding. This saves you effort and helps keep lines crisp.
- Timing ballpark: Many Bondo-style fillers are ready to shape or sand in about 5 to 15 minutes, but follow the label.
Tip for crisp corners: For a door casing edge, use the flat of your putty knife like a guide and pull it along the trim line. Think of it like icing a cake, only less delicious.
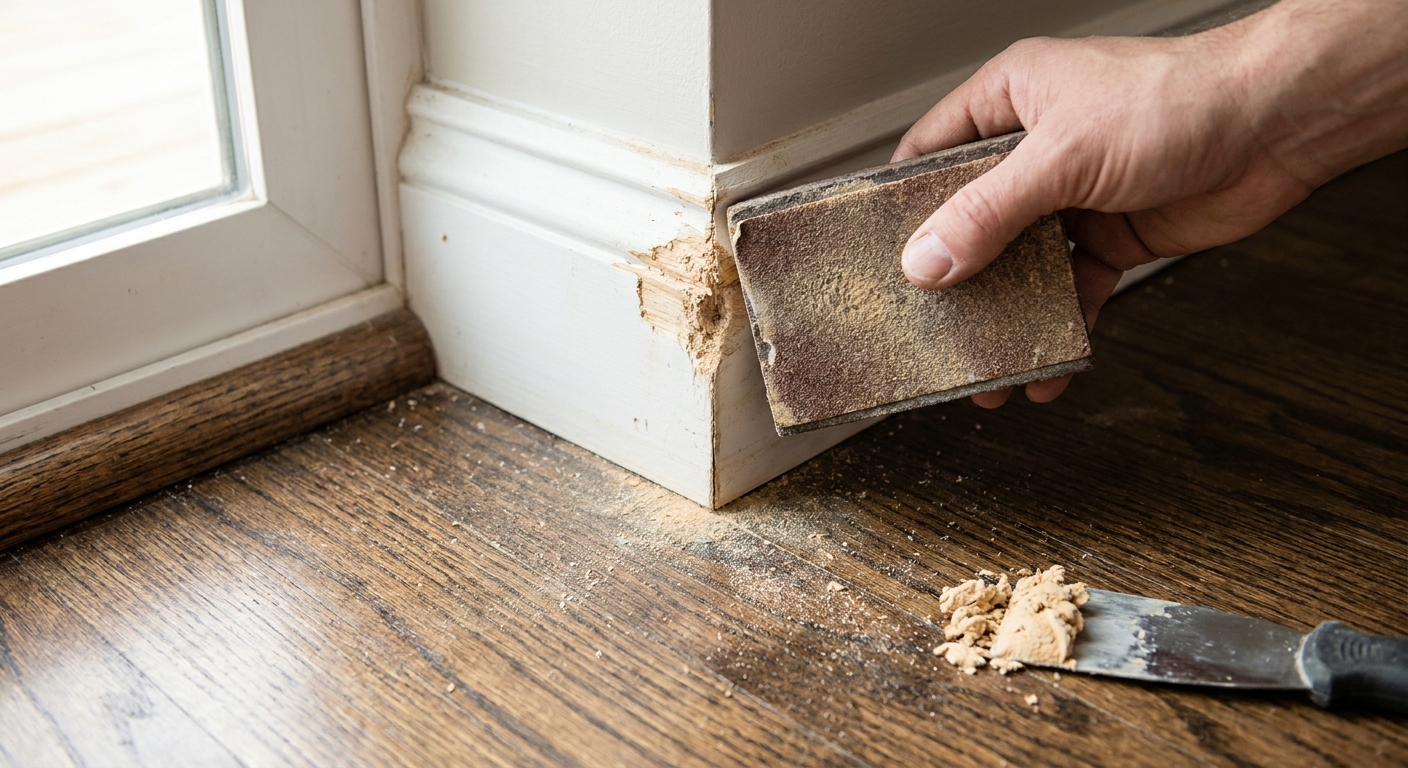
Sanding sequence
Sanding is where the repair disappears. The goal is a smooth transition you can't feel with your fingertip. Wear a dust mask or respirator, especially if you're sanding MDF or two-part filler.
The simple grit progression
- 80 to 100 grit: Only for shaping heavy Bondo or knocking down high spots fast. Keep it controlled.
- 120 to 150 grit: Your main “leveling” grit. This blends the patch to the trim plane.
- 220 grit: The finishing pass for a paint-ready surface.
How to sand without gouging
- Use a sanding block: Your fingers create dips. A block keeps edges straight.
- Feather outward: Sand the patch, then gradually extend into the surrounding paint so you don't leave a ridge.
- Check with side lighting: Shine a lamp or your phone flashlight along the trim. Ridges will show instantly.
If you close your eyes and run your finger over the area and it feels like one continuous piece, you're ready for primer.
Prime (strongly recommended)
Primer is strongly recommended on most chewed trim repairs. It seals porous filler, helps prevent flashing, and makes your paint blend more seamlessly.
When primer is truly needed
- Any raw MDF or bare wood
- Any water staining or drool staining
- Large filler areas where paint would otherwise soak in unevenly
- Tannin-prone wood (oak, knotty pine, etc.)
What primer to use
- Stain-blocking primer: Best for MDF, water staining, and tannin bleed. Shellac-based or oil-based options are the heavy hitters here, and they need good ventilation.
- Bonding primer: Great if the existing trim paint is glossy and you want extra grip.
Apply a thin coat over the repair and slightly beyond it. Let it dry (per the label), then do a light 220 grit sand to remove any texture.

Paint touch-up
This is where most touch-ups go wrong: the color is close, but the sheen is off, or the edges are too sharp. A soft blend beats a perfect paint match applied like a sticker.
Match the sheen first
Most modern trim is satin or semi-gloss. Walls are usually eggshell or matte. If you use wall paint on baseboards, it'll look chalky and scuff easily.
Feather the paint edges
- Don't stop exactly at the patch: Extend paint a few inches past the repair.
- Use thin coats: Two thin coats look smoother than one thick coat.
- Roll for super-smooth trim: A mini foam roller lightly tipped off after brushing can mimic that factory finish.
Color matching for common rental whites
Rental trim whites are famously inconsistent, but they usually fall into a few families:
- Bright, clean white: often close to “Extra White” type shades. Reads crisp against most wall colors.
- Soft warm white: a touch creamy, common in older buildings with beige or greige walls.
- Cool white: slightly gray or blue-leaning, popular in newer flips.
My low-drama method: Look for the original paint can first (basement, closet, utility room). If you can remove a physical sample, bring it to the paint store for scanning. A strike plate, hinge, or even a small offcut from a hidden closet area can be enough. Photos are great for narrowing down “warm vs cool,” but most stores can't reliably match trim paint from a photo alone.
Touch-up reality check: If your trim paint is old and has yellowed or dulled, a perfect match might still read different because the surrounding paint has aged. In that case, paint to the nearest natural break, like the full length of one baseboard run or the entire door casing. It often looks more seamless than a tiny touch-up island.
Dry time sanity: Let the first coat dry fully before the second (check the can), and give trim paint time to harden before you put it back into real life mode.
Special cases
If your trim is stained wood
Chew marks on stained wood are trickier because filler rarely stains to match perfectly. If the damage is minor, you may be able to:
- Steam out dents with a damp cloth and a warm iron (test first). This only helps with compression dents in solid wood. It won't fix torn fibers, missing chunks, veneer, or MDF.
- Use a stainable wood filler, sand, then spot-stain and topcoat
- Blend with a furniture touch-up marker and a little tinted wax
If the trim is heavily damaged, consider painting the trim for a clean reset, especially in pet zones.
If your trim is vinyl or laminate
Some newer buildings use synthetic casings. Filler can work, but adhesion is the battle. Lightly scuff, use bonding primer, and keep coats thin. If it still rejects paint, replacing that single stick of trim might be the simplest path.
Renters vs owners
If you rent
If you rent, you want a repair that looks good and doesn't start a bigger conversation with your landlord than necessary.
- Keep it tidy: Avoid expanding foam or anything that oozes beyond the repair area.
- Use painter’s tape: Especially where baseboard meets carpet.
- Document your work: A few before and after photos can help if questions come up later.
If you own
If you own, you can decide whether it's worth chasing invisible, or whether a cleaner long-term solution is painting the whole room’s trim (or upgrading MDF to real wood in the problem zones). Sometimes the most peaceful repair is the one you never have to repeat.
Replace or repair?
When replacement is smarter: If a baseboard section is chewed along a long stretch, the MDF is swollen, or the profile is totally lost, replacing one length can be faster than sculpting for hours.
When you should replace: If the MDF stays soft and crumbly even after you cut back to “good” material, the damage goes into the drywall, or the trim is repeatedly swelling from moisture, replacement is the clean call.
Caulk for the final line
If the top seam where the baseboard meets the wall looks gappy after sanding and painting, run a thin bead of paintable caulk, smooth it with a damp finger, and touch up paint. It's a small step that makes everything look more finished.
Keep it from happening again
This isn't a training article, but a tiny bit of prevention protects your fresh repair.
- Block access while it cures: Filler and paint need time. Use a baby gate or close doors.
- Add a chew-appropriate outlet: Keep a favorite chew toy near the problem area so you can redirect quickly.
- Try a clear corner guard: In high-risk spots like door frames, temporary guards can be a lifesaver during puppy months.

Quick troubleshooting
The patch looks dull under paint
That's called flashing. You likely need primer, or a second coat of paint, or both. Sand lightly with 220, prime, then repaint.
I can still see a ridge
Sand wider, not harder. Feather the edges out farther into the surrounding area, then reprime and repaint.
The filler cracked
It was applied too thick or moved before curing. Scrape out the crack, refill in thinner layers, and let it fully dry.
The color is close but still obvious
It might be sheen, not color. Confirm satin vs semi-gloss. If the trim is aged, consider painting the entire piece to a natural break.
A calm finishing note
Homes with pets are lived-in homes, and I say that with genuine affection. Repairing chewed trim isn't about chasing perfection. It's about restoring that clean, finished edge that makes a room feel cared for.
Take your time on the shaping and sanding, and the final touch-up will look like it was always that way.