Fix Peeling Laminate on IKEA Furniture
Clara Townsend
Clara Townsend is an interior stylist, vintage furniture enthusiast, and the creative voice behind Velvet Abode. With over a decade of experience transforming both cramped city apartments and sprawling fixer-uppers, she believes that a beautiful home is built on personal stories rather than massive budgets. When she isn't hunting for the perfect brass sconce at a local flea market, she can usually be found rearranging her living room for the third time this month.
If you have ever run your hand along the edge of an IKEA shelf and felt that little flap of laminate lifting up like a hangnail, you already know the emotional arc: denial, irritation, and then the split-second fear that the whole piece is about to unravel.
The good news is that most peeling laminate and edge banding issues are very fixable at home, and you do not need a workshop to make it last. You just need to understand what is happening at the chipboard edge, pick the right adhesive strategy, and finish with a seal that protects the spots that get grabbed, bumped, and wiped down daily.
Why chipboard edges lift
IKEA and many flat-pack pieces use particleboard or MDF with a thin decorative laminate and a separate strip of edge banding. The top surface is usually pretty tough. The edges are the vulnerable part because they are where moisture, heat, and impact sneak in.
The three most common culprits
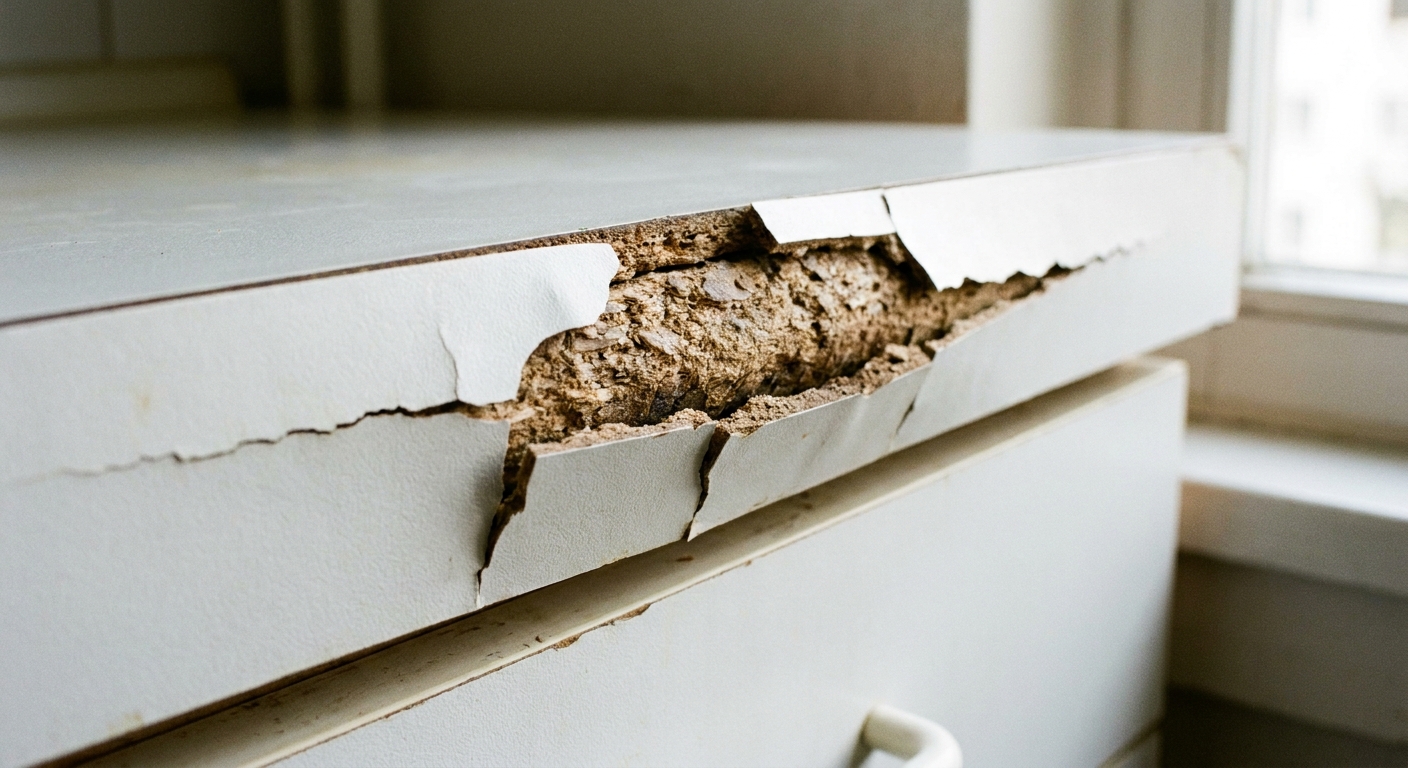
- Moisture swell at the edge: Chipboard is basically compressed wood particles. If water gets in at a seam, the core swells slightly. That swelling pushes against the laminate and weakens the glue line. Kitchens, bathrooms, and plant-heavy corners are prime suspects.
- Heat and time: Edge banding adhesives can get brittle or let go after years of temperature swings, sunny windows, or being next to a radiator.
- Mechanical stress: The edge is where hands pull drawers, scoot shelves, or drag a piece across the floor. Repeated flexing is enough to lift a tiny corner, and once it starts, it catches on sleeves and keeps peeling.
A quick diagnosis in 30 seconds
- If the edge feels puffy or the board looks swollen, you are dealing with moisture damage and you will want to dry, flatten, and seal before you reattach anything.
- If the laminate is cleanly lifting but the core looks fine, it is usually just a failed bond and a straightforward re-glue.
- If you see crumbly brown board breaking away, the substrate itself is compromised. Repairs can still work, but you will need filler and a tougher finish step.
First steps: prep
The secret to a long-lasting fix is not fancy products. It is prep. Adhesives hate dust, skin oils, and loose fibers.
What you need
- Microfiber cloth
- Isopropyl alcohol (70 to 90 percent) or a gentle degreaser
- Craft knife or razor blade
- Fine sandpaper (180 to 220 grit)
- Clamps or painter’s tape
- Wax paper or baking parchment
Prep steps
- Spot test first: Alcohol is usually safe, but some finishes can haze. Test in an out-of-sight spot, then proceed.
- Clean: Wipe the area with alcohol and let it fully dry.
- Lift and inspect: Gently lift the peeling section. If there are loose crumbs of particleboard, remove them with a dry cloth or a soft brush.
- Light sand: Very lightly sand the underside of the laminate and the chipboard edge to knock down fuzzy fibers. You are not reshaping the piece, just giving the glue something clean to grab.
- Dry fit: Press it down without glue first. If it will not sit flat, you may need to trim a curled sliver of laminate with a sharp blade.
Clara tip: If the chipboard edge is damp, stop and let it dry for a full day. A hair dryer on low can help, but do not overheat the laminate or it can warp.
Quick safety note: Sanding MDF or particleboard makes fine dust. If you are doing more than a couple swipes, wear a dust mask and vacuum up after.
Pick the right glue
There is no one “best” glue for every peeling edge. The right pick depends on how wide the lift is, whether the piece gets wiped often, and how much flex the area sees.
Know what you are bonding
- Porous-backed laminate or paper-backed edge banding: Often bonds well with PVA wood glue.
- Slick plastic (PVC/ABS) edge banding or melamine-like surfaces: PVA usually does not grab well. You will have better luck with contact cement, epoxy, or (for tiny spots) CA glue.
Best options for common IKEA fixes
- PVA wood glue (yellow or white carpenter’s glue): Great for clean lifts where the chipboard is intact and at least one surface is porous. It soaks into the fibers and cures hard.
- Contact cement: Best when the laminate keeps springing up, when you cannot clamp easily, or when you are bonding plastic edge banding to wood. It bonds strongly, but you must apply carefully and align once. Ventilate well.
- CA glue (super glue) for tiny spots: Good for a pin-sized corner that keeps snagging or for sealing cut ends. Use sparingly. It can leave a shiny line if it squeezes out, and it can bloom (a white haze) on some finishes.
- Two-part epoxy: Useful if the substrate is slightly damaged and you need gap-filling strength. It is messier, but very durable.
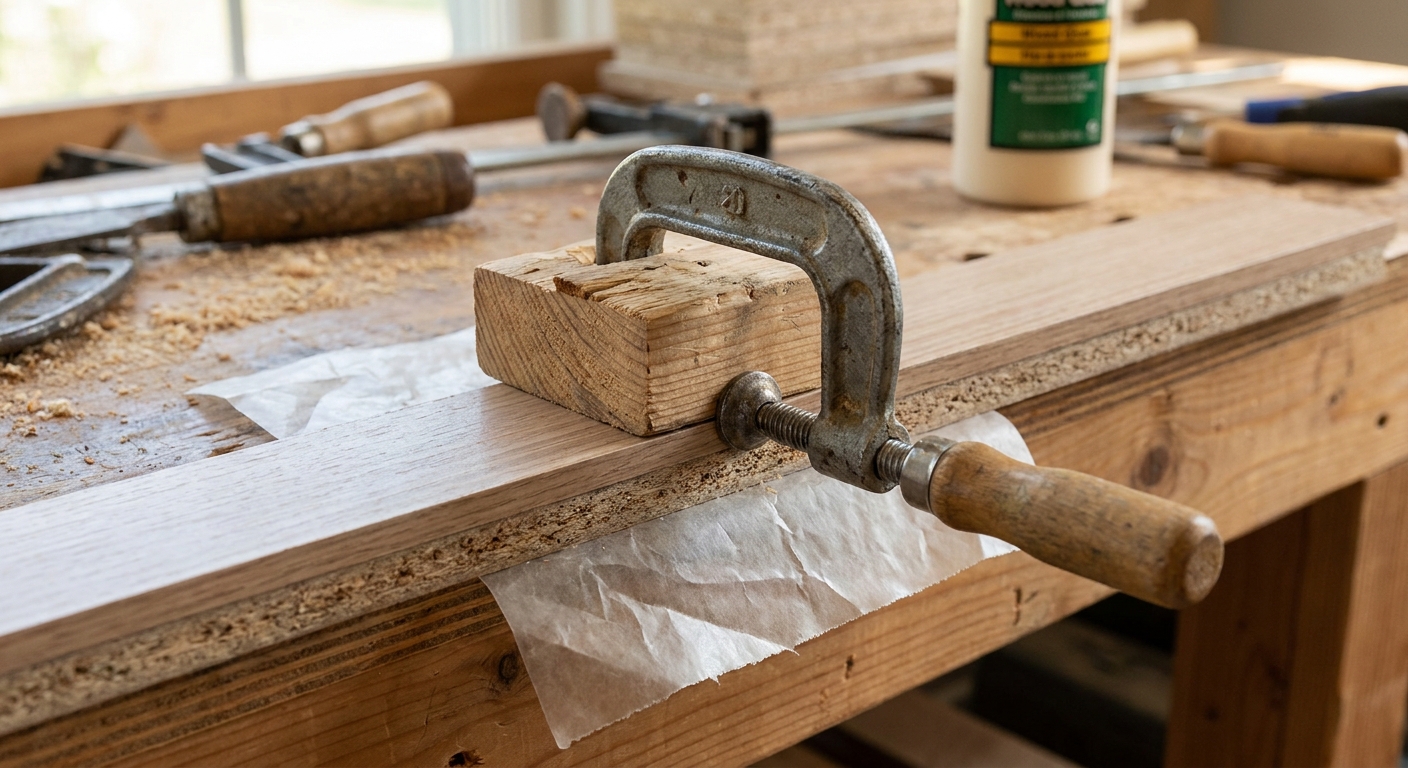
A simple clamp-and-cure method (PVA)
- Slip wax paper under and around the lifted flap to protect the visible surface.
- Use a toothpick or small brush to spread a thin, even layer of glue on both surfaces.
- Press down firmly and wipe squeeze-out immediately with a barely damp cloth.
- Clamp with a scrap of wood on top (so the clamp does not dent the surface) or use tight painter’s tape as a “wrap.” Aim for firm, even pressure, not crushing the particleboard.
- Follow the glue label for clamp time. Many PVAs want about 30 to 60 minutes clamped, then a longer cure. If you can, let it cure overnight before heavy use.
Clara tip: If you are trying PVA and it keeps popping back up, do not fight it. That is your sign the underside is too slick. Switch to contact cement or a small amount of epoxy instead.
Edge banding: heat-melt vs tape
Edge banding is that thin strip that covers the raw chipboard edge. When it starts to peel, many people reach for double-sided tape or whatever adhesive strip is in the junk drawer. Tape feels quick, but on high-touch edges it often fails because it cannot handle shear stress, heat, and cleaning.
Choose iron-on banding if
- The edge gets grabbed daily (desk front edge, dresser top edge, cabinet gables).
- You wipe the surface with damp cloths often (kitchen, entry, kid zones).
- The old banding is shrunk, brittle, or cracked.
- The edge is long and straight, and you want a cleaner finish.
When tape is OK
- It is a temporary fix on a low-touch edge (the back of a bookshelf).
- You are staging a piece for a short window and plan a real repair later.
- You are using a high-bond acrylic mounting tape and can apply strong pressure on a perfectly clean, flat edge.
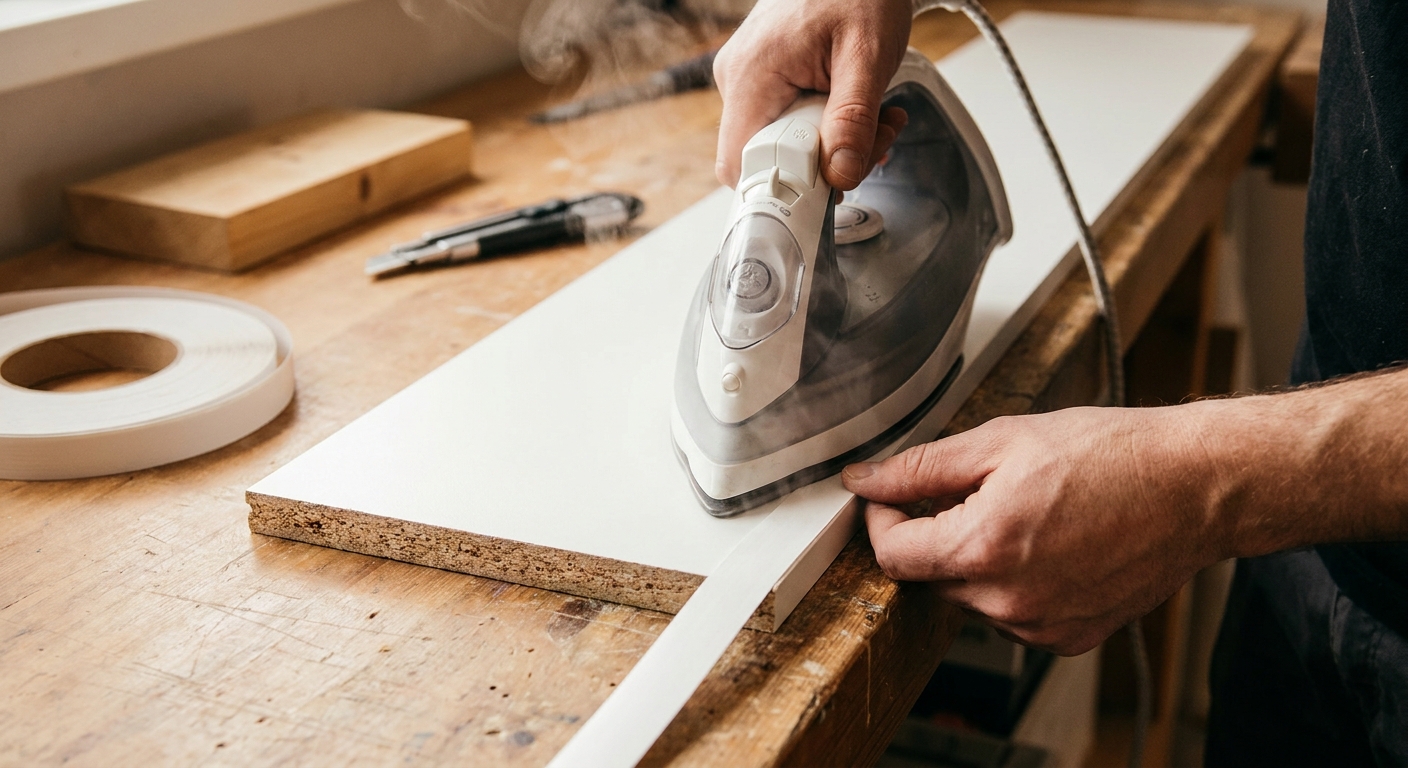
How to apply iron-on edge banding
- Remove the old strip: Warm it with a hair dryer and peel slowly. Scrape leftover adhesive with a plastic scraper.
- Square the edge: Lightly sand the raw edge flat. Fill chips with wood filler if needed and sand smooth.
- Cut banding slightly long: Leave about 1 inch extra at each end.
- Iron in sections: Set iron to cotton with no steam. Use baking parchment between iron and banding. Start with a few seconds of heat, then increase as needed until the adhesive softens. Move slowly and keep checking so you do not overheat the finish.
- Burnish while warm: Rub with a wood block or the back of a spoon to press the softened adhesive firmly into the texture of the edge, especially at the very corners.
- Trim: Once cool, trim ends with a sharp blade. For overhang, use an edge banding trimmer or a very careful blade pass angled away from the face.
- Seal the ends: Dab a tiny amount of CA glue or clear varnish at the cut ends to prevent future lifting.
Clara tip: If your iron-on banding lifts at the very corner later, it is usually because that area did not get enough pressure while the adhesive was soft. Reheat just that spot through parchment and press hard with a block until it cools.

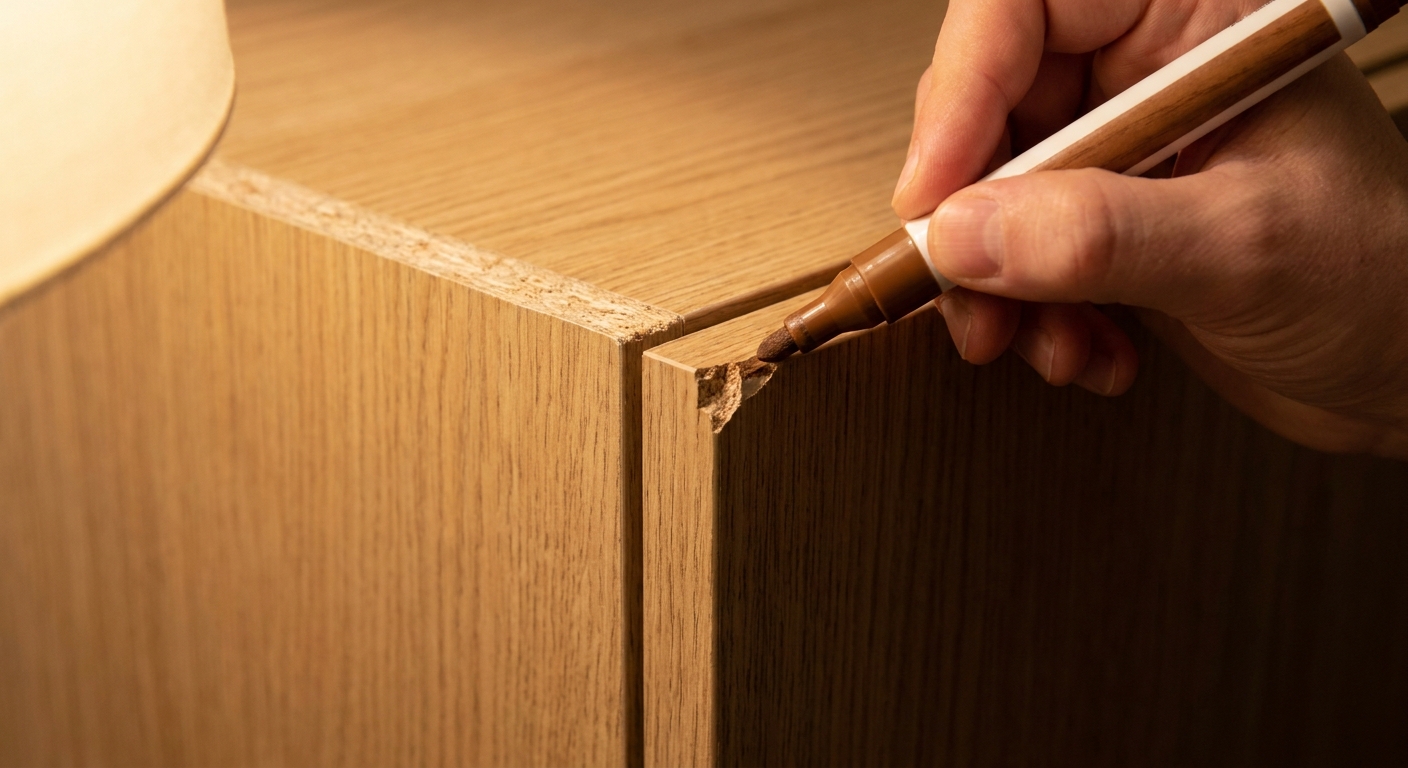
Touch up chips and wear
Once the edge is reattached, you may still have a visible chip or a beige line where the core shows through. The goal is not perfection under a microscope. The goal is to make your eye glide right past it.
Start with the least permanent fix
- Wax fill sticks and furniture repair crayons: Ideal for small edge dings. They sit in the damage and can be blended. For IKEA whites, look for “white,” “antique white,” and “ivory.” The right match is often slightly warmer than pure white.
- Water-based acrylic paint: Good for thin scuffs and exposed brown edges. Use a tiny artist brush and build in layers.
- Shellac-based touch-up markers: Great for wood tones like oak, walnut, or black-brown. These dry fast and layer well.
Clara tip: match sheen too
Most IKEA laminates are a specific finish as much as a color. If your touch-up is too matte on a satin surface, it will flash under light. After your color is close, adjust the sheen:
- If the surface is matte, finish with a matte water-based polyurethane or matte clear acrylic topcoat applied with a tiny brush.
- If the surface is satin, use satin clear coat or even a very light rub of paste wax once everything is fully cured.
- If the surface is glossy, use gloss clear coat in micro-layers and let it level before adding more.
Faking printed wood grain
If your piece has a printed wood pattern and the chip exposes plain brown board, do a two-step touch-up:
- Base coat the exposed area with a mid-tone that matches the overall wood.
- After dry, use a finer marker one shade darker to add a few soft grain lines. Keep it subtle. Two or three lines usually read more realistic than ten.
Seal high-wear corners
Corners are where furniture gets clipped by vacuum heads, bumped by laundry baskets, and grabbed when you scoot a piece an inch to the left. After you repair the edge, add a protective step so you are not doing the same fix again in three months.
Pick your corner-seal strategy
- Clear water-based polyurethane (matte or satin): Best all-around for desks, dressers, and shelves. It dries hard and is easy to clean.
- Clear nail polish: Surprisingly useful for tiny corner tips and cut ends of banding. Use sparingly, test first, and avoid large visible areas since some formulas can yellow or get brittle over time.
- CA glue as an edge hardener: For crumbling particleboard at a corner. A few drops can stiffen the fibers before filler. Ventilate well, mask nearby surfaces, and know it can darken light edges or leave a halo.
- Corner guards: If the piece is in a kid zone or a tight hallway, a small clear corner protector can be the most honest solution.
Mini method: durable corner build-up
- Reattach laminate or banding first and let it cure fully.
- If the corner is missing material, use wood filler, shape it, and sand smooth.
- Paint or wax-fill to match.
- Brush on 2 to 3 thin coats of water-based polyurethane just over the corner, letting each coat dry fully. Thin coats look cleaner than one thick coat.
Clara tip: If the corner is on a desktop or dresser top, add a felt pad under anything that repeatedly lands near that edge. The smallest friction habits create the biggest wear patterns.
When to repair or replace
Sometimes the most stylish move is knowing when to stop pouring effort into a piece that is structurally done. Here is a simple way to decide.
Decision tree
- Is the particleboard swollen more than a little, soft to the touch, or crumbling?
- Yes: Replace if it is load-bearing (shelf uprights, bed rails) or in a wet zone. If it is cosmetic only, you can attempt a repair with hardener, filler, and seal, but expect it to be temporary.
- No: Go to the next question.
- Is the peel limited to an edge strip or a small laminate flap?
- Yes: Repair. Re-glue or re-band and seal the corners.
- No: Go to the next question.
- Is more than one large panel bubbling, delaminating, or lifting across the surface?
- Yes: Replace or consider using it in a low-demand role (garage storage) if it is still safe.
- No: Go to the next question.
- Does the piece wobble, rack, or have stripped cam locks and screws?
- Yes: Replace or rebuild (wood glue and dowels can help, but only if the board is still sound).
- No: Repair. You are in the sweet spot for a long-lasting cosmetic fix.
Mistakes that cause re-peel
- Gluing over dust or oily cleaner residue: Clean with alcohol and let it dry.
- Skipping clamp time: “Feels stuck” is not cured. Follow the label, and give it overnight if you can.
- Too much glue: Thick puddles prevent tight contact and can create bumps.
- Not sealing cut ends: Ends are where moisture enters first. A tiny seal step saves you later.
- Using steam while ironing banding: Steam adds moisture. Keep it dry.
- No ventilation with strong adhesives: Contact cement and CA glue fumes build fast. Open a window and take it slow.
Clara’s edge-fix kit
If you want a small kit you can tuck in a drawer and actually use, here is my no-fuss lineup:
- Iron-on edge banding in your most common finish (white, black-brown, oak-effect)
- PVA wood glue
- Contact cement (for slick laminates and plastic edge banding)
- CA glue (for tiny corners only)
- 220-grit sandpaper
- Wax repair sticks or a touch-up marker set
- Water-based polyurethane (matte or satin)
- A cheap clamp or two and a small wood block for burnishing
The payoff is not just a cleaner-looking shelf. It is that satisfying feeling of running your hand along a smooth edge again, no snags, no flakes, just calm.