Drafty Rental Windows: Renter-Safe Fixes That Work
Clara Townsend
Clara Townsend is an interior stylist, vintage furniture enthusiast, and the creative voice behind Velvet Abode. With over a decade of experience transforming both cramped city apartments and sprawling fixer-uppers, she believes that a beautiful home is built on personal stories rather than massive budgets. When she isn't hunting for the perfect brass sconce at a local flea market, she can usually be found rearranging her living room for the third time this month.
Drafty windows have a special talent for making a perfectly fine apartment feel like a bus stop in January. You crank the heat, your toes are still cold, and somehow the air near the glass feels like it is actively judging you.
The good news is that many window drafts in rentals can be improved a lot without tools, without permanent adhesives, and without picking a fight with your lease. Below is my renter-safe lineup, from quick wins to deeper sealing, plus a simple way to document everything so your deposit stays boring.
Quick reality check: Some problems are bigger than DIY, like warped sashes that will not sit square, missing exterior caulk you cannot access, rotten wood, or failed glazing. If you spot any of that, skip to the landlord section near the end.

Find the draft first
Before you start sealing, take five minutes to figure out where the cold air is coming from. Drafts usually slip in through gaps around the sash, the meeting rail (where two sashes touch), the sides of the frame, or a neglected lock that is not pulling the window tight.
Easy draft checks
- Hand test: Run your hand slowly around the frame and sash on a windy day. You will feel the cold stream.
- Tissue test: Hold a tissue or a thin strip of toilet paper near the edges. If it flutters, that edge needs love.
- Light test at night: With room lights on and outside dark, look for faint light leaks around the sash. Light leaks can indicate gaps that may also leak air.
Also note what kind of window you have, because the best seal depends on the style.
- Double-hung sash window: Two sliding panels, up and down.
- Single-hung: Only the bottom sash moves.
- Slider: Side to side.
- Casement: Cranks outward like a door.
Draft stoppers: zero effort
If your main problem is cold air pooling at the bottom, a fabric draft stopper (aka a draft snake) is the ultimate renter move. No tape, no residue, no commitment. You just place it along the bottom edge where the sash meets the sill.
Why they work
- Instant comfort: They block that ankle-level cold stream fast.
- Truly removable: Pick it up when you need to open the window or clean.
- Great for old sills: Especially where the gap is uneven and weatherstripping struggles.
Tip: Choose one that is long enough to cover the full width. If you are between sizes, go longer and let it slightly bunch rather than leaving a gap in the corner.
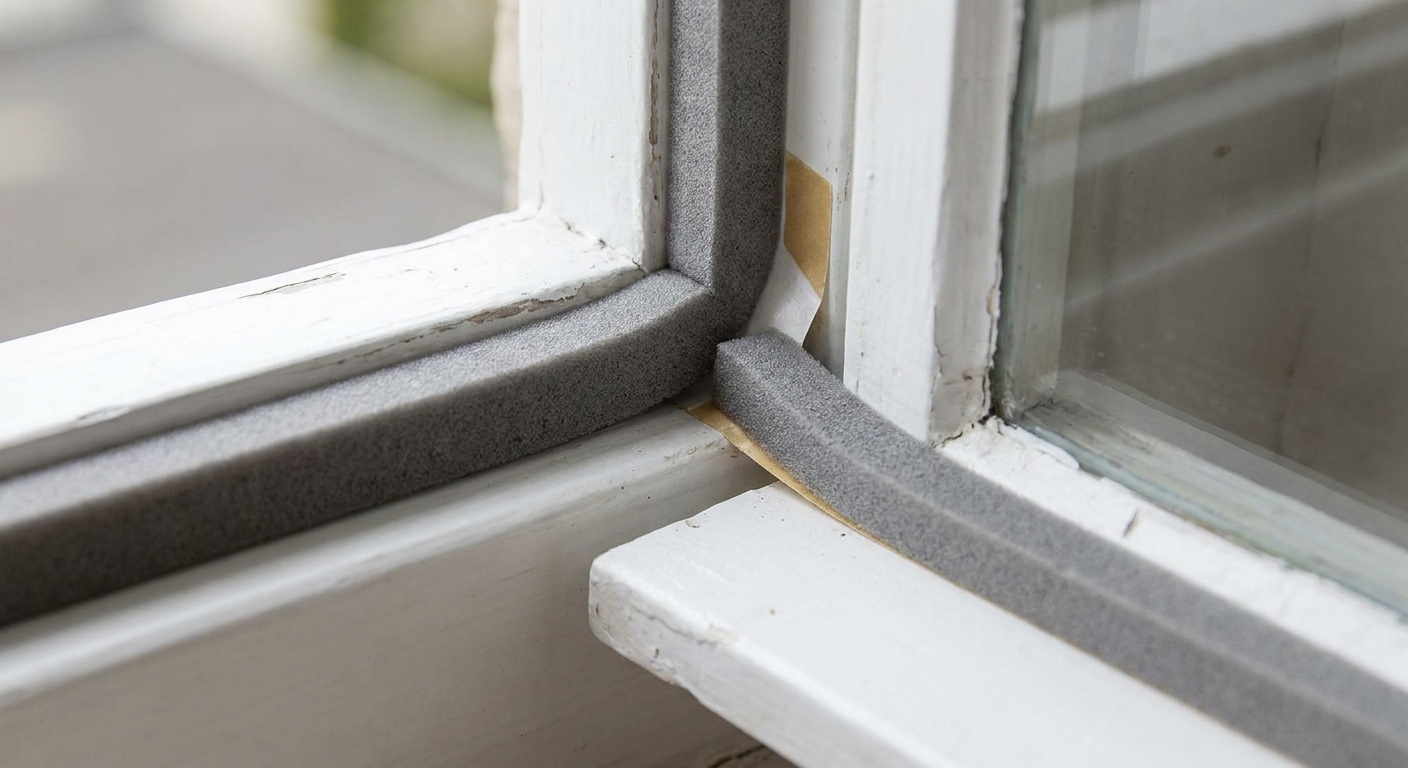
Weatherstripping: the workhorse
If you can only do one thing, do this. Weatherstripping targets the actual air gaps, which is what makes a room feel drafty. The trick in a rental is picking something that is effective but removable.
Best renter-safe options
- Compression seals (great for sash windows): Foam or rubber strips that compress when the window closes, creating a snug seal.
- V-strip or tension seal: A thin strip that springs open to seal the crack along a sliding edge. Often used on double-hung or slider windows.
- Self-adhesive foam tape: The simplest option. Choose a thickness that fills the gap without forcing the window.
Choose the right thickness
Most problems happen because the foam is either too thin (does nothing) or too thick (window will not close). If you can, measure the gap with a ruler or press a small piece of poster putty into the gap and measure the flattened thickness.
Install it and keep it removable
- Clean first: Wipe the surface with mild soap and water, then dry fully. Dust is the enemy of stick-on strips.
- Dry-fit and mark: Hold the strip in place (backing on), close the window to check clearance, and lightly mark placement with painter’s tape. Then peel and stick.
- Be neat at corners: For foam tape, you can do clean butt joints (end to end) rather than bending it around tight corners where it can lift.
- Keep packaging: If your landlord ever asks what you used, you can show it is a temporary product.
Deposit note: Self-adhesive foam tape is usually fine, but some adhesives can leave stubborn residue or pull weak paint. If you see residue at removal time, a little rubbing alcohol on a cloth often helps. For tougher spots, use an adhesive remover like Goo Gone and test in a hidden area first.
Sash windows: best seal spots
Old-school sash windows can be charming, but they are basically a draft delivery system when the original seals are worn out. Sealing helps most at the meeting rails and along the sides where the sash slides.
Where to place seals
- Meeting rail: The horizontal edge where upper and lower sashes meet.
- Side tracks (stiles): The vertical edges where the sash moves up and down.
- Bottom rail: Along the bottom edge where it meets the sill when closed.
One small fix that helps
If the window has a lock, make sure it actually pulls the sashes tight when latched. A surprising number of drafts are simply a window that is “closed” but not snug.
Rope caulk: the winter MVP
Rope caulk (sometimes called caulk cord) is a pliable putty you press into gaps. It is one of my favorite rental-friendly fixes because it is cheap, fast, and often removes cleanly when you peel it away slowly.
Best uses
- Gaps between the window frame and trim where air sneaks in but you cannot tighten anything.
- Old wood windows with uneven edges or tiny cracks.
- Seasonal sealing when you want to remove it in spring.
Apply it neatly
- Warm it in your hands so it is pliable.
- Roll into a thin “rope” if needed.
- Press it into the gap with your fingertip or a plastic card.
- Smooth the surface so it looks intentional, not like you lost a craft project in the corner.
Renter note: Test a small spot first. Avoid rope caulk on delicate wallpaper, raw unfinished wood, or crumbling paint. If the paint is already flaking, anything that grabs can take a little more with it.
Window use note: Rope caulk can prevent opening. Use it on windows you do not need for daily ventilation, and avoid blocking required emergency egress windows unless you are confident you can remove it quickly.

Shrink film: icy glass fix
Window insulation film creates a clear, tight barrier across the inside of the frame. It is especially helpful when you cannot fully stop drafts at the sash, or when the window pane is painfully cold and radiating that chill into the room.
What to expect
- Big comfort jump: The air near the window feels less cold, even if the room temperature is the same.
- Clear look: When installed well, it is barely noticeable from a few steps back.
- Seasonal commitment: It is meant to stay up for winter, then come down.
Install it without frustration
- Start with a clean frame: Dust makes the tape fail early.
- Apply tape in a continuous run as much as possible. Short segments are where leaks happen.
- Leave extra film: You can trim later. You cannot add film back once it is short.
- Shrink evenly: Follow your kit instructions for heat setting. Use a hair dryer with constant motion so you do not overheat one spot.
Deposit-friendly tip: Remove slowly when the season ends. If you are nervous about paint, test the kit tape in an inconspicuous spot first.
Egress note: Film can make a window harder to open quickly. If this is a bedroom egress window, consider weatherstripping plus curtains instead, or keep a small plan (and a reachable edge) for quick removal.
Thermal curtains: cozy layer
If you love the look of your blinds but hate the draft, layering is your friend. Think of it like getting dressed for cold weather: a base layer plus a cozy outer layer works better than one thick sweater.
The simple layering formula
- Base: Your existing blinds or a simple roller shade to control light and privacy.
- Insulating layer: Thermal curtains with a dense weave or insulated lining.
- Seal the top: Hang the curtain rod high and wide so fabric covers the frame, not just the glass.
Styling details that help performance
- Longer is warmer: Curtains that kiss the floor help block the cold air that wants to pool near the sill.
- Fullness matters: Aim for panels that are at least 2 times the window width combined. More pleats means more trapped air.
- Use tiebacks strategically: Open during sunny hours to capture warmth, close at dusk to keep it.

What to do first
If you are standing in the aisle feeling overwhelmed, here is the simplest way to choose.
- Cold air is blowing in around the edges: Start with weatherstripping and rope caulk.
- Cold air is pooling at the bottom: Add a draft stopper (draft snake) for an instant win.
- The whole window feels like a sheet of ice: Add a shrink film kit.
- You want the room to feel cozier overall: Layer thermal curtains over blinds, even if you also seal.
- You cannot open the window all winter: Rope caulk plus film is a strong combo (but make sure you have another ventilation option).
Condensation and mold
Drafts and condensation often travel together. When warm indoor air hits cold glass, moisture shows up. Sealing can help, but you still want basic moisture control so you do not create a new issue while solving the old one.
Simple habits that help
- Ventilate after showers and cooking: Run the bath fan and crack a different window if you can.
- Keep curtains off wet glass: Leave a small gap so the window can breathe.
- Wipe morning moisture: It is oddly satisfying and it prevents mildew.
- Aim for comfortable humidity: Many homes do well around 30 to 50 percent indoor RH in winter. If condensation is constant, consider a small dehumidifier.
Important: If you see soft, crumbling wood, persistent puddles on the sill, fogging between double-pane glass, or black spotting that keeps returning, flag it to your landlord. That can be a maintenance issue, not just a comfort issue.
When to call your landlord
Renter fixes are great for comfort, but some window issues need maintenance. Reach out if you notice:
- Rotten or soft wood around the sill, sash, or trim
- Cracked or missing glazing putty around panes on older windows
- Fog or moisture between panes on double-pane windows (a failed seal)
- Visible gaps to outdoors that look like exterior caulk failure
- A window that will not latch or will not sit square even after basic adjustments
Translation: if air is coming in because something is broken, you should not have to craft your way around it forever.
Document it for your deposit
Renter-safe fixes should come off cleanly, but I still like to document everything. It takes ten minutes and can save you a lot of stress later.
Your quick checklist
- Before photos: Take clear photos of each window frame and sill in good daylight.
- Product photos: Snap the packaging showing it is removable or renter-friendly.
- During photos: One photo of the weatherstripping, draft stopper, or film as installed.
- Notes: Save a short note with dates and what you used, like “Bedroom window: foam tape on side rails, shrink film installed Nov 12.”
- Removal plan: Put a calendar reminder for spring to remove film and caulk slowly and clean any residue.
Message your landlord if you want extra peace of mind
A simple, friendly note goes a long way: tell them the windows are drafty, you are using removable products, and you will restore the window to its original condition at move-out. Some landlords appreciate the heads-up, especially in older buildings.
A cozy final note
You do not need new windows to feel warm. A few careful, reversible steps can change how your whole home feels, especially at night when the outside air gets sharp and the window corners turn into little cold caves.
If you want the most dramatic renter-safe combo for winter, my vote is: weatherstripping first, then shrink film for the worst offender, then thermal curtains to wrap the whole room in softness. And if you want the laziest possible win, park a draft stopper at the bottom and enjoy your newly functional toes.