Dining Chair Glides, Felt Pads, and T-Nails
Clara Townsend
Clara Townsend is an interior stylist, vintage furniture enthusiast, and the creative voice behind Velvet Abode. With over a decade of experience transforming both cramped city apartments and sprawling fixer-uppers, she believes that a beautiful home is built on personal stories rather than massive budgets. When she isn't hunting for the perfect brass sconce at a local flea market, she can usually be found rearranging her living room for the third time this month.
There are two kinds of dining rooms: the ones that sound like a soft little café, and the ones that sound like a chair is being dragged across a parking garage every time someone stands up.
The good news is that most scratches and chair noise come down to one tiny, fixable detail: what is on the bottom of your chair legs. The right glide or pad makes the chair feel smoother, protects your floors, and honestly makes the whole room feel calmer.
Quick note before you buy a 100-pack: If you are unsure, test one chair for a week. You will learn more from that than any product label.
Start here: What is your floor made of?
Before you buy a jumbo pack of pads, take 30 seconds to identify your floor. Floors behave differently, and the best choice for one surface can be a headache on another.
- Hardwood (solid or engineered): Beautiful, repairable, and prone to micro-scratches from grit. Felt is often your best friend, but only if it stays clean.
- LVP (luxury vinyl plank) or vinyl: Tough top layer, but it can dent, scuff, or discolor with the wrong feet. It also hates anything that traps grit and drags it around.
- Laminate: Scratch-sensitive like hardwood, but less forgiving because you cannot refinish it. Smooth glides can work well.
- Tile or stone: Hard and noisy. You want something that softens sound and helps reduce scuffs and the risk of tiny edge or grout-line chips over time, usually felt or a soft glide.
- Carpet or rugs: Felt can grab, compress, and tug at fibers. You want a smooth plastic glide or a proper carpet nail-on glide that slides on pile.
Glides vs felt pads vs T-nails
These terms get tossed around like they are interchangeable. They are not. Here is the plain-English breakdown.
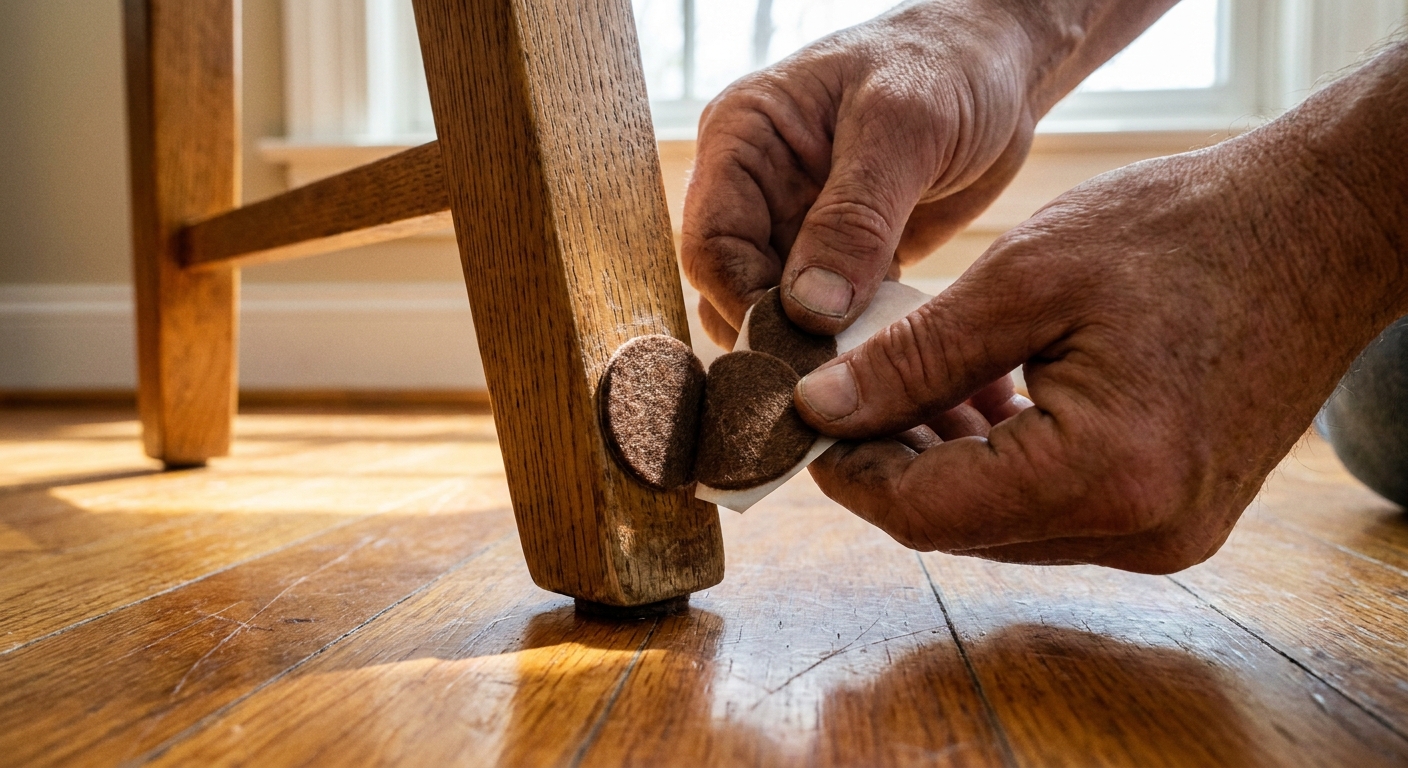
Felt pads (stick-on or nail-on)
Felt is one of the quietest options and often the kindest to hardwood. It creates a soft buffer and takes the harshness out of chair movement.
- Best for: hardwood, laminate, tile, and chairs that move often.
- Watch for: felt collects grit. That grit is what scratches floors, not the felt itself.
Hard glides (plastic or nylon)
These are little "shoes" that help a chair slide without dragging. They can be press-in, nail-on, or screw-in depending on the chair leg.
- Best for: carpet, rugs, and some LVP situations where felt tends to trap dirt.
- Watch for: hard glides on hardwood can be loud and can scratch if grit gets trapped under them.
Rubber, silicone, or TPU feet (grippy, non-slip)
These are designed to stop movement. Great for bar stools that skid, not great for dining chairs you need to scoot in and out multiple times a day.
- Best for: stools, chairs used by kids who lean back, and places where you want stability.
- Watch for: some rubber and latex-like materials can leave marks, cause "shadowing," or interact with certain vinyl finishes. When in doubt, follow your flooring manufacturer’s care guidance and test a small spot in an inconspicuous area.
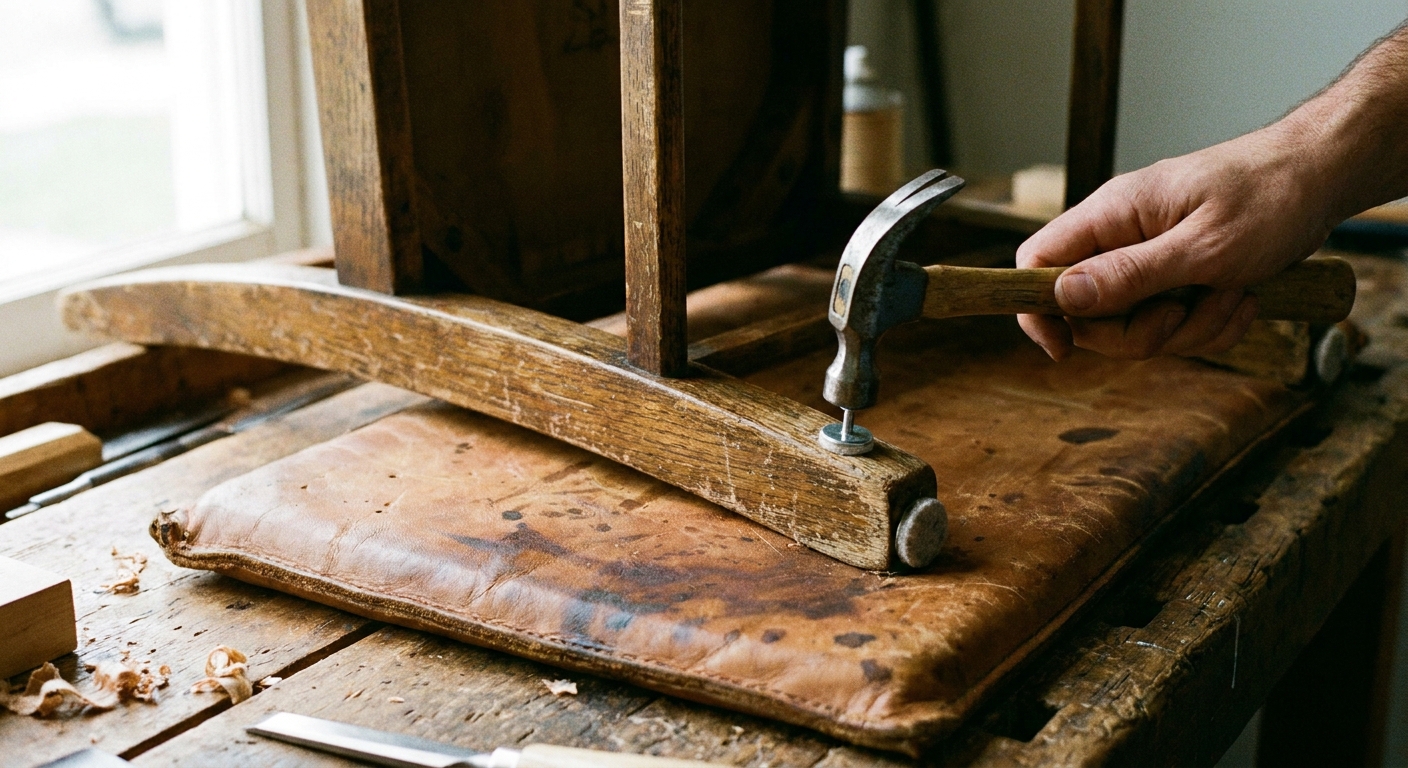
T-nails and nail-on glides (metal nail with a cap)
A T-nail glide is basically a small nail anchored into the chair leg with a glide head on the bottom. Nail-on felt pads are similar but have felt attached to a nail base.
- Best for: wooden chair legs that are flat on the bottom and can take a fastener.
- Watch for: if the nail is off-center or loosens, it can become the scratchy culprit you were trying to avoid.
Hardwood vs LVP: what holds up best
For hardwood floors
If I had to pick one default for hardwood, it is a high-quality felt pad, ideally nail-on for chairs that get used daily. The goal is to make movement soft and quiet while reducing the chance that the pad peels off mid-dinner party.
- Best everyday combo: nail-on felt on wooden legs.
- For metal legs: a cup-style glide with felt, or a stick-on felt designed for metal when the base is wide and flat.
- If your hardwood is oiled or waxed: stick-on pads may struggle to bond. Nail-on felt is usually the less-annoying option.
- Extra tip: vacuum under the table often. Grit is the real villain.
For LVP floors
LVP is resilient, but it is not invincible. It is especially sensitive to tiny bits of sand that get trapped and dragged. Felt can be fine on LVP, but only if you are willing to keep it clean or replace it more often.
- If your household is shoes-on or you have pets: consider a smooth plastic or nylon glide that is easier to wipe clean.
- If you are shoes-off and tidy: felt is still great for sound control, just check it regularly.
- Avoid: cheap, gummy rubber feet that can mark or discolor some vinyl finishes over time, especially in sunny rooms. When in doubt, test first and check the flooring manufacturer’s recommendations.
My rule of thumb: On hardwood, prioritize softness. On LVP, prioritize cleanability.
Nail-on vs stick-on
Stick-on pads: quick, budget-friendly, and a little needy
Stick-on felt pads are fantastic for renters, quick fixes, and chairs that do not get dragged constantly. The downfall is adhesive failure, especially with temperature swings and dusty leg bottoms.
- Choose stick-on if: you need speed, you are renting, or the chair legs are not friendly to nails.
- Skip stick-on if: your chairs get used heavily, your kids scoot like it is an Olympic sport, or your floors are precious and soft.
Nail-on pads or T-nail glides: the long-haul option
Nail-on options stay put. If you have wooden legs, this is usually the most reliable, least annoying solution.
- Choose nail-on if: the chair is heavy, used daily, or the stick-ons keep vanishing.
- Skip nail-on if: the leg is hollow metal, very thin, or you cannot risk splitting delicate vintage wood.
Vintage chair note: if your chair legs are old and dry, pre-drill a tiny pilot hole for nail-on pads. Use a drill bit slightly smaller than the nail diameter. It takes one extra minute and can help prevent splitting.
Before you add anything: check the existing feet
Sometimes the best fix is not adding a pad. It is replacing what is already there.
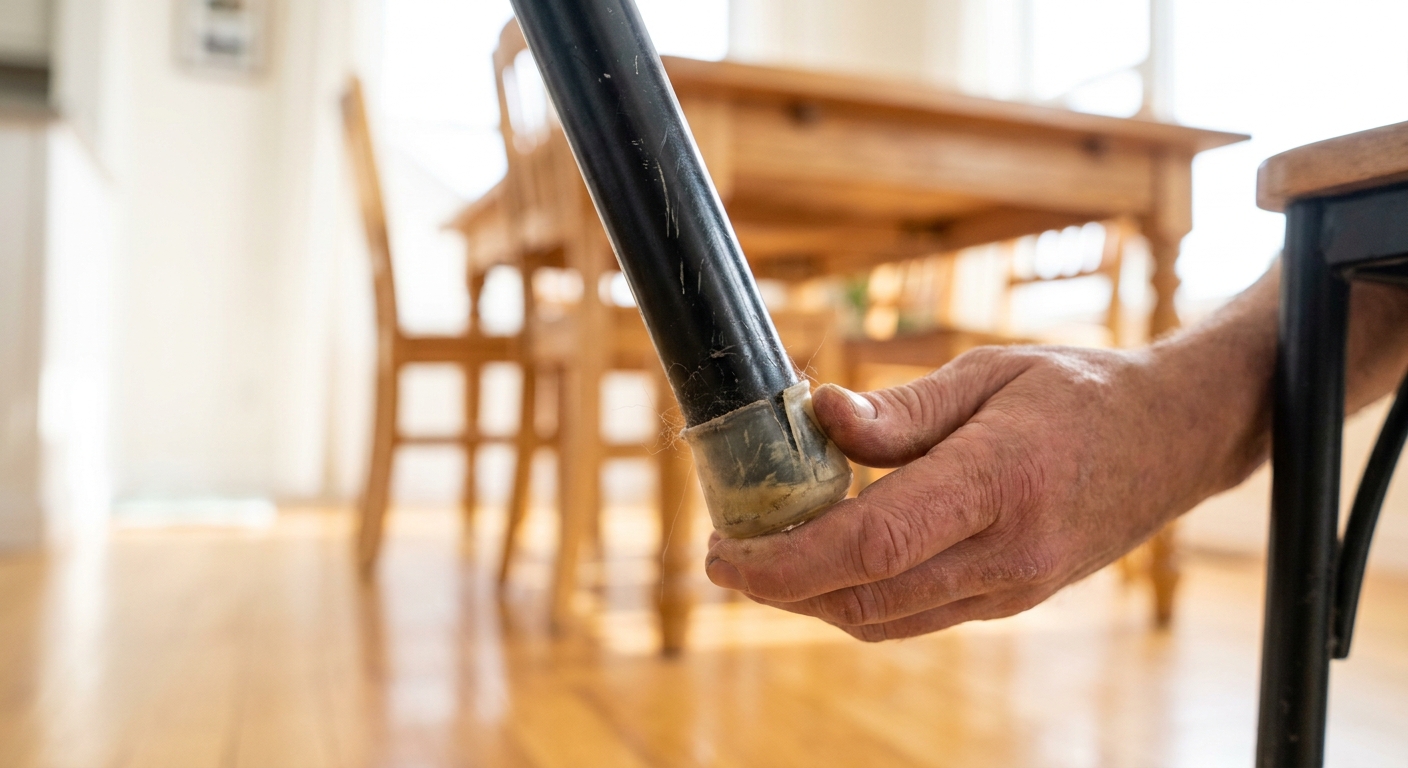
- Plastic caps on metal legs: if they are worn through or cracked, replace the cap or insert. Do not stack felt on top of a failing cap and hope for the best.
- Threaded stems: some chairs use screw-in glides. If yours do, match the stem size and replace them with a softer option (including felt-bottom versions) rather than switching styles.
- Uneven leg bottoms: if a chair wobbles, pads will wear unevenly and peel sooner. Level the chair first or replace damaged glides.
Metal chair legs: adding felt
Metal legs can be tricky because they often have a small plastic cap already, or a narrow contact point that makes stick-on felt peel quickly.
Add felt when:
- the chair squeeches on tile, laminate, or sealed concrete
- the plastic cap is worn through and you see metal touching the floor
- you want the chair to glide more quietly on hardwood
The best approaches:
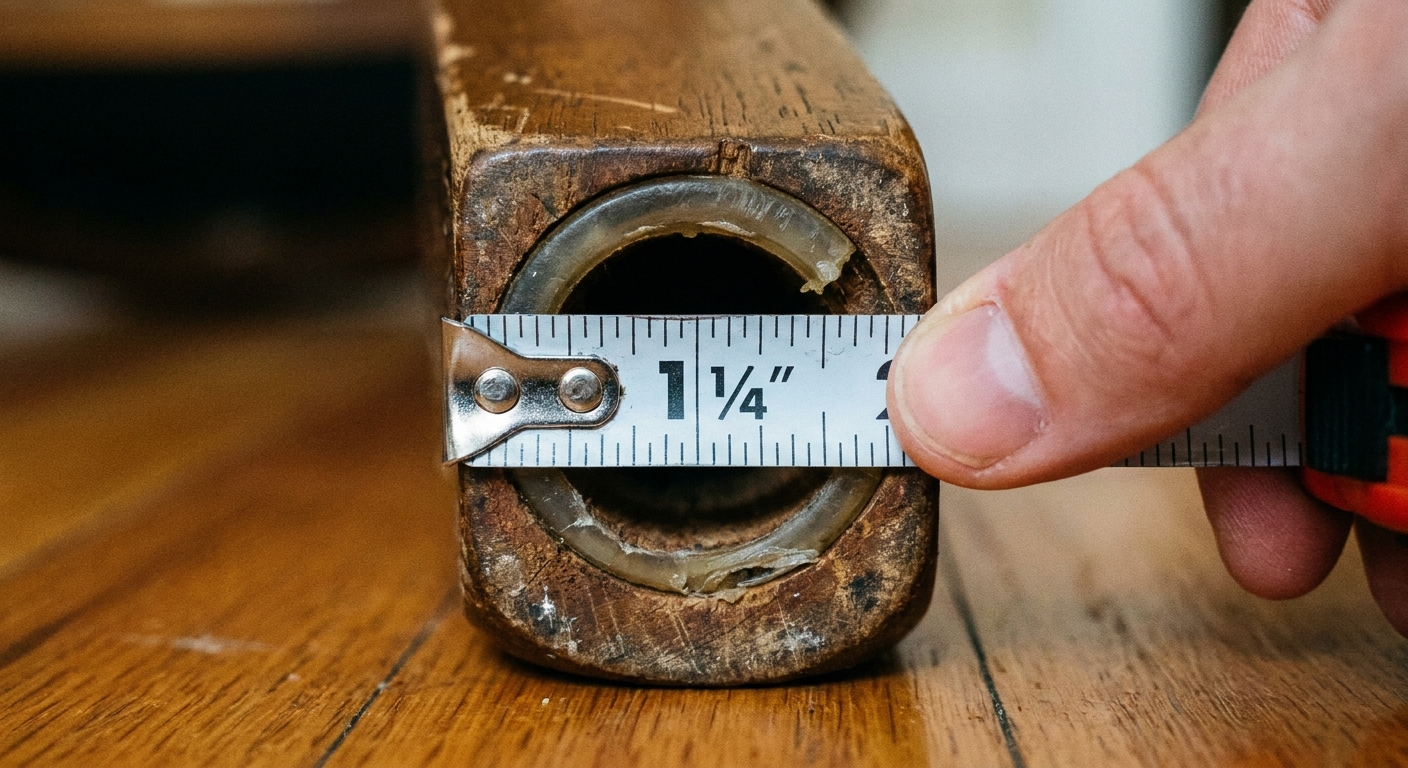
- Replace the existing cap: many metal chairs use press-in inserts. Measure the inner diameter of the leg and buy matching replacements. This is the cleanest fix.
- Use a felt-bottom cap: a slip-on or press-in glide with felt already attached tends to last longer than a flat felt sticker on a tiny surface.
- Use heavy-duty adhesive felt: only when the bottom surface is wide and flat enough to hold it.
Replacing worn pads safely
This is where people accidentally do the most harm, usually with a butter knife and a lot of determination. Let's do it the gentle way.
Step 1: Flip the chair and clean the leg bottom
Wipe away dust and waxy residue. For most chairs, a damp cloth plus a drop of dish soap is plenty. Dry fully.
Step 2: Remove old adhesive without gouging
- Lift the pad: use your fingernail or a plastic scraper. An old gift card works well.
- Soften sticky residue: use a small amount of adhesive remover on a cloth, not poured directly on the wood. Test underneath first, especially on stained or lacquered legs.
- Avoid harsh solvents: skip acetone and other strong solvents on finished wood unless the manufacturer says it is safe. Ventilate the area and follow the product label.
- Go slow: you are removing glue, not sanding a deck.
Step 3: Smooth and prep
If the wood is rough or splintery, lightly sand just the bottom edge with fine grit sandpaper. Wipe clean. This helps new pads sit flat and last longer.
Step 4: Install the new pads correctly
- Stick-on felt: press firmly for 20 to 30 seconds. Let the adhesive set before dragging the chair.
- Nail-on felt: center it. Tap gently. If the wood is hard, pre-drill a tiny pilot hole.
- Press-in glides: measure first. If it feels wrong, do not force it. You can split wood or deform metal legs.
Protect your floors while you work: put a towel or thick blanket under the chair. It keeps hardware from skittering across the room and gives your chair a soft landing.
Size and shape
Most pad failures happen because the pad is too small or the chair leg is not actually flat. Take one minute to look closely.
- Match the shape: round pads for round legs, square pads for square legs. Obvious, yes. Still worth saying.
- Go slightly larger when possible: a pad that fully covers the contact area wears more evenly.
- For angled legs: look for angled glides made for splayed legs, or use a larger pad so the contact area stays covered.
- Measure diameter: for press-in inserts, measure the inner diameter of the metal leg opening. Millimeters matter here.
Five-minute maintenance
If you want that soft, hush-hush glide that makes your dining room feel a little more grown-up, maintenance is the secret.
- Check pads monthly: if felt looks thin, matted, or gritty, replace it.
- Vacuum under the table often: grit is what turns movement into scratches.
- Keep spare pads: store a small bag in a kitchen drawer. Future-you will feel very cared for.
- Fix wobble separately: if a chair rocks, pads will wear unevenly. Tighten joints and level the chair first.
If your felt pads keep peeling off, it is usually not bad luck. It is dust, oil, or a curved leg bottom. Clean thoroughly, choose a slightly larger pad, or switch to nail-on.
Extra help for loud rooms
If noise is still a thing even with good pads, you have a couple of low-effort upgrades.
- Add an area rug: it absorbs sound and reduces grit travel under the table.
- Use a chair mat: especially helpful for daily sliding and high-traffic layouts.
Quick pick list
If you just want the shortcut, here is my simple, practical cheat sheet.
- Hardwood + wooden legs: nail-on felt pads (or nail-on felt glides).
- Hardwood + metal legs: felt-bottom caps or replacement inserts with a softer contact surface.
- LVP + high-traffic household: smooth nylon or plastic glides that wipe clean.
- Tile: felt pads or felt-bottom glides for noise control.
- Rug or carpet: hard plastic glides made for carpet.
Your floors are part of the mood of your home, not just something you walk on. A tiny glide upgrade is one of those small fixes that makes everything feel more intentional, like lighting a lamp instead of using the overheads.