Cracked or Moldy Shower Caulk: Renter-Safe Removal and Touch-Up Basics
Clara Townsend
Clara Townsend is an interior stylist, vintage furniture enthusiast, and the creative voice behind Velvet Abode. With over a decade of experience transforming both cramped city apartments and sprawling fixer-uppers, she believes that a beautiful home is built on personal stories rather than massive budgets. When she isn't hunting for the perfect brass sconce at a local flea market, she can usually be found rearranging her living room for the third time this month.
There is a very specific kind of bathroom annoyance that can make even a lovely space feel a little… not lovely. It is that peeling, cracked caulk line along the tub, or the shadowy specks that keep coming back no matter how enthusiastically you scrub. The good news is that caulk is its own material with its own rules, and in many rentals, a small touch-up is totally doable without picking a fight with your lease.
This page is about caulk, not grout. Grout lives between tiles and is usually porous (cement-based grout especially). Caulk is the flexible seal where different surfaces meet, like the tub-to-tile seam and vertical corners. If you are trying to whiten grout, you will want our grout-specific page. If the issue is cracked, missing, or moldy caulk, you are in the right place.
Is it caulk or grout?
Before you buy anything, do this tiny detective work. It saves so much frustration.
- Caulk is usually a smooth, continuous line at joints: tub-to-tile, shower pan-to-wall, inside corners, and where tile meets a countertop. It may feel slightly rubbery.
- Grout fills the gaps between tiles and feels hard and sandy or gritty. It is not meant to flex. (Note: epoxy grout exists and behaves differently, but it is still a tile-to-tile filler, not a flexible joint seal.)
A quick test: press your fingernail into the line. If it has give, it is usually caulk. If it is rock-hard and gritty between tiles, it is grout. If you are unsure, look at the location: tub-to-tile seams and corners are almost always caulk.
When to call your landlord
I love a simple DIY, especially when it makes a rental feel cared for. But there are times when the most renter-safe move is documenting and escalating.
Escalate if you notice:
- Soft, spongy walls, bubbling paint, or swollen baseboards near the tub or shower.
- Loose tiles, crumbling drywall, or a musty smell that does not go away after cleaning and drying.
- Persistent wetness around the tub edge, especially if water seems to be getting behind the wall.
- Large areas of black mold that return quickly, spread beyond the caulk line, or show up on ceilings or adjacent rooms.
- Accessibility needs or building rules that require maintenance to perform wet-area sealing.
Renter tip: take a few clear photos in good light and send a short note. Something like, “The tub-to-tile caulk is cracked and appears moldy. I am concerned about moisture getting behind the wall. Can maintenance re-caulk?” Keep it calm, factual, and dated.
Tools and supplies
You do not need a contractor-grade kit. You need the right basics so the new caulk actually sticks and looks neat.
Time: about 1 to 2 hours of work, plus cure time
Difficulty: beginner-friendly with patience (taping helps a lot)
- Caulk remover tool or a plastic razor scraper
- Utility knife (optional, use carefully)
- Rubbing alcohol (isopropyl alcohol) for final wipe
- Spray bottle of warm soapy water
- Paper towels or microfiber cloths
- Painter’s tape (blue or green)
- Caulk gun (for standard tubes) or a squeeze tube for small jobs
- New caulk (more on choosing below)
- Nitrile gloves
- Good ventilation: open window, bathroom fan, and ideally a small portable fan
- Optional: mildew remover (or hydrogen peroxide) for stains, plus a soft brush
- Optional: chemical caulk remover (test first, see note below)
Optional chemical remover note: Some caulk-remover gels can help with stubborn silicone, but they can also dull or damage certain finishes. If you use one in a rental, spot test in an inconspicuous area and follow label directions.
Choosing caulk
This is where most people get burned. In wet areas, not all caulk is created equal.
100% silicone (best for tubs and showers)
- Pros: most water-resistant, flexible, and long-lasting for constant moisture.
- Cons: harder to tool neatly, smells stronger while curing, cannot be painted, and removal later is more annoying.
- Look for: “Kitchen & Bath” and “100% silicone” on the label, plus “mildew resistant.”
Siliconized latex or acrylic latex (okay for low-splash areas)
- Pros: easier to apply and clean up, lower odor, some versions are paintable.
- Cons: generally not as durable in a daily-use shower, can shrink or crack sooner.
- Best for: areas that do not stay wet, like around a vanity backsplash or trim outside the shower.
If you are re-caulking inside a shower or along a tub where water sits, choose 100% silicone unless your landlord specifies otherwise.
Color tip: Most rentals do best with white or clear. If your tub is “almond” or “biscuit,” you can usually find a matching shade. When in doubt, bring a photo in natural light (bathroom lighting lies).
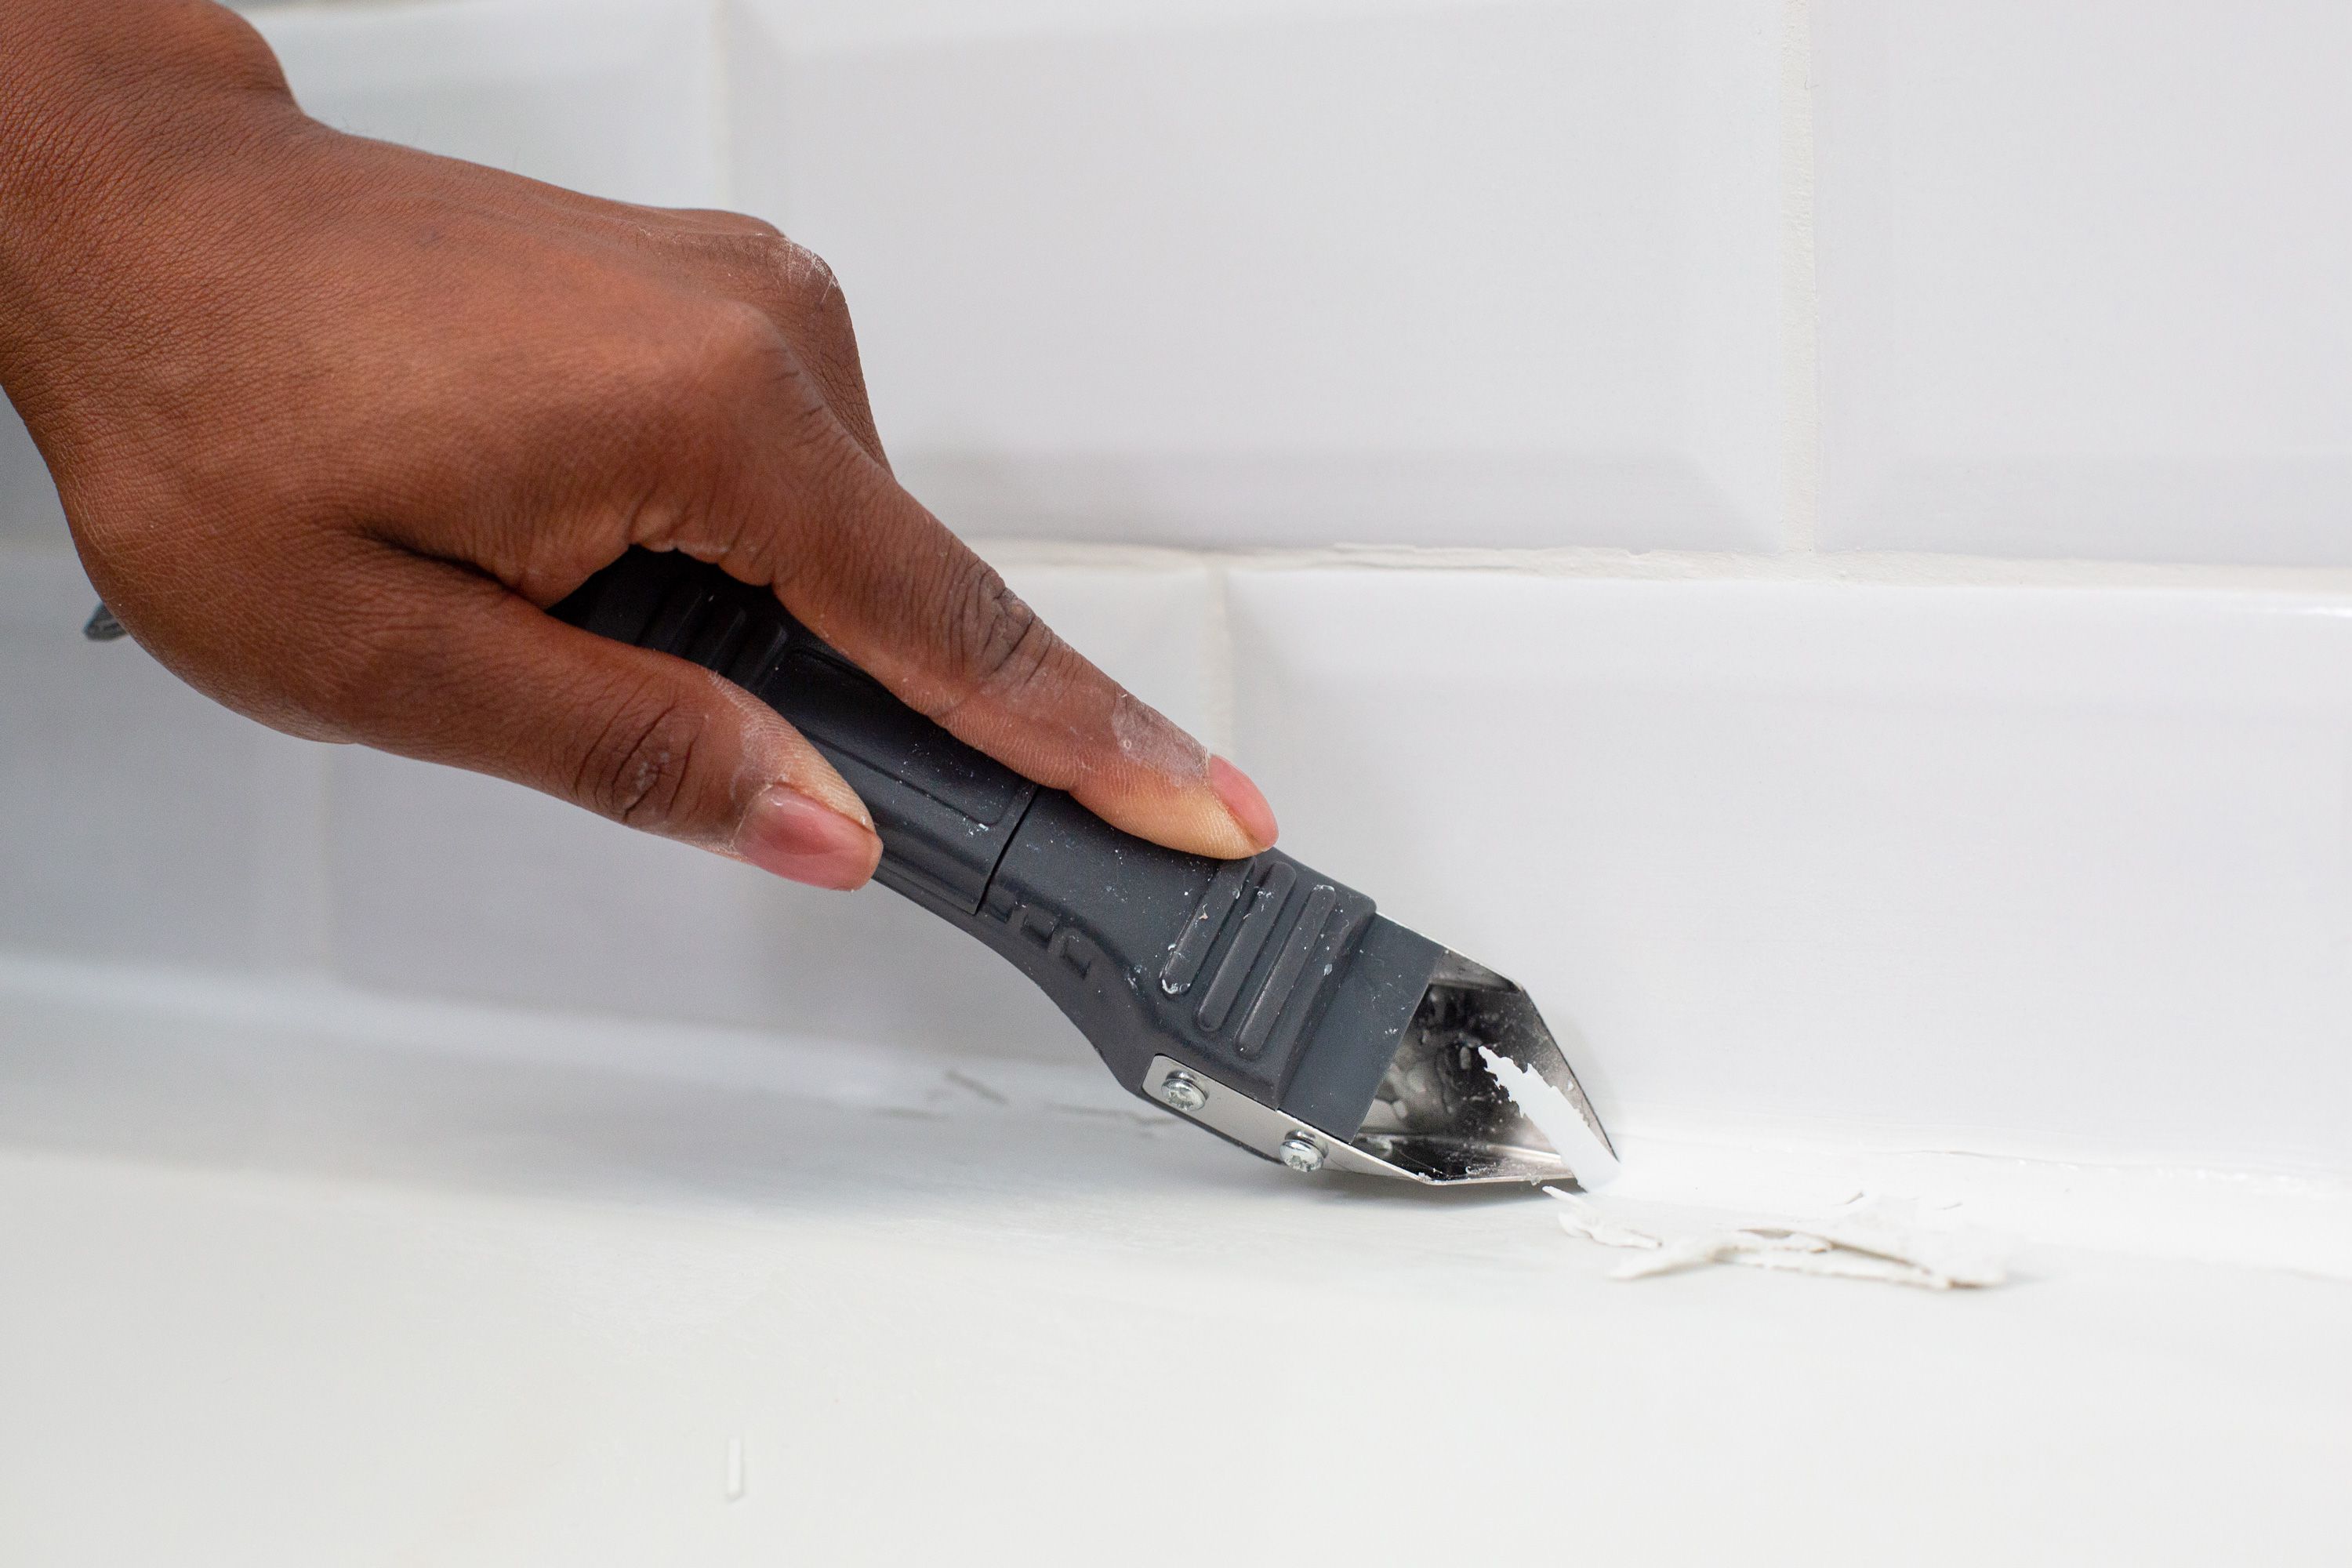
Remove old caulk
Your goal is to remove as much old caulk as possible so the new bead has a clean, dry surface to bond to. Caulk does not like sticking to caulk. And 100% silicone especially does not bond well to cured silicone.
Step-by-step
- Dry the area. If you can, avoid using the shower for 12 to 24 hours before you start. Caulk applied to damp seams is a heartbreak waiting to happen.
- Soften and lift. Use a caulk removal tool or plastic scraper to gently lift the bead. Work slowly along the seam.
- Slice carefully if needed. If the caulk is stubborn, lightly score along both edges with a utility knife. Keep the blade shallow so you do not nick the tub finish or grout lines.
- Remove residue. Tiny bits left behind will show up as bumps. Scrape what you can.
- Clean the seam. Wash with warm soapy water, rinse, then dry thoroughly.
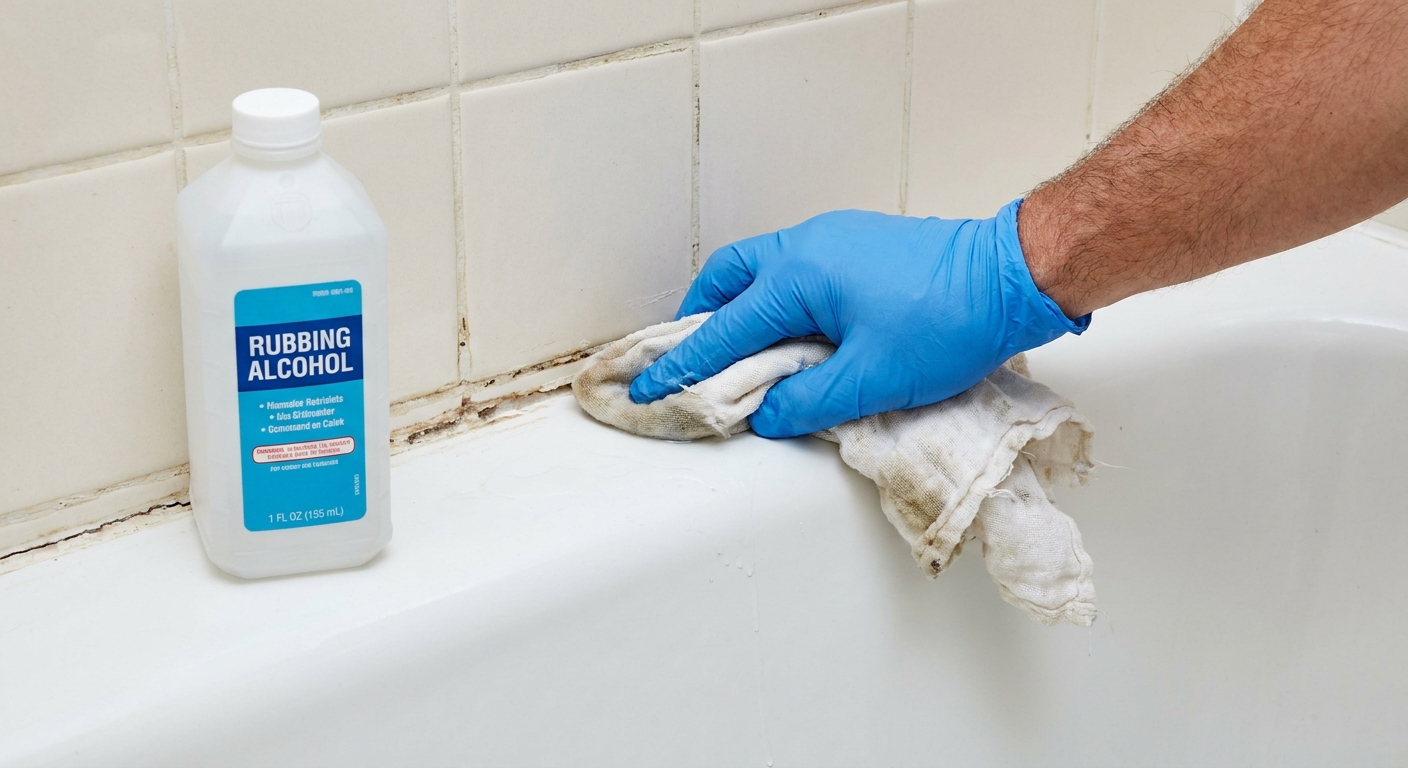
- Deal with mildew stains (optional but helpful). If staining remains, use a mildew remover or hydrogen peroxide per label directions, then rinse well and dry fully. Do not mix cleaners (especially bleach and ammonia). Ventilate.
- Final wipe. Wipe the seam with rubbing alcohol to remove oils and soap film. Let it fully air dry.
If you see mold staining that will not budge, that is often a sign the caulk has failed and moisture got behind it. Removing the caulk and allowing the seam to dry is usually the correct path. If the wall looks compromised, escalate to your landlord.
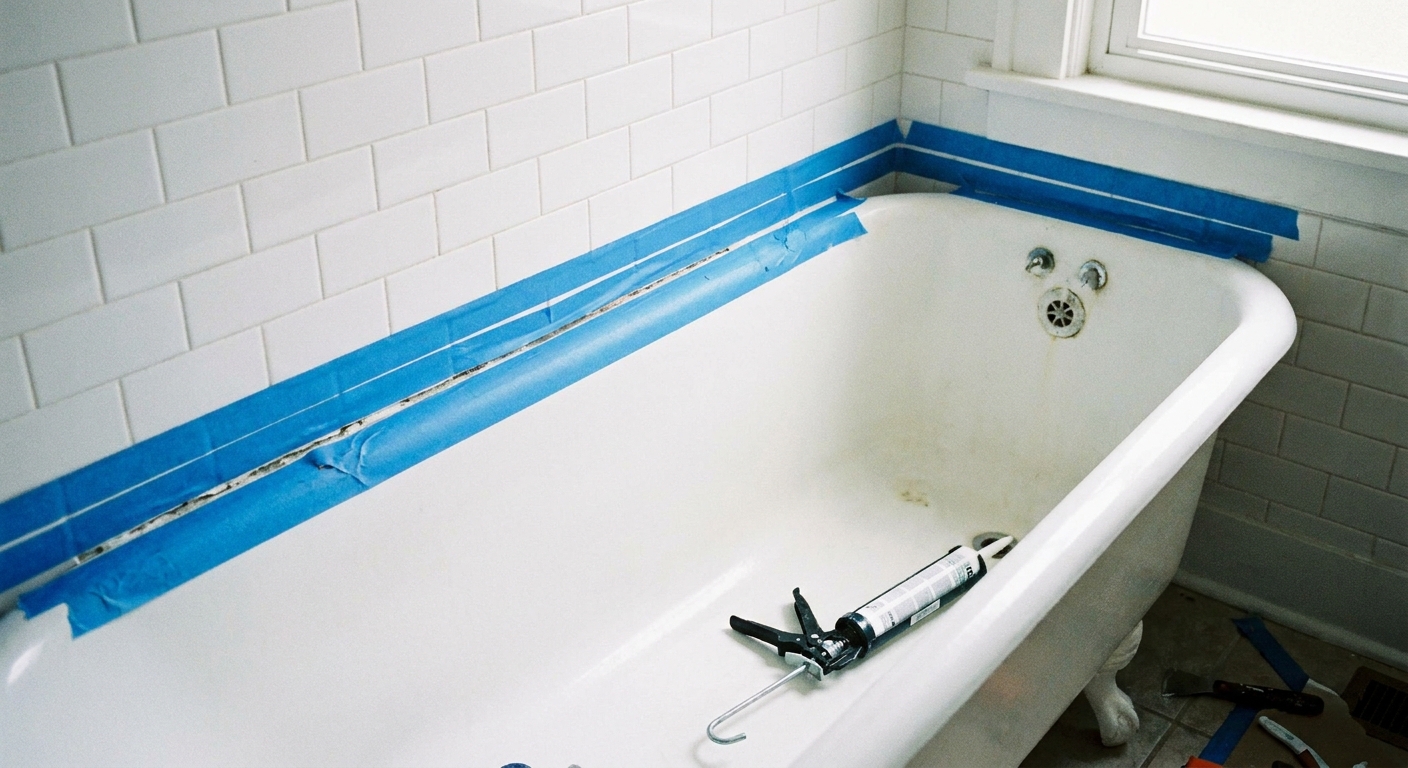
Tape for clean lines
If you have ever tried to freehand caulk, you already know it can go from “quick touch-up” to “why is this everywhere” in seconds. Painter’s tape is the best renter-friendly secret.
How to tape it
- Run one strip of tape along the tub, about 1/8 to 3/16 inch from the seam.
- Run a matching strip along the tile side, parallel to the first.
- Press the tape edges down firmly so caulk cannot seep underneath.
Keep the gap consistent. Aim for a bead that is small but fully sealed, with good contact on both surfaces. Too thick looks messy, too thin can fail.
Apply new caulk
Set yourself up: good light, a steady place to kneel, and a small trash bag nearby for paper towels. This is not a race.
One pro prep tip (for tubs)
Tubs can flex a bit when they are filled or when someone steps in. Many pros reduce future cracking by filling the tub with water before caulking (or at least keeping it in its “weighted” position). If you do this, be careful not to splash the seam and follow your product label and building guidance. When in doubt, ask maintenance.
Step-by-step
- Cut the nozzle small. Start with a tiny opening. You can always cut more. Aim for an opening similar to the bead size you want.
- Puncture the inner seal (most tubes have one) using the built-in poker on the caulk gun or a long nail.
- Apply a steady bead. Hold the gun at about a 45-degree angle and move smoothly. Try to keep consistent pressure.
- Tool it once. Use a caulk tool for the cleanest results, or follow the manufacturer’s tooling guidance. (Some people use a very light soapy-water mist to smooth silicone, but some brands caution against it, so the label gets the final vote.) Make one continuous smoothing pass. Overworking silicone can make it look ragged.
- Pull tape immediately. Remove painter’s tape while the caulk is still wet for crisp edges. Pull away at an angle.
- Do not touch it again. Let it settle and cure.
Little styling note from me: a clean caulk line makes the whole tub edge look sharper, like freshly pressed linen. It is one of those tiny maintenance details that reads as “this bathroom is cared for.”
Cure time
This part matters as much as the application. Most failed caulk jobs fail because they got wet too soon.
- Silicone: often needs 24 hours before getting wet, sometimes 48 hours depending on humidity, bead size, and product label. Many products also note full cure can take up to 7 days, so avoid aggressive scrubbing or harsh cleaners during that first week.
- Latex or siliconized latex: may be paint-ready sooner, but still typically needs at least 24 hours before heavy water exposure in a shower setting.
Always read your tube. If the label says 30 minutes to “water ready,” treat that as “splash resistant,” not “daily shower with steam and direct spray.” When in doubt, wait longer. Future-you will be so grateful.
Ventilation and safety
Bathroom air can trap fumes, and silicone can smell pretty intense while curing.
- Run the bathroom fan the whole time you work and for several hours after.
- Open a window if you have one.
- Add a small fan in the doorway pointing out to push air into the rest of the apartment.
- Wear gloves and avoid skin contact with uncured caulk.
- If you feel lightheaded, stop and get fresh air.
Stop mold from coming back
If you are constantly battling moldy caulk, it is usually less about your cleaning routine and more about moisture staying put.
Habits that actually help
- Squeegee the shower walls and tub edge after use. It takes 60 seconds.
- Keep the fan running for 20 to 30 minutes after showers.
- Leave the curtain or shower door open to let everything dry.
- Skip harsh abrasives on caulk. They can rough up the surface and make it easier for mildew to grab on.
If your bathroom has no fan or window and mold is a constant issue, that is landlord territory. Ventilation is a building problem, not a personal failing.
Touch-up vs re-caulk
Sometimes you just spot one tiny crack. Sometimes the whole bead is peeling like a sticker.
- Touch-up works if there is a small gap and the surrounding caulk is firmly bonded, clean, and not moldy. Clean and dry the area first.
- Touch-up with silicone has a catch: because 100% silicone will not reliably bond to cured silicone, you need to scrape the gap area back to clean, bare surfaces (tub and tile) before applying the patch. Think “mini removal job,” not “just smear a little on top.”
- Full re-caulk is better if the caulk is moldy, separating from either surface, cracking repeatedly, or feels loose anywhere along the seam.
In wet zones, patching over failing caulk usually buys you a short time window. Full removal and replacement is the more lasting fix.
Common mistakes
- Caulking over old caulk (especially silicone over silicone)
- Applying to a seam that is still damp
- Cutting the nozzle too large and flooding the joint
- Waiting too long to pull tape
- Showering too soon after caulking
Message you can copy
If you decide to escalate, here is a ready-to-send note.
Hi [Name], the caulk along the tub/shower seam is cracked and has visible mildew. I am concerned water may be getting behind the wall. Could maintenance remove and replace the caulk and check for any moisture damage? I can share photos and coordinate access. Thank you.
What “done” looks like
Your final result does not need to be perfect to be effective. You are aiming for one continuous, sealed line with no gaps, no loose edges, and no wetness getting behind the tub. When the caulk is cured, the seam should look smooth and intentional, like a clean hem.
If you try this once and decide you never want to do it again, I get it. But if you do it and realize it is oddly satisfying, welcome to the club. Some of us rearrange living rooms for fun. Others find peace in a crisp caulk line.