Clean a Glass Cooktop Without Scratching It
Clara Townsend
Clara Townsend is an interior stylist, vintage furniture enthusiast, and the creative voice behind Velvet Abode. With over a decade of experience transforming both cramped city apartments and sprawling fixer-uppers, she believes that a beautiful home is built on personal stories rather than massive budgets. When she isn't hunting for the perfect brass sconce at a local flea market, she can usually be found rearranging her living room for the third time this month.
A glass cooktop is basically the black turtleneck of the kitchen. Sleek, flattering, and somehow it shows every single crumb the second you turn around. The good news is that most messes can come up beautifully without scratching, as long as you follow two rules: be patient about cool-down, and use the right pressure with the right tools.
Quick note on terminology: most “glass” cooktops are actually glass-ceramic. The cleaning approach is the same, but your owner’s manual always wins if it says something different.
This guide covers the three most common “oh no” situations in rental and everyday kitchens: burnt sugar, melted plastic, and those stubborn rings that keep reappearing like a bad chorus.
Before you touch it: cool-down rules
Glass cooktops are tough, but they hate thermal shock. That is sudden temperature change that can turn a tiny chip into a full crack.
- Let the surface cool fully. If the “hot surface” light is on, wait. Even if it feels merely warm, give it time.
- Never pour cold water onto a hot cooktop. Not even “just a splash.” Use a damp cloth only after it cools.
- If sugar or plastic is melting right now, act quickly but carefully. Many major manufacturers’ manuals advise removing molten sugar and plastic with a scraper while the surface is still hot, because once it hardens it can bond like glass and become much harder to lift. If you do this, turn the burner off, wear an oven mitt, keep your free hand away from the heat, and follow your specific manual.
If you are in a rental, check your lease or building handbook. Some property managers prefer that you do not use a razor blade at all, even though it is a standard method when used correctly.
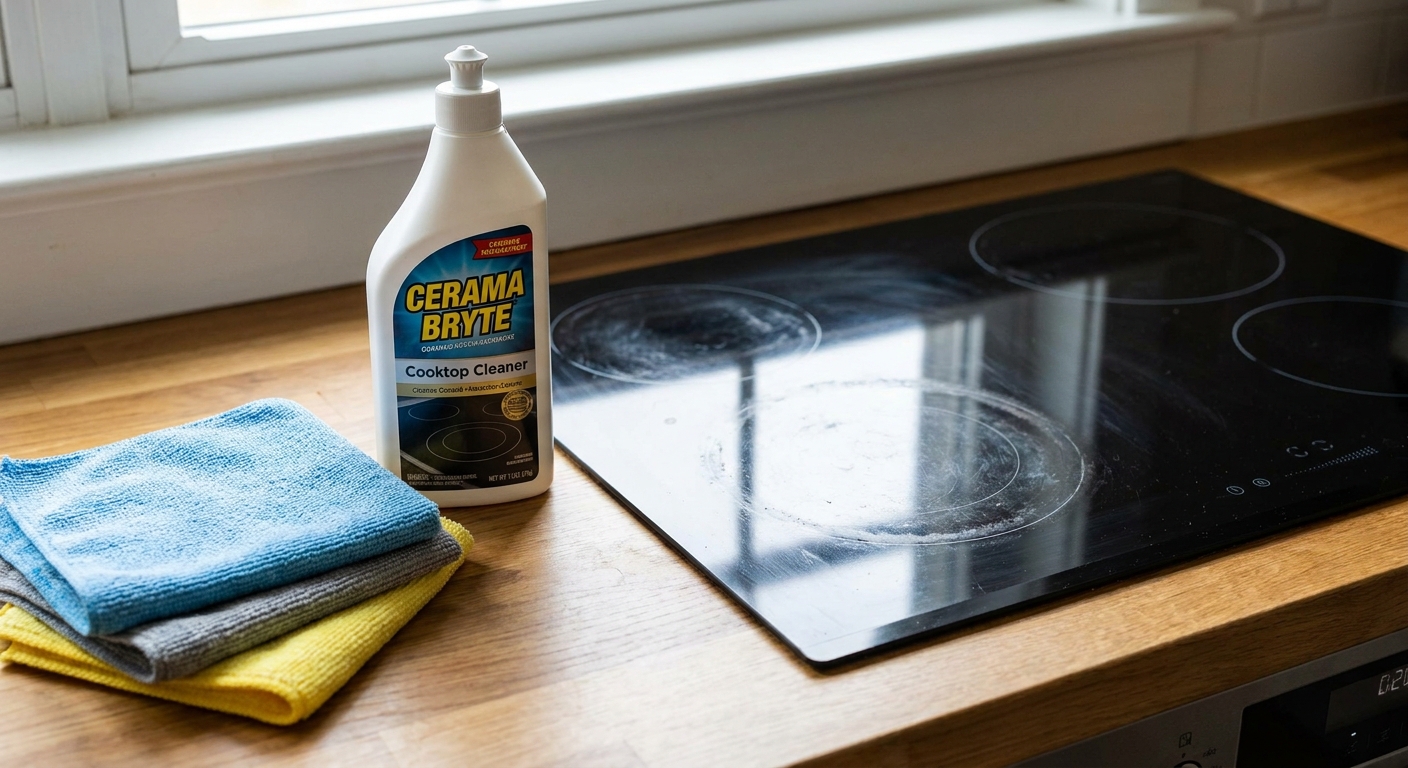
Your no-scratch toolkit
You do not need a caddy of specialty products. You need a small, dependable set that works together.
Best tools
- Cooktop razor scraper (the kind with a handle and a guarded blade)
- New single-edge razor blades (dull blades can chatter and leave fine marks)
- Microfiber cloths (a few, so you can switch to clean ones)
- Cooktop-safe non-scratch pad labeled for glass-ceramic (these are not the generic green scrub pads)
- Plastic putty knife (helpful if you are nervous about a blade)
Safest cleaners
- Cooktop cream cleaner made for glass-ceramic surfaces
- Dish soap + warm water for everyday grease
- Baking soda paste (baking soda + a little water) for gentle abrasion
Avoid these
- Steel wool or scouring powders not labeled for glass cooktops
- Abrasive scrub sponges (the rough green side is a frequent offender)
- Oven cleaner unless your manual explicitly allows it
- Chlorine bleach (may discolor surrounding trims/markings or leave stubborn haze, so check the manual)
- Ammonia-heavy cleaners used repeatedly (can leave haze and streaking on some tops)
Warranty note: Many manufacturers specify a “glass-ceramic cooktop cleaner” and a scraper as approved tools. If you have the manual, follow it. If you do not, stick to dish soap, cooktop cream, and a handled scraper.
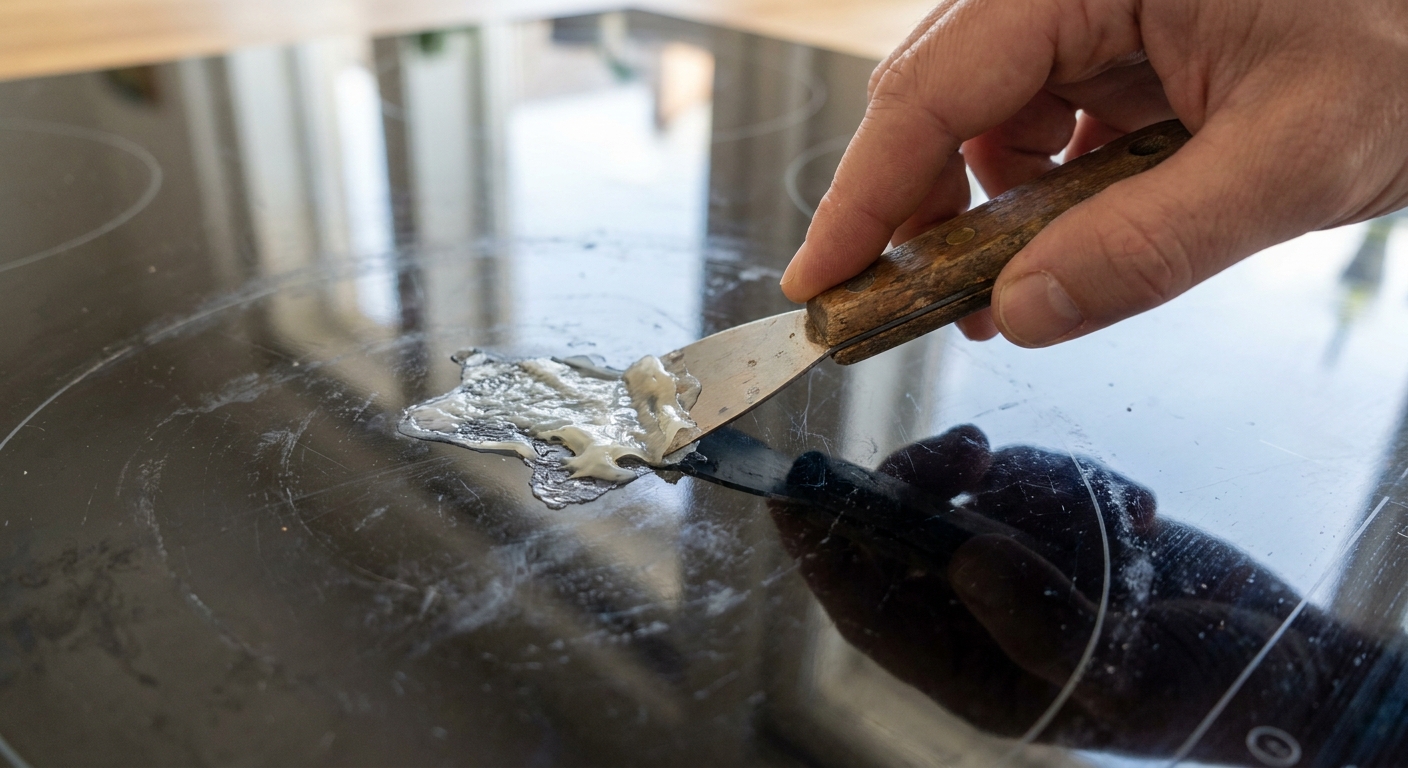
Razor-scraper technique
If you take only one thing from this page, let it be this: a razor scraper is not scary when you use it like a ski, not like a shovel.
Step-by-step
- Start on a clean surface. Wipe crumbs away first. A single grain of grit under a cloth can scratch.
- Hold the scraper at a low angle. Aim for about 30 to 45 degrees against the glass. Too steep increases the chance of gouging.
- Use light, even pressure. Short strokes. Let the blade do the work.
- Keep the area slightly lubricated. A thin film of cooktop cream or a bit of soapy water helps the blade glide.
- Work around burner markings. If your top has printed rings or decals, scrape gently and avoid digging at the edges of the markings. When possible, scrape parallel to the line instead of jabbing into it.
- Wipe, check, and repeat. Do not keep scraping blindly. Check your progress often.
- Replace the blade if it skips. A blade that chatters can leave tiny lines.
If you see a mark that looks like a scratch, pause and clean the area with cooktop cream. Sometimes it is metal transfer or residue that looks like damage under overhead lights.
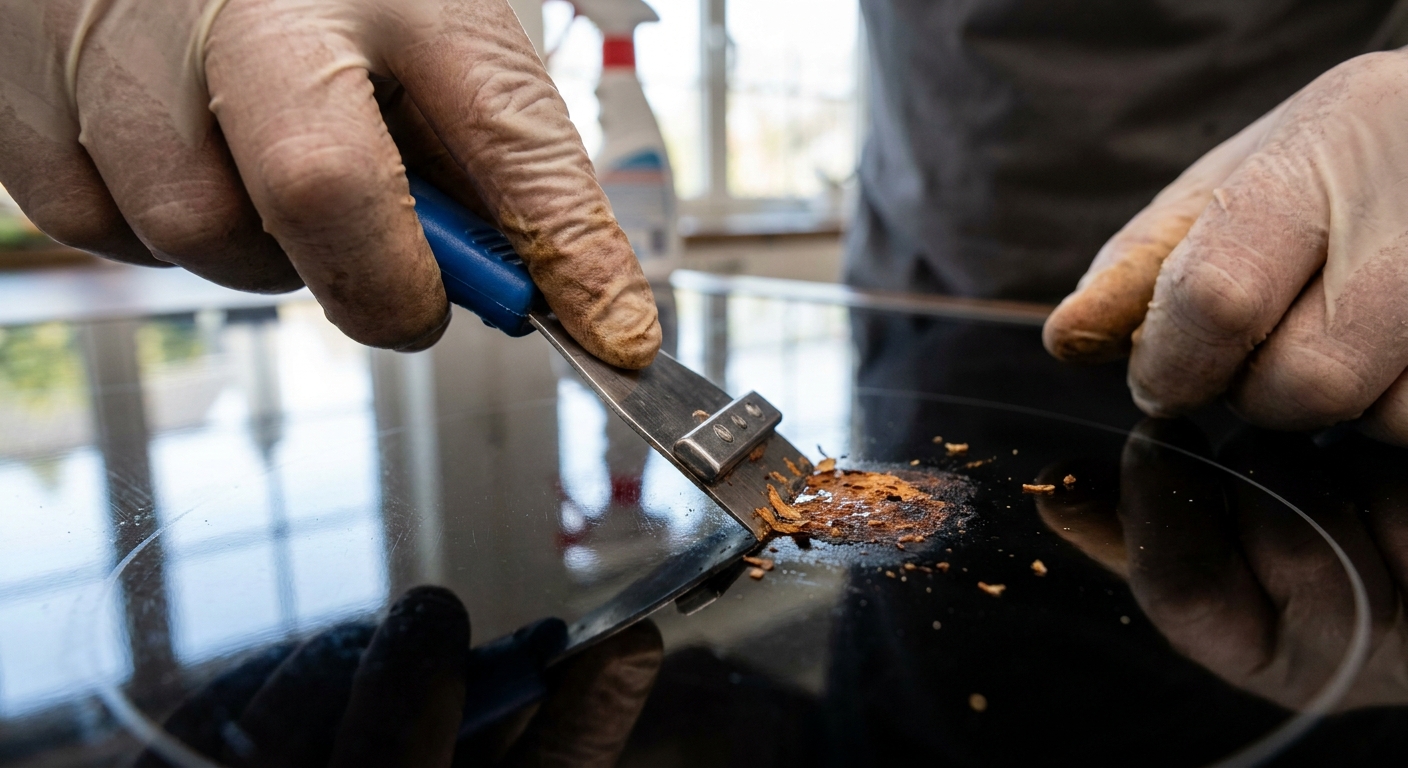
Burnt sugar
Burnt sugar is dramatic because it becomes a clear, rock-hard candy shell. The goal is to lift it cleanly, not sand it down.
If the spill just happened
- Turn off the burner.
- Put on an oven mitt.
- Many major manufacturers’ manuals recommend using a scraper to lift sugar while still hot. Follow your manual, keep the blade low, and lift the spill away from the hot zone.
- Let the surface cool fully, then finish with cooktop cream.
If it is cooled and hardened
- Lay a warm, damp microfiber cloth over the spot for 5 to 10 minutes to soften the edges.
- Apply a small amount of cooktop cream.
- Scrape at 30 to 45 degrees, wiping the blade edge often.
- Polish with a clean microfiber cloth.
Do not attack sugar with a rough scrubber. It encourages scratches because you end up using more pressure for longer.
Melted plastic
Plastic is trickier than sugar because it can smear and re-bond. The key is getting it firm enough to lift.
Method A: lift while hot (fresh accident)
- Ventilate the kitchen and avoid breathing fumes.
- With an oven mitt on, use the scraper to gently lift softened plastic away.
- Let the cooktop cool, then clean with cooktop cream.
Method B: harden it first (if it is smeary)
- Let the cooktop cool completely. The surface should be cool to the touch and the hot-surface light should be off.
- Do not use ice on a warm cooktop. Once fully cool, place a bag of ice on top of the plastic for 5 minutes to make it brittle. Keep the ice in a bag so water does not run everywhere.
- Scrape carefully to lift chunks.
- Use cooktop cream to remove the final film, then buff dry.
Avoid solvents like acetone unless your appliance manual says it is safe. In some homes it is fine, but it is not a universal recommendation.
Cloudy rings and rainbow haze
Rings often come from mineral deposits, cleaner residue, or heat-baked oils. Rainbow haze is frequently a thin film that needs polishing, not aggressive scrubbing.
Polish-out routine
- Wash the surface with a few drops of dish soap in warm water. Wipe clean and dry.
- Apply a small amount of cooktop cream cleaner.
- Rub in small circles with a microfiber cloth or a cooktop-safe non-scratch pad labeled for glass.
- Buff with a clean, dry microfiber until it feels slick, not grabby.
If rings keep coming back
- Check your cookware bottoms. Rough, dirty, or warped pans can leave marks and metal transfer.
- Avoid sliding pans. Lift instead of drag, especially cast iron.
- Wipe spills quickly once cooled. Heat-baked oil becomes that gray shadow you can never unsee.
Reality check: Some “scratches” are actually metal transfer from aluminum or stainless steel, or just residue. Cooktop cream often removes it. True scratches often catch a fingernail, while transfer and residue usually do not, but it is not a perfect test. When in doubt, stop and check your manual before you keep scraping.
Burnt-on grease
Not every mess is sugar or plastic. Sometimes it is just years of oil that has baked itself into the surface like it pays rent.
- Once the cooktop is cool, wash with warm soapy water and dry.
- Apply cooktop cream and let it sit for 1 to 2 minutes.
- Rub with a cooktop-safe non-scratch pad or microfiber in small circles.
- If there are still raised, crusty bits, use the razor scraper at a low angle with a thin film of cleaner for glide.
- Buff dry with a clean microfiber to remove haze.
Daily upkeep
This is the part that makes your future self feel deeply cared for.
- After cooking, once cool: wipe with a damp microfiber and a drop of dish soap, then dry.
- Weekly: use cooktop cream to remove any film before it bakes on.
- Keep blades fresh: store the scraper safely and replace blades regularly.
- Go easy on product: too much cleaner can leave residue that turns into haze under heat.
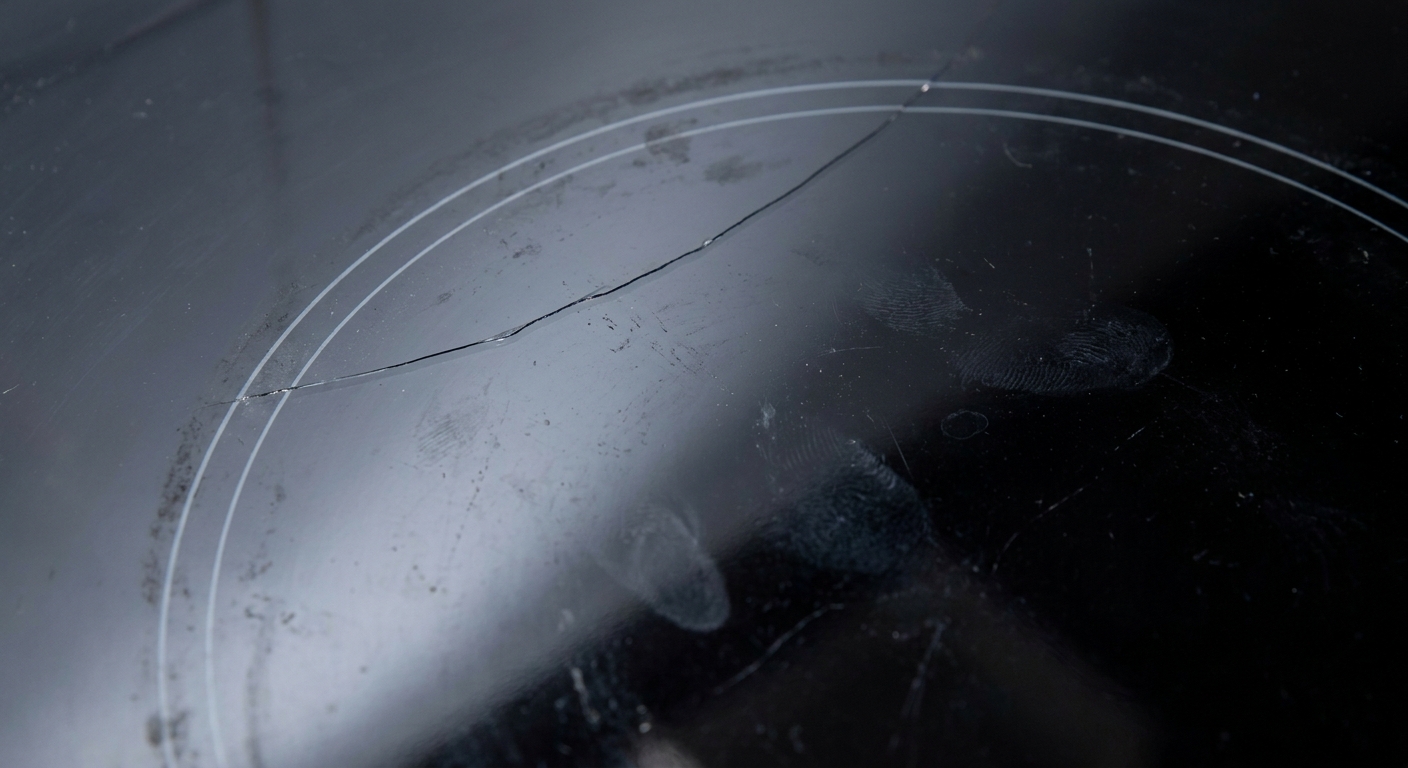
When to stop
There is a line between “stubborn spot” and “this is no longer a cleaning project.” If you cross it, you risk making a small issue worse, or unsafe.
Stop and notify management or the manufacturer if:
- You see a crack, even a hairline one.
- You find a chip on an edge or near a burner.
- The surface feels uneven or the glass is lifting.
- Liquid seems to have seeped under the glass.
- The cooktop is making unusual sounds or showing error codes after a spill.
In a rental, document it: take a clear photo in natural light and send a short note describing what you noticed and when. It keeps things calm and factual, which is the goal.
Quick cheat sheet
- Burnt sugar: follow your manual, scrape carefully (often while still hot), then cooktop cream.
- Melted plastic: lift while hot with protection, or harden with ice only after fully cooled, then polish residue.
- Cloudy rings: wash, then cooktop cream and buff fully dry.
- Burnt-on grease: cream + cooktop-safe pad, scraper only for raised bits.
- Biggest scratch causes: grit under cloths, dull blades, rough scrubbers, sliding heavy pans.
- Stop for damage: chips and cracks mean call, do not scrub.
With a little patience and the right angle, you can get the cooktop back to sleek without turning it into a scratch-and-regret situation.