Chalk Paint vs. Milk Paint
Clara Townsend
Clara Townsend is an interior stylist, vintage furniture enthusiast, and the creative voice behind Velvet Abode. With over a decade of experience transforming both cramped city apartments and sprawling fixer-uppers, she believes that a beautiful home is built on personal stories rather than massive budgets. When she isn't hunting for the perfect brass sconce at a local flea market, she can usually be found rearranging her living room for the third time this month.
If you have ever stood in the paint aisle (or hovered over an online cart at midnight) wondering whether chalk paint or milk paint is the better choice for your next furniture glow up, you are in very good company. Both are beloved for turning tired dressers into charming, touchable pieces that look like they have a story. The difference is how they tell that story.
Think of chalk paint as your dependable friend who shows up with snacks, a playlist, and a clear plan. Milk paint is the artsy one who might show up barefoot with wild ideas and a little chaos. Neither is wrong. You just want the one that matches your piece, your patience level, and the vibe you are chasing.
Quick definitions
What is chalk paint?
Chalk paint (often sold as “chalk-style” paint) is a matte, opaque, water-based decorative paint that often adheres well with minimal prep. It is famous for an easy, velvety finish and for making distressing and layering simple. Most brands are pre-mixed and ready to use, but slick and stain-prone surfaces may still need sanding or primer.
What is milk paint?
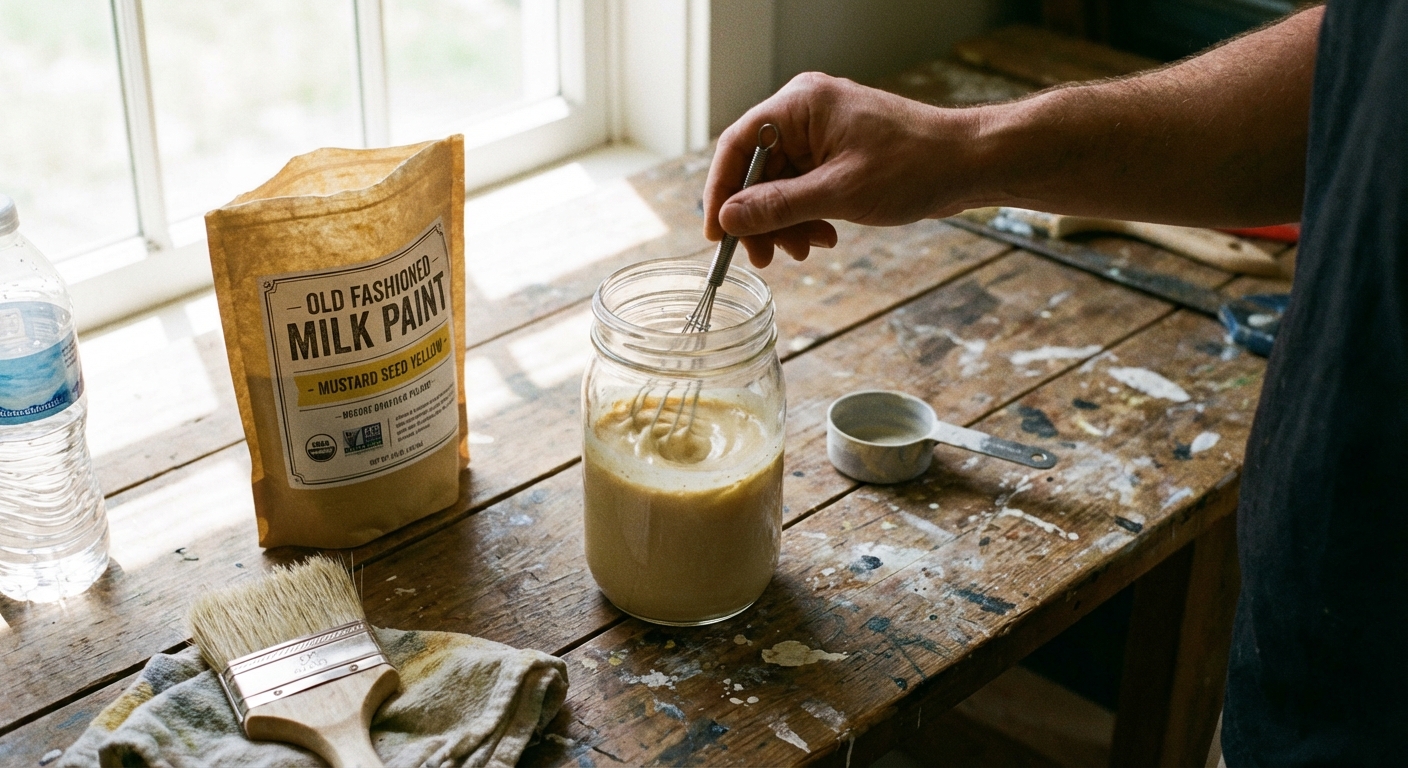
Traditional milk paint is a natural paint made from milk protein (casein), lime, and pigment. Many modern versions come as a powder you mix with water. It soaks into porous surfaces and can create beautiful, varied results, from smooth and whispery to chippy and timeworn.
Quick note so you do not get tricked by labels: some products marketed as “milk paint” are acrylic or latex blends. They can be great paints, but they do not behave exactly like true milk paint.
Finish
Chalk paint finish
- Look: Soft, matte, and more uniform coverage.
- Feel: Velvety and smooth once waxed or sealed.
- Style sweet spot: Cottage, French country, grandmillennial, modern vintage, and anything that wants a calm, consistent color.
If you love that “fresh but not shiny” look, chalk paint is an easy yes. It photographs beautifully in warm light, especially in creamy whites, muted greens, and dusty blues.
Milk paint finish
- Look: Organic, slightly translucent or layered, often with natural variation.
- Feel: More like a stain-plus-paint hybrid on raw wood, especially when burnished.
- Style sweet spot: Primitive, farmhouse, European antique, wabi-sabi, and pieces you want to feel genuinely old.
Milk paint is the queen of patina. Even when you aim for smooth, it can give you those subtle highs and lows that look like decades rather than an afternoon project.
Prep
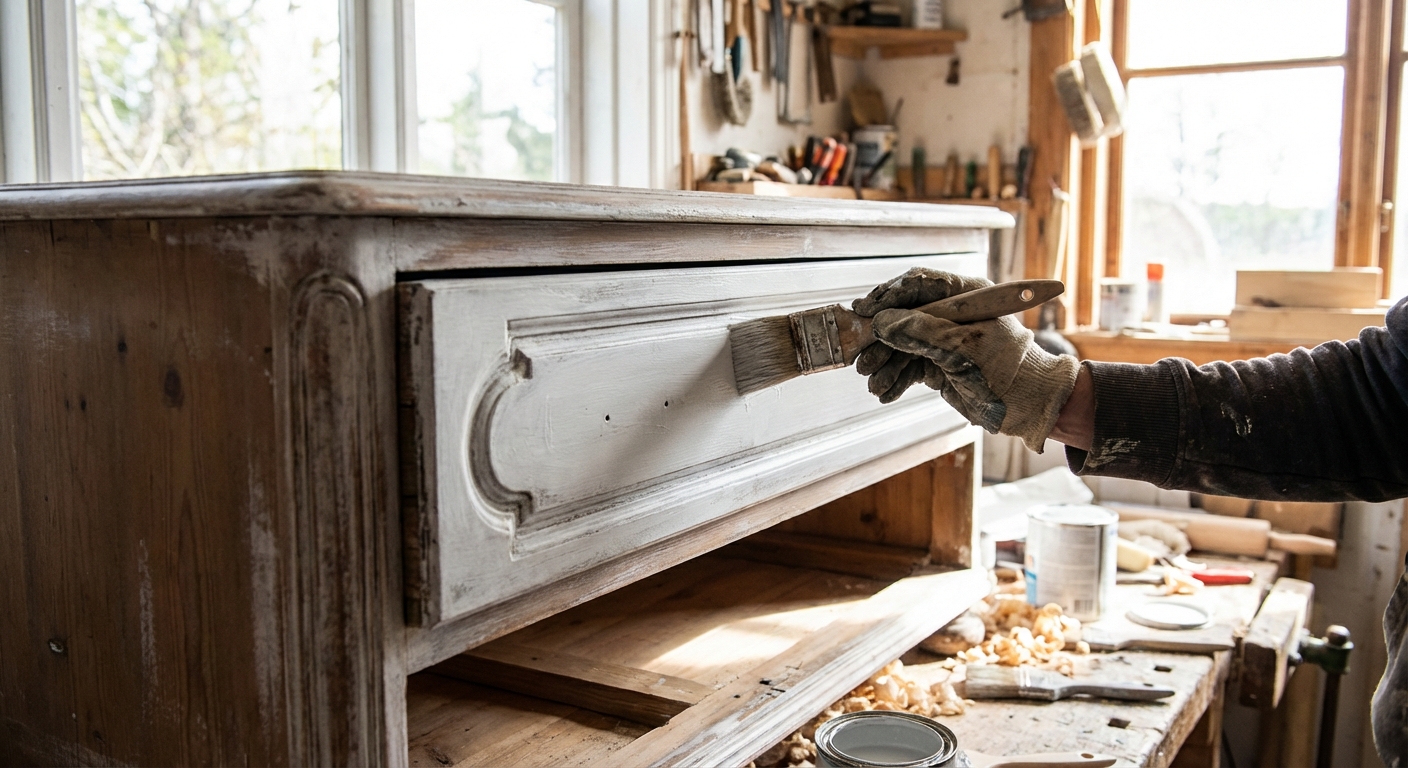
Chalk paint prep
Chalk paint is loved because it is forgiving, but it is not magic. The real rule is: clean well, then decide if you need extra steps.
- Usually enough: Degrease (especially kitchen pieces), scuff sand glossy finishes lightly, and start painting.
- Prime first when: The wood has tannins (oak, mahogany, cherry), there are knots in pine, the piece smells smoky, or there are mystery stains. A stain-blocking primer can save your sanity. Many pros reach for shellac-based primer for serious bleed-through.
- Extra tip: If the piece is slick laminate or factory lacquer, a light scuff and a bonding primer can help prevent scratch-off.
Milk paint prep
Milk paint bonds best to raw or porous surfaces. That is the whole romance of it. On sealed furniture, it can feel unpredictable.
- Best surface: Bare wood, unfinished furniture, or previously milk-painted pieces.
- If the piece is sealed: You have two paths. Sand to open the surface (not always down to raw, but enough to give tooth) or use a bonding additive.
- Bonding additive: Many milk paint brands sell one. It reduces chipping and makes results more consistent, but you also lose a bit of that naturally aged magic.
If you secretly want that flaky, antique chipping, sealed wood without bonding additive is where milk paint can surprise you in the best way. If you want control, prep more or add the bond.
Durability
Durability depends less on the paint label and more on surface prep, cure time, and topcoat. Both can last beautifully when sealed properly and treated like a newly finished surface for the first couple of weeks.
Chalk paint durability
- Strengths: Builds an even film, can be quite tough with the right topcoat.
- Weak spots: Without a sealer, it can mark, scuff, and grab fingerprints, especially in deep colors.
- Ideal for: Dressers, nightstands, bookcases, and decorative chairs (anything not constantly wet or heavily abraded).
Milk paint durability
- Strengths: Soaks in and can feel “part of” the wood on raw surfaces, especially when finished with oil or a durable topcoat.
- Weak spots: On slick surfaces it can chip more easily, which is either a dealbreaker or the goal.
- Ideal for: Raw wood pieces, historic style finishes, and projects where character is welcome.
Real talk: For dining tables, kitchen cabinets, and anything that sees water rings, treat both paints as “needs a high-use topcoat” territory. Pick the paint look you love, then commit to a durable sealer and full cure time.
Cure time cheat sheet
- Dry to touch: Often 30 minutes to a few hours (varies by brand and humidity).
- Recoat: Often 1 to 4 hours.
- Handle gently: 24 to 72 hours.
- Full cure: Commonly 7 to 30 days depending on paint and topcoat. During cure, avoid heavy stacking, taped-on décor, or aggressive cleaning.
Sealing
Sealing chalk paint
Chalk paint almost always benefits from a protective finish.
- Wax: Gives that buttery, hand-rubbed feel and a soft sheen. Lovely for low-traffic pieces. Not ideal for hot mugs or constant wiping.
- Water-based polyurethane topcoat (for example, Polycrylic): More durable for heavy use, easier maintenance. Choose matte or satin to keep the look cozy.
- Hardwax oil: Beautiful, durable, and tactile, but follow product directions carefully.
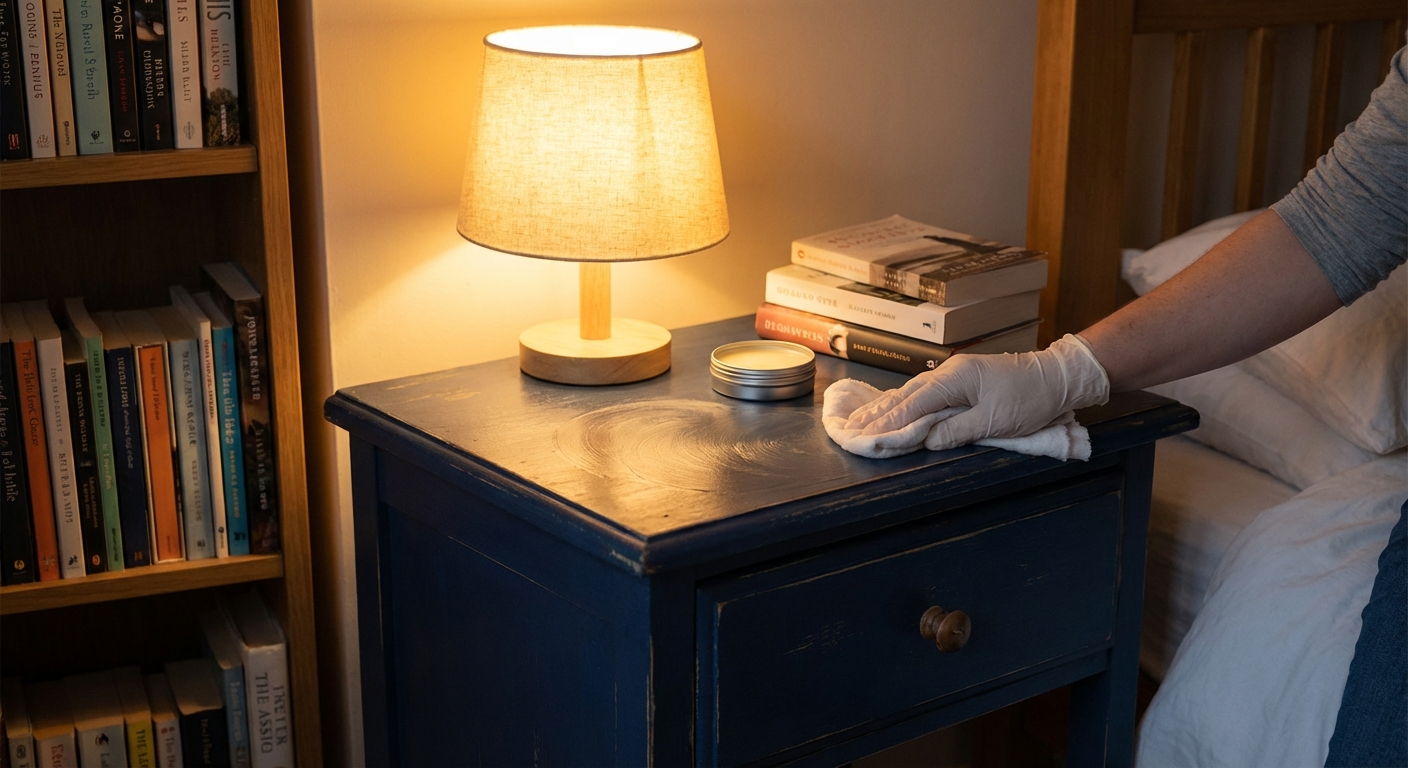
Sealing milk paint
Milk paint can be left unsealed for a chalky, old-world look, but it will be more porous and may show marks. It can also rub off on hands or clothing, especially in high-contact spots. Most pieces in everyday homes do better sealed.
- Hemp oil, tung oil, or finishing oil: Deepens color and adds a warm, aged glow, especially stunning on earthy pigments. Test first and allow full cure, since some oils (especially tung oil) cure slowly and results vary by brand and layer thickness.
- Wax: Adds softness and a gentle patina. Great for that antique vibe.
- Polyurethane or furniture varnish: Best for high-use surfaces when you want milk paint’s look with modern practicality.
Ease of use
Chalk paint is easier for predictable results
It is grab-and-go. Open the can, stir, paint. Coverage is typically strong, and the finish is consistent. It is excellent for beginners, or anyone painting in small pockets of time.
Milk paint is easier if you like a natural process
Milk paint is not hard, but it is more variable. You mix powder with water, strain if needed, and work fairly quickly. Some colors need extra coats. Some batches feel thinner or more textured depending on ratios. It is a little like baking bread. Simple ingredients, lots of personality.
Brush strokes and texture
- Chalk paint: Can show brush texture, but it levels nicely with the right brush and technique. It also plays well with rollers for smoother finishes.
- Milk paint: Often looks best with a natural bristle brush and a relaxed hand. Slight texture can add to the charm.
Cost and coverage
Prices vary wildly by brand and region, but here is the general pattern:
- Chalk paint: Usually more expensive per quart, but convenient and consistent. Coverage is often solid in 2 coats.
- Milk paint: Powder can feel more budget-friendly, and you can mix only what you need. Coverage depends on the look you want and the surface underneath. Expect 2 to 4 coats for full opacity.
If you are doing a lot of small projects, milk paint can be economical because you are not storing half-used cans that dry out. If you need reliability for a bigger piece, chalk paint may save time and re-dos.
Best uses
Choose chalk paint if you want:
- A consistent, opaque color
- Minimal prep on most previously finished furniture (with the right cleaning and scuffing)
- An easy path to smooth modern-vintage or gently distressed looks
- A beginner-friendly experience
Choose milk paint if you want:
- That authentic, aged variation and patina
- A finish that feels in the wood, not sitting on top of it
- Chippy character on purpose
- To work on raw wood or stripped pieces
Piece-by-piece picks
- Thrifted laminate dresser: Chalk paint with a bonding primer, then a high-use topcoat.
- Raw pine table: Milk paint plus oil for a warm, historic feel, or milk paint plus a high-use topcoat for family life.
- Kitchen chairs: Chalk paint for predictability, unless you want milk paint chipping on edges for a truly timeworn look.
- Antique cabinet with details: Either works, but milk paint can make carvings look like they have been there forever.
Mini walkthroughs
Chalk paint in 5 steps
- Clean: Degrease thoroughly and let dry.
- Scuff: Lightly sand glossy areas, then remove dust.
- Prime if needed: Use a stain-blocking primer for tannins, knots, smoke, or stains.
- Paint: Apply 2 thin coats, sanding lightly between coats only if you want an extra-smooth finish.
- Seal: Wax for low-traffic pieces or a water-based polyurethane topcoat for heavy use.
Milk paint in 5 steps
- Choose your surface: Raw wood is easiest for consistent bonding.
- Mix: Combine powder and water, then let it sit a few minutes. Strain if you want a smoother finish.
- Add bond (optional): Use bonding additive if you want less chipping on sealed surfaces.
- Paint: Apply thin coats. Expect more coats for full opacity, and let each coat dry well.
- Finish: Oil or wax for an old-world feel, or a high-use topcoat for tables and cabinets.
Pitfalls
My chalk paint scratches off with my fingernail
- Clean better. Grease and polish residues are sneaky.
- Let it cure. Paint can feel dry in hours but still be soft for days.
- Use a topcoat appropriate for the piece’s use.
My milk paint is powdery and wiping off
- Add more coats, then seal. Milk paint often needs a finish to lock it in.
- Check your mix ratio. Too much water can make it weak.
- Consider a bonding additive if you are on a sealed surface.
My milk paint chipped everywhere and I did not want that
- That is usually a surface issue. Sand more for tooth or use the bonding additive.
- Seal after you get the look you want to stop further wear.
Safety notes
- Ventilation matters: Paint and topcoats can have fumes, even water-based ones. Open windows and use fans when you can.
- Dust protection: Wear a dust mask or respirator when sanding, especially on old finishes.
- Lead paint caution: If your piece is from before 1978, assume lead paint is possible. Test first and follow lead-safe practices (or skip sanding and use an appropriate encapsulating plan).
My verdict
If you want the most reliable, low-fuss upcycle with a soft matte finish, chalk paint is usually the best choice. It is fantastic when you are painting a piece you cannot fully strip, when you want clean color, and when you just want the project to behave.
If you want a finish that feels like it has lived a life, especially on raw wood, milk paint is pure magic. It is the one I reach for when I want a piece to look like it belongs in a sun-faded farmhouse kitchen, even if it is going into my very city apartment.
And if you are still torn, here is my favorite compromise: use milk paint for that layered, old-world base, then seal well. Or use chalk paint for the main color and add character with a soft glaze or gentle sanding. Your home does not need rules. It needs pieces that make you smile when you walk past them with your morning coffee.
FAQ
Is chalk paint the same as chalkboard paint?
No. Chalk paint is a decorative matte paint. Chalkboard paint is designed to be written on with chalk.
Can I use milk paint over chalk paint?
You can, but milk paint prefers porous surfaces. Over sealed chalk paint, results can be unpredictable unless you sand for tooth or use a bonding additive. If you want layering, many people do the opposite: milk paint first on raw wood, then chalk paint on top for controlled distressing.
Which is better for beginners?
Chalk paint, if you want consistent results quickly. Milk paint, if you are comfortable experimenting and you love organic variation.