Ceiling Line Cracks Where Wall Meets Ceiling: Renter-Friendly Fixes
Clara Townsend
Clara Townsend is an interior stylist, vintage furniture enthusiast, and the creative voice behind Velvet Abode. With over a decade of experience transforming both cramped city apartments and sprawling fixer-uppers, she believes that a beautiful home is built on personal stories rather than massive budgets. When she isn't hunting for the perfect brass sconce at a local flea market, she can usually be found rearranging her living room for the third time this month.
That skinny little crack where your wall meets the ceiling can feel like it’s shouting every time the afternoon light hits it. The good news is that most of these “ceiling line cracks” are boring, cosmetic, and wildly common in rentals. The slightly less fun news is that sometimes they are worth documenting, especially if they’re growing, staining, or showing up with other symptoms.
Let’s walk through what you’re likely seeing, how to tell “normal settling” from “please email the landlord today,” and how to do a renter-friendly touch-up that looks clean without crossing your lease lines.

Why cracks show up at the seam
The joint where the wall meets the ceiling is a natural stress point. Different materials expand and contract with temperature and humidity, buildings settle over time, and paint can get brittle. In many rentals, that seam was painted over without flexible caulk, so a tiny shift later, the paint film splits like a dry cookie.
Common harmless causes
- Normal settlement: especially in older buildings or after seasonal weather changes.
- Humidity swings: bathrooms, kitchens, or top-floor apartments can move a little more.
- No caulk at the seam: paint alone cannot flex the way caulk can.
- Multiple paint layers: thick paint can crack as it ages.
A quick note on what your place is made of
- Drywall: the wall to ceiling seam is usually taped and mudded. If tape is failing or the finish was rushed, you can see repeat cracking.
- Plaster: hairline cracks are common with age, but wider or fast-growing cracks should be checked.
- Crown molding: a gap where molding meets the wall or ceiling is often a caulk issue, not the ceiling itself.
- Concrete ceilings (some condos and high-rises): cracks can look sharper. New, widening, or multiple cracks are still “document and ask maintenance” territory.
Cosmetic or warning sign?
You do not need to become a structural engineer to make a smart call. Think in patterns, size, and “is anything else happening?” Also, sudden change matters more than a single measurement.
Usually cosmetic (monitor, then tidy up if allowed)
- Hairline width: very thin, like a pencil line or less, often straight along the seam.
- Stable over time: looks the same week to week.
- No staining: no yellowing, brown rings, or damp spots.
- No texture changes: the ceiling surface is not soft, bubbling, or sagging.
Document and contact your landlord (do not cover it)
- It is changing: lengthening quickly, widening, or spreading onto the ceiling or down the wall.
- It is wide: about 1/8 inch (3 mm) or wider, or widening over time. If you can slip the edge of a credit card into it, that is a good “time to report” clue.
- Stains or dampness: yellow, brown, or gray rings, active dripping, or the area feels cool and moist. (Sometimes this is HVAC condensation or cold bridging, but if it is new or spreading, it is still worth reporting.)
- Bulging or sagging: the ceiling looks bowed, bubbled, or soft.
- Multiple cracks: especially stair-step cracks in drywall, cracks near doors or windows that suddenly stick, or a new gap between trim and wall.
- Movement-linked changes: the crack opens or shifts with normal activity like walking above, doors slamming, or temperature swings.
If you suspect water, treat it as urgent. Water issues can become mold issues, and renters should not be asked to “just paint over it.”
How to document it
Even if it is probably cosmetic, a little documentation can save you stress later. Think of it as creating a calm paper trail.
Do this in 10 minutes
- Take clear photos in natural light and with a lamp angled across the surface so the crack shows.
- Include one location photo that shows the whole corner or room, then close-ups.
- Add a size reference like a ruler or tape measure held near the crack.
- Note the date in your phone notes, and re-check in 2 to 4 weeks.
- Email or portal message if it is new, changing, stained, or you are unsure. Keep it polite and factual.
A simple message you can copy
“Hi [Name], I noticed a crack along the wall to ceiling seam in [room, corner]. It appears [hairline/widening] and I first saw it on [date]. I’ve attached photos. Please advise if you’d like maintenance to take a look.”

Before you fix anything
Some rentals are relaxed about tiny touch-ups. Others want all repairs handled by maintenance, or they require specific paint and products. Before you caulk or paint:
- Check your lease for language about painting, patching, and alterations.
- Ask about paint if you plan to cover anything. Many properties track paint colors and sheen.
- Never seal in a possible leak or stain without reporting it. Covering a water issue can come back to you.
Quick safety notes
- Ventilate: crack a window and run a fan if you are caulking or painting.
- Step stool basics: use a stable stool on a flat surface and avoid overreaching. Move the stool instead of leaning for “one last inch.”
Renter-safe cosmetic fixes
If the crack is truly hairline and dry, and you have permission to do a minor cosmetic touch-up, you have two renter-friendly paths: a flexible caulk line (best for a seam) or a small paint touch-up (best when the seam is stable and already caulked).
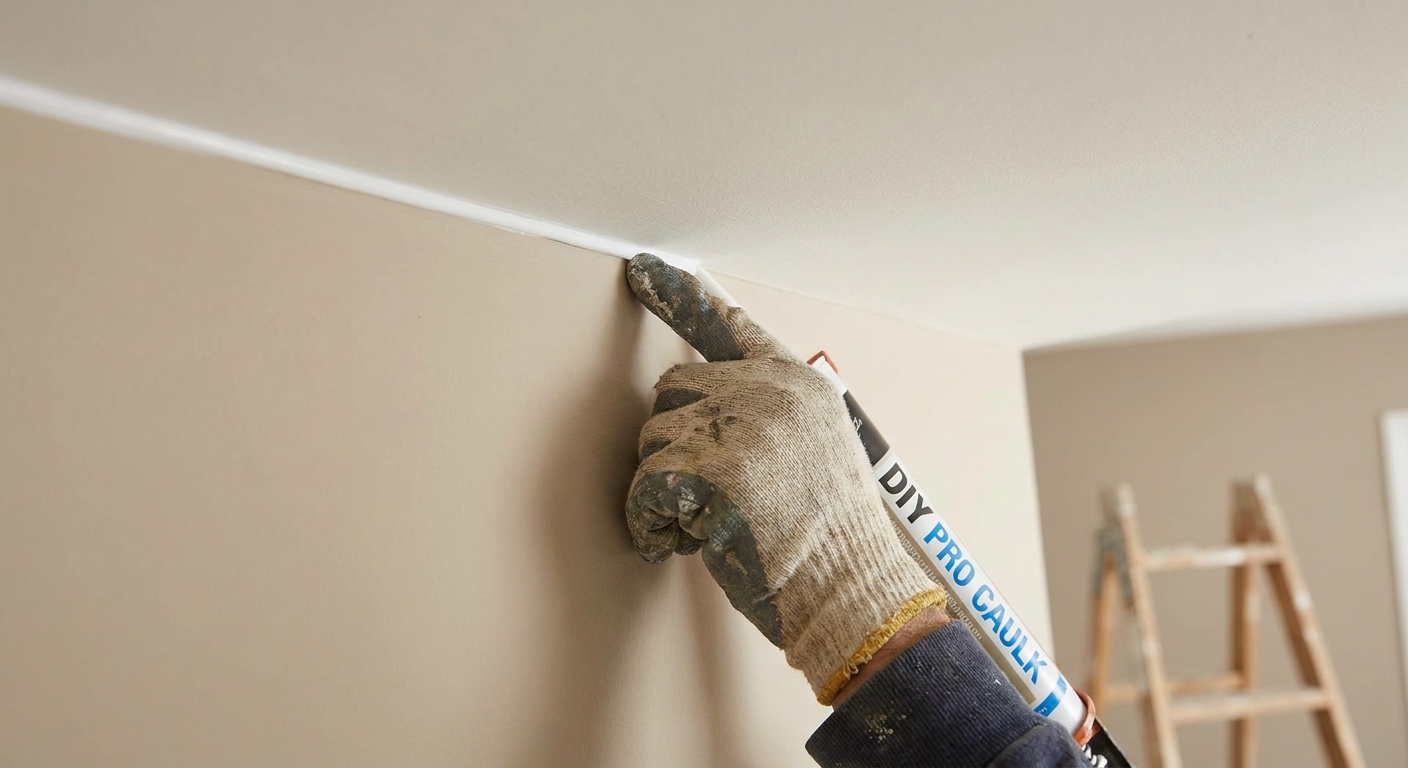
Option 1: Paintable caulk (best for seams)
This works beautifully because caulk stays flexible, which is exactly what that joint needs. Your goal is a tiny bead, not a frosting moment.
- Choose the right caulk: a paintable acrylic latex caulk, or a siliconized acrylic labeled paintable. Avoid silicone-only caulk if you plan to paint, since paint will not adhere well.
- Keep it low-odor: look for low-VOC options, especially in small apartments.
Step-by-step
- Clean the seam: wipe with a barely damp cloth, then let it dry fully. Dust prevents adhesion.
- Tape for crisp edges (optional): painter’s tape on the ceiling and wall, leaving a narrow gap right over the seam.
- Cut a small tip opening: you want a thin line, about the width of cooked spaghetti or less.
- Apply a light bead: steady pressure, moving smoothly.
- Tool it: run a damp finger or a caulk smoothing tool once, gently. Wipe excess immediately.
- Remove tape: pull it off while the caulk is still wet for a clean edge.
- Let it cure: follow the tube. Many are paint-ready in 30 to 60 minutes, but full cure is often closer to 24 hours. Always check the label.
My note: Less caulk looks more professional. When in doubt, do a thinner bead and add a second pass only if you truly need it.
If the crack keeps coming back: recurring seam cracks can mean the joint tape is loose, the original finish was thin, or the building is moving more than caulk can hide. That is when maintenance may need to re-tape and refinish, not just recaulk.
Option 2: Careful paint touch-up
If the crack is in the paint film and the seam is not moving much, paint can disguise it. The trick is matching color and sheen. Many ceilings are flat white, but not all flats are the same white.
How to get a match
- Ask your landlord for the exact paint name and sheen if possible. This is the cleanest route.
- Take a tiny paint sample only if allowed: a small flake from an already-loose area can help a paint store match.
- Match the sheen: ceilings are typically flat, walls often eggshell or satin. Using the wrong sheen makes touch-ups flash in angled light.
Touch-up tips that stay subtle
- Feather the edges: use a small brush and lightly “dry out” the paint at the edge so there is no hard outline.
- Use a mini roller for larger areas: if you paint more than a few inches, a mini roller better mimics ceiling texture.
- Paint in the same direction as existing roller marks when possible.
Option 3: Zero-paint disguises
If your lease is strict and the crack is minor, you can still make it feel less noticeable without altering anything.
- Change the lighting angle: cracks pop under harsh, sideways light. A warmer bulb or shifting a floor lamp can soften the shadow line.
- Use placement: a tall plant, a high bookcase, or larger art can visually reroute the eye away from that seam.
- Temporary peel-and-stick caution: I do not recommend putting adhesive strips right at the ceiling seam. Removal can lift paint, especially on older ceilings.
What not to do
- Do not use spackle alone at the wall to ceiling seam. Even setting-type compounds can crack if the joint keeps moving. The core issue is movement and flexibility at the seam, and sometimes missing or failing joint tape.
- Do not paint over stains without reporting and confirming the area is fully dry and the cause is fixed.
- Do not widen the crack aggressively to “clean it out.” In rentals, minimal intervention is safer.
- Do not sand textured ceilings without confirmation. Some textured coatings, especially pre-1980s (region varies), can contain asbestos. Ask management or get it tested before disturbing it.
Mini shopping list
- Paintable acrylic latex caulk (or paintable siliconized acrylic)
- Caulk gun (if needed for the tube size)
- Painter’s tape
- Small flexible putty knife or caulk smoothing tool (optional)
- Microfiber cloth
- Small angled brush and mini roller (only if painting is approved)
When to stop DIY
If you are seeing repeat cracking after a caulk fix, or any signs of moisture, shifting, or bulging, pause. It is not a personal failure. It is the building telling you it needs attention behind the scenes.
Take photos, send a message, and let maintenance be the grown-up in the room.
A final reality check
Hairline cracks at the ceiling line are the apartment equivalent of laugh lines. They show up with time, seasons, and a little movement, especially in older places with layers of paint history. With the right documentation and a light, flexible touch, you can make that seam look clean again and keep your deposit and your peace intact.