7 Easy Weekend Upcycling Projects for a Fresh Living Room
Clara Townsend
Clara Townsend is an interior stylist, vintage furniture enthusiast, and the creative voice behind Velvet Abode. With over a decade of experience transforming both cramped city apartments and sprawling fixer-uppers, she believes that a beautiful home is built on personal stories rather than massive budgets. When she isn't hunting for the perfect brass sconce at a local flea market, she can usually be found rearranging her living room for the third time this month.
If your living room is feeling a little… flat, I have good news. You do not need a new sofa or a perfectly curated online cart of “designer” decor to make the space feel refreshed. You need one free weekend, a small stack of supplies, and the willingness to get a tiny bit messy.
Upcycling is my favorite kind of home magic because it leans on what you already have. It is also the fastest way to make a room feel personal. The goal is not perfection. The goal is that comforting, hug-like feeling when you walk in at the end of the day.
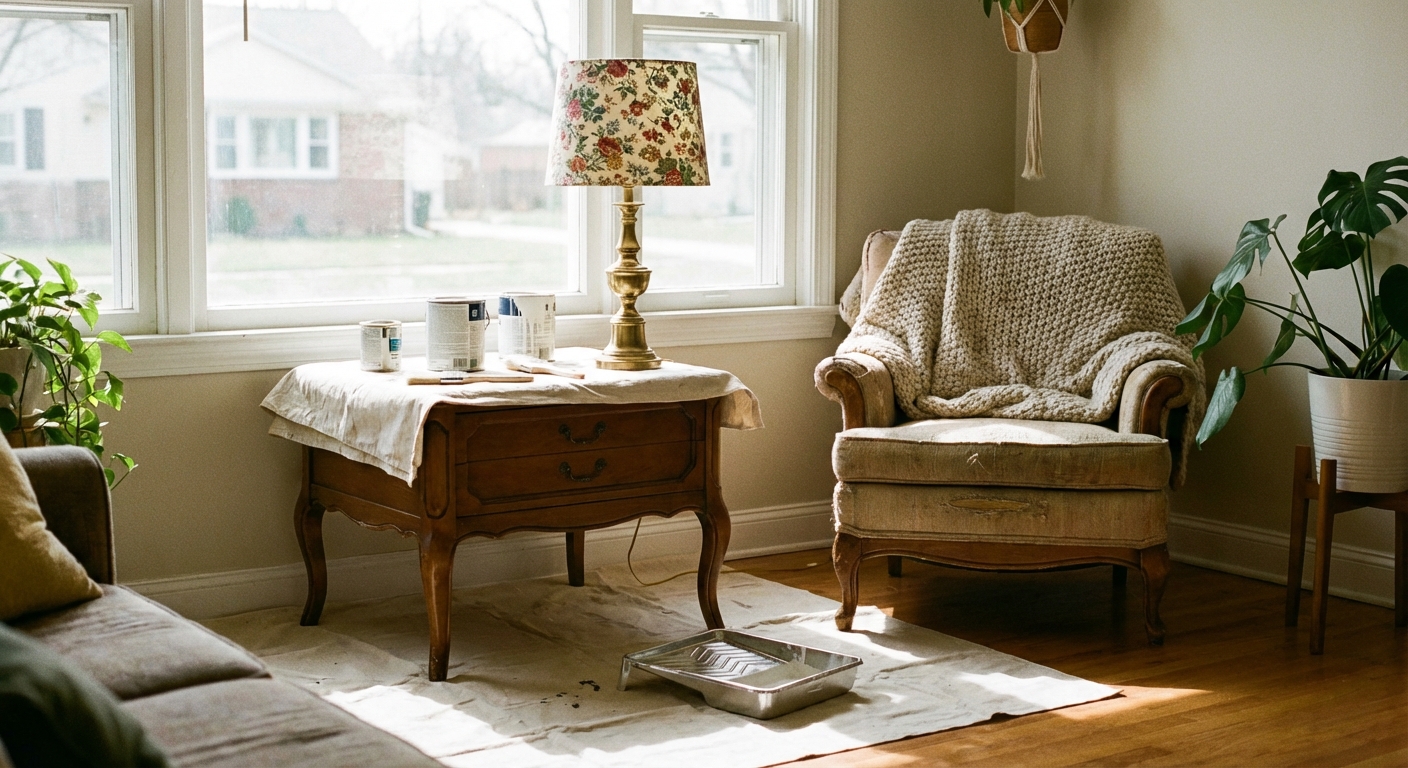
Below are seven easy weekend projects with a big visual payoff. Pick one, or stack two if you are feeling spicy.
Before you start: a 10-minute refresh checklist
- Clear one surface (coffee table, mantel, or media console) so you have room to work.
- Take a quick photo of the room. It helps you see the changes, especially with subtle upgrades like hardware or lighting.
- Choose one accent color to repeat in 2 to 3 places (pillow, frame, book spine, vase). Repetition is the secret sauce.
- Open a window if you are painting, staining, or using spray adhesive.
Quick safety note: Put down a drop cloth (spray adhesive travels), wear gloves if you are staining or waxing, and give finishes time to cure and off-gas before bringing pieces back into daily use. For lamps, LED bulbs are your best friend because they run cooler, and always keep fabric and adhesive well away from the bulb.
1) Recover a lampshade
Best for: instant cozy, softer light
Skill level: easy
Time/cost: 1 to 2 hours, low
Lighting is mood. A new shade changes the whole room faster than almost anything else, especially if your current shade is bright white and a bit tired. I love linen, soft cotton, and even vintage scarf fabric for a little pattern moment.
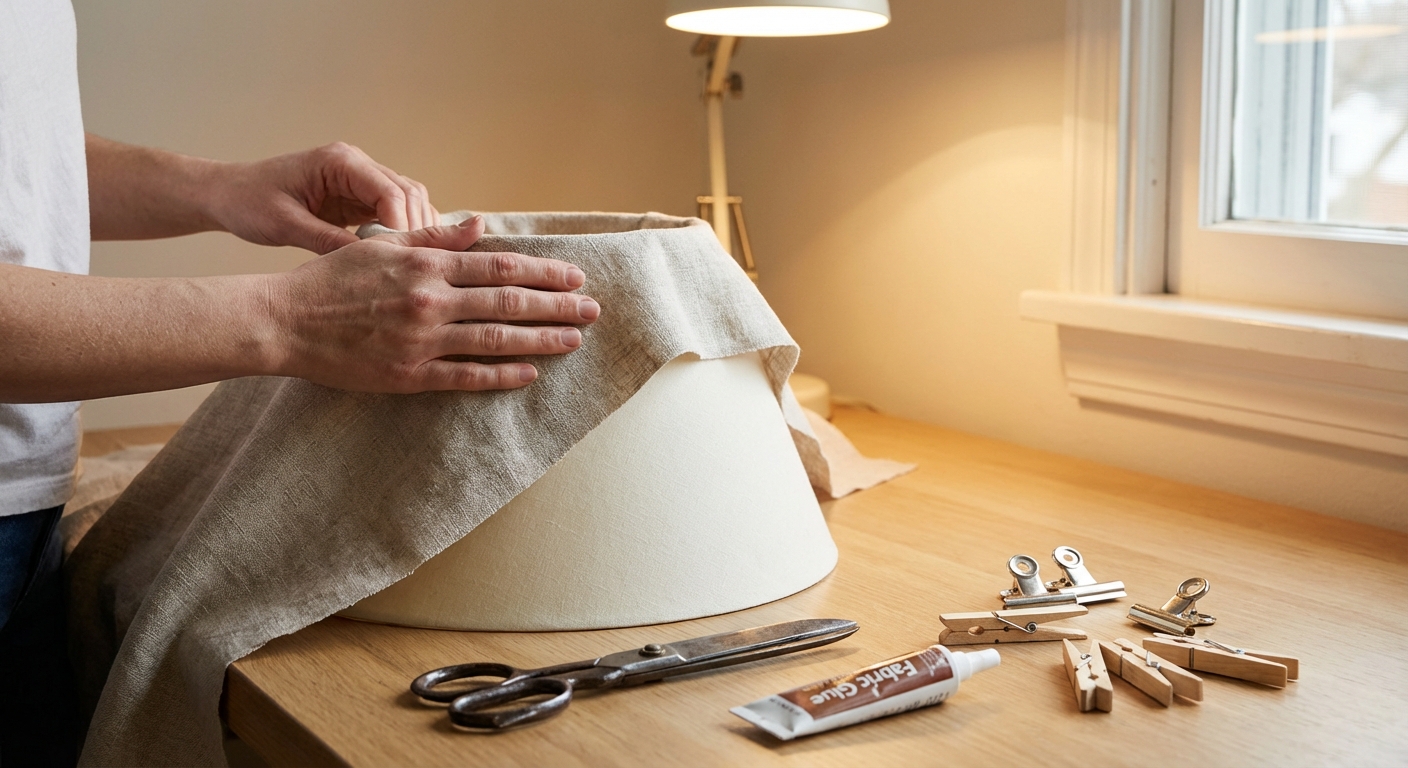
What you need
- Existing lampshade (drum or tapered works best)
- Fabric (linen, cotton, or a lightweight vintage textile)
- Spray adhesive or fabric glue (low-odor if possible)
- Scissors, ruler, clips or clothespins
- Optional: trim, bias tape, or grosgrain ribbon for the top and bottom edges
How to do it
- Cut fabric with 1 to 2 inches extra on all sides.
- Adhere in sections, smoothing as you go. (If using spray adhesive, protect nearby surfaces from overspray.)
- Fold excess to the inside at top and bottom. Add trim to hide raw edges if needed.
- Let it cure and fully air out before using the lamp.
Clara tip: If you have a brass or amber-based lamp, try an oatmeal linen shade. It makes the light glow like candlelight, but without the soot.
Lamp safety, in plain English: Stick with LED bulbs, keep fabric from drooping near the bulb, and skip this project if you use halogen bulbs or very hot-running bulbs. When in doubt, check your lamp and shade for heat warnings.
2) Frame vintage paper scraps
Best for: budget-friendly art, filling blank walls
Skill level: easy
Time/cost: 30 to 60 minutes, very low
This is my favorite “I need art, but I also need groceries” project. A single leftover wallpaper scrap, a page from an old book, or even high-quality wrapping paper can look intentional when framed. The trick is to give it breathing room with a mat or faux mat.
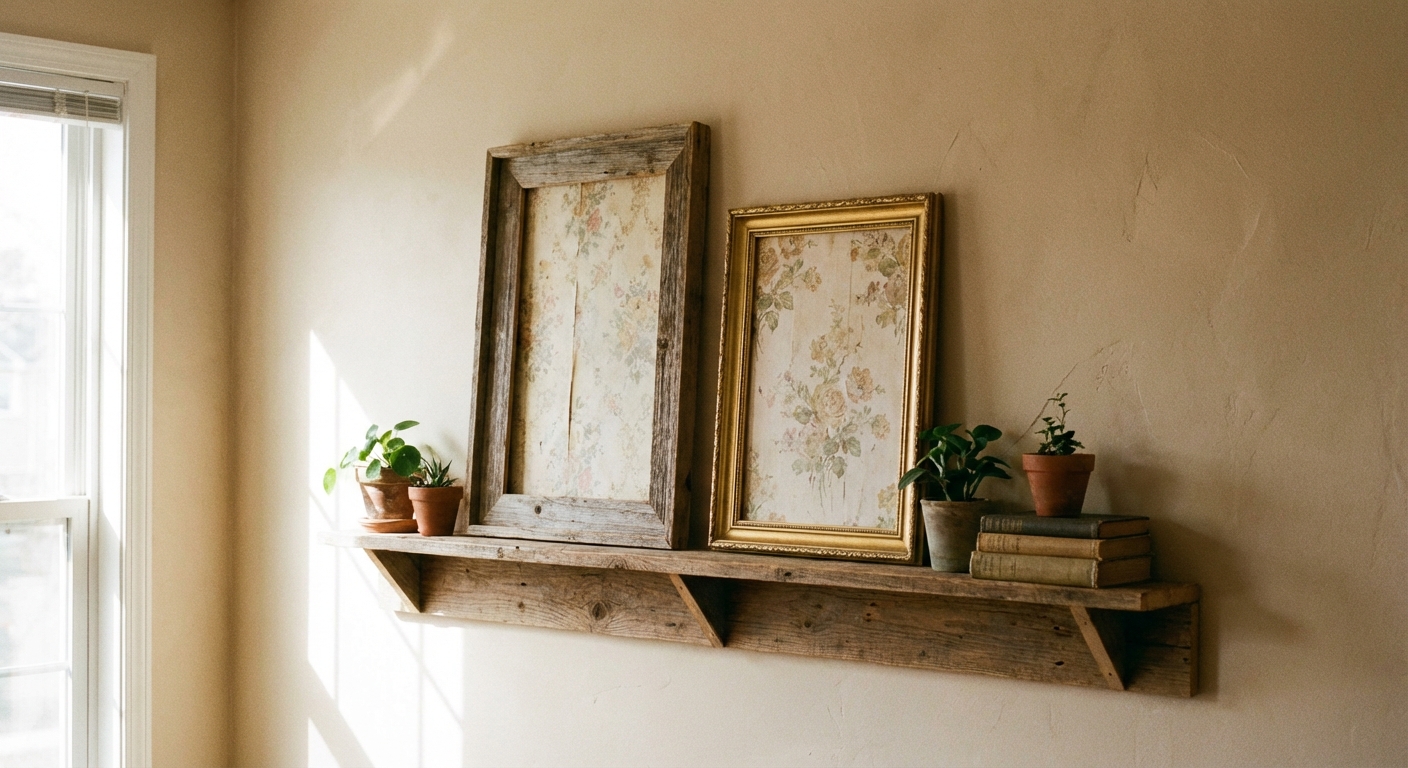
What you need
- Frames you already own or thrifted frames
- Wallpaper scraps, wrapping paper, or decorative paper
- Mat board or cardstock (optional but very worth it)
- Craft knife or scissors
How to do it
- Choose a frame size first, then trim your paper to fit.
- Add a mat or faux mat. Aim for about 1.5 to 3 inches of border for that gallery feel.
- Hang as a pair or trio for a collected look.
Clara tip: Mixing frame finishes looks more vintage and less matchy. Just repeat one element, like all gold tones or all thin profiles.
3) Upgrade frames with rub and buff
Best for: making thrift finds look expensive fast
Skill level: easy
Time/cost: 1 to 2 hours, low
If your living room needs a little polish, this is a low effort, high impact weekend win. Rub and buff gives you that aged, softly glinting finish that reads expensive from across the room. Paint can do the opposite, turning ornate frames modern and graphic.
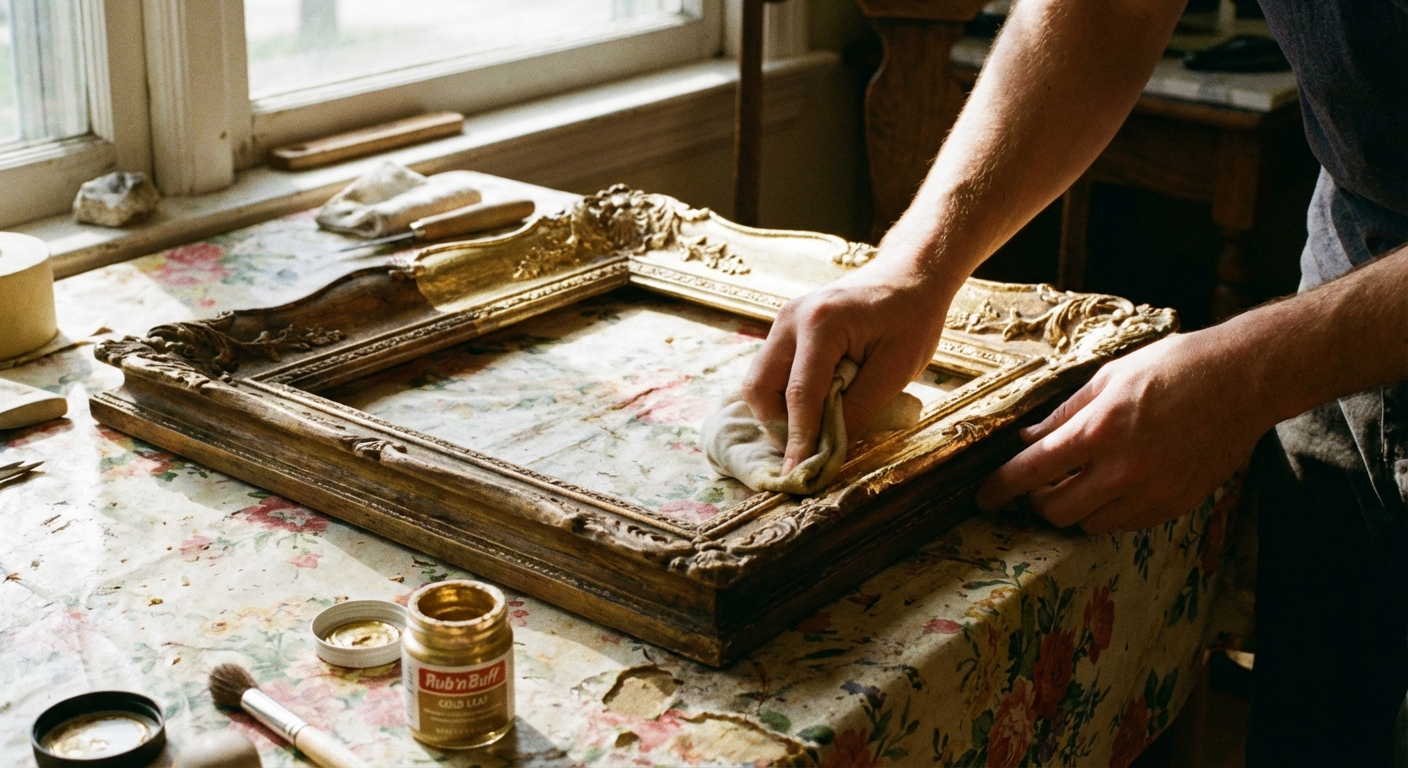
What you need
- Thrifted frame(s)
- Rub and buff wax or paint
- Soft cloth or small brush
- Optional: clear wax or matte sealer
How to do it
- Clean the frame well and let it dry.
- Apply rub and buff in thin layers, then buff. (Or paint in light coats.)
- Let it set before handling a lot, and seal if needed.
Clara tip: Rub and buff is powerful. Start with a pea-sized amount. You can always add more, but it is harder to take away.
4) Swap hardware on a table
Best for: making basic furniture feel custom
Skill level: easy
Time/cost: 30 to 90 minutes, low to medium
Hardware is jewelry for furniture. Swap basic knobs for vintage glass, warm brass, or chunky wood pulls, and suddenly that “fine” piece looks custom. This one is especially satisfying if your living room storage is doing the heavy lifting.
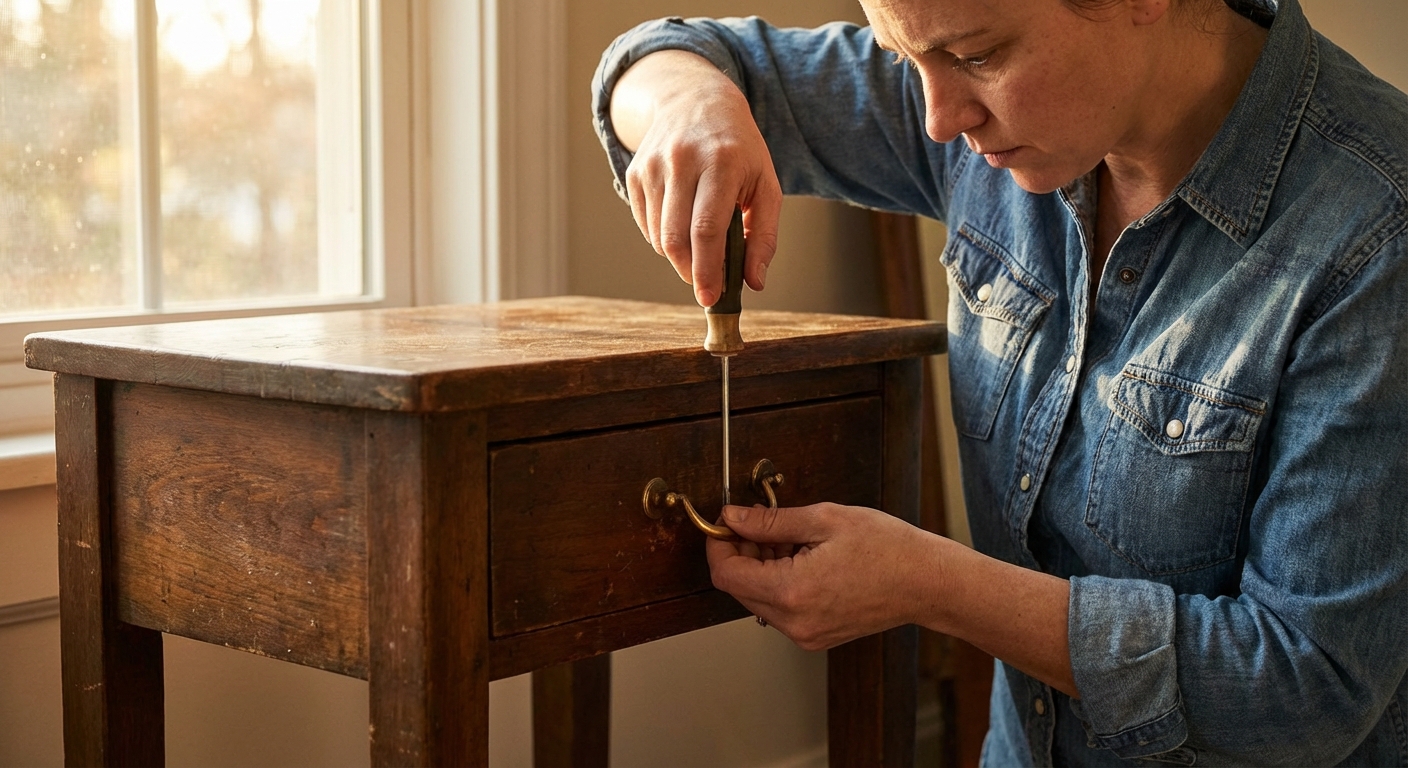
What you need
- New knobs or pulls (measure existing hole spacing first)
- Screwdriver and measuring tape
- Optional: wood filler and drill if you are changing placement
How to do it
- Measure the distance between holes on current pulls (center to center).
- Buy replacements that match, or plan to fill and re-drill.
- Install and tighten gently. Over-tightening can crack glass knobs.
Clara tip: If your room has a mix of metals, choose hardware that relates to your lighting. It makes the whole space feel more on purpose.
5) Paint or dye a basket
Best for: hiding clutter, making storage look styled
Skill level: easy
Time/cost: 1 to 2 hours plus dry time, very low
Baskets are living room workhorses. They hide throws, kids’ toys, chargers, and the random stuff that seems to multiply overnight. A quick color update makes them look styled instead of strictly practical.
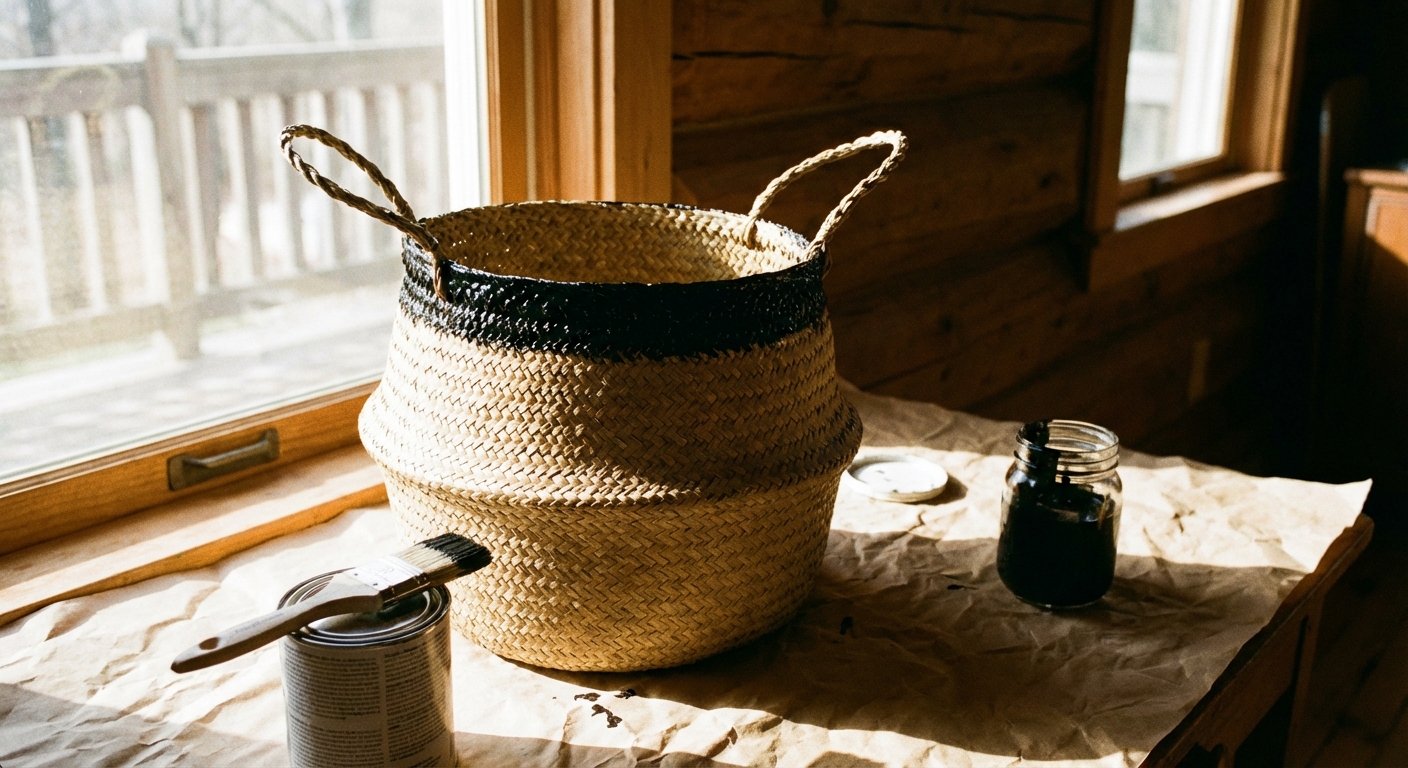
What you need
- Woven basket
- Acrylic paint, or all-purpose dye (results vary by fiber and finish)
- Brush or sponge
- Drop cloth
How to do it
- For paint: focus on the top third, rim, or a simple stripe.
- For dye: spot test underneath first. Some coated seagrass or rattan barely takes dye, and that is normal.
- Let it dry fully before putting textiles back inside.
Clara tip: A matte black rim on a natural basket looks so good with warm woods and vintage brass. It is a tiny change that reads very styled.
6) Make a no-sew pillow cover
Best for: a quick sofa refresh, adding pattern without commitment
Skill level: easy
Time/cost: 45 to 90 minutes, low
If you want your sofa to look different by Sunday night, update your pillows. A vintage tablecloth, an old linen sheet, or even a sturdy scarf can become a slipcover with iron-on hem tape or a simple envelope fold.
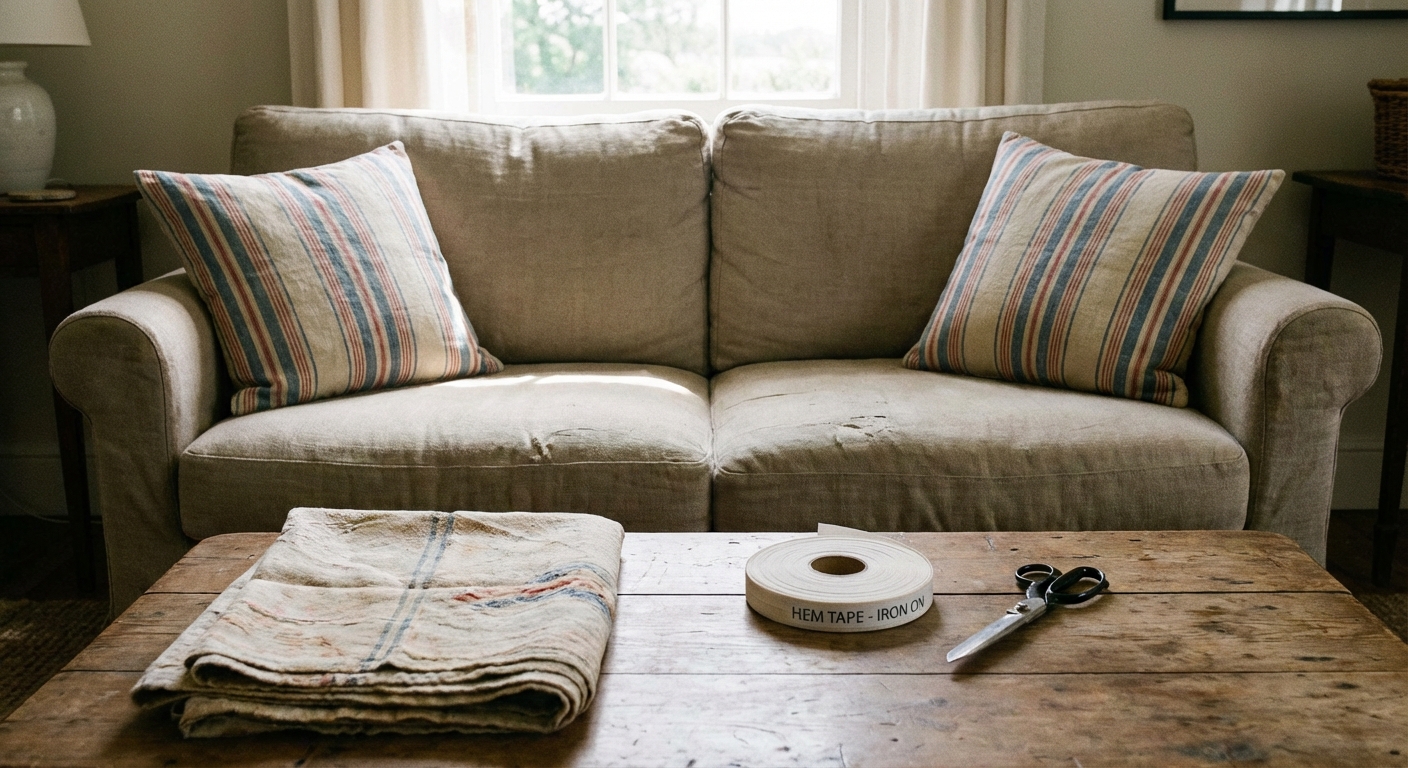
What you need
- Pillow insert you already own
- Vintage textile (washed and pressed)
- Iron-on hem tape or fabric glue
- Iron and scissors
How to do it
- Cut fabric to wrap around the pillow with an overlap. Aim for about 4 to 6 inches of overlap for an envelope back.
- Hem raw edges with hem tape.
- Fold into an envelope shape, secure the hems, then insert the pillow.
Clara tip: Use feather inserts if you can. Even okay fabric looks elevated when the pillow has that soft, sink-in shape.
Care note: If you use hem tape, hand wash or gentle cycle and air dry when possible. Heat can loosen some adhesives over time.
7) Deepen wood tones with wax
Best for: pulling mismatched wood tones together
Skill level: easy to moderate
Time/cost: 1 to 3 hours plus cure time, low to medium
When a living room feels disjointed, it is often because the wood tones are fighting each other. A weekend refresh on one small piece, like a side table, picture ledge, or wooden tray, can quietly pull everything together.
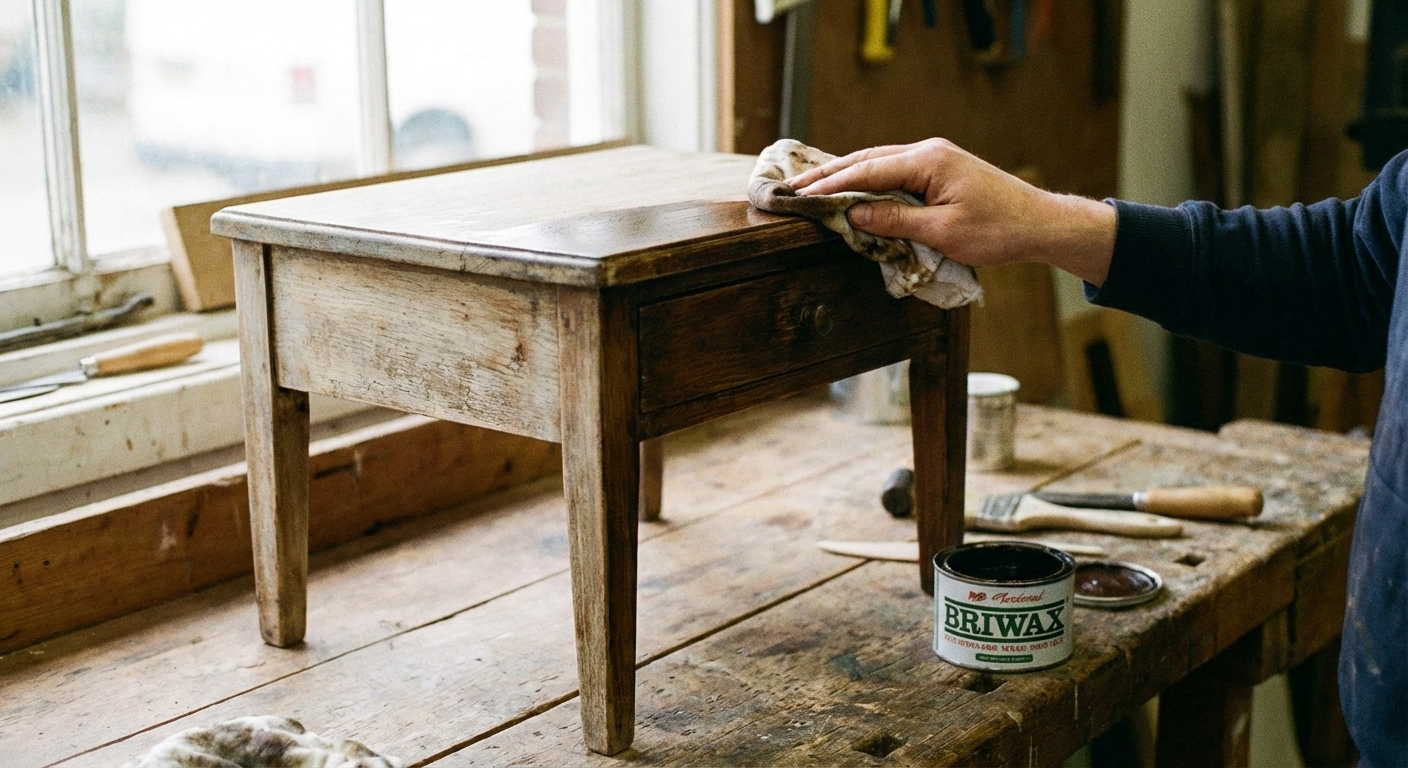
What you need
- Small wood piece (solid wood or wood veneer)
- Tinted wax or wood stain
- Rags, gloves
- Optional: fine sandpaper (220 grit)
How to do it
- Clean the surface. If it is glossy, scuff sand very lightly.
- Test your wax or stain underneath or in a hidden spot first, especially on veneer.
- Apply in thin layers, then wipe off excess.
- Let it cure, then buff for a soft sheen.
Clara tip: Tinted wax is wonderfully forgiving. It gives you that old library depth without the full commitment of stripping and refinishing.
Veneer note: Go easy with sanding. Veneer is thin, and the goal is just a light scuff for grip, not a full strip down.
How to pick your project
If you are unsure where to start, use this little cheat sheet:
- Room feels cold: Recover a lampshade or add textile pillow covers.
- Room feels cluttered: Upgrade a basket catch-all or make framed paper art to replace tiny scattered decor.
- Room feels dated: Swap hardware or refresh frames.
- Room feels off: Adjust one wood tone with tinted wax and repeat one accent color.
Finish and care
- Wax, stain, and paint: Dry is not the same as cured. If you can, give pieces 24 to 72 hours before heavy use.
- Rub and buff: Buff well, then avoid constant handling for a day. Seal if it is a high-touch frame.
- Lampshades: Let adhesives fully cure and air out, and stick with cool-running LED bulbs.
A gentle reminder
The best living rooms are not the ones that look untouched. They are the ones that look lived in and loved, with a few well chosen pieces that tell the story of you. Choose one project that makes you excited to walk back into the room. That is the real upgrade.
Design is not a finish line. It is an ongoing conversation with your space, and weekends are perfect for saying, “Okay, what do we want next?”
If you try one, take a before photo. Future you will want the proof.