15 Budget-Friendly DIY Wall Art Ideas Using Repurposed Materials
Clara Townsend
Clara Townsend is an interior stylist, vintage furniture enthusiast, and the creative voice behind Velvet Abode. With over a decade of experience transforming both cramped city apartments and sprawling fixer-uppers, she believes that a beautiful home is built on personal stories rather than massive budgets. When she isn't hunting for the perfect brass sconce at a local flea market, she can usually be found rearranging her living room for the third time this month.
My favorite kind of wall art is the kind with a past. A linen offcut that used to be someone’s curtain. A scrap of wood that smells faintly like a workshop. A page from a battered poetry book that’s been loved within an inch of its life. This list is for that kind of home, the one built from stories, hand-me-downs, and “wait, I can make something out of that.”
Below are 15 budget-friendly DIY wall art ideas using repurposed materials you can find in your own stash, a thrift store, or the bottom drawer of your kitchen junk cabinet. Each one is simple, flexible, and designed to look intentional on a gallery wall, even if you made it in an afternoon.
Before you start: a quick gather
You don't need a craft room. You need a small surface, a little patience, and permission to experiment.
- Basic tools: scissors, ruler, pencil, craft knife, painter’s tape
- Adhesives: glue stick, white glue, Mod Podge (optional), double-sided tape
- Hanging: picture hooks, Command strips, binder clips, or bulldog clips
- Finishing: acrylic paint, leftover wall paint, stain, sandpaper
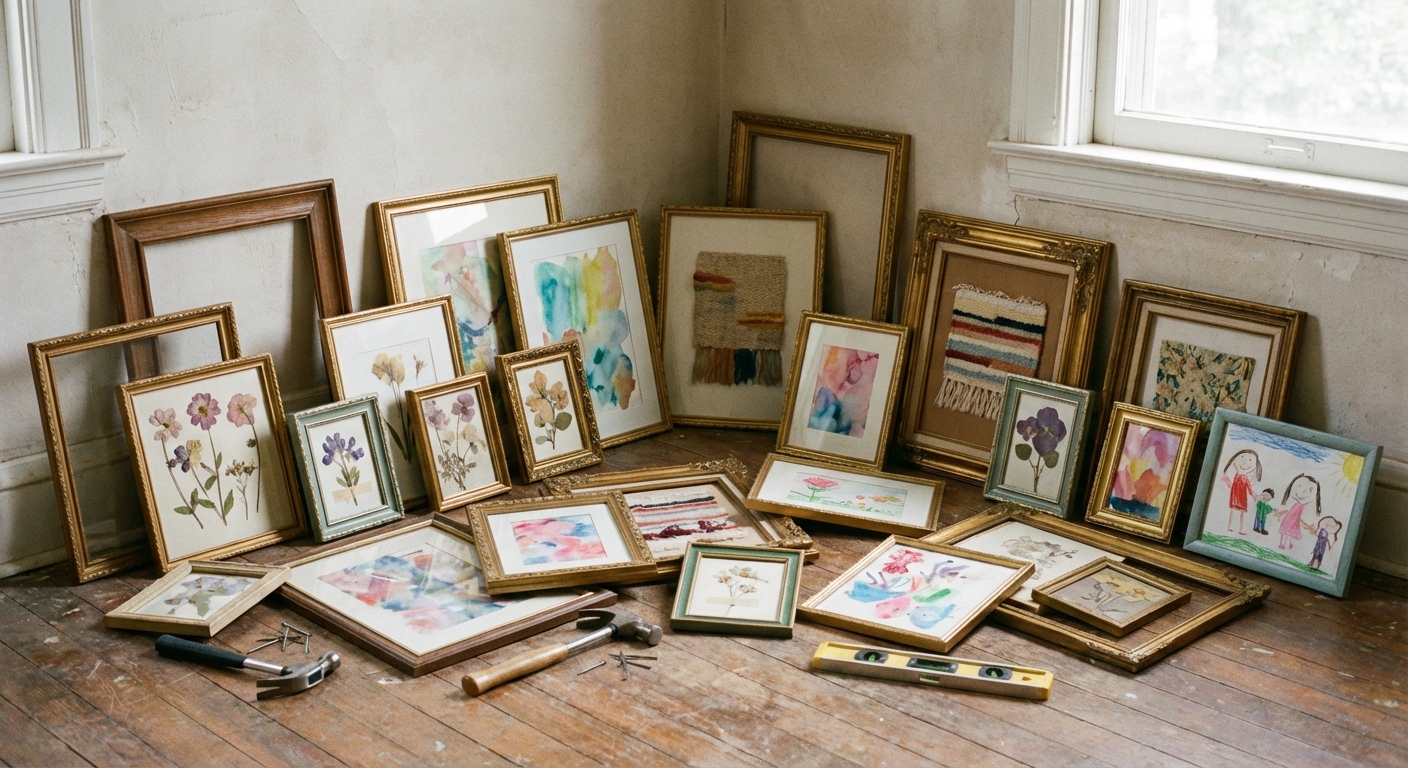
Clara’s tiny tip: If you're building a gallery wall, repeat at least one element three times. A repeated frame color, a repeated paper tone, a repeated brass clip. Repetition makes “collected” look like “curated.”
15 DIY wall art ideas from repurposed materials
1) Frame fabric swatches like mini tapestries
Leftover upholstery fabric, an old scarf, even a linen napkin can become art when it's framed cleanly.
- Materials: fabric scraps, thrifted frames, cardstock or cereal box cardboard
- How: wrap fabric around the backing like a present, tape on the back, then frame
- Make it look expensive: choose one “quiet” neutral fabric and one patterned fabric, then alternate them across the wall
2) Patchwork a wall panel from leftover textiles
This is the cozy cousin of a quilt, but faster. Great for covering a large blank wall without paying large-canvas prices.
- Materials: fabric offcuts, an old pillowcase, or worn tea towels; a cheap artist canvas or foam board
- How: arrange pieces until it feels balanced, then glue or staple to the back
- Style note: keep all fabrics within one color family so the texture does the talking
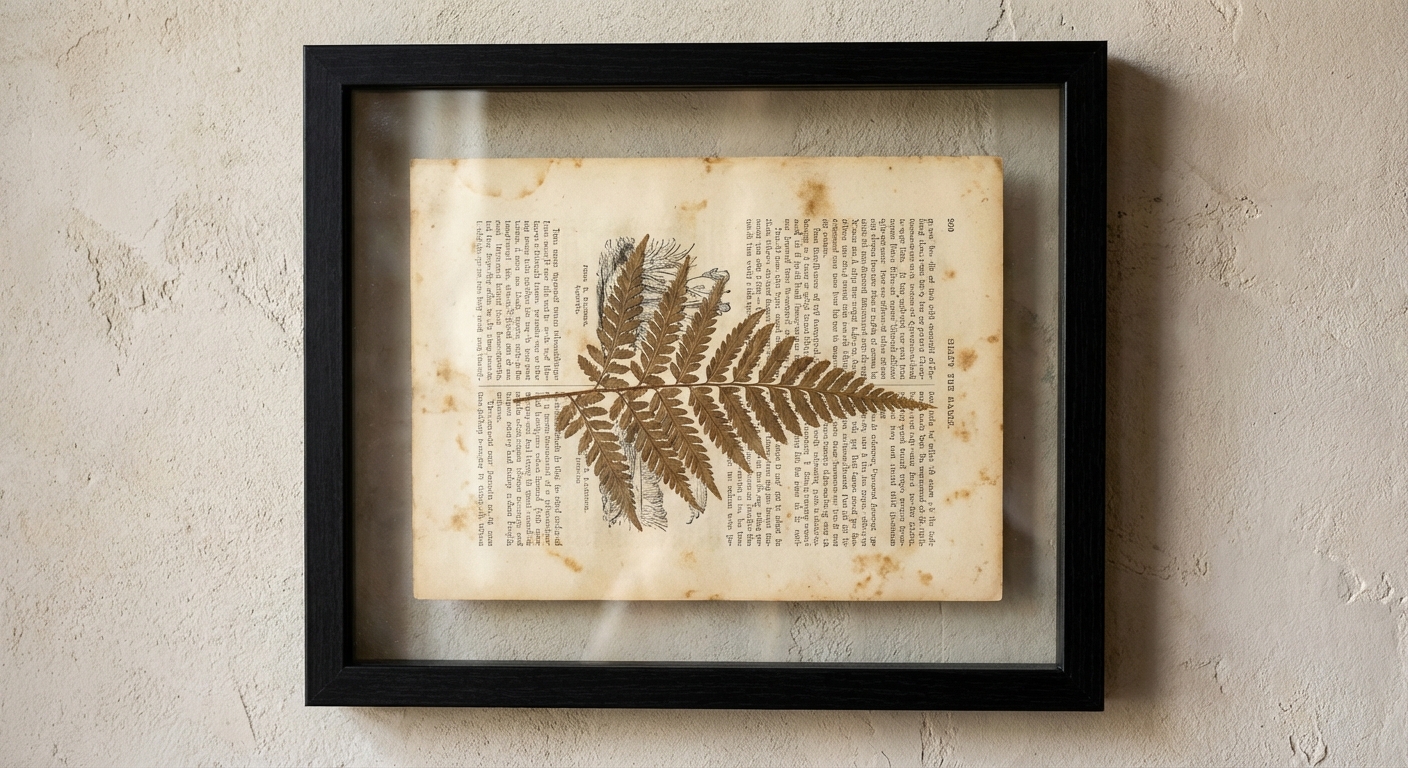
3) Turn a vintage book page into botanical “specimens”
If you have a truly damaged book, missing cover, water stains, torn spine, you can give it a second life.
- Materials: old book pages, leaves or flowers (pressed or faux), glue stick, frames
- How: mount a single stem to a page, then float it in a frame with a bit of breathing room
- Ethics note: skip rare or collectible books, and use thrifted “reader copies” that are already beyond repair
4) Make a typography print using potato stamps and scrap paper
Handmade lettering feels charming, especially when it's imperfect in that human way.
- Materials: potatoes or erasers, acrylic paint, kraft paper bags or packing paper
- How: carve simple block letters, stamp a short word or phrase, let dry, then frame
- Looks best: one word, lots of negative space
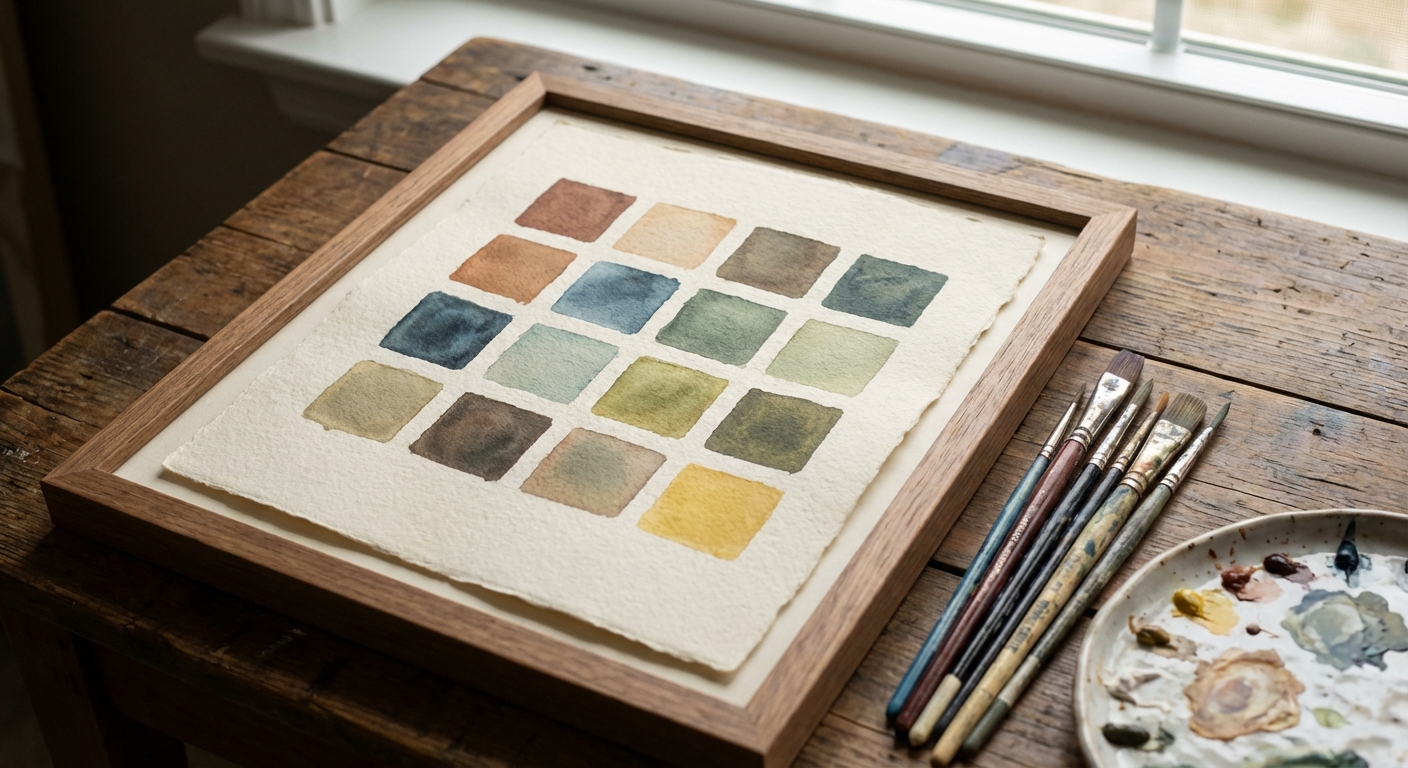
5) Create a “paint chip” grid using leftover wall paint
This is for the people with half-cans of paint under the sink. You know who you are.
- Materials: leftover wall paint, thick paper, painter’s tape
- How: tape off a grid, paint each square a different shade, peel tape, frame
- Gallery wall trick: repeat one of your room’s accent colors to tie everything together
6) Hang a scrap wood ledger rail for rotating art
Instead of committing to nails for every print, create a simple rail that lets you swap pieces whenever the mood hits.
- Materials: scrap wood strip, sandpaper, stain or wax, two screws
- How: sand, finish, mount level, then lean postcards, pages, and photos along it
- Safety note: if you're not drilling into studs, use wall anchors rated for the weight of the rail plus whatever you plan to display
- Styling: layer 5 to 7 pieces, mixing sizes for an effortless, studio-ish look
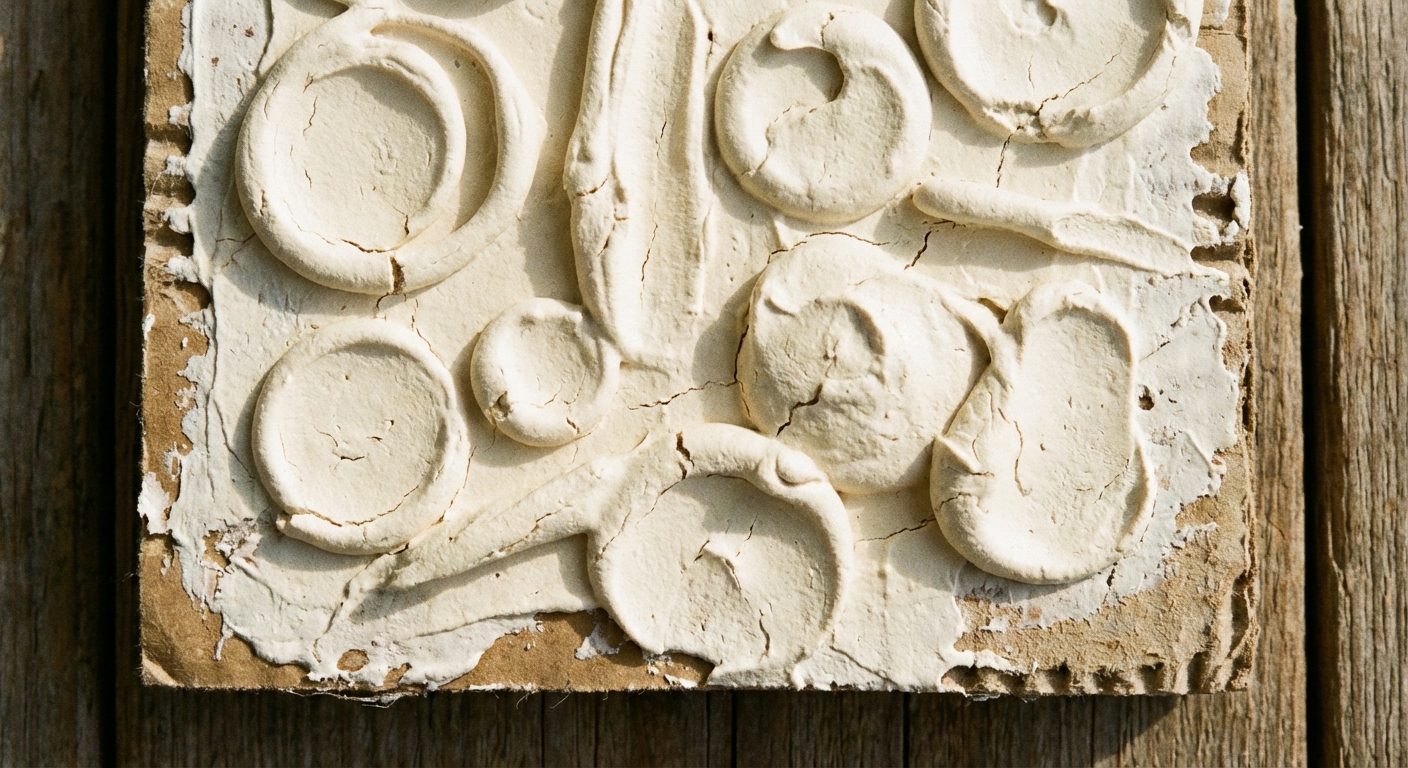
7) Make a mini abstract using cardboard and joint compound
Textured art is having a moment because it adds depth without visual noise. This version costs almost nothing.
- Materials: shipping box cardboard, joint compound or spackle, an old gift card as a scraper
- How: spread compound in loose shapes, let dry, paint in warm white or soft clay
- Frame option: float-mount it in a deep frame for extra polish
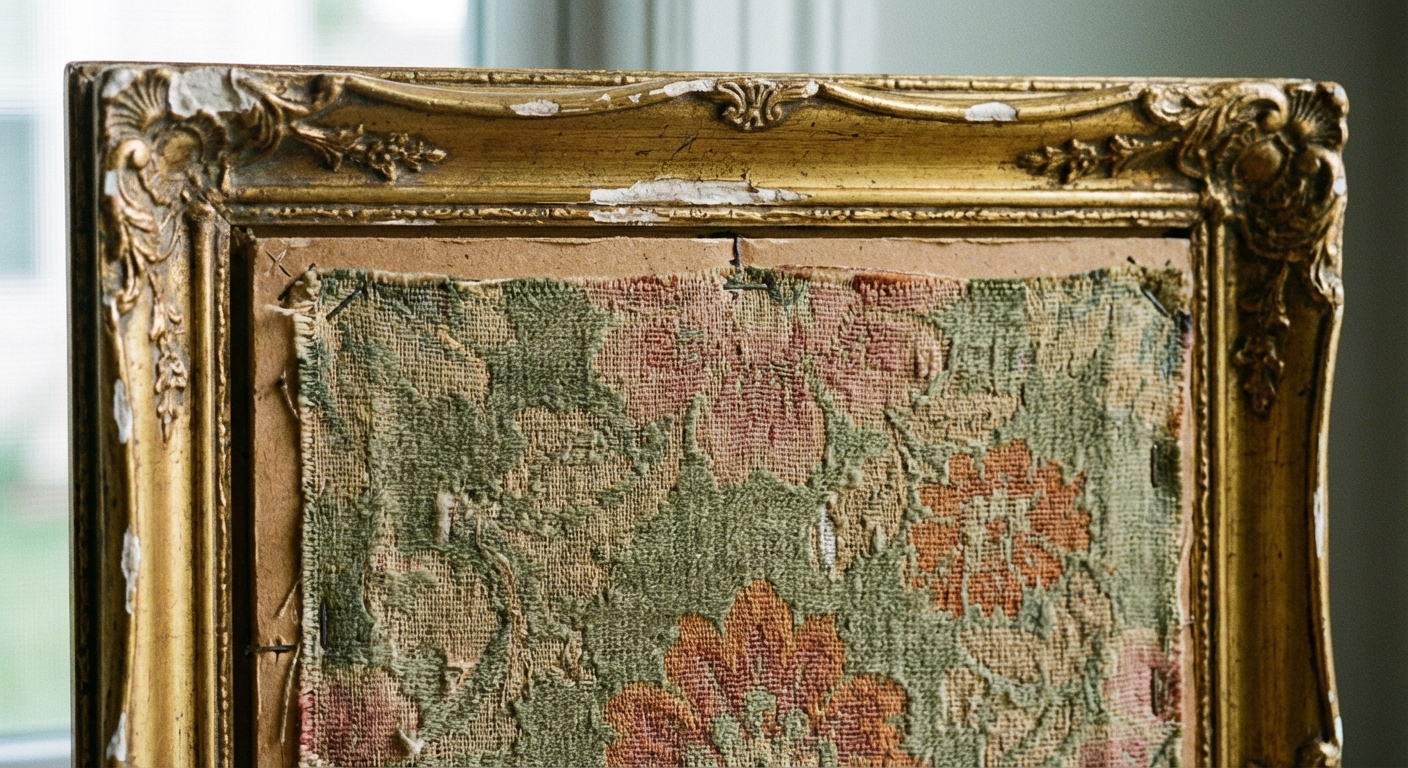
8) Turn a broken frame into art with a linen “mat”
If the glass is missing or the corners are a little wobbly, don't toss it. Use it as a sculptural border.
- Materials: empty frame, linen scrap, stapler or tape
- How: stretch linen across the back like a drum, then hang the frame as-is
- Why it works: the fabric texture reads like a high-end canvas
9) Create a “found object” shadowbox from a cigar box or gift box
This is perfect for tiny keepsakes you don't want hidden in a drawer.
- Materials: sturdy small box, old postcards, ticket stubs, shells, keys, ribbon
- How: line the box with paper, arrange objects, secure with glue dots, hang
- Keep it elegant: limit yourself to 5 to 9 items and one background color
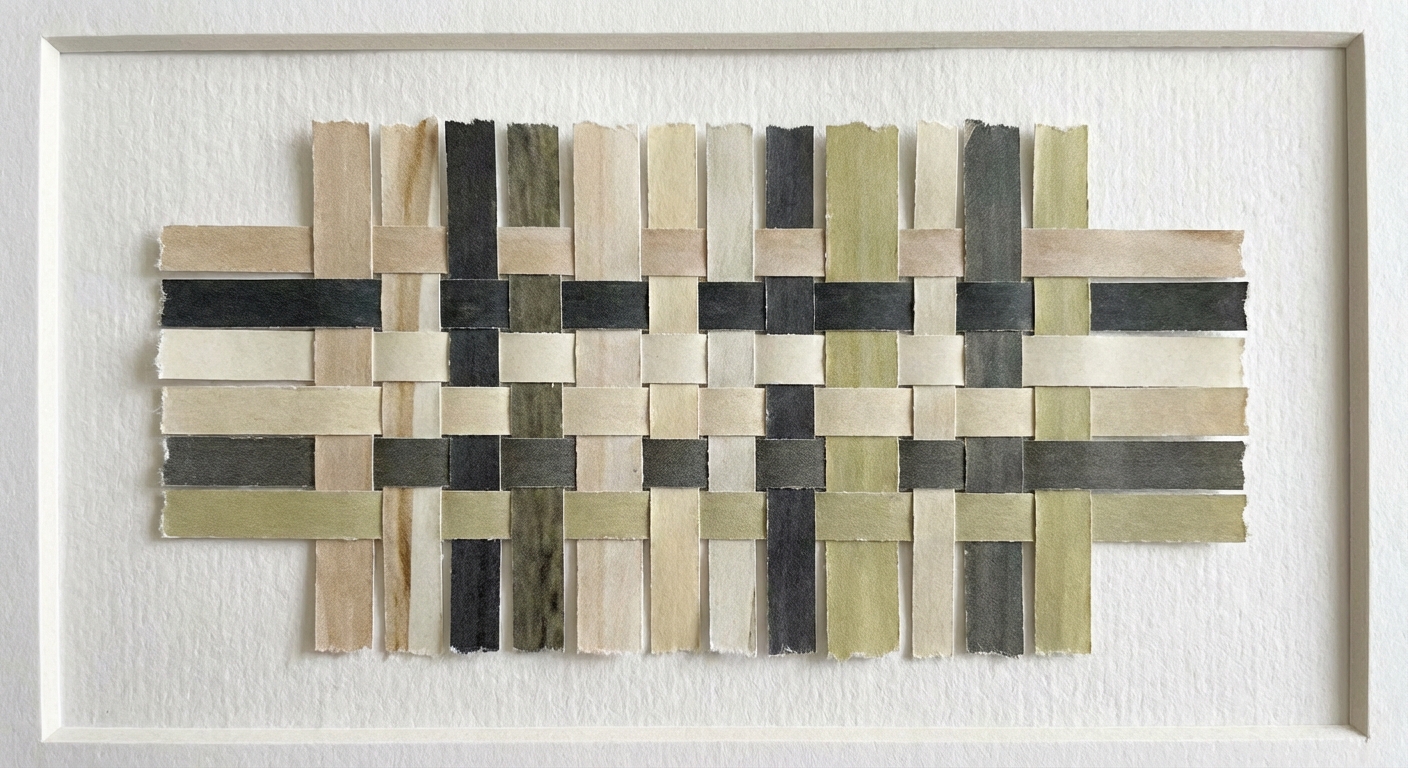
10) Make paper “weavings” from old magazines and junk mail
Yes, the glossy stuff can be beautiful. When cut into strips, color becomes texture.
- Materials: magazines, envelopes, flyers; scissors; glue
- How: cut strips, weave over-under, glue the back edges, mount on cardstock
- Best color palettes: all neutrals, all blues, or a warm sunset mix
11) Use scrap wood blocks as tiny “pedestals” for wall-mounted objects
This is a great way to display small vintage finds like a brass key, a dried flower bundle, or a tiny ceramic ornament.
- Materials: wood offcuts, leftover paint or stain, small nails or hooks
- How: sand and finish the block, attach a hook, mount the block to the wall
- Placement: tuck one into a gallery wall like a little surprise
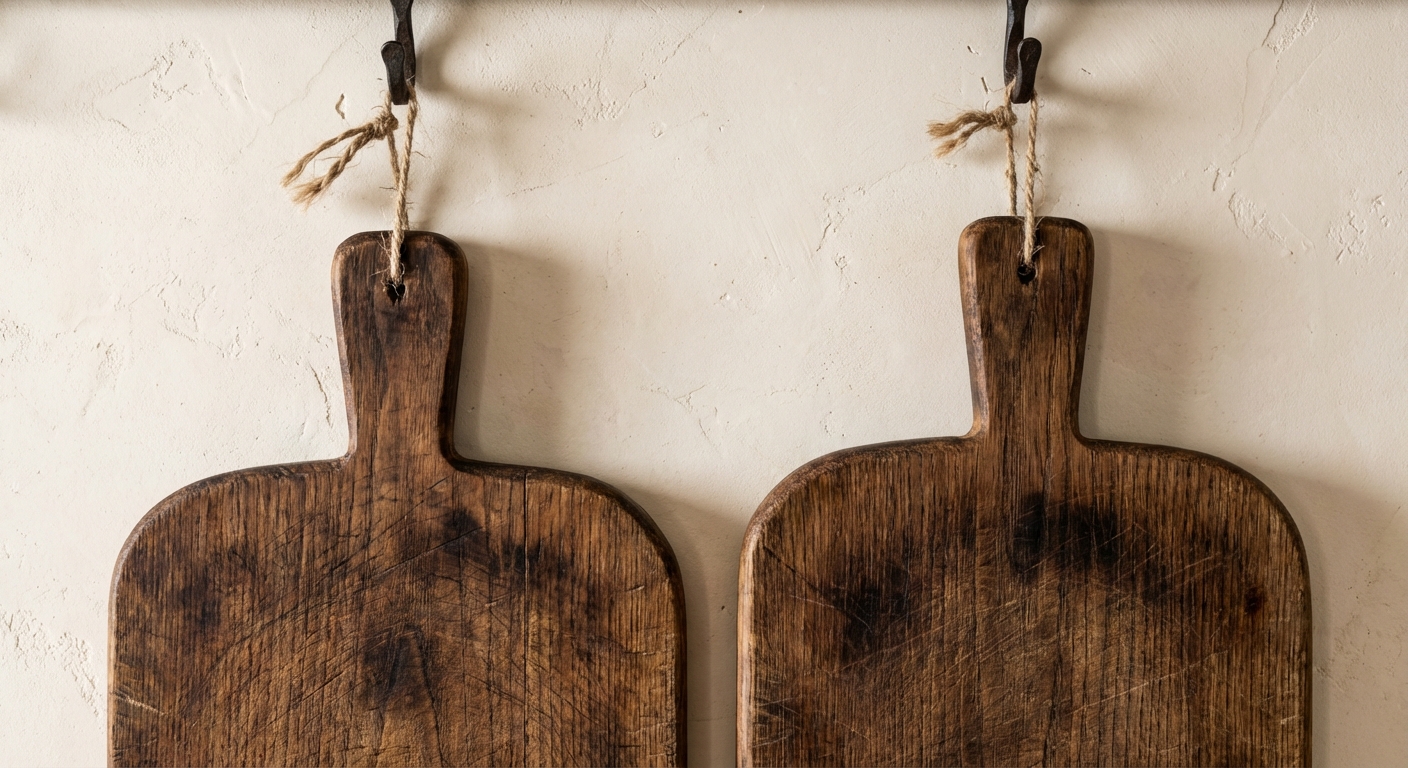
12) Make a diptych from two thrifted cutting boards
If you find old wooden cutting boards with great grain, you're basically holding ready-made wall panels.
- Materials: two cutting boards, sandpaper, oil or wax, hanging hardware
- How: sand lightly, oil, hang side by side with 2 to 3 inches between
- Hang it safely: use D-rings or a French cleat, and add wall anchors if you can't hit studs. Choose hardware rated for the boards' weight
- Optional: add a single painted stripe across both for a modern touch
13) Frame handwritten recipes or letters as heirloom art
This one gets people every time. It's tender, specific, and quietly powerful.
- Materials: photocopy of a recipe card or letter, matte paper, frame
- How: scan or photocopy (protect the original), then frame with a simple mat
- Design tip: choose frames that match your hardware, black, brass, or wood, to keep it cohesive
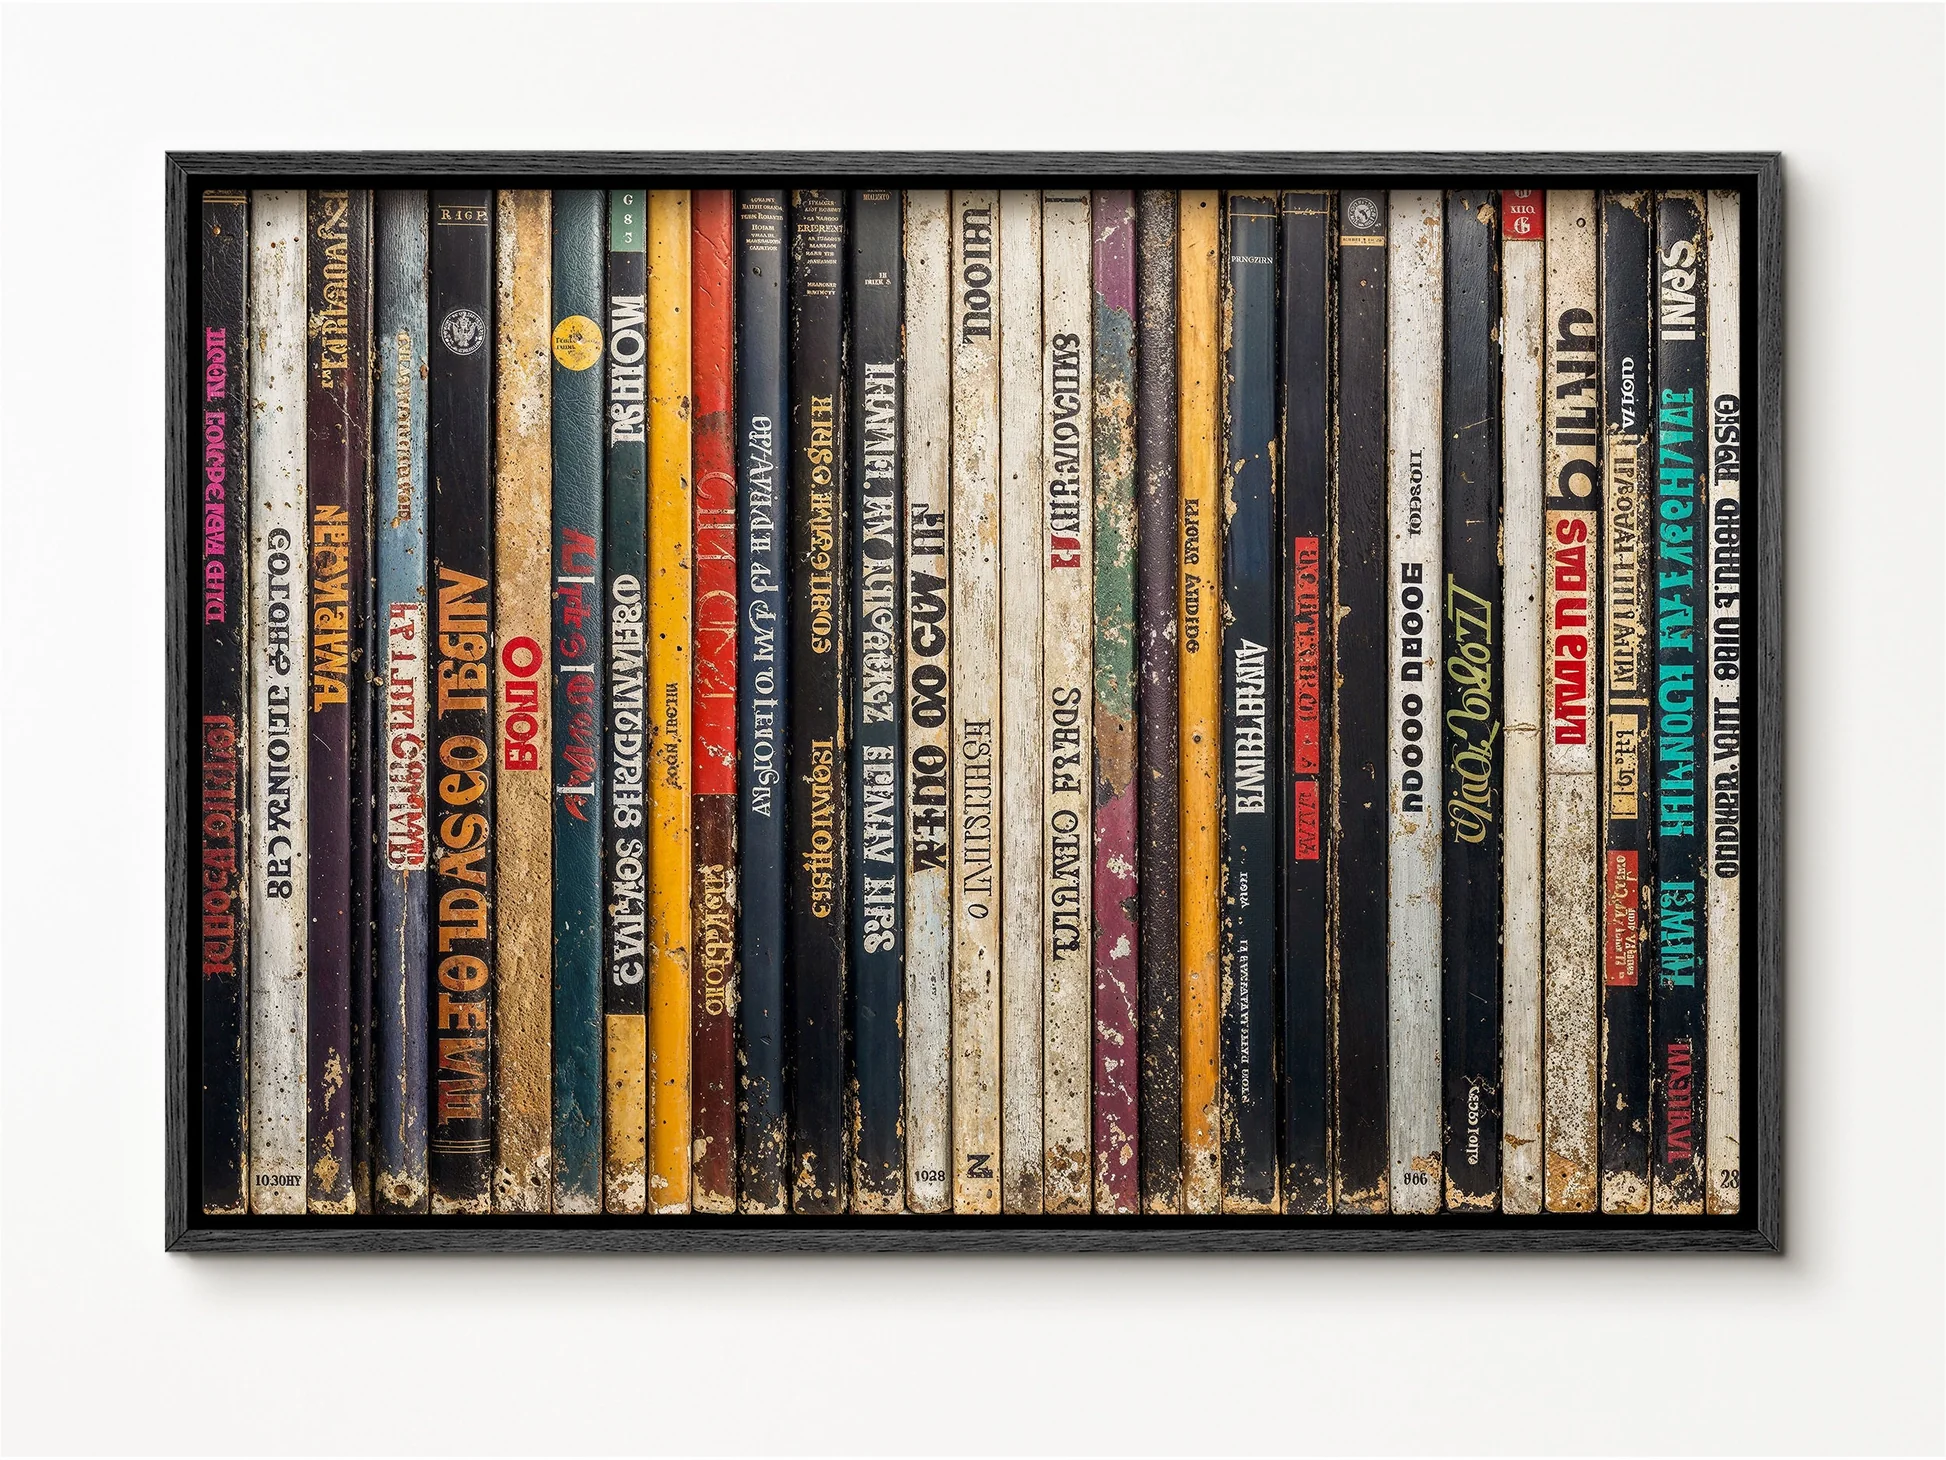
14) Create a “book spine” stripe using damaged hardcover books
If you have a few covers beyond saving, you can turn their spines into a graphic piece with real texture.
- Materials: damaged hardcovers, craft knife, backing board, glue
- How: carefully remove spines, align them in a row, glue to backing, frame
- Looks best: when the spines share a color family like creams, browns, and faded reds
15) Turn leftover tile or wallpaper into a “sample” frame set
Interior designers love a sample board for a reason. It's instant texture and pattern, neatly contained.
- Materials: leftover tile, a wallpaper sample, or contact paper scraps; frames; cardboard backing
- How: mount the piece on backing, frame it like art, and group 3 together
- Finishing touch: use the same frame for all three so the patterns feel intentional
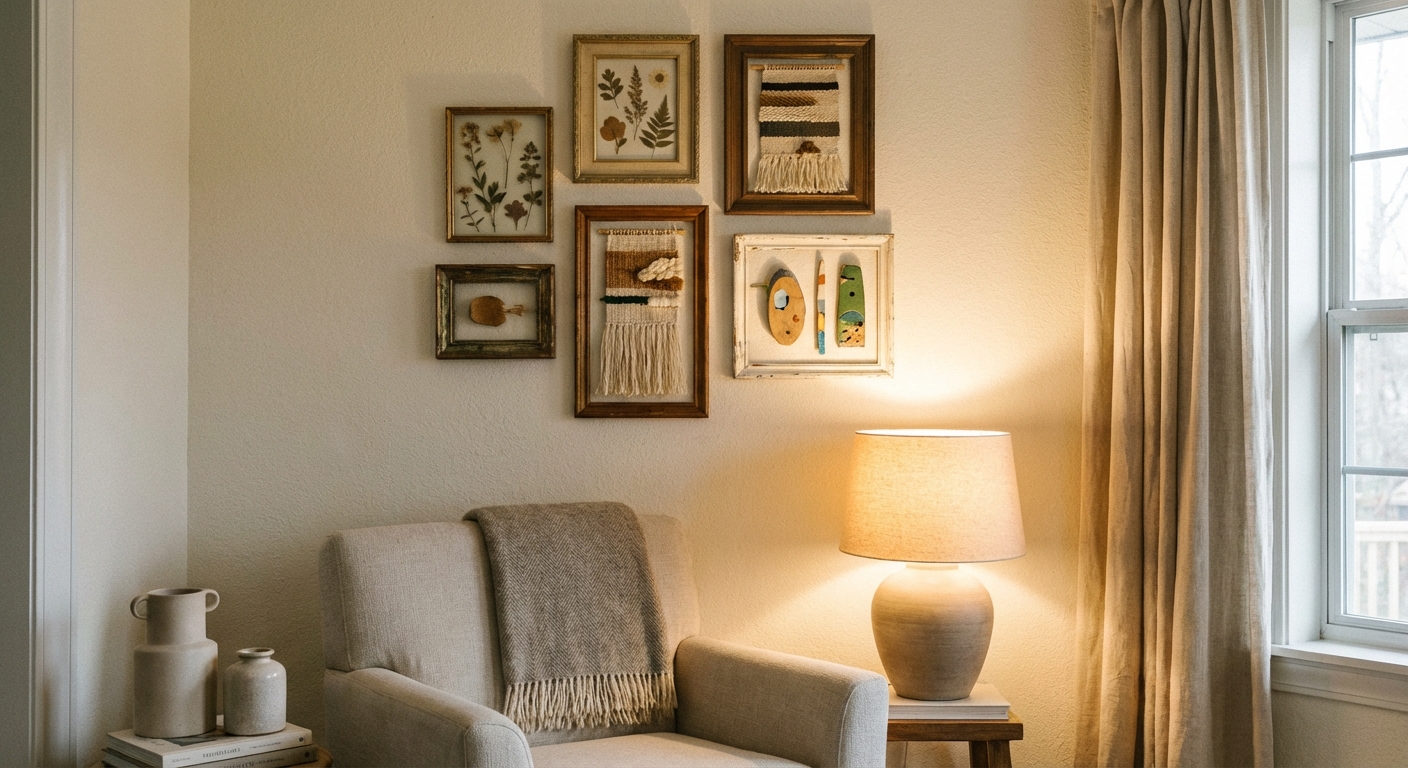
How to make it look like a real gallery wall
DIY art looks its best when it's given the same respect as “real” art. A good frame and thoughtful spacing do most of the heavy lifting.
- Pick a unifying element: one frame finish, one paper tone, or one accent color
- Mind the spacing: 2 to 3 inches between frames is a sweet spot for most walls
- Mix sizes: pair one larger anchor piece with smaller supporting pieces
- Add one reflective moment: a small mirror or glass-front frame breaks up matte textures beautifully
Where to find repurposed materials
- Your own home: gift wrap, old calendars, fabric scraps, packaging paper, broken frames
- Thrift stores: frames, damaged books, scarves, placemats, cutting boards
- Hardware store scrap bin: short wood offcuts that are perfect for small projects
- Buy Nothing groups: people give away leftover tile, paint, and frames constantly
If you make one piece from this list, I hope it gives you that little spark that says: my home gets to be personal. Not perfect. Personal.