10 Cozy Throw Pillows from Old Sweaters and Linens
Clara Townsend
Clara Townsend is an interior stylist, vintage furniture enthusiast, and the creative voice behind Velvet Abode. With over a decade of experience transforming both cramped city apartments and sprawling fixer-uppers, she believes that a beautiful home is built on personal stories rather than massive budgets. When she isn't hunting for the perfect brass sconce at a local flea market, she can usually be found rearranging her living room for the third time this month.
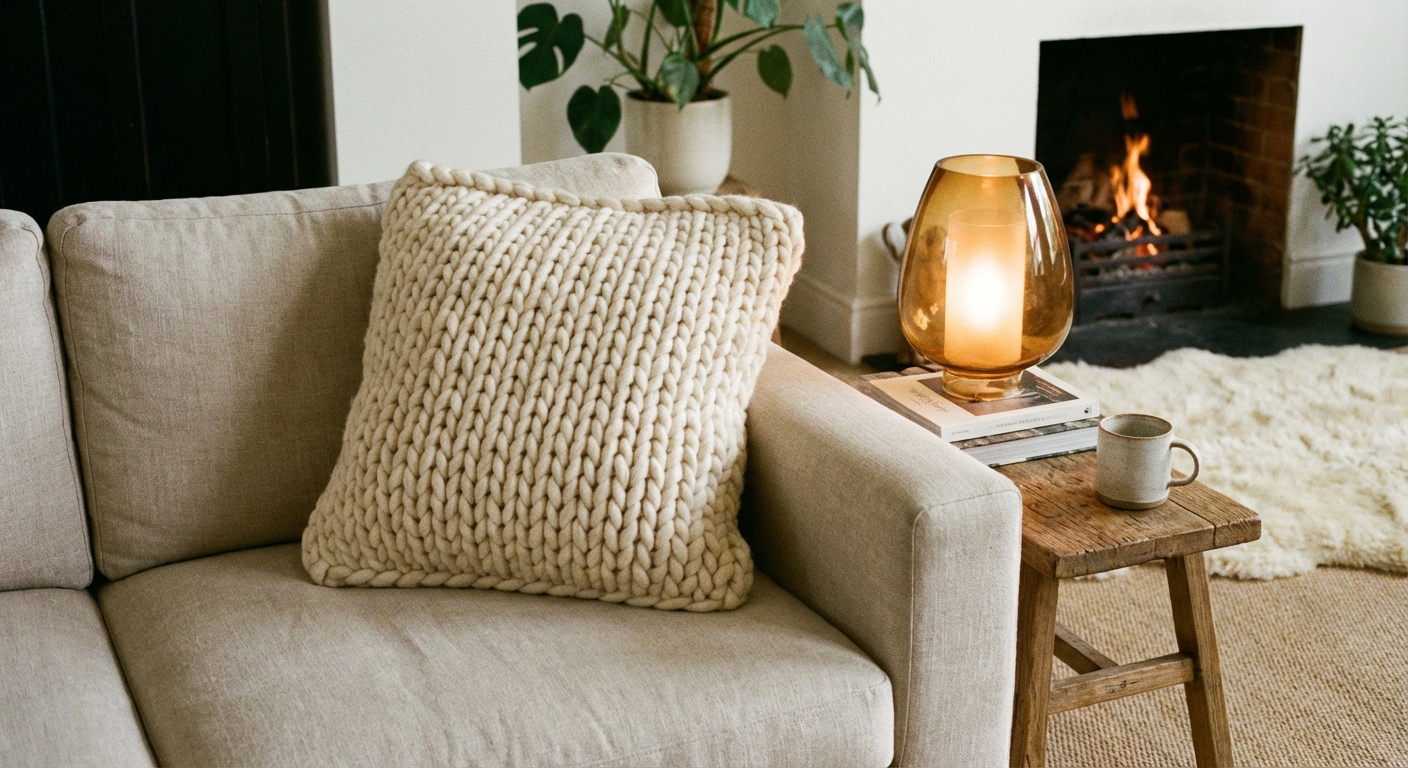
There is a specific kind of comfort that comes from a pillow made out of something that already lived a life. An old fisherman-knit sweater that survived three apartments. A linen sheet that somehow got softer every wash. When you turn those into throw pillows, you are not just saving money. You are keeping the good parts of the past within arm’s reach.
This guide gives you 10 cozy ways to repurpose sweaters and linens into pillows, including sewing and no-sew options. Pick one. Make a mess. Put the kettle on. Your couch is about to feel like a hug.
Before you cut anything
What you need (choose your lane)
- Pillow insert (16x16, 18x18, or lumbar 12x20 are the easiest sizes to source)
- Fabric scissors or a rotary cutter
- Straight pins or clips
- Hand needle and thread or a sewing machine
- No-sew options: iron-on hem tape, fabric glue, or fusible web
- Optional helpers: zipper foot, invisible zipper, buttons, twill tape, bias binding
Quick textile check
Sweaters: Wool and wool blends are warm and forgiving. Very loose knits need backing so they do not stretch into a saggy hammock. Cashmere is dreamy, but treat it gently and use a lining.
Linens: Linen, cotton linen, and sturdy cotton sheets are ideal. Thin, slippery fabrics can work, but they behave better as a back panel rather than the whole pillow.
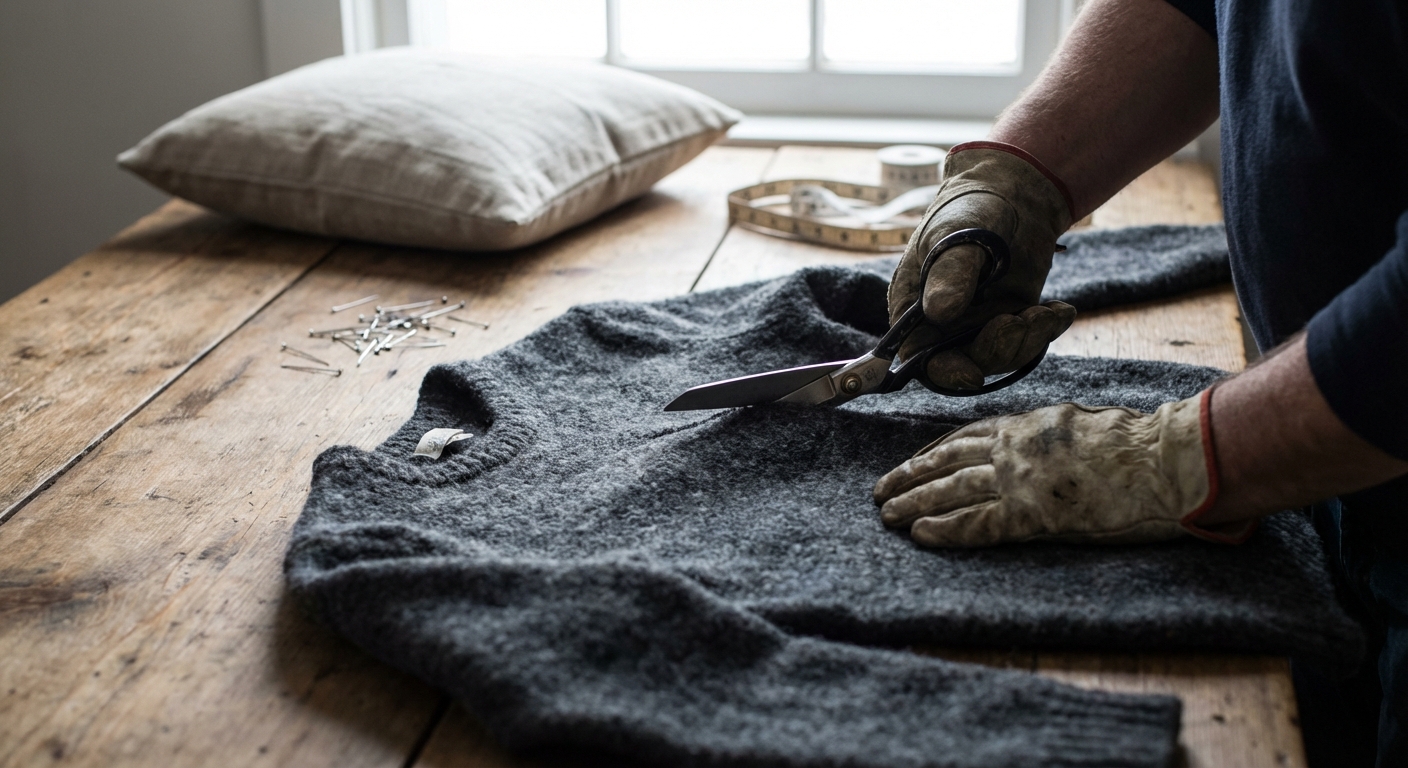
Prep, de-pill, and stabilize
- Pre-wash first using the same method you will use later. Linens and cottons can usually handle a normal wash and dry. Sweaters vary: hand wash cold and lay flat to dry unless you are intentionally felting (see Method 6). This keeps surprises to a minimum.
- De-pill sweaters with a fabric shaver for a fresh finish.
- Stabilize knits by adding a backing layer or interfacing. A tricot knit fusible or a sew-in cotton backing works well. Always test on a scrap first, especially with open knits (some fusibles can show through or feel stiff).
My cheat: If a sweater stretches when you simply look at it, it will stretch even more around a pillow insert. Give it a lining and it will behave like a grown-up.
1) Sweater front, linen back
This is my go-to when I want texture on the front and an easy, crisp finish on the back. Linen keeps things breathable and tailored.
How to make it
- Cut a square from the sweater front in a flat area (avoid bulky side seams and armholes unless you want them as a feature). Cut it insert size + 1 inch in both directions for a 1/2 inch seam allowance all around.
- Cut a matching square from linen for the back.
- Sew right sides together, leave a 6 inch opening.
- Turn, insert the pillow, then ladder stitch the opening closed.
Cozy detail: Use a sweater section with a ribbed hem as one edge. That ribbing reads like a designer trim without any extra work.
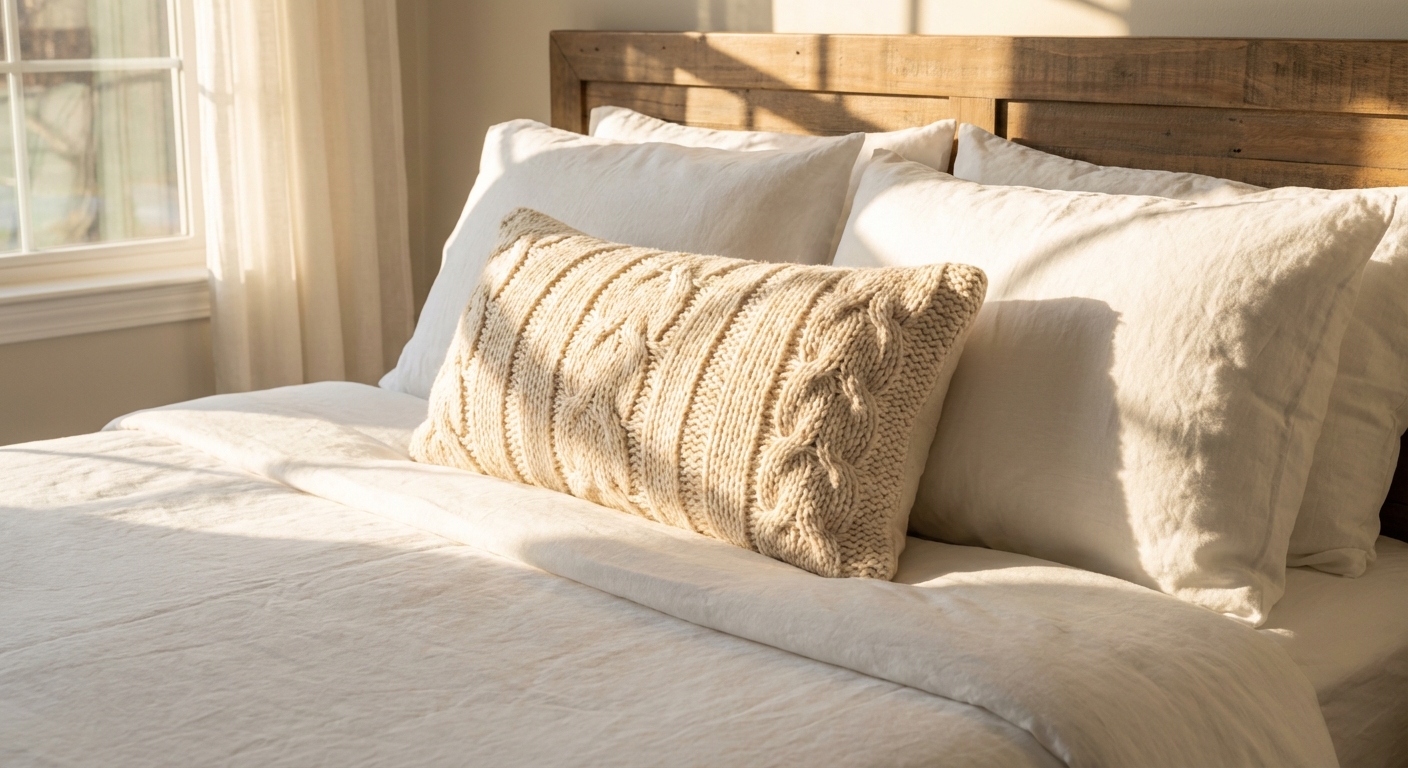
2) Cable-knit lumbar pillow
Cable knits look especially good stretched slightly across a lumbar insert. They become sculptural, like a cozy landscape for your lower back.
How to make it
- Cut your sweater panel to fit a lumbar insert + 1 inch in both directions (for a 1/2 inch seam allowance).
- Use linen or a sturdy cotton for the back panel, cut to the same size.
- Add a zipper along the bottom edge, or do an overlapping envelope back for simplicity.
Proportion tip: If your sweater cables are large, choose a larger insert (20x20) so the texture has room to breathe.
3) Envelope-back linen pillow
If you have a linen sheet with a worn-in hand, this method gives you that relaxed, European hotel feel in an afternoon.
How to cut the pieces
- Front panel: cut insert size + 1 inch wide and insert size + 1 inch tall (that is a 1/2 inch seam allowance all around).
- Two back panels: cut each one the same width as the front, and cut the height as: (front height ÷ 2) + 4 inches. This gives you a 4 to 6 inch overlap depending on hemming and seam allowance.
How to make it
- Hem one long edge on each back panel (a simple 1/2 inch double fold is perfect).
- Layer front and backs right sides together with the hemmed edges overlapping in the middle.
- Sew around all sides with a 1/2 inch seam allowance, clip corners, turn, insert.
Example (18x18 insert): Cut the front 19x19. Cut two backs 19x(19 ÷ 2 + 4) which is 19x13.5. After hemming, you will land in that cozy overlap zone.
Cozy detail: Keep the original sheet hem if it is pretty. That tiny line of stitching feels quietly special.
4) Patchwork memory pillow
This one is for the sentimental among us, and honestly, for anyone who loves texture. Combine a few sweaters and a linen scrap into a patchwork front that looks collected, not crafted.
How to make it
- Save your scraps: As you cut panels for other pillows, toss leftover sweater and linen pieces into a bag. Patchwork you will thank yourself later.
- Cut 4, 9, or 16 squares from different textiles.
- Stabilize sweater squares with lightweight interfacing or a cotton backing. Test on a scrap first if you are fusing anything.
- Sew squares into rows, press seams toward the linen sections.
- Assemble pillow like a standard cover with a zipper or envelope back.
Color tip: Keep it cohesive by choosing one “bridge” color that appears in every square, even if it is just a tiny thread or heathered tone.
5) No-sew sweater pillow
If sewing makes you break out in a sweat, let’s keep this truly cozy. Iron-on hem tape can hold surprisingly well for decor pillows.
How to make it
- Turn the sweater inside out and slide your insert inside to find the best section.
- Pin where you want the pillow edges to be.
- Remove insert, lay hem tape along the pinned lines, then iron according to package directions.
- Trim excess fabric, turn right side out, insert pillow.
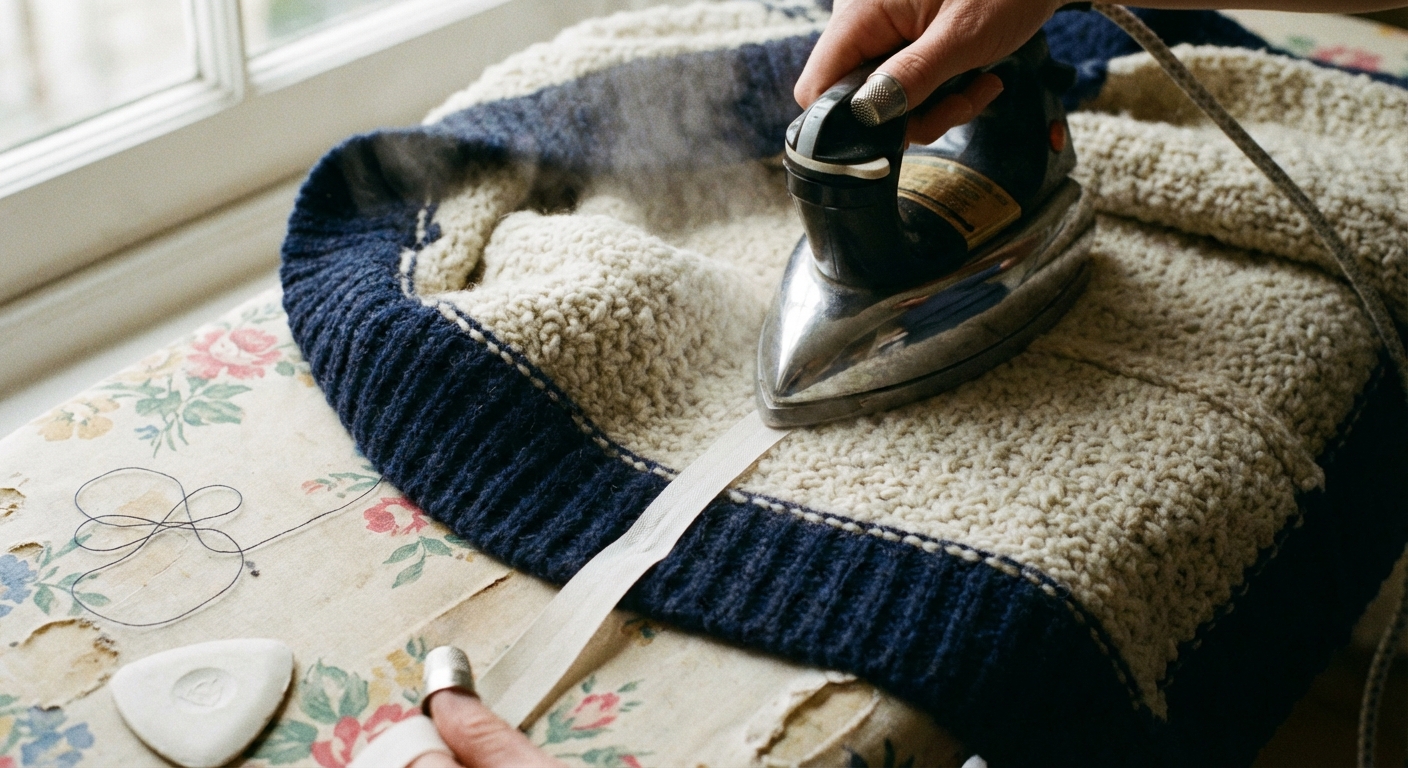
Important: Hem tape works best on denser knits (or felted wool) and light-use pillows. On very textured or stretchy knits, it can lift over time. If you want insurance, add a few hand stitches at the corners.
Heat note: Use low heat and a pressing cloth for synthetics. For wool, steam is your friend, but test first and follow the fiber care label.
6) Felted wool pillow
Felted sweaters become dense and plush, almost like boiled wool. The edges do not fray much, which makes this option wonderfully forgiving.
How to felt a wool sweater
- Make sure it is mostly wool (check the tag). Avoid superwash wool, which usually will not felt the way you want.
- Remove or protect anything that could be damaged: leather patches, plastic buttons, delicate trim.
- Wash on hot with a little detergent, then tumble dry hot. Toss in an old towel or jeans to add agitation.
- Results vary by fiber blend and machine. Expect significant shrinkage and fuzz. Repeat if needed until it thickens.
Turn it into a pillow
- Cut panels to size (insert size + 1 inch in both directions for a 1/2 inch seam allowance).
- Sew with a slightly longer stitch length to avoid puckering.
- Add a zipper or envelope back.
Cozy detail: Felted wool takes on a matte, velvety finish that looks beautiful with brass and warm wood tones.
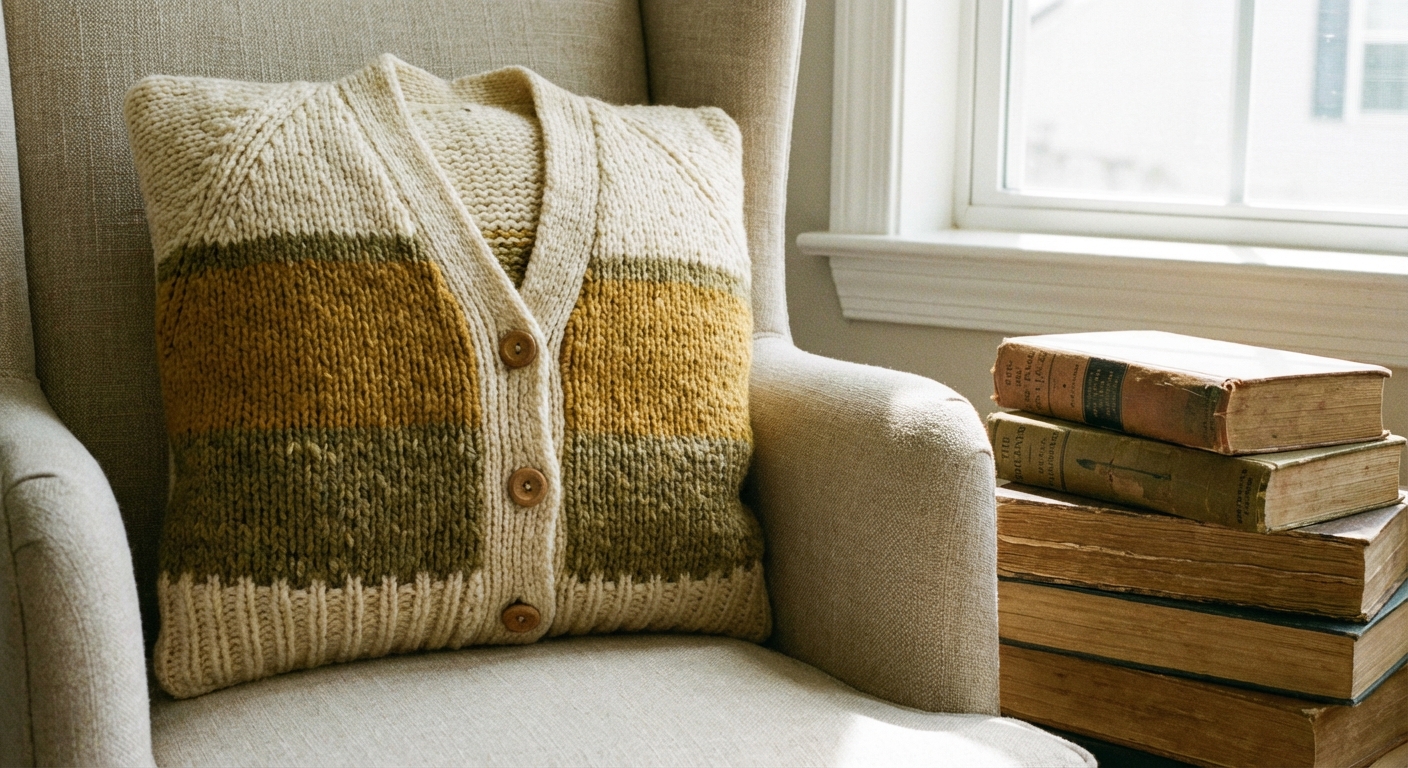
7) Cardigan button closure
Cardigans are basically begging to become pillows. The button placket does the hard work of looking intentional.
How to make it
- Cut the cardigan so the button placket sits centered on the back panel.
- Stabilize the placket area with interfacing or a backing layer if it is stretchy. Test on a scrap if fusing.
- Sew the cover with a 1/2 inch seam allowance, with the placket acting as your opening.
- Button it up around the insert.
Style tip: Mismatched vintage buttons are charming. If you want it calmer, swap them for simple wood or brass-tone buttons.
8) Flanged-edge linen pillow
A flange is that little border that frames a pillow like a quiet picture frame. Linen makes it feel breezy, but still polished.
How to make it
- Cut front and back larger than your insert to allow for a 1.5 to 2 inch flange, plus seam allowance.
- Sew panels together, then stitch again around the perimeter to create the flange line.
- Add an envelope back or zipper opening.
Cozy detail: Use slightly rumpled linen and let it be imperfect. That is the whole point.
9) Sweater appliqué on linen
If a sweater is too fragile or too open-knit to become a full pillow front, treat it like a texture accent instead. Think of it as adding a little “knit jewelry” to a linen cover.
How to make it
- Create a simple linen pillow cover first.
- Cut a shape from the sweater: a rectangle, circle, or soft arch.
- Stitch it on with a zigzag stitch, blanket stitch, or fabric glue for no-sew. If you use glue or fusible web, test on a scrap and use a pressing cloth.
Design tip: Keep the appliqué off-center. Slightly imperfect placement feels collected and modern.
10) Ruffled linen pillow
Ruffles can go cottage, but in washed linen they read as soft and intentional, like something you found at a tiny shop you still think about.
How to make it
- Cut long strips of linen, hem one long edge.
- Gather the other long edge using a basting stitch or a gathering foot.
- Attach to the pillow front in rows or around the edge as a border.
- Finish as a normal cover with an envelope or zipper back.
Cozy detail: Use a slightly darker linen for the ruffle so the shadows do the decorating for you.

Inserts and finishing
Pick an insert that feels expensive
- Feather or down alternative gives that sink-in squish.
- Size up for a fuller look: use an 18x18 insert inside a 17x17 cover.
- For knits, avoid overstuffing. Let the texture breathe.
Keep corners crisp
- Trim seam bulk and clip corners before turning.
- Push corners out gently with a chopstick or the blunt end of a pencil.
Stop stretch and popped seams
- Line sweater fronts with cotton or interfacing.
- Use a zigzag stitch or stretch stitch when sewing knits. A ballpoint or stretch needle helps, too.
- Finish seam allowances with a zigzag stitch (or serger if you have one) for extra durability.
- Store pillows flat if you rotate covers seasonally.
Zipper or envelope?
- Envelope: fastest and easiest, great for linen and casual pillows.
- Zipper: best if you plan to wash often or want a more tailored, secure closure.
Style them
- Mix textures, not chaos: One chunky sweater pillow, one smooth linen, one patterned vintage textile if you have it.
- Repeat a warm note: caramel, rust, olive, ink, or oatmeal ties mixed materials together.
- Balance old and new: Pair your thrifted sweater pillow with a simple modern cover so it feels intentional.
If you are unsure, put the chunkiest texture at the back, the smoothest in front, and let the middle one be the wild card.
Care and cleaning
These are decor pillows, so they do not need to be precious, but a little care keeps them looking lovely.
- Sweater covers: Spot clean or gentle hand wash, then lay flat to dry. If you felted the wool, stick to spot cleaning.
- Linen covers: Machine wash cold, line dry for that soft rumple, or tumble low if you want extra softness.
- Felted wool: Spot clean and air out. Wool is naturally odor-resistant.
Small pep talk
If your seams are not perfectly straight, welcome to the club. Cozy homes are not built on perfection. They are built on the little decisions that say, “This space is mine.”
Pick one sweater you have not worn in ages. Give it a second life on the sofa. And when you sink into that pillow later tonight, you will feel it. Not just softness, but the quiet satisfaction of making something beautiful from what you already had.